Temple Topple: Difference between revisions
Power Flotzo (talk | contribs) (→Names in other languages: +It) |
m (Text replacement - "dktable-brown" to "wikitable dk") |
||
| (19 intermediate revisions by 8 users not shown) | |||
| Line 1: | Line 1: | ||
{{distinguish|Tumble Temple}} | {{distinguish|Tumble Temple}} | ||
{{ | {{level infobox | ||
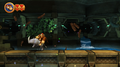
|image=[[File:DKCR Temple Topple 1.png|260px]] | |||
|image=[[File: | |||
|code=3-6 | |code=3-6 | ||
|world=[[Ruins]] | |world=[[Ruins]] | ||
|game=''[[Donkey Kong Country Returns]]'' (''[[Donkey Kong Country Returns 3D|3D]]'') | |game=''[[Donkey Kong Country Returns]]'' (''[[Donkey Kong Country Returns 3D|3D]]'') | ||
|before=[[Itty Bitty Biters|<<]] | |before=[[Itty Bitty Biters|<<]] | ||
| | |before_alt=[[Damp Dungeon|**]] | ||
|after=[[ | |after=[[Ruined Roost|>>]] | ||
| | |track=Voices of the Temple Returns | ||
}} | }} | ||
'''Temple Topple''' is the twenty-first level in ''[[Donkey Kong Country Returns]]'' and ''[[Donkey Kong Country Returns 3D]]'', as well as the sixth area in the [[Ruins]] world. | '''Temple Topple''' is the twenty-first level in ''[[Donkey Kong Country Returns]]'' and ''[[Donkey Kong Country Returns 3D]]'', as well as the sixth area in the [[Ruins]] world. | ||
==Summary== | |||
The level takes at a temple ruins; the first half takes place inside the ruins while the other half takes place outside. The interior area has [[Tiki Tank]]s, [[Hopgoon]]s, and a lot of spikes. Shortly after, [[Donkey Kong]] and [[Diddy Kong|Diddy]] can find a [[Rambi]] [[animal crate|Crate]]. Rambi assists the [[Kong]] by defeating enemies along the way and breaking through floor spikes. Rambi must avoid some [[Tiki Torch]]es along the way. Toward the end of the level, stone walkways start to collapse and the Kongs must rush to avoid falling down. The pathway does not fall down if the Kongs stay in the air by jumping on enemies. Other obstacles in the level include red, bouncy flowers and fiery rings that Rambi can jump through for items. | |||
In the [[Donkey Kong Country Returns#Time Attack|Time Attack]] mode | In the [[Donkey Kong Country Returns#Time Attack|Time Attack]] mode, a time of 1:15:00 is needed to get a gold medal, a time of 1:34:00 for silver, and a time of 2:09:00 for bronze. | ||
==Overview== | ==Overview== | ||
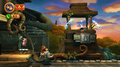
[[File: | [[File:DKCR Temple Topple 2.png|thumb|left|250px|The Kongs jump off a Tiki Tank]] | ||
The level begins by a bridge that leads to a [[DK Barrel]]. Ahead of this is another bridge, some enemies, and a stair-like platform that leads to some spikes. A Tiki Tank is after these spikes, and another is in a pile of spikes in a lower area. Another group of spikes is nearby but it can be crossed by using a platform that is right above it. The Kongs can find a crate after these spikes; if they break it open, they can find Rambi the Rhino. Using Rambi, they can charge through a long area of spikes that cannot be safely crossed without the Animal Buddy. A bridge with a Tiki Tank on it is farther ahead, as well as a large rock wall that Rambi can smash through. Spikes are placed after this, leading to an urn that can be broken open to reveal a collectible. After it is a slanted bridge with a fiery ring above it; Rambi jump through this ring to gain some bananas. Some toppling platforms supporting rock walls (in which Rambi can smash through) can be found nearby, leading to the letter O of the [[K-O-N-G Letters]]. The wall next to the letter cannot be fully moved, and when Rambi hits into it, the wall only budges and pushes the heroes backwards, causing them to land in the gap below the letter O. In the gap, there are many large, stone cubes. Rambi can smash through these and the cubes down a hallway leading outside of the temple to reach the [[Tutorial Pig]] at the checkpoint. | The level begins by a bridge that leads to a [[DK Barrel]]. Ahead of this is another bridge, some enemies, and a stair-like platform that leads to some spikes. A Tiki Tank is after these spikes, and another is in a pile of spikes in a lower area. Another group of spikes is nearby but it can be crossed by using a platform that is right above it. The Kongs can find a crate after these spikes; if they break it open, they can find Rambi the Rhino. Using Rambi, they can charge through a long area of spikes that cannot be safely crossed without the Animal Buddy. A bridge with a Tiki Tank on it is farther ahead, as well as a large rock wall that Rambi can smash through. Spikes are placed after this, leading to an urn that can be broken open to reveal a collectible. After it is a slanted bridge with a fiery ring above it; Rambi jump through this ring to gain some bananas. Some toppling platforms supporting rock walls (in which Rambi can smash through) can be found nearby, leading to the letter O of the [[KONG Letters|K-O-N-G Letters]]. The wall next to the letter cannot be fully moved, and when Rambi hits into it, the wall only budges and pushes the heroes backwards, causing them to land in the gap below the letter O. In the gap, there are many large, stone cubes. Rambi can smash through these and the cubes down a hallway leading outside of the temple to reach the [[Professor Chops|Tutorial Pig]] at the checkpoint. | ||
About halfway through the level, the primates can find a solid rock pathway leading under a platform with a Tiki Bomber on it. Frogoons also hop in the heroes' way down the pathway. Soon after a second Tiki Bomber on high platform, the rhinoceros must aid the primates in smashing through a rock wall and a statue. When he hits into a statue, the base forms a small bridge, which Rambi and the Kongs can use to travel over a small gap. If the Kongs continue down the rock pathway after this gap, they come up to some Tiki Tanks, finding another DK Barrel. A bouncy flower is located after the barrel to help the Kongs progress and reach the letter N. Farther ahead are some large, hanging structures that Rambi can break, along with some spikes with a Tiki Tank in them. Rambi can charge through the spikes and smash through some more Tiki Tanks on the following rock pathway to get to some more bouncy flowers. Many bananas and a ring are above these flowers. After passing a fountain seen in the background, Rambi can hit the base of a statue to create another bridge leading to the second Tutorial Pig with the checkpoint. | About halfway through the level, the primates can find a solid rock pathway leading under a platform with a Tiki Bomber on it. Frogoons also hop in the heroes' way down the pathway. Soon after a second Tiki Bomber on high platform, the rhinoceros must aid the primates in smashing through a rock wall and a statue. When he hits into a statue, the base forms a small bridge, which Rambi and the Kongs can use to travel over a small gap. If the Kongs continue down the rock pathway after this gap, they come up to some Tiki Tanks, finding another DK Barrel. A bouncy flower is located after the barrel to help the Kongs progress and reach the letter N. Farther ahead are some large, hanging structures that Rambi can break, along with some spikes with a Tiki Tank in them. Rambi can charge through the spikes and smash through some more Tiki Tanks on the following rock pathway to get to some more bouncy flowers. Many bananas and a ring are above these flowers. After passing a fountain seen in the background, Rambi can hit the base of a statue to create another bridge leading to the second Tutorial Pig with the checkpoint. | ||
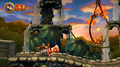
[[File: | [[File:DKCR Temple Topple 3.png|thumb|250px|The Kongs and Rambi travel in front of a fountain.]] | ||
A rocky pathway of a darker color than the paths before is farther ahead. When stood on, it begins to fall. Rambi must race across this pathway while smashing into some Tiki Tanks and walls on the way. A solid area is not too far away from here, so Rambi and the Kongs can stay here without falling. An urn can be found in this area with a collectible in it as well. More toppling rock pathways are after this, and many gaps are between the platforms. The letter G is between two of these falling platforms, and some Frogoons and Tiki Tanks are on them as well. Eventually, the heroes make their way into a wall that Rambi can smash through to reach an area of smaller falling platforms. The rhinoceros must continue to run fast while jumping over many small gaps and through a ring that gives bananas when jumped through. After the group dashes over a long, tumbling, platform, they can reach solid ground again, where the [[Slot Machine Barrel]] is located. If they hit the barrel, the level is complete. | A rocky pathway of a darker color than the paths before is farther ahead. When stood on, it begins to fall. Rambi must race across this pathway while smashing into some Tiki Tanks and walls on the way. A solid area is not too far away from here, so Rambi and the Kongs can stay here without falling. An urn can be found in this area with a collectible in it as well. More toppling rock pathways are after this, and many gaps are between the platforms. The letter G is between two of these falling platforms, and some Frogoons and Tiki Tanks are on them as well. Eventually, the heroes make their way into a wall that Rambi can smash through to reach an area of smaller falling platforms. The rhinoceros must continue to run fast while jumping over many small gaps and through a ring that gives bananas when jumped through. After the group dashes over a long, tumbling, platform, they can reach solid ground again, where the [[Slot Machine Barrel]] is located. If they hit the barrel, the level is complete. | ||
{{br}} | {{br}} | ||
==Enemies== | |||
{| class="wikitable dk" | |||
!Image | |||
!Name | |||
!Count | |||
|- | |||
|align="center"|[[File:Hopgoon.png|x50px]] | |||
|align="center"|[[Hopgoon]] | |||
|5 | |||
|- | |||
|align="center"|[[File:DKCR Tiki Tank Artwork.png|x50px]] | |||
|align="center"|[[Tiki Tank]] | |||
|17 | |||
|- | |||
|align="center"|[[File:Tiki Bomber dropping variant.png|x50px]] | |||
|align="center"|[[Tiki Bomber]] (dropping) | |||
|2 | |||
|} | |||
== | ==Items== | ||
{|class="wikitable dk" width=15% | |||
|- | |||
!Image | |||
!Name | |||
!Count | |||
|- | |||
|align="center"|[[File:BananacoinDKCR.png|x50px]] | |||
|align="center"|[[Banana Coin]] | |||
|7 | |||
|- | |||
|align="center"|[[File:DKBarrelDKCR.png|x50px]] | |||
|align="center"|[[DK Barrel]] | |||
|2 | |||
|- | |||
|align="center"|[[File:Heart.png|x50px]] | |||
|align="center"|[[Heart (item)|Heart]] | |||
|1 | |||
|} | |||
===K-O-N-G Letters=== | ===K-O-N-G Letters=== | ||
[[File: | {|class="wikitable dk" width=70% | ||
|- | |||
!Image | |||
!Letter | |||
!Location | |||
|- | |||
|align="center"|[[File:DKCR Temple Topple Letter K.png|250px]] | |||
|align="center"|K | |||
|After the Kongs free Rambi, they must go left into a section of spikes and Ground Pound a trapdoor to enter a small gap with the letter K. | |||
|- | |||
|align="center"|[[File:Temple Topple letter O.png|250px]] | |||
|align="center"|O | |||
|Shortly before the first checkpoint, Rambi must break through two large walls of blocks and jump over a gap to get the letter O. | |||
|- | |||
|align="center"|[[File:DKCR Temple Topple Letter N.png|250px]] | |||
|align="center"|N | |||
|In an outside part of the level, the Kongs and Rambi must bounce from a large, red flower to collect the letter N in midair. | |||
|- | |||
|align="center"|[[File:DKCR Temple Topple Letter G.png|250px]] | |||
|align="center"|G | |||
|After the fifth Rambi Crate, the Kongs and Rambi must run across some collapsing rock platforms. The letter G is positioned after a group of them. | |||
|} | |||
===Puzzle Pieces=== | ===Puzzle Pieces=== | ||
{|class="wikitable dk" width=70% | |||
|- | |||
!Image | |||
!Number | |||
!Location | |||
|- | |||
|align="center"|[[File:DKCR Temple Topple Puzzle Piece 1.png|250px]] | |||
|align="center"|1 | |||
|From the first DK Barrel, the Kongs must jump from two platforms at the upper-left, the second of which has a Tiki Tank, and blast between a few Blast Barrels. The third Blast Barrel blasts them down to the [[Puzzle Piece (Donkey Kong Country Returns)|Puzzle Piece]]. | |||
|- | |||
|align="center"|[[File:DKCR Temple Topple Puzzle Piece 2.png|250px]] | |||
|align="center"|2 | |||
|After the Kongs release Rambi from his Animal Crate, they must return to the start of the level. From there, Rambi must break a large block, allowing them to collect a Puzzle Piece obscured by the water. | |||
|- | |||
|align="center"|[[File:Temple Topple DKCR bonus room.png|250px]] | |||
|align="center"|3 | |||
|After the letter O, Rambi must break through some hollow blocks to reach a floor below. Rambi must go under a Banana Bunch and pound a trapdoor for the Kongs to enter a [[Bonus Level]]. There. the Kongs have 30 seconds to bounce from a horizontally-moving platform and collect four Banana Coins and 40 bananas above (some of the bananas have a pair of wings). After collecting the items, the Puzzle Piece appears for the Kongs to collect. | |||
|- | |||
|align="center"|[[File:DKCR Temple Topple Puzzle Piece 4.png|250px]] | |||
|align="center"|4 | |||
|After the first checkpoint, the Kongs and Rambi must Ground Pound a gourd to reveal the fourth Puzzle Piece. | |||
|- | |||
|align="center"|[[File:DKCR Temple Topple Puzzle Piece 5.png|250px]] | |||
|align="center"|5 | |||
|If the Kongs and Rambi Ground Pound an urn to the bottom-right of the Slot Machine Barrel, they can collect the final Puzzle Piece. | |||
|} | |||
==Gallery== | |||
<gallery> | |||
Temple Topple Rambi freed.png|Rambi is freed from his Animal Crate | |||
Temple Topple checkpoint.png|The Kongs and Rambi pass a checkpoint | |||
Temple Topple Tiki Tanks defeated.png|Rambi defeats a Tiki Tank | |||
Temple Topple Slot Machine Barrel.png|The Kongs and Rambi reach the Slot Machine Barrel | |||
</gallery> | |||
==Names in other languages== | ==Names in other languages== | ||
{{foreign names | {{foreign names | ||
| Line 48: | Line 131: | ||
|Spa=Tirando Templos | |Spa=Tirando Templos | ||
|SpaM=Knocking Temples Down | |SpaM=Knocking Temples Down | ||
| | |FreA=Pierres Précaires | ||
| | |FreAM=Precarious Stones | ||
|Ger=Wackeltempel | |Ger=Wackeltempel | ||
|GerM=Wonky Temple | |GerM=Wonky Temple | ||
|Ita=Arcata | |Ita=Arcata sfracello | ||
|ItaM=Havoc Arch | |ItaM=Havoc Arch | ||
|Kor=대시! 람비 | |Kor=대시! 람비 | ||
| Line 61: | Line 144: | ||
|ChiM=Dash! Rambi | |ChiM=Dash! Rambi | ||
}} | }} | ||
{{DKCR}} | {{DKCR}} | ||
[[Category:Donkey Kong Country Returns | [[Category:Donkey Kong Country Returns levels]] | ||
[[Category:Temples | [[Category:Temples]] | ||
Latest revision as of 14:17, February 3, 2024
- Not to be confused with Tumble Temple.
| Level | |
|---|---|
| Temple Topple | |

| |
| Level code | 3-6 |
| World | Ruins |
| Game | Donkey Kong Country Returns (3D) |
| Music track | Voices of the Temple Returns |
| ** << Directory of levels >> | |
Temple Topple is the twenty-first level in Donkey Kong Country Returns and Donkey Kong Country Returns 3D, as well as the sixth area in the Ruins world.
Summary[edit]
The level takes at a temple ruins; the first half takes place inside the ruins while the other half takes place outside. The interior area has Tiki Tanks, Hopgoons, and a lot of spikes. Shortly after, Donkey Kong and Diddy can find a Rambi Crate. Rambi assists the Kong by defeating enemies along the way and breaking through floor spikes. Rambi must avoid some Tiki Torches along the way. Toward the end of the level, stone walkways start to collapse and the Kongs must rush to avoid falling down. The pathway does not fall down if the Kongs stay in the air by jumping on enemies. Other obstacles in the level include red, bouncy flowers and fiery rings that Rambi can jump through for items.
In the Time Attack mode, a time of 1:15:00 is needed to get a gold medal, a time of 1:34:00 for silver, and a time of 2:09:00 for bronze.
Overview[edit]

The level begins by a bridge that leads to a DK Barrel. Ahead of this is another bridge, some enemies, and a stair-like platform that leads to some spikes. A Tiki Tank is after these spikes, and another is in a pile of spikes in a lower area. Another group of spikes is nearby but it can be crossed by using a platform that is right above it. The Kongs can find a crate after these spikes; if they break it open, they can find Rambi the Rhino. Using Rambi, they can charge through a long area of spikes that cannot be safely crossed without the Animal Buddy. A bridge with a Tiki Tank on it is farther ahead, as well as a large rock wall that Rambi can smash through. Spikes are placed after this, leading to an urn that can be broken open to reveal a collectible. After it is a slanted bridge with a fiery ring above it; Rambi jump through this ring to gain some bananas. Some toppling platforms supporting rock walls (in which Rambi can smash through) can be found nearby, leading to the letter O of the K-O-N-G Letters. The wall next to the letter cannot be fully moved, and when Rambi hits into it, the wall only budges and pushes the heroes backwards, causing them to land in the gap below the letter O. In the gap, there are many large, stone cubes. Rambi can smash through these and the cubes down a hallway leading outside of the temple to reach the Tutorial Pig at the checkpoint.
About halfway through the level, the primates can find a solid rock pathway leading under a platform with a Tiki Bomber on it. Frogoons also hop in the heroes' way down the pathway. Soon after a second Tiki Bomber on high platform, the rhinoceros must aid the primates in smashing through a rock wall and a statue. When he hits into a statue, the base forms a small bridge, which Rambi and the Kongs can use to travel over a small gap. If the Kongs continue down the rock pathway after this gap, they come up to some Tiki Tanks, finding another DK Barrel. A bouncy flower is located after the barrel to help the Kongs progress and reach the letter N. Farther ahead are some large, hanging structures that Rambi can break, along with some spikes with a Tiki Tank in them. Rambi can charge through the spikes and smash through some more Tiki Tanks on the following rock pathway to get to some more bouncy flowers. Many bananas and a ring are above these flowers. After passing a fountain seen in the background, Rambi can hit the base of a statue to create another bridge leading to the second Tutorial Pig with the checkpoint.

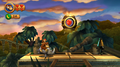
A rocky pathway of a darker color than the paths before is farther ahead. When stood on, it begins to fall. Rambi must race across this pathway while smashing into some Tiki Tanks and walls on the way. A solid area is not too far away from here, so Rambi and the Kongs can stay here without falling. An urn can be found in this area with a collectible in it as well. More toppling rock pathways are after this, and many gaps are between the platforms. The letter G is between two of these falling platforms, and some Frogoons and Tiki Tanks are on them as well. Eventually, the heroes make their way into a wall that Rambi can smash through to reach an area of smaller falling platforms. The rhinoceros must continue to run fast while jumping over many small gaps and through a ring that gives bananas when jumped through. After the group dashes over a long, tumbling, platform, they can reach solid ground again, where the Slot Machine Barrel is located. If they hit the barrel, the level is complete.
Enemies[edit]
| Image | Name | Count |
|---|---|---|

|
Hopgoon | 5 |

|
Tiki Tank | 17 |

|
Tiki Bomber (dropping) | 2 |
Items[edit]
| Image | Name | Count |
|---|---|---|
| Banana Coin | 7 | |
| DK Barrel | 2 | |

|
Heart | 1 |
K-O-N-G Letters[edit]
| Image | Letter | Location |
|---|---|---|

|
K | After the Kongs free Rambi, they must go left into a section of spikes and Ground Pound a trapdoor to enter a small gap with the letter K. |

|
O | Shortly before the first checkpoint, Rambi must break through two large walls of blocks and jump over a gap to get the letter O. |

|
N | In an outside part of the level, the Kongs and Rambi must bounce from a large, red flower to collect the letter N in midair. |

|
G | After the fifth Rambi Crate, the Kongs and Rambi must run across some collapsing rock platforms. The letter G is positioned after a group of them. |
Puzzle Pieces[edit]
| Image | Number | Location |
|---|---|---|

|
1 | From the first DK Barrel, the Kongs must jump from two platforms at the upper-left, the second of which has a Tiki Tank, and blast between a few Blast Barrels. The third Blast Barrel blasts them down to the Puzzle Piece. |

|
2 | After the Kongs release Rambi from his Animal Crate, they must return to the start of the level. From there, Rambi must break a large block, allowing them to collect a Puzzle Piece obscured by the water. |

|
3 | After the letter O, Rambi must break through some hollow blocks to reach a floor below. Rambi must go under a Banana Bunch and pound a trapdoor for the Kongs to enter a Bonus Level. There. the Kongs have 30 seconds to bounce from a horizontally-moving platform and collect four Banana Coins and 40 bananas above (some of the bananas have a pair of wings). After collecting the items, the Puzzle Piece appears for the Kongs to collect. |

|
4 | After the first checkpoint, the Kongs and Rambi must Ground Pound a gourd to reveal the fourth Puzzle Piece. |

|
5 | If the Kongs and Rambi Ground Pound an urn to the bottom-right of the Slot Machine Barrel, they can collect the final Puzzle Piece. |
Gallery[edit]
Rambi is freed from his Animal Crate
The Kongs and Rambi pass a checkpoint
Rambi defeats a Tiki Tank
The Kongs and Rambi reach the Slot Machine Barrel


Names in other languages[edit]
| Language | Name | Meaning |
|---|---|---|
| Japanese | ダッシュ!ランビ Dasshu! Ranbi |
Dash! Rambi |
| Chinese | 冲刺!兰比 Chōngcì! Lánbǐ |
Dash! Rambi |
| French (NOA) | Pierres Précaires |
Precarious Stones |
| German | Wackeltempel |
Wonky Temple |
| Italian | Arcata sfracello |
Havoc Arch |
| Korean | 대시! 람비 Daesi! Rambi |
Dash! Rambi |
| Spanish | Tirando Templos |
Knocking Temples Down |