Koindozer Klamber: Difference between revisions
No edit summary |
Scrooge200 (talk | contribs) No edit summary |
||
| Line 1: | Line 1: | ||
{{levelbox | {{levelbox | ||
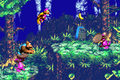
|image=[[File:Koindozer Klamber.png]] | |||
|image=[[File:Koindozer Klamber.png | |||
|code=7 - 4 (SNES)<br>8 - 4 (GBA) | |code=7 - 4 (SNES)<br>8 - 4 (GBA) | ||
|world=[[KAOS Kore]] | |world=[[KAOS Kore]] | ||
| Line 11: | Line 10: | ||
'''Koindozer Klamber''' is the thirty-fourth [[level]] in ''[[Donkey Kong Country 3: Dixie Kong's Double Trouble!]]'' It is also the fourth area in [[KAOS Kore]]. In the game's [[Game Boy Advance]] remake, the level is instead the fortieth level. | '''Koindozer Klamber''' is the thirty-fourth [[level]] in ''[[Donkey Kong Country 3: Dixie Kong's Double Trouble!]]'' It is also the fourth area in [[KAOS Kore]]. In the game's [[Game Boy Advance]] remake, the level is instead the fortieth level. | ||
This jungle level is home to enemies similar to [[Koin]]s, known as [[Koindozer]]s. | This jungle level is home to enemies similar to [[Koin]]s, known as [[Koindozer]]s. They aggressively guard ledges, trying to ram the Kongs into [[Abyss|pits]] with their shields. Koindozers are usually found on long stretches of land or small platforms where they cannot move. The Kongs can reach high areas by jumping on their shields. Other enemies in the level include [[Krimp]]s, [[Bazuka]]s, and a single [[Re-Koil]]. Also, unlike in [[Konveyor Rope Klash]], the Konveyor Ropes do not run in this level; they move in the Game Boy Advance version. | ||
==Level layout== | ==Level layout== | ||
| Line 19: | Line 18: | ||
==Enemies== | ==Enemies== | ||
{|class="dktable-brown" width=10% | |||
|- | |||
!Name | |||
!Count | |||
|- | |||
|align="center" |[[File:Bazuka DKC3.png]]<br>[[Bazuka]] | |||
|2 | |||
|- | |||
|align="center" |[[File:Koindozer DKC3.png]]<br>[[Koindozer]] | |||
|30 | |||
|- | |||
|align="center" |[[File:Krimp DKC3.png]]<br>[[Krimp]] | |||
|5 | |||
|- | |||
|align="center" |[[File:Rekoil DKC3.png]]<br>[[Re-Koil]] | |||
|1 | |||
|} | |||
==Items and objects== | |||
{|class="dktable-brown" width=15% | |||
|- | |||
!Sprite | |||
!Name | |||
!Count | |||
|- | |||
|[[File:Banana Bunch DKC SNES.png]] | |||
|[[Banana|Banana Bunch]] | |||
|1 | |||
|- | |||
|[[File:DK Barrel.png]] | |||
|[[DK Barrel]] | |||
|4 | |||
|- | |||
|[[File:Bear Coin.png]] | |||
|[[Bear Coin]] | |||
|2 | |||
|- | |||
|[[File:SwitchBarrel.png]] | |||
|[[Switch Barrel]] | |||
|1 | |||
|} | |||
== Secrets == | |||
=== Bonus Areas === | |||
{|class="dktable-brown" width=70% | |||
|- | |||
!Image | |||
!Type and description | |||
|- | |||
|[[File:KoindozerKlamber-Secret.png]] | |||
|'''Collect the Stars!'''<br>Right after the first Bazuka, the Kongs can grab onto a konveyor rope. To the left from the beginning of this rope is a [[Bonus Barrel]], hidden by the trees. The barrel takes the Kongs to a [[Bonus Level]], where they must jump on some Koindozers to collect many [[Star (Donkey Kong Country series)|Star]]s. If the Kongs collect all the stars before time runs out, they find a [[Bonus Coin]] at the end of the stage. | |||
|- | |||
|[[File:Koindozer Klamber Bonus Area 2.png]] | |||
|'''Collect 15 Bananas!'''<br>When the Kongs see the level's only Re-Koil, they can get to the above hidden Bonus Barrel by bouncing off the Re-Koil, or by standing on the nearest Koindozer and using their [[Team-up]] move to throw the other Kong into it. When they land in the barrel, they are taken to a Bonus Level where they have to hop on the shields of two Koindozers to collect 15 green bananas in 40 seconds. Once enough green bananas are collected, they find a Bonus Coin nearby. | |||
|} | |||
===DK Coin=== | |||
{|class="dktable-brown" width=70% | |||
|- | |||
!Sprite | |||
!Location | |||
|- | |||
|[[File:Koin DKC3.png]] | |||
|Near the end of the level, the Kongs will see a Koin with the DK Coin. Normal barrels from a nearby Bazuka are hitting the Koin, so the Kongs need to change them to Steel Barrels. The Kongs can bounce on the barrels to find a rope above the Bazuka. Jumping to the left of this rope makes the Kongs hit a Switch Barrel which is obscured by trees, turning the barrels the Bazuka fires into [[Steel Barrel]]s. Backtracking to the Koin and letting a fired Steel Barrel hit him earns them the DK Coin. | |||
|} | |||
===K-O-N-G Letters=== | ===K-O-N-G Letters=== | ||
{|class="dktable-brown" width=35% | |||
|- | |||
!Letter | |||
!Location | |||
|- | |||
| align="center" |[[File:Letter K.png]] | |||
|Obtained by luring away a Koindozer on top of the letter | |||
|- | |||
| align="center" |[[File:Letter O.png]] | |||
|Obscured behind the tops of trees midway through the first tightrope in the level | |||
|- | |||
| align="center" |[[File:Letter N.png]] | |||
|Above a Krimp found after a succession of Koindozers on small platforms | |||
|- | |||
| align="center" |[[File:Letter G.png]] | |||
|Shortly beyond the level's Koin and the second Bazuka | |||
|} | |||
== | ==Gallery== | ||
===Super Nintendo Entertainment System=== | |||
<gallery> | |||
Koindozer Klamber DKC3 rope.png|The Kongs climbing across a rope. | |||
Koindozer Klamber DKC3 Koindozers.png|Three consecutive Koindozers. | |||
Koindozer Klamber DKC3 Bazuka.png|The Kongs on a rope near a Bazuka. | |||
Koindozer Klamber DKC3 steps.png|The Kongs jump up steep steps. | |||
</gallery> | |||
===Game Boy Advance=== | |||
<gallery> | |||
Koindozer Klamber DKC3 GBA pit.png|Dixie jumps over a pit. | |||
</gallery> | |||
==Names in other languages== | ==Names in other languages== | ||
Revision as of 17:53, April 5, 2019
Template:Levelbox Koindozer Klamber is the thirty-fourth level in Donkey Kong Country 3: Dixie Kong's Double Trouble! It is also the fourth area in KAOS Kore. In the game's Game Boy Advance remake, the level is instead the fortieth level.
This jungle level is home to enemies similar to Koins, known as Koindozers. They aggressively guard ledges, trying to ram the Kongs into pits with their shields. Koindozers are usually found on long stretches of land or small platforms where they cannot move. The Kongs can reach high areas by jumping on their shields. Other enemies in the level include Krimps, Bazukas, and a single Re-Koil. Also, unlike in Konveyor Rope Klash, the Konveyor Ropes do not run in this level; they move in the Game Boy Advance version.
Level layout
The level begins with the Kongs walking along the jungle pathway, passing a few Koindozers and crossing some small gaps. Moving a Koindozer reveals the letter K. Jumping platform to platform, they meet more Koindozers. The Kongs find a rope to grab on. Climbing across, they make their way into an area full of more Koindozers. Most of these enemies are on small platforms. Soon, the Kongs find a large abyss, which they cross by bouncing on the barrels from a nearby Bazuka. Once they meet the Bazuka on land, they grab onto a rope to find the Star Barrel.
About halfway into the level, the Kongs drop down from the rope and head down the path. After passing a Koindozer, they meet another Koindozer who is needed for the Kongs to reach a high area. Some Koindozers stand on platforms surrounded by some gaps. The Kongs need to jump on the Koindozers' shields to continue. After passing the letter N, the Kongs jump along more small platforms and soon use the help of another Koindozer to reach up high ledge. They use the barrels of another Bazuka to cross the second large abyss. When they meet the Bazuka on the other side of the chasm, they grab onto a rope and hop back on land. Walking down some small hills then takes them to the letter G. Farther on, the Kongs hop up three more small platforms, each occupied by Koindozers. Once they cross all the small gaps in between the platforms, they find the Level Flag.
Enemies
| Name | Count |
|---|---|
Bazuka |
2 |
Koindozer |
30 |
Krimp |
5 |
Re-Koil |
1 |
Items and objects
| Sprite | Name | Count |
|---|---|---|
| Banana Bunch | 1 | |
| DK Barrel | 4 | |
| Bear Coin | 2 | |
| Switch Barrel | 1 |
Secrets
Bonus Areas
| Image | Type and description |
|---|---|

|
Collect the Stars! Right after the first Bazuka, the Kongs can grab onto a konveyor rope. To the left from the beginning of this rope is a Bonus Barrel, hidden by the trees. The barrel takes the Kongs to a Bonus Level, where they must jump on some Koindozers to collect many Stars. If the Kongs collect all the stars before time runs out, they find a Bonus Coin at the end of the stage. |

|
Collect 15 Bananas! When the Kongs see the level's only Re-Koil, they can get to the above hidden Bonus Barrel by bouncing off the Re-Koil, or by standing on the nearest Koindozer and using their Team-up move to throw the other Kong into it. When they land in the barrel, they are taken to a Bonus Level where they have to hop on the shields of two Koindozers to collect 15 green bananas in 40 seconds. Once enough green bananas are collected, they find a Bonus Coin nearby. |
DK Coin
| Sprite | Location |
|---|---|
| Near the end of the level, the Kongs will see a Koin with the DK Coin. Normal barrels from a nearby Bazuka are hitting the Koin, so the Kongs need to change them to Steel Barrels. The Kongs can bounce on the barrels to find a rope above the Bazuka. Jumping to the left of this rope makes the Kongs hit a Switch Barrel which is obscured by trees, turning the barrels the Bazuka fires into Steel Barrels. Backtracking to the Koin and letting a fired Steel Barrel hit him earns them the DK Coin. |
K-O-N-G Letters
| Letter | Location |
|---|---|
| Obtained by luring away a Koindozer on top of the letter | |
| Obscured behind the tops of trees midway through the first tightrope in the level | |
| Above a Krimp found after a succession of Koindozers on small platforms | |
| Shortly beyond the level's Koin and the second Bazuka |
Gallery
Super Nintendo Entertainment System
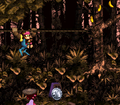
The Kongs climbing across a rope.
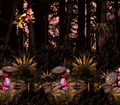
Three consecutive Koindozers.
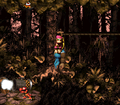
The Kongs on a rope near a Bazuka.
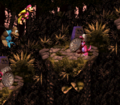
The Kongs jump up steep steps.


Game Boy Advance
Dixie jumps over a pit.

Names in other languages
| Language | Name | Meaning |
|---|---|---|
| Japanese | コインドーザーの森 Koindōzā no mori |
Koindozer's Forest |
| German | Koindozer-Kollision |
Koindozer Collision |
| Italian | Sentiero di Monete |
Path of Coins |
| Spanish | Subida de Monedas |
Coin Clamber |