Krack Shot Kroc: Difference between revisions
No edit summary |
No edit summary |
||
| (34 intermediate revisions by 12 users not shown) | |||
| Line 1: | Line 1: | ||
{{level | {{level infobox | ||
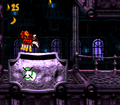
|image=[[File:Krack Shot Kroc DKC3.png]] | |||
|image=[[File:Krack Shot | |||
|code=5 - 4 | |code=5 - 4 | ||
|world=[[K3]] | |||
|game=''[[Donkey Kong Country 3: Dixie Kong's Double Trouble!]] | |game=''[[Donkey Kong Country 3: Dixie Kong's Double Trouble!]] | ||
| | |track=Nuts and Bolts | ||
|before=[[Barrel Drop Bounce|<<]] | |before=[[Barrel Drop Bounce|<<]] | ||
|after=[[Lemguin Lunge|>>]] | |after=[[Lemguin Lunge|>>]] | ||
}} | }} | ||
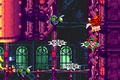
'''Krack Shot Kroc''' is the twenty-fourth [[level]] in ''[[Donkey Kong Country 3: Dixie Kong's Double Trouble!]]'' | '''Krack Shot Kroc''', originally spelled '''Krack-Shot Kroc''', is the twenty-fourth [[level]] in ''[[Donkey Kong Country 3: Dixie Kong's Double Trouble!]]'' and the fourth level of [[K3]]. Krack Shot Kroc is the last factory level. For most of the level, the Kongs are transformed as [[Squitter]], who must use his web platforms to travel throughout the factory. This includes traversing large gaps or going up to higher platforms. The main obstacle of the level is [[Kroc]], who is represented by a crosshair that shoots individual fireballs at Squitter. A warning sign at the start even warns the starting point where Kroc begins aiming at Squitter. There are opportunities where Squitter can hide behind a metal wall to dodge Kroc's fireballs. | ||
==Layout== | |||
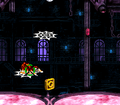
[[File:Krack Shot Kroc DKC3 GBA.png|thumb|left|Krack Shot Kroc in the Game Boy Advance version]] | |||
The level begins with a straight pathway into a small gap. Jumping into this gap takes Dixie and Kiddy into a [[Animal Barrel|Squitter Barrel]], turning both of them into Squitter. He then falls through the rest of the small gap to land near [[KONG Letters|the letter K]]. Squitter must head down the path to the right and defeat a few Bristles with his webs. Shortly after building web platforms to reach the top of a ledge, he should meet the Kroc, who tries to attack him throughout the rest of the level. There are a few Bristles in this area, whom must be defeated by Squitter. A few stair-like platforms are also farther into the level. The spider needs to climb them and build web platforms to the area in the top left corner of the screen. There, he can find a straight pathway leading across a [[bubbling cauldron]], along with some Bristles. After crossing over another bubbling cauldron, he should find a high ledge leading to the next area, where he needs to climb upwards with his web platforms and find two more tubs of fire. Crossing them and a lone red Buzz, he should find the letter O above the next two cauldrons. There is a [[Star Barrel]] right after this area, and it marks the halfway point when hit. | |||
About halfway into the level, Squitter needs to pass another two bubbling cauldrons and travel upwards around several Buzzes to reach the next floor. On this floor, there is another tub of fire to cross, as well as a pathway down the area. The letter N is not too far from here, and it is located above the next two bubbling cauldrons. Squitter must cross the cauldrons and move through a narrow, Re-Koin infested passage to notice more fire below him. After crossing it, he should climb upwards again and head right at the top floor. There is a dead-end at the end of this pathway, so Squitter's only option is to use more of his web platforms to climb upwards, dodging a few Buzzes. There are a few more Re-Koils at the top of this area, as well as more tubs of fire. Squitter has to cross the three cauldrons and head past a "No Kroc Sign". At that point, the Kroc stops following the spider, so he can safely travel into the nearby gap, where a [[No Animal Sign|No Squitter sign]] can be found. Crossing it turns him back into the Kongs, who must then raise the flag on the nearby flagpole, ending the level. | |||
== | ==Enemies== | ||
The | The following enemies appear in the following quantities: | ||
<gallery> | |||
Bristles DKC3.png|[[Bristles]] (8) | |||
Buzz DKC3 green.png|[[Buzz (enemy)|Buzz]] (green) (9) | |||
Buzz DKC3 red.png|Buzz (red) (7) | |||
Kroc DKC3.png|[[Kroc]] (1) | |||
Rekoil DKC3.png|[[Re-Koil]] (19) | |||
</gallery> | |||
==Items and objects== | |||
The following items and objects appear in the following quantities: | |||
<gallery> | |||
Bear Coin.png|[[Bear coin]] (3) | |||
DK Barrel.png|[[DK Barrel]] (4) | |||
Red Extra Life Balloon DKC3.png|[[Red Balloon]] (1) | |||
</gallery> | |||
===K-O-N-G Letters=== | |||
*'''K:''' To the left of the Animal Barrel | |||
*'''O:''' Above two bubbling cauldrons | |||
*'''N:''' Above another bubbling cauldron, circled by a red Buzz | |||
*'''G:''' Hidden behind a wall to the left of the area after the second Bonus Area | |||
== | ===DK Coin=== | ||
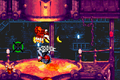
= | [[File:Krack Shot Kroc DKC3 Koin.png|thumb|The Koin of Krack Shot Kroc]] | ||
At the end of the level, Squitter turns into a [[Iron Barrel|Steel Barrel]] after passing the [[No Animal Sign]]. The Kongs should pick up this barrel, jump on top of the nearby [[Koin]], and throw the barrel at a nearby wall. This defeats the enemy, rewarding the Kongs with its [[DK Coin]]. | |||
{{br}} | |||
== | ==Bonus Levels== | ||
{{multiframe|[[File:Krack Shot Kroc Bonus Area 1 GBA.png|200px]] [[File:Krack Shot Kroc Bonus Area 2.png|200px]]|size=420|The first and second Bonus Levels respectively}} | |||
*'''Collect 15 Bananas!''': To get to the first [[Bonus Barrel]], the Kongs have to move all the way to the right after meeting Kroc. While going up, there is a fork. If Squitter chooses to jump up to the left, he should enter a [[Bonus Area]]. In this bonus room, Squitter must grab 15 [[green banana]]s. The bananas continuously appear over a bubbling cauldron that can only be crossed with Squitter's web platforms. After grabbing 15, a [[Bonus Coin (Donkey Kong franchise)|Bonus Coin]] appears. | |||
*'''Bash the Baddies!''': The Kongs can find a red Buzz circling the area a little after the Star Barrel. If they go upwards past this Buzz, they should find a Bonus Barrel. In this Bonus Area, the player controls Kroc's gun and must shoot down eight Re-Koils and two Buzzes. If done successfully, a Bonus Coin appears in the upper-middle section, and it must be shot at as well. | |||
==Gallery== | |||
<gallery> | |||
Krack Shot Kroc DKC3 wall.png|Squitter jumps from behind a wall. | |||
Krack Shot Kroc DKC3 letter O.png|Squitter near the letter O. | |||
Krack Shot Kroc DKC3 Buzzes.png|Squitter moves between two Buzzes | |||
Krack Shot Kroc DKC3 GBA red Buzz.png|Squitter jumps over a red Buzz in the Game Boy Advance version | |||
Krack Shot Kroc DKC3 GBA cover.png|Squitter goes behind a wall for cover in the Game Boy Advance version | |||
Krack Shot Kroc DKC3 GBA climb.png|Squitter creates web platforms in the Game Boy Advance version | |||
</gallery> | |||
==Names in other languages== | ==Names in other languages== | ||
| Line 31: | Line 63: | ||
|JapR=Nerawareta Sukuittā | |JapR=Nerawareta Sukuittā | ||
|JapM=Targeted Squitter | |JapM=Targeted Squitter | ||
|Spa=Krack, golpe y | |Spa=Krack, golpe y Kroc | ||
|SpaM=Krack, blow and | |SpaM=Krack, blow and Kroc | ||
| | |Fre=Cible Casse-Pieds | ||
| | |FreM=Annoying Target | ||
|Ger=Alligator-Attentat | |Ger=Alligator-Attentat | ||
|GerM=Alligator Assassination | |GerM=Alligator Assassination | ||
|Ita=Krack Kolpisce Kroc | |||
|ItaM=Krack Hits Kroc | |||
}} | }} | ||
{{DKC3}} | {{DKC3}} | ||
[[ | [[Category:Factories]] | ||
[[Category:Donkey Kong Country 3: Dixie Kong's Double Trouble! levels]] | |||
Latest revision as of 17:10, January 20, 2024
| Level | |
|---|---|
| Krack Shot Kroc | |

| |
| Level code | 5 - 4 |
| World | K3 |
| Game | Donkey Kong Country 3: Dixie Kong's Double Trouble! |
| Music track | Nuts and Bolts |
| << Directory of levels >> | |
Krack Shot Kroc, originally spelled Krack-Shot Kroc, is the twenty-fourth level in Donkey Kong Country 3: Dixie Kong's Double Trouble! and the fourth level of K3. Krack Shot Kroc is the last factory level. For most of the level, the Kongs are transformed as Squitter, who must use his web platforms to travel throughout the factory. This includes traversing large gaps or going up to higher platforms. The main obstacle of the level is Kroc, who is represented by a crosshair that shoots individual fireballs at Squitter. A warning sign at the start even warns the starting point where Kroc begins aiming at Squitter. There are opportunities where Squitter can hide behind a metal wall to dodge Kroc's fireballs.
Layout[edit]

The level begins with a straight pathway into a small gap. Jumping into this gap takes Dixie and Kiddy into a Squitter Barrel, turning both of them into Squitter. He then falls through the rest of the small gap to land near the letter K. Squitter must head down the path to the right and defeat a few Bristles with his webs. Shortly after building web platforms to reach the top of a ledge, he should meet the Kroc, who tries to attack him throughout the rest of the level. There are a few Bristles in this area, whom must be defeated by Squitter. A few stair-like platforms are also farther into the level. The spider needs to climb them and build web platforms to the area in the top left corner of the screen. There, he can find a straight pathway leading across a bubbling cauldron, along with some Bristles. After crossing over another bubbling cauldron, he should find a high ledge leading to the next area, where he needs to climb upwards with his web platforms and find two more tubs of fire. Crossing them and a lone red Buzz, he should find the letter O above the next two cauldrons. There is a Star Barrel right after this area, and it marks the halfway point when hit.
About halfway into the level, Squitter needs to pass another two bubbling cauldrons and travel upwards around several Buzzes to reach the next floor. On this floor, there is another tub of fire to cross, as well as a pathway down the area. The letter N is not too far from here, and it is located above the next two bubbling cauldrons. Squitter must cross the cauldrons and move through a narrow, Re-Koin infested passage to notice more fire below him. After crossing it, he should climb upwards again and head right at the top floor. There is a dead-end at the end of this pathway, so Squitter's only option is to use more of his web platforms to climb upwards, dodging a few Buzzes. There are a few more Re-Koils at the top of this area, as well as more tubs of fire. Squitter has to cross the three cauldrons and head past a "No Kroc Sign". At that point, the Kroc stops following the spider, so he can safely travel into the nearby gap, where a No Squitter sign can be found. Crossing it turns him back into the Kongs, who must then raise the flag on the nearby flagpole, ending the level.
Enemies[edit]
The following enemies appear in the following quantities:


Items and objects[edit]
The following items and objects appear in the following quantities:

Bear coin (3)

DK Barrel (4)

Red Balloon (1)


K-O-N-G Letters[edit]
- K: To the left of the Animal Barrel
- O: Above two bubbling cauldrons
- N: Above another bubbling cauldron, circled by a red Buzz
- G: Hidden behind a wall to the left of the area after the second Bonus Area
DK Coin[edit]

At the end of the level, Squitter turns into a Steel Barrel after passing the No Animal Sign. The Kongs should pick up this barrel, jump on top of the nearby Koin, and throw the barrel at a nearby wall. This defeats the enemy, rewarding the Kongs with its DK Coin.
Bonus Levels[edit]


- Collect 15 Bananas!: To get to the first Bonus Barrel, the Kongs have to move all the way to the right after meeting Kroc. While going up, there is a fork. If Squitter chooses to jump up to the left, he should enter a Bonus Area. In this bonus room, Squitter must grab 15 green bananas. The bananas continuously appear over a bubbling cauldron that can only be crossed with Squitter's web platforms. After grabbing 15, a Bonus Coin appears.
- Bash the Baddies!: The Kongs can find a red Buzz circling the area a little after the Star Barrel. If they go upwards past this Buzz, they should find a Bonus Barrel. In this Bonus Area, the player controls Kroc's gun and must shoot down eight Re-Koils and two Buzzes. If done successfully, a Bonus Coin appears in the upper-middle section, and it must be shot at as well.
Gallery[edit]
Squitter jumps from behind a wall.
Squitter near the letter O.
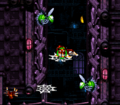
Squitter moves between two Buzzes
Squitter jumps over a red Buzz in the Game Boy Advance version

Squitter goes behind a wall for cover in the Game Boy Advance version
Squitter creates web platforms in the Game Boy Advance version


Names in other languages[edit]
| Language | Name | Meaning |
|---|---|---|
| Japanese | ねらわれたスクイッター Nerawareta Sukuittā |
Targeted Squitter |
| French | Cible Casse-Pieds |
Annoying Target |
| German | Alligator-Attentat |
Alligator Assassination |
| Italian | Krack Kolpisce Kroc |
Krack Hits Kroc |
| Spanish | Krack, golpe y Kroc |
Krack, blow and Kroc |