Kastle Kaos: Difference between revisions
Domenic78960 (talk | contribs) No edit summary |
m (Text replacement - "Fra([AE]?M? *)=" to "Fre$1=") |
||
| (60 intermediate revisions by 32 users not shown) | |||
| Line 1: | Line 1: | ||
[[ | {{level infobox | ||
|image=[[File:Kastle KAOS DKC3.png]] | |||
|code=7 - BOSS (SNES)<br>8 - BOSS (GBA) | |||
|world=[[Kaos Kore]] | |||
|game=''[[Donkey Kong Country 3: Dixie Kong's Double Trouble!]] | |||
|track=Big Boss Blues (SNES)<br>Boss Boogie (GBA) | |||
|boss=[[KAOS]]<br>[[King K. Rool|Baron K. Roolenstein]] | |||
|before=[[Poisonous Pipeline|<<]] | |||
|after=[[Stampede Sprint|>>]] | |||
}} | |||
{{quote|So, who owns the castle?|Dixie Kong|Donkey Kong Country 3: Dixie Kong's Double Trouble!}} | |||
'''Kastle Kaos''' is a large, looming castle and the boss level of [[Kaos Kore]] in ''[[Donkey Kong Country 3: Dixie Kong's Double Trouble!]]'' It is the main base-of-operations of [[KAOS]] and [[King K. Rool|Baron K. Roolenstein]], and is where [[Dixie Kong|Dixie]] and [[Kiddy Kong]] fight both of them. | |||
'' | Kastle Kaos features many towers, the highest of which emits a mysterious pink glow, and overlooks the lake and waterfalls of Kaos Kore. The castle itself is built out of light brown bricks. The exterior is mostly shown from official artwork, because it is only shown as a faint, birds-eye-view from the Kaos Kore map. In the [[Game Boy Advance]] port, the whole exterior was redesigned to be held together by green pillars with yellow spikes protruding across the castle. The interior of Kastle Kaos appears to be a small laboratory (possibly based on ''{{wp|Frankenstein}}''), featuring some control panels in front of a large window, a beaker, three shelves of books on the right wall, and chains that hang from the ceiling. There is also a red curtain on the right wall concealing a chamber. There are two large bulbs on each side of the room which at first serve at platforms, but are used to generate electricity later. | ||
==Layout== | |||
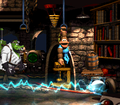
[[File:Kastle KAOS first battle.png|thumb|left|Dixie about to hit KAOS with a barrel]] | |||
The [[Kong]]s fight KAOS and Baron K. Roolenstein within a large room of the castle. A [[DK Barrel]] appears the start if the player enters the stage with only one Kong. Upon entering the castle, the Kongs are confronted by KAOS. Much like in his [[Kaos Karnage|first battle]], KAOS tries to burn the Kongs using his exhaust flames. KAOS can take damage from having a [[barrel]] thrown at his head, causing the head to fly off and revealing another head. KAOS moves to the center of the arena and begins to launch bombs in an arc. A barrel appears on the other side and the Kongs must once again throw it at KAOS's head. After firing four bombs, KAOS ceases to function, and a hook comes to lift him away. In a reference to ''{{wp|The Wizard of Oz (1939 film)|The Wizard of Oz}}'', the curtain rises up, revealing a control panel where Baron K. Roolenstein had been operating KAOS. If there is only one Kong, a DK Barrel will appear so that both Kongs are present during K. Rool's portion of the battle. | |||
For K. Rool's part of the battle, he begins by using his remote to make two [[handle (Donkey Kong Country 3: Dixie Kong's Double Trouble!)|handle]]s to descend from the ceiling. He then starts hovering to the left and right. The Kongs can duck under him to avoid being hit. They must grab onto the handles to make barrels drop from the ceiling, then throw them at K. Rool's [[Propellerpack]] to damage him. Each time he is hit, he will bounce around for a few seconds. After two hits, K. Rool uses his remote to change the layout of the stage, which now has three handles on the ceiling and a wooden platform above the bulb on the right. The bulbs start generating electricity, which covers the entire floor, making it no longer safe to traverse. The Kongs must jump across the handles while avoiding K. Rool. Pulling the handle on the far left spawns more barrels to hit K. Rool's Propellerpack with. Each hit causes K. Rool to fall into the flowing electricity, shocking him. After a fourth hit, K. Rool changes the layout again, with the wooden platform now moving to the left side and another one spawning to the right of it. This second platform continuously moves left and right. The Kongs must ride the platform to reach the handle on the right and supply themselves with more barrels. K. Rool changes the layout again after two more hits. The wooden platforms now remain stationary above the two bulbs, which now generate electricity in brief bursts roughly every three seconds rather than continuously. There are two handles that spawn barrels, and the Kongs must alternate pulling each handle to keep spawning more of them. The electricity destroys the barrels, so the Kongs must quickly grab them after the drop from the ceiling. After nine hits, K. Rool falls through the floor and drops a [[Bonus Coin (Donkey Kong franchise)|Bonus Coin]] in defeat. KAOS's body drops down from the ceiling, and [[Donkey Kong]] and [[Diddy Kong]] fall out of it, revealing that they were being used as a power source for KAOS. [[Cranky Kong|Cranky]] then appears, saying he wasn't impressed by the Kongs' victory, which angers them. | |||
If the Kongs return to this stage after completing it and beat Baron K. Roolenstein again, they are rewarded with a [[bear coin]] instead of a Bonus Coin. If the Kongs defeat KAOS but lose to K. Rool, they do not fight KAOS again when re-entering the stage. KAOS only needs to be rematched if the player gets a [[Game Over]] or resets the game. In the Game Boy Advance version, KAOS cannot be fought again, and the level will always start with the fight against K. Rool if KAOS has already been defeated. | |||
==Gallery== | |||
===Artwork=== | |||
<gallery> | |||
KastleKAOS.jpg|Dixie Kong and Kiddy Kong running from a pair of [[Buzz (enemy)|Buzz]]es outside Kastle Kaos | |||
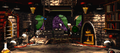
DKC3 Kastle KAOS Lab Background.jpg|Interior design | |||
</gallery> | |||
===Super Nintendo Entertainment System=== | |||
<gallery> | |||
Kastle KAOS SNES Artwork.png|Layout | |||
Kastle KAOS second head off.png|KAOS's second head flying off | |||
Kastle KAOS third head.png|KAOS's third head | |||
Kastle KAOS K Rool reveal.png|Baron K. Roolenstein revealing himself and bemoaning KAOS's defeat. | |||
Kastle KAOS lever.png|Kiddy holding onto a handle to avoid the generated electricity below | |||
Kastle KAOS Kongs rescued.png|Donkey Kong and Diddy Kong being freed after defeating KAOS and K. Rool. | |||
Diddy | </gallery> | ||
===Game Boy Advance=== | |||
<gallery> | |||
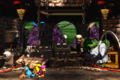
Kastle KAOS (GBA).png|Layout | |||
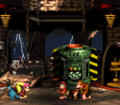
Kastle KAOS DKC3 GBA.png|The boss fight against K. Rool | |||
Kastle KAOS GBA reveal.png|Baron K. Roolenstein revealing himself to the Kongs. | |||
Kastle KAOS GBA Baron electrocuted.png|Baron K. Roolenstein getting electrocuted. | |||
</gallery> | |||
==Names in other languages== | |||
{{foreign names | |||
|Jap=復讐のマシン ボス カオス | |||
|JapR=Fukushuu no Mashin Bosu Kaosu | |||
|JapM=Avenger Machine Boss KAOS | |||
|Fre=Château KAOS | |||
|FreM=Castle KAOS | |||
|Ger=Schloss Kaos | |||
|GerM=Kaos Castle | |||
|Ita=Kastello Kaos | |||
|ItaM=Castle KAOS ("Kastello" is "Castello" ''(castle)'' with a "K") | |||
|Spa=Kastillo de Kaos | |||
|SpaM=Kastle of Kaos | |||
}} | |||
{{DKC3}} | |||
[[Category:Castles]] | |||
[[Category:Laboratories]] | |||
[[Category: | |||
[[Category: | |||
[[Category:Northern Kremisphere]] | [[Category:Northern Kremisphere]] | ||
[[Category:Donkey Kong Country 3: Dixie Kong's Double Trouble! levels]] | |||
Latest revision as of 08:33, January 8, 2024
| Level | |
|---|---|
| Kastle Kaos | |

| |
| Level code | 7 - BOSS (SNES) 8 - BOSS (GBA) |
| World | Kaos Kore |
| Game | Donkey Kong Country 3: Dixie Kong's Double Trouble! |
| Boss | KAOS Baron K. Roolenstein |
| Music track | Big Boss Blues (SNES) Boss Boogie (GBA) |
| << Directory of levels >> | |
- “So, who owns the castle?”
- —Dixie Kong, Donkey Kong Country 3: Dixie Kong's Double Trouble!
Kastle Kaos is a large, looming castle and the boss level of Kaos Kore in Donkey Kong Country 3: Dixie Kong's Double Trouble! It is the main base-of-operations of KAOS and Baron K. Roolenstein, and is where Dixie and Kiddy Kong fight both of them.
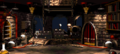
Kastle Kaos features many towers, the highest of which emits a mysterious pink glow, and overlooks the lake and waterfalls of Kaos Kore. The castle itself is built out of light brown bricks. The exterior is mostly shown from official artwork, because it is only shown as a faint, birds-eye-view from the Kaos Kore map. In the Game Boy Advance port, the whole exterior was redesigned to be held together by green pillars with yellow spikes protruding across the castle. The interior of Kastle Kaos appears to be a small laboratory (possibly based on Frankenstein), featuring some control panels in front of a large window, a beaker, three shelves of books on the right wall, and chains that hang from the ceiling. There is also a red curtain on the right wall concealing a chamber. There are two large bulbs on each side of the room which at first serve at platforms, but are used to generate electricity later.
Layout[edit]

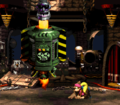
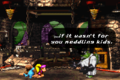
The Kongs fight KAOS and Baron K. Roolenstein within a large room of the castle. A DK Barrel appears the start if the player enters the stage with only one Kong. Upon entering the castle, the Kongs are confronted by KAOS. Much like in his first battle, KAOS tries to burn the Kongs using his exhaust flames. KAOS can take damage from having a barrel thrown at his head, causing the head to fly off and revealing another head. KAOS moves to the center of the arena and begins to launch bombs in an arc. A barrel appears on the other side and the Kongs must once again throw it at KAOS's head. After firing four bombs, KAOS ceases to function, and a hook comes to lift him away. In a reference to The Wizard of Oz, the curtain rises up, revealing a control panel where Baron K. Roolenstein had been operating KAOS. If there is only one Kong, a DK Barrel will appear so that both Kongs are present during K. Rool's portion of the battle.
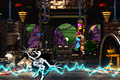
For K. Rool's part of the battle, he begins by using his remote to make two handles to descend from the ceiling. He then starts hovering to the left and right. The Kongs can duck under him to avoid being hit. They must grab onto the handles to make barrels drop from the ceiling, then throw them at K. Rool's Propellerpack to damage him. Each time he is hit, he will bounce around for a few seconds. After two hits, K. Rool uses his remote to change the layout of the stage, which now has three handles on the ceiling and a wooden platform above the bulb on the right. The bulbs start generating electricity, which covers the entire floor, making it no longer safe to traverse. The Kongs must jump across the handles while avoiding K. Rool. Pulling the handle on the far left spawns more barrels to hit K. Rool's Propellerpack with. Each hit causes K. Rool to fall into the flowing electricity, shocking him. After a fourth hit, K. Rool changes the layout again, with the wooden platform now moving to the left side and another one spawning to the right of it. This second platform continuously moves left and right. The Kongs must ride the platform to reach the handle on the right and supply themselves with more barrels. K. Rool changes the layout again after two more hits. The wooden platforms now remain stationary above the two bulbs, which now generate electricity in brief bursts roughly every three seconds rather than continuously. There are two handles that spawn barrels, and the Kongs must alternate pulling each handle to keep spawning more of them. The electricity destroys the barrels, so the Kongs must quickly grab them after the drop from the ceiling. After nine hits, K. Rool falls through the floor and drops a Bonus Coin in defeat. KAOS's body drops down from the ceiling, and Donkey Kong and Diddy Kong fall out of it, revealing that they were being used as a power source for KAOS. Cranky then appears, saying he wasn't impressed by the Kongs' victory, which angers them.
If the Kongs return to this stage after completing it and beat Baron K. Roolenstein again, they are rewarded with a bear coin instead of a Bonus Coin. If the Kongs defeat KAOS but lose to K. Rool, they do not fight KAOS again when re-entering the stage. KAOS only needs to be rematched if the player gets a Game Over or resets the game. In the Game Boy Advance version, KAOS cannot be fought again, and the level will always start with the fight against K. Rool if KAOS has already been defeated.
Gallery[edit]
Artwork[edit]
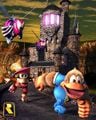
Dixie Kong and Kiddy Kong running from a pair of Buzzes outside Kastle Kaos

Interior design


Super Nintendo Entertainment System[edit]
Layout
KAOS's second head flying off

KAOS's third head
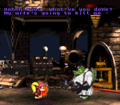
Baron K. Roolenstein revealing himself and bemoaning KAOS's defeat.
Kiddy holding onto a handle to avoid the generated electricity below
Donkey Kong and Diddy Kong being freed after defeating KAOS and K. Rool.


Game Boy Advance[edit]
Layout
The boss fight against K. Rool
Baron K. Roolenstein revealing himself to the Kongs.
Baron K. Roolenstein getting electrocuted.
.png)


Names in other languages[edit]
| Language | Name | Meaning |
|---|---|---|
| Japanese | 復讐のマシン ボス カオス Fukushuu no Mashin Bosu Kaosu |
Avenger Machine Boss KAOS |
| French | Château KAOS |
Castle KAOS |
| German | Schloss Kaos |
Kaos Castle |
| Italian | Kastello Kaos |
Castle KAOS ("Kastello" is "Castello" (castle) with a "K") |
| Spanish | Kastillo de Kaos |
Kastle of Kaos |