Rambi Rumble (Donkey Kong Land 2): Difference between revisions
No edit summary |
LinkTheLefty (talk | contribs) mNo edit summary |
||
| (23 intermediate revisions by 10 users not shown) | |||
| Line 1: | Line 1: | ||
{{ | {{italic title|id=yes}} | ||
{{level infobox | |||
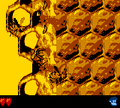
{{level | |image=[[File:Rambi Rumble DKL2.png|160px]] | ||
|image=[[File: | |||
|code=3 - 7 | |code=3 - 7 | ||
|world=[[Krazy Kremland]] | |||
|game=''[[Donkey Kong Land 2]]'' | |game=''[[Donkey Kong Land 2]]'' | ||
| | |track=Flight of the Zinger | ||
|before=[[Mudhole Marsh (Donkey Kong Land 2)|<<]] | |before=[[Mudhole Marsh (Donkey Kong Land 2)|<<]] | ||
|after=[[ | |after=[[King Zing Sting (Donkey Kong Land 2)|>>]] | ||
}} | }} | ||
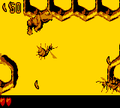
'''Rambi Rumble''' is the twenty-second [[level]] in ''[[Donkey Kong Land 2]]''. | '''Rambi Rumble''' is the twenty-second [[level]] in ''[[Donkey Kong Land 2]]'' and the seventh level of [[Krazy Kremland]]. Rambi Rumble takes place in a [[Zinger]] hive, and for the first part, [[Diddy Kong|Diddy]] and [[Dixie Kong|Dixie]] can jump from sticky honey on the walls to progress further into the level. However, there are patches of honey on the ground that restrict their movement. During the second half, the Kongs are required to enter an [[Animal Barrel]] to transform into [[Rambi]], who can jump on [[Zinger]]s to safely go across gaps. The track "Run, Rambi! Run!" from [[Rambi Rumble (Donkey Kong Country 2: Diddy's Kong Quest)|the level's ''Donkey Kong Country 2: Diddy's Kong Quest'' counterpart]], instead plays in the [[Screech's Sprint (Donkey Kong Land 2)|Screech's Sprint]] level. | ||
==Layout== | |||
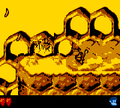
[[File:Rambi Rumble DKL2 shot 2.png|thumb|left|160px|Rambi jumps into a gap.]] | |||
The level begins with a small hill that has a few Spinies walking along it. A ledge is near the end of the hill that the Kongs can drop down from to find a barrel next to a small section of honey. The honey is sticky, so they cannot walk through it easily. A Spiny is located just ahead in an alcove, which has the first DK Barrel above it. Four more Spinies and a Klampon are on the other side of the alcove on the way up a small hill. The letter K is at the top of this hill near a wall drenched in honey. The sticky substance can be used to climb upwards. Zinger fly in the Kongs' way as they travel up this long wall. A hook can be found at the top of the wall to be used to cross a small gap. If the heroes fall into this gap, they land back at the bottom of the area, being forced to climb back up again. Some honey is splattered along the ground on the other side of the gap. A second abyss is ahead that can be crossed with the aid of a pair of hooks, but a Zinger blocks the Kongs' path. They must dodge the foe and cross the abyss to find another wall covered in a thick layer of honey. When they climb to the top of the wall, they find a Klampon on a flat platform. A DK Barrel is located near here in a lower area. The primates can notice a wide gap to the left of the barrel. The walls along the gaps are coated with honey that they can stick to. With the sticky substance, they can climb downwards to a platform with another Klampon on it. The letter O is also in this area. If the heroes continue down the gap mentioned previously, they can land in a lower area. A Klampon patrols this flat area. A pair of hooks are scattered in the air above the foe. They can be used to reach a platform with the Star Barrel on it. | |||
More hooks are near here. They can be used to reach a pair of walls that are covered in honey. As the heroes climb these walls, they come up to a DK Barrel, many [[banana]]s, and several Zingers, some of which that move around small parts of the area. The trail of honey that covers the wall on the right ends about halfway up the area, so the Kongs must continue upwards with only the left wall. At the top of the wall, the primates can reach a small platform. A gap with a lone Zinger in it follows. Klampons also walk along a trail after the gap. After the second Klampon, the heroes reach another gap with a Zinger on the other side of it. A spot of honey with a Spiny marching in it is ahead. Another Spiny and a Klampon are nearby in a slightly lower area that can be reached by dropping from a small ledge. At the end of the pathway, the Kongs run into a stationary Zinger. A series of Barrel Cannons are above the enemy. They can shoot the heroes into an Animal Barrel, which turns them into Rambi when entered. A small hill is ahead of here. Once Rambi travels to the edge of the path, he can find an abyss. If he drops into it, falling past a few Zingers on the way, he can land in a flat area with a Spiny in it. There is a small ledge to the left of here that leads down to a slightly lower area with another Spiny and a Zinger. | |||
A second ledge is just ahead that leads into a flat trail with two more Spinies on it. Some spots of sticky honey are also along the ground in this section. Two more ledges can be found after here, but they lead farther up the area. As the rhinoceros progresses up the ledges, he passes over more honey and encounters a Kruncha. Soon, the hero approaches a wide abyss that he can jump into to access another part of the level, where there is a second Kruncha and another Klampon. A Zinger floats in a wide gap just ahead. The rhinoceros can drop into this abyss to reach a flat pathway, which is covered in honey. Klampons also march along it. After climbing a small ledge, the hero passes a No Animal Sign, turning him back into the Kongs and giving them an [[Red Balloon|Extra Life Balloon]]. There is a small hill nearby with a Spiny walking down it. If the primates drop into the abyss following the hill, they can land at the bottom of the level on a large spot of honey. A Zinger is ahead of here on another section of honey splattered across the ground. After climbing two small ledges, the primates reach a spring. The level is completed when they bounce on it. | |||
==Enemies== | |||
*[[Klampon]] | |||
*[[Spiny (Donkey Kong Country 2: Diddy's Kong Quest)|Spiny]] | |||
*[[Zinger]] | |||
==Items and objects== | |||
The following items and objects appear in the following quantities: | |||
*[[Banana Coin]]: 1 | |||
*[[Barrel]]: 1 | |||
*[[DK Barrel]]: 3 | |||
*[[Cannonball|Kannonball]]: 2 (first Bonus Level only) | |||
===KONG Letters=== | |||
*K: The letter K is around several Spinies and Klampons, right before the first honey-coated wall. | |||
*O: The letter O is next to the second Klampon after the second DK Barrel. | |||
*N: Rambi must go to the first gap ahead and jump from a Zinger to reach the letter N. | |||
*G: The letter G is shortly before the No Animal Sign. Before dropping down the large ledge before the No Animal Sign, Rambi must bounce on a few Zingers above to reach the item. Alternatively, by completing the second Bonus Level, Rambi is launched directly to the letter G back in the main level. | |||
== | ===Cranky's Video Game Coin=== | ||
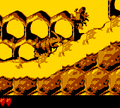
[[File:Rambi Rumble DKL2 DK Coin.png|thumb|The Video Game Hero Coin of Rambi Rumble]] | |||
After Rambi crosses the No Animal Sign, the Kongs must jump into a nearby abyss. As Diddy and Dixie fall, they must stay near the left side to enter a tunnel and continue left into an area with the [[DK Coin|Video Game Hero Coin]] and a Klampon. | |||
{{br}} | |||
[[File: | |||
==== | ==Bonus Levels== | ||
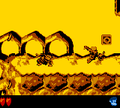
*After | [[File:Rambi Rumble DKL2 Bonus Area 2.png|thumb|The second Bonus Level of Rambi Rumble]] | ||
Rambi Rumble has two [[Bonus room|Bonus Levels]], listed by type: | |||
*'''Destroy Them All!''': Near the start, the Kongs must climb a wall of honey to find the third Klampon. Dixie must use her [[Helicopter Spin]] and travel left, where she bounces off a Flitter and lands into an Auto-Fire Barrel. After blasting from a few more Auto-Fire Barrels, Dixie lands into a [[Bonus Barrel]]. In the [[Bonus Level]], the Kongs must defeat four Spinies and two Klampons within 25 seconds. There are some patches of honey on the floors and two kannonballs to help the Kongs defeat the enemies. When the active Kong defeats every enemy, the [[Kremkoin]] appears. | |||
*'''Collect the Stars!''': On a ledge almost immediately before the No Animal Sign, Rambi must bounce from a Zinger in the air and another one ahead of it to reach a platform with the second Bonus Barrel. In the Bonus Level, Rambi must collect 10 [[star (Donkey Kong franchise)|star]]s within 20 seconds in a relatively straightforward area. When Rambi collects all of the stars, the Kremkoin appears at the rightmost area. | |||
==Gallery== | ==Gallery== | ||
<gallery> | <gallery> | ||
Rambi Rumble DKL2 honey wall.png|Diddy clinging to a honey-coated wall between two Zingers | |||
Rambi Rumble DKL2 honey floor.png|Diddy sticking to a patch of honey on the floor | |||
Rambi Rumble DKL2 letter O.png|The letter O is over a Klampon | |||
Rambi Rumble DKL2 Spiny defeated.png|Rambi defeats a Spiny | |||
Rambi Rumble DKL2 Zinger jump.png|Rambi jumps on a Zinger | |||
</gallery> | </gallery> | ||
== | ==Names in other languages== | ||
{{foreign names | |||
|Jap=ランビといっしょ | |||
|JapR=Ranbi to issho | |||
|JapM=Be with Rambi | |||
}} | |||
{{DKL2}} | {{DKL2}} | ||
[[Category:Donkey Kong Land 2 | [[Category:Food areas]] | ||
[[Category:Donkey Kong Land 2 levels]] | |||
[[Category:Crocodile Isle]] | [[Category:Crocodile Isle]] | ||
Latest revision as of 20:19, January 2, 2024
| Level | |
|---|---|
| Rambi Rumble | |

| |
| Level code | 3 - 7 |
| World | Krazy Kremland |
| Game | Donkey Kong Land 2 |
| Music track | Flight of the Zinger |
| << Directory of levels >> | |
Rambi Rumble is the twenty-second level in Donkey Kong Land 2 and the seventh level of Krazy Kremland. Rambi Rumble takes place in a Zinger hive, and for the first part, Diddy and Dixie can jump from sticky honey on the walls to progress further into the level. However, there are patches of honey on the ground that restrict their movement. During the second half, the Kongs are required to enter an Animal Barrel to transform into Rambi, who can jump on Zingers to safely go across gaps. The track "Run, Rambi! Run!" from the level's Donkey Kong Country 2: Diddy's Kong Quest counterpart, instead plays in the Screech's Sprint level.
Layout[edit]

The level begins with a small hill that has a few Spinies walking along it. A ledge is near the end of the hill that the Kongs can drop down from to find a barrel next to a small section of honey. The honey is sticky, so they cannot walk through it easily. A Spiny is located just ahead in an alcove, which has the first DK Barrel above it. Four more Spinies and a Klampon are on the other side of the alcove on the way up a small hill. The letter K is at the top of this hill near a wall drenched in honey. The sticky substance can be used to climb upwards. Zinger fly in the Kongs' way as they travel up this long wall. A hook can be found at the top of the wall to be used to cross a small gap. If the heroes fall into this gap, they land back at the bottom of the area, being forced to climb back up again. Some honey is splattered along the ground on the other side of the gap. A second abyss is ahead that can be crossed with the aid of a pair of hooks, but a Zinger blocks the Kongs' path. They must dodge the foe and cross the abyss to find another wall covered in a thick layer of honey. When they climb to the top of the wall, they find a Klampon on a flat platform. A DK Barrel is located near here in a lower area. The primates can notice a wide gap to the left of the barrel. The walls along the gaps are coated with honey that they can stick to. With the sticky substance, they can climb downwards to a platform with another Klampon on it. The letter O is also in this area. If the heroes continue down the gap mentioned previously, they can land in a lower area. A Klampon patrols this flat area. A pair of hooks are scattered in the air above the foe. They can be used to reach a platform with the Star Barrel on it.
More hooks are near here. They can be used to reach a pair of walls that are covered in honey. As the heroes climb these walls, they come up to a DK Barrel, many bananas, and several Zingers, some of which that move around small parts of the area. The trail of honey that covers the wall on the right ends about halfway up the area, so the Kongs must continue upwards with only the left wall. At the top of the wall, the primates can reach a small platform. A gap with a lone Zinger in it follows. Klampons also walk along a trail after the gap. After the second Klampon, the heroes reach another gap with a Zinger on the other side of it. A spot of honey with a Spiny marching in it is ahead. Another Spiny and a Klampon are nearby in a slightly lower area that can be reached by dropping from a small ledge. At the end of the pathway, the Kongs run into a stationary Zinger. A series of Barrel Cannons are above the enemy. They can shoot the heroes into an Animal Barrel, which turns them into Rambi when entered. A small hill is ahead of here. Once Rambi travels to the edge of the path, he can find an abyss. If he drops into it, falling past a few Zingers on the way, he can land in a flat area with a Spiny in it. There is a small ledge to the left of here that leads down to a slightly lower area with another Spiny and a Zinger.
A second ledge is just ahead that leads into a flat trail with two more Spinies on it. Some spots of sticky honey are also along the ground in this section. Two more ledges can be found after here, but they lead farther up the area. As the rhinoceros progresses up the ledges, he passes over more honey and encounters a Kruncha. Soon, the hero approaches a wide abyss that he can jump into to access another part of the level, where there is a second Kruncha and another Klampon. A Zinger floats in a wide gap just ahead. The rhinoceros can drop into this abyss to reach a flat pathway, which is covered in honey. Klampons also march along it. After climbing a small ledge, the hero passes a No Animal Sign, turning him back into the Kongs and giving them an Extra Life Balloon. There is a small hill nearby with a Spiny walking down it. If the primates drop into the abyss following the hill, they can land at the bottom of the level on a large spot of honey. A Zinger is ahead of here on another section of honey splattered across the ground. After climbing two small ledges, the primates reach a spring. The level is completed when they bounce on it.
Enemies[edit]
Items and objects[edit]
The following items and objects appear in the following quantities:
- Banana Coin: 1
- Barrel: 1
- DK Barrel: 3
- Kannonball: 2 (first Bonus Level only)
KONG Letters[edit]
- K: The letter K is around several Spinies and Klampons, right before the first honey-coated wall.
- O: The letter O is next to the second Klampon after the second DK Barrel.
- N: Rambi must go to the first gap ahead and jump from a Zinger to reach the letter N.
- G: The letter G is shortly before the No Animal Sign. Before dropping down the large ledge before the No Animal Sign, Rambi must bounce on a few Zingers above to reach the item. Alternatively, by completing the second Bonus Level, Rambi is launched directly to the letter G back in the main level.
Cranky's Video Game Coin[edit]

After Rambi crosses the No Animal Sign, the Kongs must jump into a nearby abyss. As Diddy and Dixie fall, they must stay near the left side to enter a tunnel and continue left into an area with the Video Game Hero Coin and a Klampon.
Bonus Levels[edit]

Rambi Rumble has two Bonus Levels, listed by type:
- Destroy Them All!: Near the start, the Kongs must climb a wall of honey to find the third Klampon. Dixie must use her Helicopter Spin and travel left, where she bounces off a Flitter and lands into an Auto-Fire Barrel. After blasting from a few more Auto-Fire Barrels, Dixie lands into a Bonus Barrel. In the Bonus Level, the Kongs must defeat four Spinies and two Klampons within 25 seconds. There are some patches of honey on the floors and two kannonballs to help the Kongs defeat the enemies. When the active Kong defeats every enemy, the Kremkoin appears.
- Collect the Stars!: On a ledge almost immediately before the No Animal Sign, Rambi must bounce from a Zinger in the air and another one ahead of it to reach a platform with the second Bonus Barrel. In the Bonus Level, Rambi must collect 10 stars within 20 seconds in a relatively straightforward area. When Rambi collects all of the stars, the Kremkoin appears at the rightmost area.
Gallery[edit]
Diddy clinging to a honey-coated wall between two Zingers
Diddy sticking to a patch of honey on the floor
The letter O is over a Klampon
Rambi defeats a Spiny
Rambi jumps on a Zinger


Names in other languages[edit]
| Language | Name | Meaning |
|---|---|---|
| Japanese | ランビといっしょ Ranbi to issho |
Be with Rambi |