Gusty Glade (Donkey Kong Land 2): Difference between revisions
mNo edit summary |
LinkTheLefty (talk | contribs) mNo edit summary |
||
| (24 intermediate revisions by 12 users not shown) | |||
| Line 1: | Line 1: | ||
{{ | {{italic title|id=yes}} | ||
{{ | {{level infobox | ||
|image=[[File:Gusty Glade DKL2.png]] | |||
|image=[[File: | |||
|code=4 - 3 | |code=4 - 3 | ||
|world=[[Gloomy Gulch]] | |||
|game=''[[Donkey Kong Land 2]]'' | |game=''[[Donkey Kong Land 2]]'' | ||
| | |track=Bayou Boogie | ||
|before=[[Krazy Koaster|<<]] | |before=[[Krazy Koaster|<<]] | ||
|after=[[Parrot Chute Panic (Donkey Kong Land 2)|>>]] | |after=[[Parrot Chute Panic (Donkey Kong Land 2)|>>]] | ||
}} | }} | ||
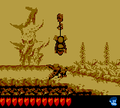
'''Gusty Glade''' is the twenty-fifth [[level]] of ''[[Donkey Kong Land 2]]''. It is | '''Gusty Glade''' is the twenty-fifth [[level]] of ''[[Donkey Kong Land 2]]'' and the fifth level of [[Gloomy Gulch]]. It takes place in a spooky forest that has a strong [[wind]] swaying left and right, pushing [[Diddy Kong|Diddy]] and [[Dixie Kong|Dixie]] in the direction it blows. There are several [[pit]]s that can be crossed with the use of [[hook]]s, [[Barrel Cannon]]s, or the wind. Sometimes, the wind blows in the opposite direction that the [[Kong]]s must go. There is the option to enter a hidden [[Animal Barrel]] of [[Rattly]] at the start. | ||
==Layout== | |||
Gusty Glade has a very similar layout to the eponymous [[Gusty Glade (Donkey Kong Country 2: Diddy's Kong Quest)#Layout|''Donkey Kong Country 2: Diddy's Kong Quest'' level]]. Some enemies and items in Gusty Glade were excluded or moved, although the [[Bonus Level]]s and other secrets are in distinct areas. | |||
==Enemies== | |||
*[[Kannon]] | |||
*[[Klampon]] | |||
*[[Klomp]] | |||
*[[Spiny (Donkey Kong Country 2: Diddy's Kong Quest)|Spiny]] | |||
*[[Zinger]] | |||
== | ==Items and objects== | ||
The following items and objects appear in the following quantities: | |||
*[[Banana Coin]]: 2 | |||
*[[DK Barrel]]: 3 | |||
*[[Treasure chest]]: 2 | |||
===KONG Letters=== | |||
[[File:GustyGlade-DKL2-O.png|thumb|The letter O]] | |||
*K: The letter K is inside the first treasure chests, which is shortly after the first DK Barrel. | |||
*O: The letter O is on a thin platform found shortly after the second DK Barrel. | |||
*N: Shortly after the Star Barrel, the Kongs can find the second treasure chest around a few Spinies. Breaking it reveals the letter N. | |||
*G: The letter G hovers above the second-to-last pit in the level. A [[Blast Barrel]] is beneath the letter G to catch the Kongs when they drop to it. | |||
{{br}} | |||
===Cranky's Video Game Hero Coin=== | |||
Near the end of the level, after passing an area with a Kannon, the Kongs must blast across a pit with Barrel Cannons and acquire the [[DK Coin|Video Game Hero Coin]] along the way. | |||
==Bonus Levels== | |||
[[File:Gusty Glade DKL2 Bonus Area 2.png|thumb|The second Bonus Level of Gusty Glade]] | |||
Gusty Glade has two [[Bonus room|Bonus Levels]], listed by type: | |||
*'''Collect the Stars!''': After passing the letter O in an area with thin platforms, the Kongs must cross a pit from a hook. Instead of jumping to the ledge to the right, Diddy or Dixie must drop below and follow a [[banana]] trail to land in a hidden [[Bonus Barrel]]. In the [[Bonus Level]], the Kongs have 20 seconds to collect 15 [[Star (Donkey Kong franchise)|star]]s in a small area. They must jump from ground platforms to reach the stars. Once the Kongs collect all of the stars, the [[Kremkoin]] appears. | |||
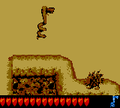
*'''Destroy them All!''': After passing the letter N, the Kongs can find a nearby a [[Cannonball|kannonball]]. They must pick it up and carry it along the path until they find a [[Cannon|kannon]]. They must load it into the kannon to blast up to the second [[Bonus Level]]. There, the Kongs have 20 seconds to defeat five enemies: two Spinies, a nearby Klampon, and two Kaboings. After defeating every enemy, the Kremkoin appears for them to collect. | |||
[[File: | |||
*After passing the letter O in | |||
*After passing the letter N, the | |||
==Gallery== | ==Gallery== | ||
<gallery | <gallery> | ||
Gusty Glade DKL2 Klampon.png|Diddy hanging over a Klampon | |||
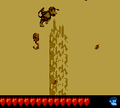
Gusty Glade DKL2 Rattly and Spiny.png|Rattly approaching a Spiny | |||
Gusty Glade DKL2 hook jumping.png|Diddy jumps from a hook | |||
</gallery> | </gallery> | ||
{{ | ==Names in other languages== | ||
{{foreign names | |||
|Jap=かぜの森 | |||
|JapR=Kaze no Mori | |||
|JapM=Windy Woods | |||
}} | |||
{{DKL2}} | {{DKL2}} | ||
[[Category: | [[Category:Haunted forests]] | ||
[[Category:Crocodile Isle]] | [[Category:Crocodile Isle]] | ||
[[Category: | [[Category:Donkey Kong Land 2 levels]] | ||
Latest revision as of 20:19, January 2, 2024
| Level | |
|---|---|
| Gusty Glade | |

| |
| Level code | 4 - 3 |
| World | Gloomy Gulch |
| Game | Donkey Kong Land 2 |
| Music track | Bayou Boogie |
| << Directory of levels >> | |
Gusty Glade is the twenty-fifth level of Donkey Kong Land 2 and the fifth level of Gloomy Gulch. It takes place in a spooky forest that has a strong wind swaying left and right, pushing Diddy and Dixie in the direction it blows. There are several pits that can be crossed with the use of hooks, Barrel Cannons, or the wind. Sometimes, the wind blows in the opposite direction that the Kongs must go. There is the option to enter a hidden Animal Barrel of Rattly at the start.
Layout[edit]
Gusty Glade has a very similar layout to the eponymous Donkey Kong Country 2: Diddy's Kong Quest level. Some enemies and items in Gusty Glade were excluded or moved, although the Bonus Levels and other secrets are in distinct areas.
Enemies[edit]
Items and objects[edit]
The following items and objects appear in the following quantities:
- Banana Coin: 2
- DK Barrel: 3
- Treasure chest: 2
KONG Letters[edit]

- K: The letter K is inside the first treasure chests, which is shortly after the first DK Barrel.
- O: The letter O is on a thin platform found shortly after the second DK Barrel.
- N: Shortly after the Star Barrel, the Kongs can find the second treasure chest around a few Spinies. Breaking it reveals the letter N.
- G: The letter G hovers above the second-to-last pit in the level. A Blast Barrel is beneath the letter G to catch the Kongs when they drop to it.
Cranky's Video Game Hero Coin[edit]
Near the end of the level, after passing an area with a Kannon, the Kongs must blast across a pit with Barrel Cannons and acquire the Video Game Hero Coin along the way.
Bonus Levels[edit]

Gusty Glade has two Bonus Levels, listed by type:
- Collect the Stars!: After passing the letter O in an area with thin platforms, the Kongs must cross a pit from a hook. Instead of jumping to the ledge to the right, Diddy or Dixie must drop below and follow a banana trail to land in a hidden Bonus Barrel. In the Bonus Level, the Kongs have 20 seconds to collect 15 stars in a small area. They must jump from ground platforms to reach the stars. Once the Kongs collect all of the stars, the Kremkoin appears.
- Destroy them All!: After passing the letter N, the Kongs can find a nearby a kannonball. They must pick it up and carry it along the path until they find a kannon. They must load it into the kannon to blast up to the second Bonus Level. There, the Kongs have 20 seconds to defeat five enemies: two Spinies, a nearby Klampon, and two Kaboings. After defeating every enemy, the Kremkoin appears for them to collect.
Gallery[edit]
Diddy hanging over a Klampon
Rattly approaching a Spiny
Diddy jumps from a hook


Names in other languages[edit]
| Language | Name | Meaning |
|---|---|---|
| Japanese | かぜの森 Kaze no Mori |
Windy Woods |