Fiery Furnace (Donkey Kong Land 2): Difference between revisions
mNo edit summary |
No edit summary |
||
| (22 intermediate revisions by 10 users not shown) | |||
| Line 1: | Line 1: | ||
{{ | {{italic title|id=yes}} | ||
{{level infobox | |||
{{level | |image=[[File:Fiery Furnace DKL2.png]] | ||
|image=[[File: | |||
|code=7 - 3 | |code=7 - 3 | ||
|world=[[Lost World (Donkey Kong Country 2: Diddy's Kong Quest)|Lost World]] | |||
|game=''[[Donkey Kong Land 2]]'' | |game=''[[Donkey Kong Land 2]]'' | ||
| | |track=Hot Head Bop | ||
|before=[[Black Ice Battle (Donkey Kong Land 2)|<<]] | |before=[[Black Ice Battle (Donkey Kong Land 2)|<<]] | ||
|after=[[Klobber Karnage (Donkey Kong Land 2)|>>]] | |after=[[Klobber Karnage (Donkey Kong Land 2)|>>]] | ||
}} | }} | ||
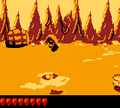
'''Fiery Furnace''' is the | '''Fiery Furnace''' is the thirty-seventh [[level]] of ''[[Donkey Kong Land 2]]'' and the third level in [[Lost World (Donkey Kong Country 2: Diddy's Kong Quest)|Lost World]]. It takes place in a volcanic area featuring [[Blast Barrel]]s that are used to cross the [[pit]]s of [[lava]]. In the second half, the Kongs must ride across many [[Hot Air Balloon]]s. There is a part of the level where [[Squitter]] is playable, and he can use his web platforms to make his way across the pits of lava. | ||
==Layout== | |||
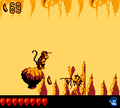
[[File:FieryFurnace-DKL2.png|thumb|left|Diddy Kong in an area with two Banana Coins]] | |||
When they begin the level, the Kongs must travel down the path and dodge some enemies, such as Klampons and Klobbers. Soon, they will get to a large abyss, which must be crossed by using a few barrels and a good aim. When they get to the other side, they will have to continue along the rather flat land and watch out for more foes. Shortly after arriving back on land, they must get over another abyss via barrels. With the guidance of banana trails, the monkeys should aim and shoot themselves to the next area. Here, they will need to dodge only a few Spinies, and then hop onto a Hot Air Balloon. It will lead them across another abyss, although their weight is too much for the balloon, and it will sink into the fire if they aren't fast enough. After gliding through the air on the balloon and watching out for Zingers, they must jump into some barrels and blast to another Hot Air Balloon above them. They must use it to float over the rest of the large gap. Back on land, the group will have to jump up a few ledges and soon find the Star Barrel. | When they begin the level, the Kongs must travel down the path and dodge some enemies, such as Klampons and Klobbers. Soon, they will get to a large abyss, which must be crossed by using a few barrels and a good aim. When they get to the other side, they will have to continue along the rather flat land and watch out for more foes. Shortly after arriving back on land, they must get over another abyss via barrels. With the guidance of banana trails, the monkeys should aim and shoot themselves to the next area. Here, they will need to dodge only a few Spinies, and then hop onto a Hot Air Balloon. It will lead them across another abyss, although their weight is too much for the balloon, and it will sink into the fire if they aren't fast enough. After gliding through the air on the balloon and watching out for Zingers, they must jump into some barrels and blast to another Hot Air Balloon above them. They must use it to float over the rest of the large gap. Back on land, the group will have to jump up a few ledges and soon find the Star Barrel. | ||
From there, the monkeys will need to continue down the path and turn into [[Squitter the Spider]] with an [[Animal Barrel]]. Squitter must build his trademark webs and form platforms with them. He should use the platforms he created to travel over another abyss. Soon, the spider will need to follow a banana trail back to solid ground and defeat the enemies in his path. Eventually, he will get to another gap, which, again, must be crossed using his web platforms. As he builds his way across, there are many Zingers trying to get in the way, so he needs to be careful. Once on the other side, the [[Animal Friend]] will pass a [[No Animal Sign]] and turn back into the Kongs. The no longer transformed monkeys should then hop atop a Hot Air Balloon and begin to ride it. After a while, they will meet a Zinger in the way. From here, they must jump into the air and land on another balloon. Shortly after that, they will have to bounce off of a couple Flitters to reach yet another Hot Air Balloon. It will, as usual, take them to another balloon, followed by yet another balloon, until they finally reach land again. The group must dodge a few Klobbers here, and then hop into a barrel. With their skills, they will need to aim carefully and shoot to the other end of the wide abyss. Once they finally get to the other side, they will find a spring down the path. When they jump on it, it will bounce them out of the level. | From there, the monkeys will need to continue down the path and turn into [[Squitter the Spider]] with an [[Animal Barrel]]. Squitter must build his trademark webs and form platforms with them. He should use the platforms he created to travel over another abyss. Soon, the spider will need to follow a banana trail back to solid ground and defeat the enemies in his path. Eventually, he will get to another gap, which, again, must be crossed using his web platforms. As he builds his way across, there are many Zingers trying to get in the way, so he needs to be careful. Once on the other side, the [[Animal Friend]] will pass a [[No Animal Sign]] and turn back into the Kongs. The no longer transformed monkeys should then hop atop a Hot Air Balloon and begin to ride it. After a while, they will meet a Zinger in the way. From here, they must jump into the air and land on another balloon. Shortly after that, they will have to bounce off of a couple Flitters to reach yet another Hot Air Balloon. It will, as usual, take them to another balloon, followed by yet another balloon, until they finally reach land again. The group must dodge a few Klobbers here, and then hop into a barrel. With their skills, they will need to aim carefully and shoot to the other end of the wide abyss. Once they finally get to the other side, they will find a spring down the path. When they jump on it, it will bounce them out of the level. | ||
== | ==Enemies== | ||
==== | *[[Flitter]] | ||
* | *[[Neek]] | ||
*[[Kaboing]] | |||
*[[Klobber]] | |||
*[[Krochead]] | |||
*[[Klampon]] | |||
*[[Kruncha]] | |||
*[[Zinger]] | |||
==Items and objects== | |||
The following items and objects appear in the following quantities: | |||
*[[Banana Bunch]] 2 | |||
*[[Banana Coin]]: 3 | |||
*[[Barrel]]: 1 | |||
*[[Treasure Chest]]: 1 (rewards an [[Red Balloon|Extra Life Balloon]]) | |||
===KONG Letters=== | |||
*K: In front of a barrel cannon within the barrel blasting segment at the beginning. | |||
*O: Found while descending from a Hot Air Balloon. | |||
*N: As Squitter, a banana trail will allude to where the "N" Letter is; above some low-profile Zingers east of a small island with a Klobber. | |||
*G: In between two Klobbers. | |||
==Bonus Level== | |||
*'''Find the Token!''': After the No Animal Sign, the Kongs must blast through some more Barrel Cannons. After reaching the ground, Diddy or Dixie must perform a roll jump to the left and jump over a Zinger to enter into a [[Bonus Barrel]]. Alternatively, from the first Barrel Cannon, as it moves to the very right, the Kongs must blast right to land into the Bonus Barrel. In the Bonus Level, Diddy or Dixie have twenty seconds to cross the lava and get the [[DK Coin|Video Game Hero Coin]] on the other side. They must activate a few [[Krockhead Barrel]]s along the way to jump from the [[Krockhead]]s which emerge from the lava. Some Flitters are also found above the lava. | |||
==Gallery== | |||
<gallery> | |||
Fiery Furnace DKL2 Barrel Cannon.png|Dixie is launched from a Barrel Cannon | |||
Fiery Furnace DKL2 Hot Air Balloon.png|Diddy traveling across a Hot Air Balloon | |||
FieryFurnace-DKL2-O.png|The letter O | |||
Fiery Furnace DKL2 Klampon defeated.png|Squitter defeats a Klampon | |||
FieryFurnace-DKL2-N.png|The letter N | |||
FieryFurnace-DKL2-Bonus.png|The Bonus Barrel's location | |||
</gallery> | |||
==Names in other languages== | |||
{{foreign names | |||
|Jap=ホットドームタイザー | |||
|JapR=Hotto Dōmu Taizā | |||
|JapM=Hot Dome Tizer, possibly a reference to {{wp|Appletiser}}, carbonated apple juice that comes in a red "Grapetizer" variety, and is popular in Japan. | |||
}} | |||
{{DKL2}} | {{DKL2}} | ||
[[Category:Donkey Kong Land 2 | [[Category:Donkey Kong Land 2 levels]] | ||
[[Category:Crocodile Isle]] | [[Category:Crocodile Isle]] | ||
[[Category:Secret | [[Category:Secret levels]] | ||
[[Category: | [[Category:Underground areas]] | ||
[[Category:Volcanic | [[Category:Volcanic areas]] | ||
Latest revision as of 11:30, December 16, 2023
| Level | |
|---|---|
| Fiery Furnace | |

| |
| Level code | 7 - 3 |
| World | Lost World |
| Game | Donkey Kong Land 2 |
| Music track | Hot Head Bop |
| << Directory of levels >> | |
Fiery Furnace is the thirty-seventh level of Donkey Kong Land 2 and the third level in Lost World. It takes place in a volcanic area featuring Blast Barrels that are used to cross the pits of lava. In the second half, the Kongs must ride across many Hot Air Balloons. There is a part of the level where Squitter is playable, and he can use his web platforms to make his way across the pits of lava.
Layout[edit]

When they begin the level, the Kongs must travel down the path and dodge some enemies, such as Klampons and Klobbers. Soon, they will get to a large abyss, which must be crossed by using a few barrels and a good aim. When they get to the other side, they will have to continue along the rather flat land and watch out for more foes. Shortly after arriving back on land, they must get over another abyss via barrels. With the guidance of banana trails, the monkeys should aim and shoot themselves to the next area. Here, they will need to dodge only a few Spinies, and then hop onto a Hot Air Balloon. It will lead them across another abyss, although their weight is too much for the balloon, and it will sink into the fire if they aren't fast enough. After gliding through the air on the balloon and watching out for Zingers, they must jump into some barrels and blast to another Hot Air Balloon above them. They must use it to float over the rest of the large gap. Back on land, the group will have to jump up a few ledges and soon find the Star Barrel.
From there, the monkeys will need to continue down the path and turn into Squitter the Spider with an Animal Barrel. Squitter must build his trademark webs and form platforms with them. He should use the platforms he created to travel over another abyss. Soon, the spider will need to follow a banana trail back to solid ground and defeat the enemies in his path. Eventually, he will get to another gap, which, again, must be crossed using his web platforms. As he builds his way across, there are many Zingers trying to get in the way, so he needs to be careful. Once on the other side, the Animal Friend will pass a No Animal Sign and turn back into the Kongs. The no longer transformed monkeys should then hop atop a Hot Air Balloon and begin to ride it. After a while, they will meet a Zinger in the way. From here, they must jump into the air and land on another balloon. Shortly after that, they will have to bounce off of a couple Flitters to reach yet another Hot Air Balloon. It will, as usual, take them to another balloon, followed by yet another balloon, until they finally reach land again. The group must dodge a few Klobbers here, and then hop into a barrel. With their skills, they will need to aim carefully and shoot to the other end of the wide abyss. Once they finally get to the other side, they will find a spring down the path. When they jump on it, it will bounce them out of the level.
Enemies[edit]
Items and objects[edit]
The following items and objects appear in the following quantities:
- Banana Bunch 2
- Banana Coin: 3
- Barrel: 1
- Treasure Chest: 1 (rewards an Extra Life Balloon)
KONG Letters[edit]
- K: In front of a barrel cannon within the barrel blasting segment at the beginning.
- O: Found while descending from a Hot Air Balloon.
- N: As Squitter, a banana trail will allude to where the "N" Letter is; above some low-profile Zingers east of a small island with a Klobber.
- G: In between two Klobbers.
Bonus Level[edit]
- Find the Token!: After the No Animal Sign, the Kongs must blast through some more Barrel Cannons. After reaching the ground, Diddy or Dixie must perform a roll jump to the left and jump over a Zinger to enter into a Bonus Barrel. Alternatively, from the first Barrel Cannon, as it moves to the very right, the Kongs must blast right to land into the Bonus Barrel. In the Bonus Level, Diddy or Dixie have twenty seconds to cross the lava and get the Video Game Hero Coin on the other side. They must activate a few Krockhead Barrels along the way to jump from the Krockheads which emerge from the lava. Some Flitters are also found above the lava.
Gallery[edit]
Dixie is launched from a Barrel Cannon
Diddy traveling across a Hot Air Balloon
The letter O
Squitter defeats a Klampon
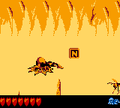
The letter N
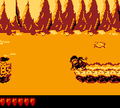
The Bonus Barrel's location


Names in other languages[edit]
| Language | Name | Meaning |
|---|---|---|
| Japanese | ホットドームタイザー Hotto Dōmu Taizā |
Hot Dome Tizer, possibly a reference to Appletiser, carbonated apple juice that comes in a red "Grapetizer" variety, and is popular in Japan. |