Scrapbook (Donkey Kong Country series): Difference between revisions
m (period) |
|||
| Line 164: | Line 164: | ||
{{br}} | {{br}} | ||
===''Donkey Kong Country 2''=== | ===''Donkey Kong Country 2''=== | ||
[[Snapjaw (Donkey Kong Country 2: Diddy's Kong Quest)|Snapjaw]] and the [[Barnacled Bosses|bosses]] are the only characters to not appear in the scrapbook. | [[Snapjaw (Donkey Kong Country 2: Diddy's Kong Quest)|Snapjaw]] and the [[Barnacled Bosses|bosses]] are the only characters to not appear in the scrapbook. | ||
| Line 287: | Line 286: | ||
|style="background:#EAE7D1"|'''First photo:''' Shoot the [[Zinger]] at the top of the [[Toxic Tower|tower]].<br>'''Second photo:''' Plunge into the icy waters of Clapper's Cavern. | |style="background:#EAE7D1"|'''First photo:''' Shoot the [[Zinger]] at the top of the [[Toxic Tower|tower]].<br>'''Second photo:''' Plunge into the icy waters of Clapper's Cavern. | ||
|} | |} | ||
{{Stub|section=yes}} | |||
{{br}} | {{br}} | ||
== References == | == References == | ||
<references /> | <references /> | ||
Revision as of 21:42, September 1, 2018
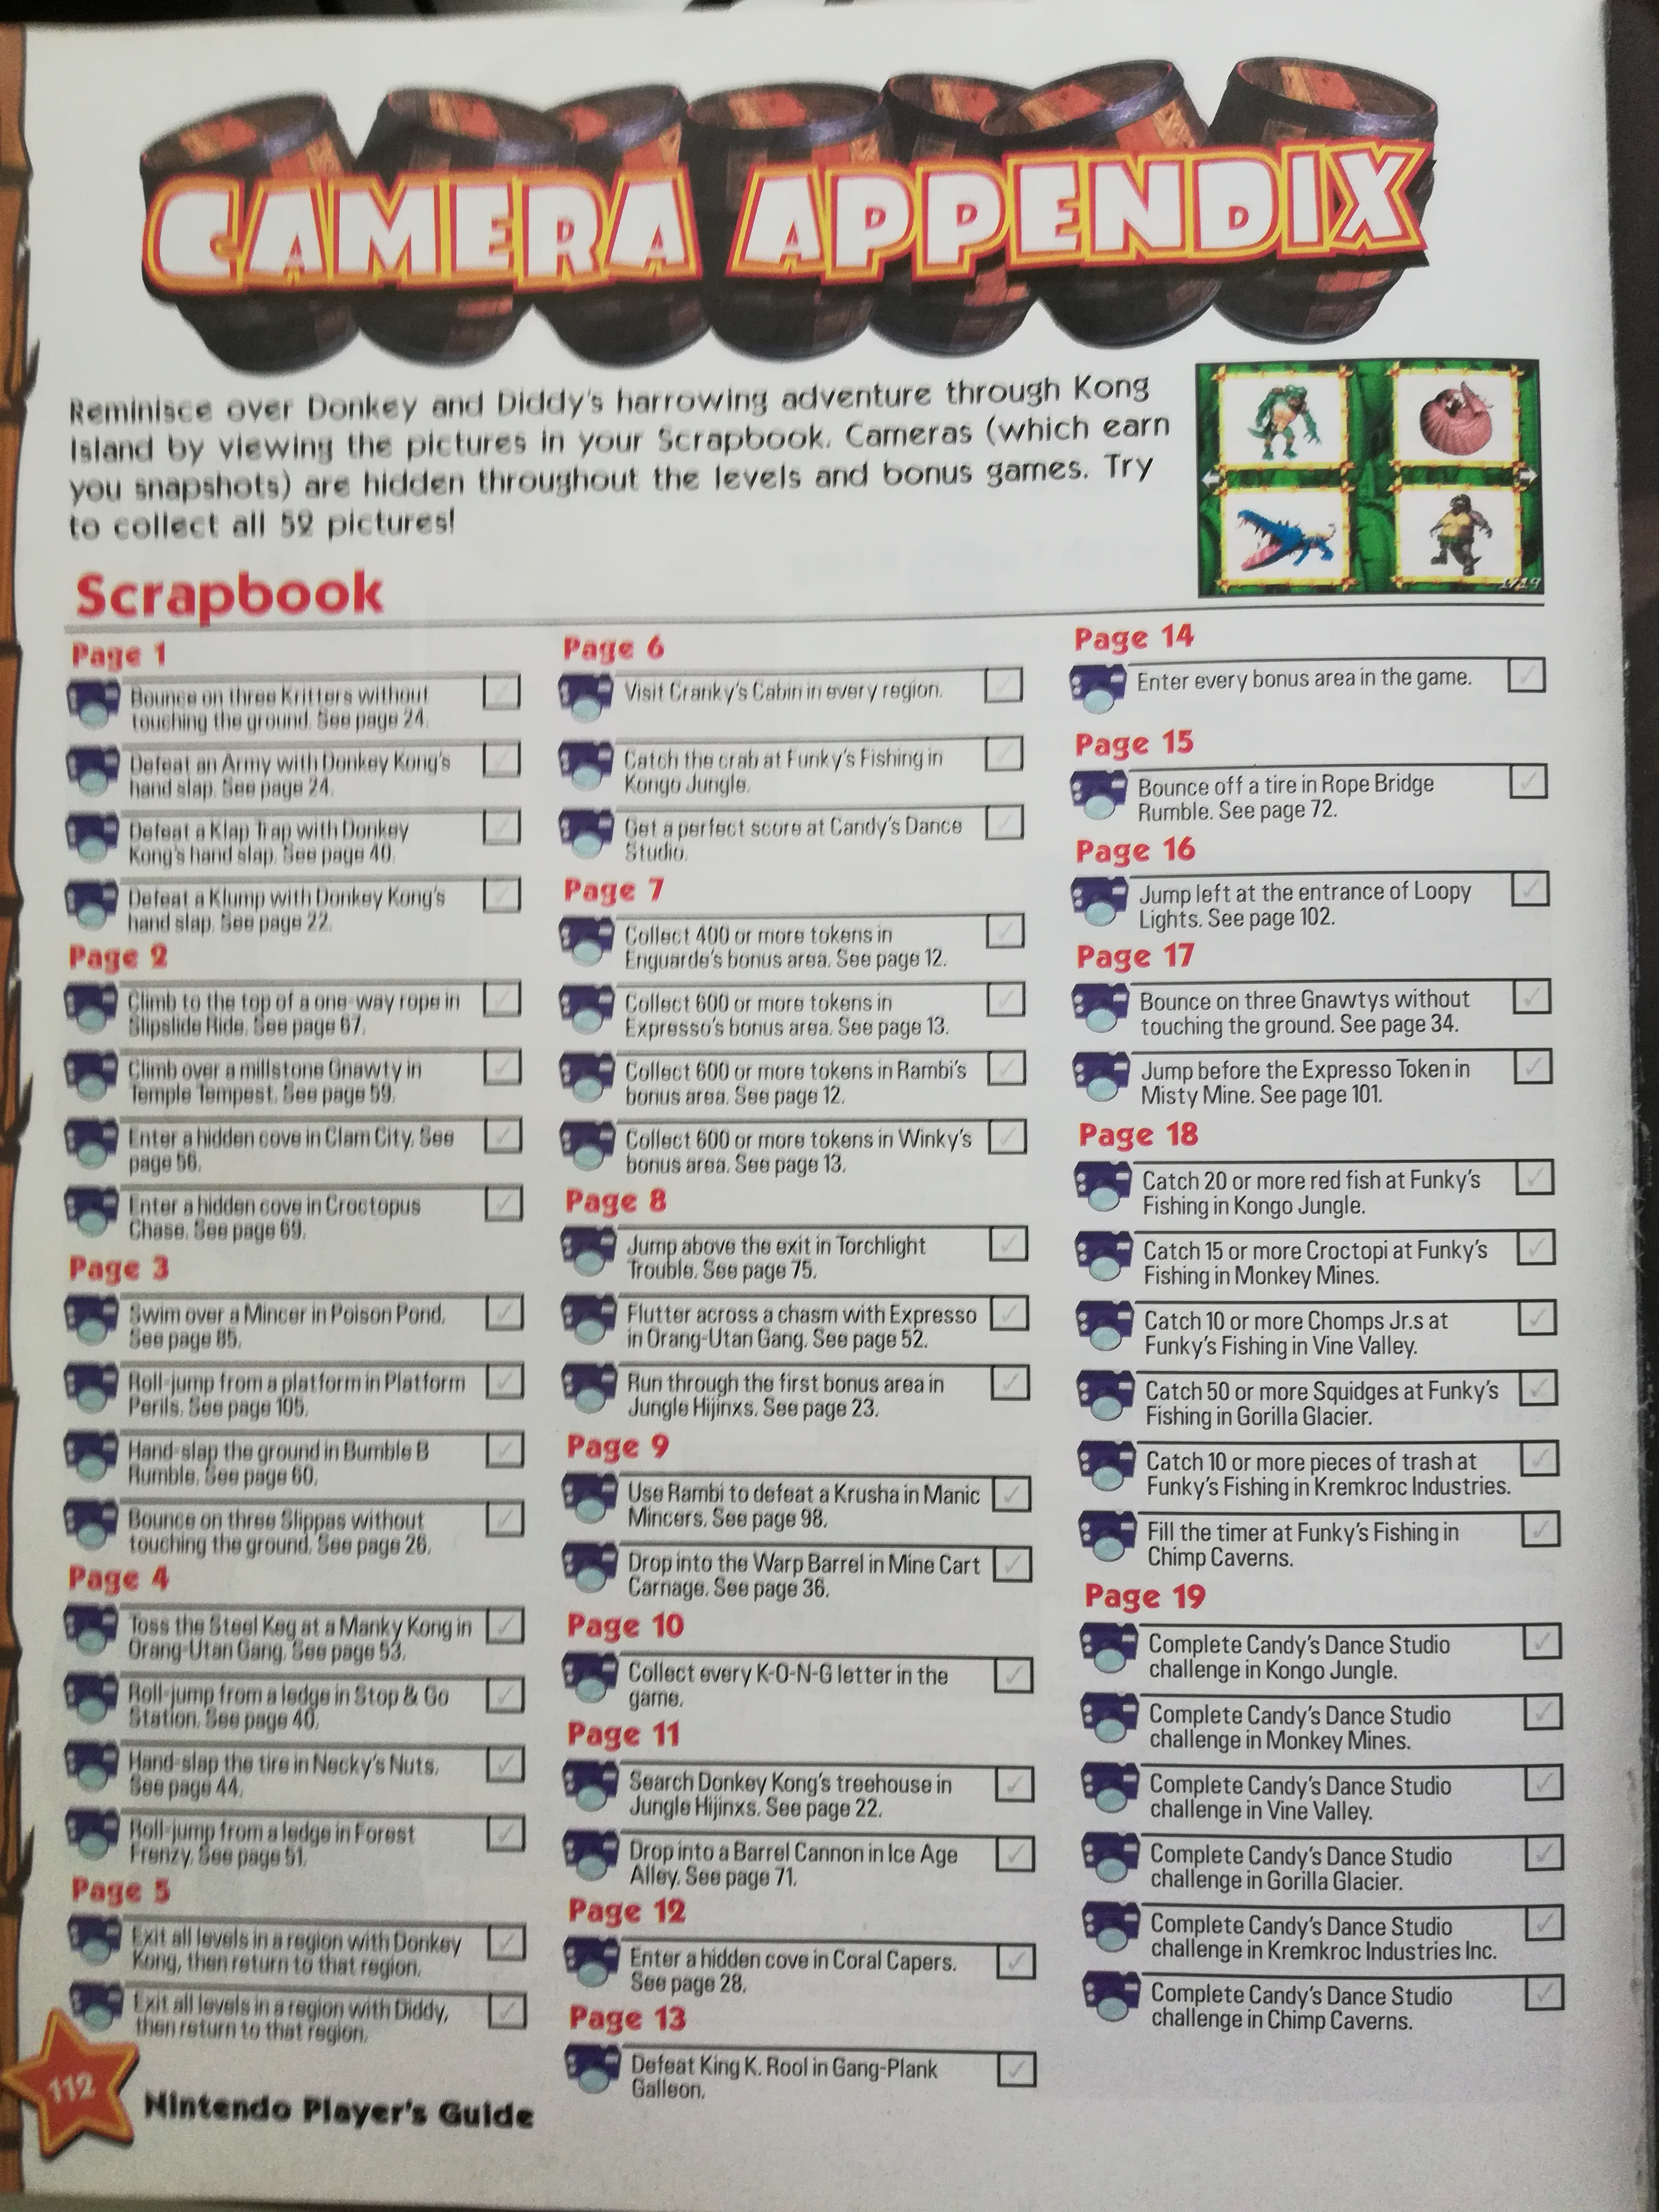
The Scrapbook[1] holds a collection of Photographs collected by the Kongs in the Game Boy Advance versions of both Donkey Kong Country and Donkey Kong Country 2. The Scrapbook is the successor to the Sticker Book from the Game Boy Color port, and the Photographs are in turn the successor to Sticker Pads. The Scrapbook and its Photographs do not appear in Donkey Kong Country 3's Game Boy Advance remake.
During the adventure in both games, the Kongs can view their collected photographs in the Scrapbook from the ![]() button menu. Pictures in the Scrapbook depict artwork of characters and enemies in various stances and are gradually unlocked by obtaining Photographs. Pictures that occupy more than one space of a page are composed of multiple Photographs. Collecting every Photograph is essential for the completion percentage.
button menu. Pictures in the Scrapbook depict artwork of characters and enemies in various stances and are gradually unlocked by obtaining Photographs. Pictures that occupy more than one space of a page are composed of multiple Photographs. Collecting every Photograph is essential for the completion percentage.
Donkey Kong and Diddy Kong begin their adventure with the Scrapbook in Donkey Kong Country. However, in Donkey Kong Country 2, Diddy and Dixie can receive the Scrapbook from Wrinkly Kong in Kong Kollege if they request a homework assignment. Wrinkly rewards them with a DK Coin for every page they fill in. An animated icon of a DK Coin appears in the bottom left corner of every completed page. The later scrapbook pages usually consist of one picture, all of which are put together by two Photographs (except for Donkey Kong on page 11).
In the later three worlds, Krazy Kremland, Gloomy Gulch, and K. Rool's Keep, Wrinkly offers hints for every Photograph location of a page at 10 Banana Bunch Coins each. She offers advice for five pages per world, with pages 1–5 in the former, pages 6–10 in the medial, and pages 11–15 in the latter. This totals to 50 Banana Coins spent per world, and 150 spent altogether. Wrinkly's advice, including of her scrapbook locations, is logged on "Wrinkly's Help" from the ![]() button's submenu of the
button's submenu of the ![]() menu.
menu.
Pages
This section is under construction. Therefore, please excuse its informal appearance while it is being worked on. We hope to have it completed as soon as possible.
Donkey Kong Country
| Page | Pictures (clockwise from top left) |
Unlocking condition |
|---|---|---|
 Page 1 |
Kritter | Defeating four Kritters in a row |
| Army | Hand Slapping an Army enemy | |
| Klump | Hand Slapping a Klump | |
| Klaptrap | Hand Slapping a Klaptrap | |
 Page 2 |
Chomps | Collecting the photograph in Clam City, in a hidden area behind a Clambo found shortly after the letter O. |
| Chomps Jr. | Collecting the photograph in Temple Tempest. Past the Star Barrel and an upward stairway with jumping Kritters, there is a Millstone standing in the same spot as the photograph. The Kongs should lure the Millstone away before grabbing the collectible. | |
| Croctopus | Collecting the photograph in Croctopus Chase. After passing the Star Barrel and swimming away from several Croctopuses, the Kongs encounter a Blast Barrel that shoots them up a long passage, leading to another Blast Barrel that shoots them close to the left. Afterwards, the Kongs should head backwards, slipping past the second barrel into the previous passage, where they will eventually encounter an opening in the wall on the left. This opening leads to a room concealing two Croctopuses and the photograph. | |
| Clambo | Collecting the photograph in Slipslide Ride. After passing a wide abyss via a series of ropes with Zingers and a Necky, the Kongs encounter a blue rope sliding them up a vertical passage. At the top of this rope, on the ceiling, lies the photograph. | |
 Page 3 |
Squidge | Collecting a photograph in Poison Pond. From the Star Barrel, the Kongs should head right and enter the second alcove with a Mincer coming in and out of it. At the end of the alcove, they will find the photograph along with a Banana Bunch. |
| Krusha | Collecting the photograph in Platform Perils. Moving past three consecutive scaffolds with Armies on them, the Kongs encounter an arrow platform that leads them down to the photograph. The Kongs should grab it before the platform drops into the abyss. | |
| Slippa | Defeating three Slippas in a row | |
| Zinger | Hand Slapping any spot under Queen B. in Bumble B. Rumble | |
 Page 4 |
Manky Kong | Collecting the photograph in Blackout Basement. The Kongs should visit the level's first Bonus Room and exit it. As they are blasted back into the main level, they crash into a patch on the ground, which breaks and reveals a Steel Keg. The keg should be picked up and carried further ahead to a Manky Kong, then used to defeat it, which will produce the photograph. |
| Rockkroc | Collecting the photograph in Stop & Go Station. After falling from a ledge onto a lower footpath with a Klaptrap, the Kongs should perform a roll jump over the gap preceding it to collect the photograph. | |
| Mini-Necky | Collecting the photograph in Forest Frenzy. After the final rope of the level reaches the end of its course, the Kongs should slide to the bottom of it and pick up the collectible. | |
| Necky | Hand Slapping the tire in Necky's Nuts. | |
 Page 5 |
Donkey Kong | Completing all levels as Donkey Kong and having his head icon on every level on the map. |
| Diddy Kong | Completing all levels as Diddy Kong and having his head icon on every level on the map. | |
 Page 6 |
Cranky Kong | Visiting Cranky's Hut in every world. |
| Funky Kong | Catching a crab at Funky's Fishing. | |
| Candy Kong | Obtaining a "Perfect" rating on a level of Candy's Dance Studio. | |
 Page 7 |
Enguarde the Swordfish | Collecting 400 Mini Animal Tokens in Enguarde's Bonus Room. |
| Expresso the Ostrich | Collecting 600 Mini Animal Tokens in Expresso's Bonus Room. | |
| Winky the Frog | Collecting 600 Mini Animal Tokens in Winky's Bonus Room. | |
| Rambi the Rhino | Collecting 600 Mini Animal Tokens in Rambi's Bonus Room. | |
 Page 8 |
Squawks the Parrot | Above the exit in Torchlight Trouble. |
| Diddy Kong and Expresso | Flapping Expresso across the large chasm in Orang-utan Gang, which is located below the first set of treetop platforms. | |
| Donkey Kong and Rambi | Midway through the first Bonus Area of Jungle Hijinxs. | |
 Page 9 |
Donkey and Diddy Kong riding Rambi. | In Manic Mincers, Rambi must stomp on a Krusha just after the Star Barrel. |
| Donkey and Diddy in a mine cart. | Located above the Warp Barrel in Mine Cart Carnage. | |
 Page 10 |
The Kong Family | Collecting every level's K-O-N-G Letters. |
 Page 11 |
Donkey and Diddy swinging on vines | On the far left of DK's Tree House, hidden behind a large Banana Bunch. |
| Donkey and Diddy in a snowy area | In Ice Age Alley, shortly after the Star Barrel, the Kongs swing from a group of three Ropes. They can jump down between the second and third icy cliffs for the Photograph, and then be shot back up by a Barrel Cannon. | |
 Page 12 |
Donkey and Diddy Kong swimming underwater, surrounded by a Chomps and a Croctopus | In Coral Capers, hidden in a cove below the letter G. |
 Page 13 |
Kremlings | Defeating King K. Rool in Gangplank Galleon. |
 Page 14 |
Donkey and Diddy Kong at Cranky's Cabin | Entering every Bonus Area of the game. |
 Page 15 |
Diddy attempts to defeat a Kritter behind an unaware Donkey Kong in a treetop area | In Rope Bridge Rumble, to the left of the second Tire after the first Bonus Area. |
 Page 16 |
Donkey and Diddy in a mine shaft | In Loopy Lights, by jumping inside the entryway at the very start. |
 Page 17 |
Gnawty (uses Very Gnawty's artwork) | Bouncing on three Gnawties without touching the ground. |
| Bitesize | In Misty Mine, between two Black Drums shortly after the Star Barrel. The Kongs can jump off the second one to reach it on the left side. | |
 Page 18 |
Donkey and Diddy fish on the coast of Donkey Kong Island. | The scrapbook picture is made up of six individual Photographs, one per completing a Funky's Fishing challenge in each world. |
 Page 19 |
Donkey, Diddy and Candy Kong dance at Candy's Dance Studio | Like page 18, this picture is also made up of six Photographs, one per completing a Candy's Dance Studio challenge in each world. |
Donkey Kong Country 2
Snapjaw and the bosses are the only characters to not appear in the scrapbook.
| Page | Pictures (clockwise from top left) |
Wrinkly's Help |
|---|---|---|
 Page 1 |
Klomp | Bash the Klomp on Squawks's Shaft. |
| Neek | Defeat the Neek at the start of Web Woods. | |
| Click-Clack | Hot Klobber Hop. | |
| Klobber | High up Topsail Trouble. | |
 Page 2 |
Klinger | Climb up. Chain Link Chamber. |
| Kaboing | By the G, Rattle Battle. | |
| Klampon | Halfway, Red-Hot Ride. | |
| Kruncha | Find the N. Black Ice Battle. | |
 Page 3 |
Screech | Beat Screech's time. |
| Zinger | Parrot Chute Panic. | |
| Kannon | Krockhead Klamber. | |
| Flitter | Blasting away on Kannon's Klaim. | |
 Page 4 |
Flotsam | In the Locker after the G. |
| Shuri | After halfway, Glimmer's Galleon. | |
| Puftup | By the N, Lava Lagoon. | |
| Lockjaw | In the Seal's Cavern. | |
 Page 5 |
Kackle | Don't be too quick to leave on Haunted Hall. |
| Kloak | Look up, Ghostly Grove. | |
| Kaboom | After the N on Klobber Karnage. | |
 Page 6 |
Kutlass | Hidden on Rambi Rumble. |
| Krook | Just after the Star Barrel on Castle Crush. | |
| Cat O' 9 Tails | End of Fiery Furnace. | |
 Page 7 |
Mini-Necky | After the N on Mudhole Marsh. |
| Spiny | Look in Hornet Hole. | |
| Krockhead | A single banana shows the way in Barrel Bayou. | |
 Page 8 |
Diddy and Dixie | First photo: Go right at the start of Bramble Scramble. Second photo: Look before the O in Jungle Jinx. |
 Page 9 |
Wrinkly and Cranky | First photo: Complete Wrinkly's task. Second photo: Visit the Kong family. |
 Page 10 |
Swanky and Funky | First photo: Become the quiz master. Second photo: Earn your wings. |
 Page 11 |
Donkey Kong | Send K. Rool flying. |
 Page 12 |
Rattly the Rattlesnake and Rambi the Rhino | First photo: Head left on Gusty Glade. Second photo: Smash open the doorway in Pirate Panic. |
 Page 13 |
Expresso the Ostrich and Squawks the Parrot | First photo: Animal Antics around the N. Second photo: Become the fastest bird around. |
 Page 14 |
Enguarde the Swordfish and Glimmer the Angler Fish | First photo: Arctic Abyss, under the change barrel. Second photo: Past the O is too far on Glimmer's Galleon. |
 Page 15 |
Squitter the Spider and Clapper the Seal | First photo: Shoot the Zinger at the top of the tower. Second photo: Plunge into the icy waters of Clapper's Cavern. |
 This section is a stub. You can help the Super Mario Wiki by expanding it.