Lakeside Limbo: Difference between revisions
LinkTheLefty (talk | contribs) mNo edit summary |
No edit summary |
||
| (19 intermediate revisions by 13 users not shown) | |||
| Line 1: | Line 1: | ||
{{ | {{level infobox | ||
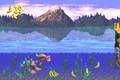
|image=[[File:Lakeside Limbo.png]] | |image=[[File:Lakeside Limbo.png]] | ||
|code=1 - 1 | |code=1 - 1 | ||
|world=[[Lake Orangatanga]] | |world=[[Lake Orangatanga]] | ||
|game=''[[Donkey Kong Country 3: Dixie Kong's Double Trouble!]] | |game=''[[Donkey Kong Country 3: Dixie Kong's Double Trouble!]] | ||
| | |track=Stilt Village | ||
|before=<< | |before=<< | ||
|after=[[Doorstop Dash|>>]] | |after=[[Doorstop Dash|>>]] | ||
}} | }} | ||
'''Lakeside Limbo''' is the first level of ''[[Donkey Kong Country 3: Dixie Kong's Double Trouble!]]'' It is located in the first world, [[Lake Orangatanga]]. This level takes place on a series of boardwalks hanging over a large body of water. As the first level, Lakeside Limbo does not feature any unique obstacles or hazards. [[Dixie Kong|Dixie]] and [[Kiddy Kong|Kiddy]] can use their [[team up]] ability early in the level to reach above for bonus items. There are a few basic enemies in the level, including [[Sneek]]s, [[Kobble]]s, and a single [[Booty Bird]]. There are a few segments where the Kongs can swim in the lake below. The Kongs can optionally break open an [[Animal Crate]] of [[Ellie|Ellie the Elephant]] during the latter half of the level, and they can ride on her in some later parts of the level. | |||
'''Lakeside Limbo''' is the first level of ''[[Donkey Kong Country 3: Dixie Kong's Double Trouble!]]'' It is located in the first world, [[Lake Orangatanga]]. | |||
This level takes place on a series of boardwalks hanging over a large body of water. As the first level, Lakeside Limbo does not feature any unique obstacles or hazards. [[Dixie Kong|Dixie]] and [[Kiddy Kong|Kiddy]] can use their [[team up]] ability early in the level to reach above for bonus items. There are a few basic enemies in the level, including [[Sneek]]s, [[Kobble]]s, and a single [[Booty Bird]]. There are a few segments where the Kongs can swim in the lake below. The Kongs can optionally break open an [[Animal Crate]] of [[Ellie the Elephant]] during the latter half of the level. | |||
==Layout== | ==Layout== | ||
At the beginning of the level, the Kongs | [[File:Lakeside Limbo GBA Kobbles.png|thumb|left|Lakeside Limbo in the Game Boy Advance version]] | ||
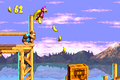
At the beginning of the level, the Kongs start under a small tunnel, which leads to a tunnel supported by large stilts. After the tunnel, there are long sets of boardwalks over the lake with Sneeks, a [[barrel]], and the [[K-O-N-G Letters|letter K]]. The player can then climb up a small ledge to reach the first Kobble and a formation of bananas creating the letter R. The next section has some tightropes, and on the boards below the ropes, there is a [[Koin]] and the letter O. The player must then go downwards through a straight pathway to some Kobbles in a small alcove with a tightrope. Continuing to the other side reveals a tunnel with a [[Star Barrel]]. | |||
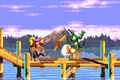
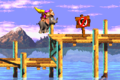
About halfway into the level, | About halfway into the level, there is a DK Barrel and a large gap of water that must be swum through to reach another boardwalk. There, the player can find a Kobble and a small gap with the letter N above it. A pathway leading to a ledge is also located nearby. Jumping off this ledge causes the Kongs to land on a crate with Ellie in it. Near Ellie's crate, the player should defeat a Booty Bird to earn the letter G. After climbing over a raised piece of the boards, the Kongs reach a flat surface with a lone Kobble and [[No Animal Sign]]. Afterwards, the player can reach the [[Level Flag]] located nearby the sign. | ||
{{br|left}} | {{br|left}} | ||
==Enemies== | ==Enemies== | ||
<gallery> | |||
Booty Bird DKC3.png|[[Booty Bird]] (1) | |||
Kobble DKC3.png|[[Kobble]] (6) | |||
Sneek DKC3.png|[[Sneek]] (5) | |||
</gallery> | |||
==Items and objects== | ==Items and objects== | ||
[[File:Lakeside Limbo GBA Red Balloon Star Barrel.png|thumb|The Kongs find a Red Balloon just before the Star Barrel]] | [[File:Lakeside Limbo GBA Red Balloon Star Barrel.png|thumb|The Kongs find a Red Balloon just before the Star Barrel]] | ||
<gallery> | |||
Banana DKC SNES.png|[[Banana]] (107) | |||
Bear Coin.png|[[Bear coin]] (4) | |||
Blue Extra Life Balloon DKC3.png|[[Blue Balloon]] (1){{footnote|main|a}} | |||
DK Barrel.png|[[DK Barrel]] (2) | |||
Green Extra Life Balloon DKC3.png|[[Green Balloon]] (1){{footnote|main|b}} | |||
Red Extra Life Balloon DKC3.png|[[Red Balloon]] (3){{footnote|main|c}} | |||
|[[Banana]] | </gallery> | ||
{{footnote|note|a|The Blue Balloon is above the last Kobble, right before the No Animal Sign.}} | |||
{{footnote|note|b|The Green Balloon is hidden directly after the second Bonus Barrel.}} | |||
{{footnote|note|c|The first two Red Balloons are hidden over the first and second houses respectively, while the third one is above the third house.}} | |||
|[[Bear | |||
|[[Blue Balloon]] | |||
| | |||
|[[DK Barrel]] | |||
|[[Green Balloon]] | |||
| | |||
|[[Red Balloon]] | |||
| | |||
===K-O-N-G Letters=== | ===K-O-N-G Letters=== | ||
*'''K:''' The letter K is floating in the air after the first Sneek. | |||
*'''O:''' Shortly after the first DK Barrel is an area with some ropes and the Koin. The letter O is hovering on the lower rope, just above the [[Iron Barrel|Steel Barrel]]. | |||
*'''N:''' After the Kongs cross the first water area from the Star Barrel, they find the letter N above a small gap. | |||
*'''G:''' Near the end of the level, the Kongs must defeat a Booty Bird to get the letter G. | |||
===DK Coin=== | ===DK Coin=== | ||
Right under the letter O, the Kongs can find the [[Koin]] and a [[Iron Barrel|Steel Barrel]]. The Kongs must pick up the Steel Barrel and throw it behind Koin on either side, whether it is facing left or right. The Steel Barrel then bounces off either wall and hits Koin from behind, defeating him and thus earning the Kongs the [[DK Coin]]. | |||
==Bonus Levels== | |||
{{multiframe|[[File:Lakeside Limbo Bonus Area 1.png|200px]] [[File:Lakeside Limbo Bonus Area 2.png|200px]]|size=420|The first and second Bonus Levels respectively}} | |||
{| | Lakeside Limbo has two Bonus Levels, listed by type: | ||
*'''''Collect 50 Stars!''''': To access the first [[Bonus Level]], Dixie must use a [[team up]] throw for Kiddy to land on a crack in the boardwalk, next to a group of bananas shaped like an "A" (or "R" in the [[Game Boy Advance]] remake), which represents the button to use team up. The Kongs can go down the opened gap to enter a [[Bonus Barrel]]. In the [[Bonus Level]], the Kongs must collect fifty [[star (Donkey Kong franchise)|star]]s within twenty seconds by using a horizontal rope in an open area. After the Kongs collect all the stars, the [[Bonus Coin (Donkey Kong franchise)|Bonus Coin]] appears. | |||
*'''''Grab 15 Bananas!''''': To reach the second Bonus Barrel, the Kongs must swim under a boardwalk with the letter N. They must continue forward and jump out the water and into the Bonus Barrel. In the Bonus Level, the Kongs have 30 seconds to collect 15 [[green banana]]s, which individually appear around a horizontal rope. After the Kongs collect every banana, the Bonus Coin appears. | |||
|[[File:Lakeside Limbo Bonus Area | |||
==Warp Barrel== | |||
On the edge before the first DK Barrel, Kiddy must use team up and throw Dixie to the top-left. This | [[File:Warp Barrel Lakeside Limbo.png|thumb|left|The location of the Warp Barrel]] | ||
On the edge before the first DK Barrel, Kiddy must use team up and throw Dixie to the top-left. This will cause them to land in a hidden [[Warp Barrel]], warping them directly to the Level Flag at the end. | |||
{{br|left}} | |||
==Gallery== | ==Gallery== | ||
| Line 118: | Line 63: | ||
Lakeside Limbo DKC3 first Bonus Barrel.png|Dixie carrying Kiddy to a crack leading below into the first Bonus Barrel | Lakeside Limbo DKC3 first Bonus Barrel.png|Dixie carrying Kiddy to a crack leading below into the first Bonus Barrel | ||
Lakeside Limbo second Bonus Barrel.png|The Kongs swim to the second Bonus Barrel | Lakeside Limbo second Bonus Barrel.png|The Kongs swim to the second Bonus Barrel | ||
Lakeside Limbo DKC3 shot 2.png|The location of Koin | |||
Lakeside Limbo K.png|The location of the letter K | |||
Lakeside Limbo O.png|The location of the letter O | |||
Lakeside Limbo N.png|The location of the letter N | |||
Lakeside Limbo G.png|The location of the letter G | |||
DKC3LakesideLimboSNES1.png|The Kongs and Ellie in the area where Ellie's Animal Crate was | DKC3LakesideLimboSNES1.png|The Kongs and Ellie in the area where Ellie's Animal Crate was | ||
Lakeside Limbo Booty Bird.png|Ellie throws a barrel at a Booty Bird | Lakeside Limbo Booty Bird.png|Ellie throws a barrel at a Booty Bird | ||
| Line 125: | Line 75: | ||
===Game Boy Advance=== | ===Game Boy Advance=== | ||
<gallery> | <gallery> | ||
Lakeside Limbo DKC3 GBA.png|Dixie using team up at a crack in the boardwalk leading into a Bonus Barrel below | Lakeside Limbo DKC3 GBA.png|Dixie using team up at a crack in the boardwalk leading into a Bonus Barrel below | ||
Lakeside Limbo GBA swimming.png|Dixie and Kiddy swimming in a lake | Lakeside Limbo GBA swimming.png|Dixie and Kiddy swimming in a lake | ||
| Line 131: | Line 80: | ||
Lakeside Limbo GBA Ellie and Kobble.png|Ellie defeats a Kobble with a barrel | Lakeside Limbo GBA Ellie and Kobble.png|Ellie defeats a Kobble with a barrel | ||
Lakeside Limbo DKC3 GBA 2.png|The Kongs lead Ellie to a No Animal Sign | Lakeside Limbo DKC3 GBA 2.png|The Kongs lead Ellie to a No Animal Sign | ||
Lakeside Limbo GBA Bonus Level 2.png|Grab 15 Bananas! | |||
</gallery> | </gallery> | ||
== Names in other languages == | ==Names in other languages== | ||
{{foreign names | {{foreign names | ||
|Jap=湖のほとり | |Jap=湖のほとり | ||
| Line 140: | Line 90: | ||
|Spa=Entre Dos Aguas | |Spa=Entre Dos Aguas | ||
|SpaM=Between Two Lakes | |SpaM=Between Two Lakes | ||
| | |Fre=Péril Du Lac | ||
| | |FreM=Danger of the Lake | ||
|Ger=Lago Limbo | |Ger=Lago Limbo | ||
|GerM=Lago Limbo<br>"Lago" is the Spanish name for "lake." | |GerM=Lago Limbo<br>"Lago" is the Spanish name for "lake." | ||
| Line 147: | Line 97: | ||
|ItaM=Countercurrent | |ItaM=Countercurrent | ||
}} | }} | ||
{{DKC3}} | {{DKC3}} | ||
[[Category:Lakes]] | [[Category:Lakes]] | ||
[[Category:Donkey Kong Country 3: Dixie Kong's Double Trouble! | [[Category:Donkey Kong Country 3: Dixie Kong's Double Trouble! levels]] | ||
[[de:Lago Limbo]] | |||
Latest revision as of 16:52, January 20, 2024
| Level | |
|---|---|
| Lakeside Limbo | |

| |
| Level code | 1 - 1 |
| World | Lake Orangatanga |
| Game | Donkey Kong Country 3: Dixie Kong's Double Trouble! |
| Music track | Stilt Village |
| << Directory of levels >> | |
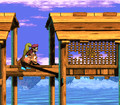
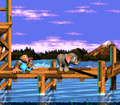
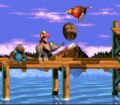
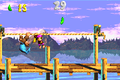
Lakeside Limbo is the first level of Donkey Kong Country 3: Dixie Kong's Double Trouble! It is located in the first world, Lake Orangatanga. This level takes place on a series of boardwalks hanging over a large body of water. As the first level, Lakeside Limbo does not feature any unique obstacles or hazards. Dixie and Kiddy can use their team up ability early in the level to reach above for bonus items. There are a few basic enemies in the level, including Sneeks, Kobbles, and a single Booty Bird. There are a few segments where the Kongs can swim in the lake below. The Kongs can optionally break open an Animal Crate of Ellie the Elephant during the latter half of the level, and they can ride on her in some later parts of the level.
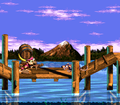
Layout[edit]

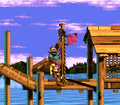
At the beginning of the level, the Kongs start under a small tunnel, which leads to a tunnel supported by large stilts. After the tunnel, there are long sets of boardwalks over the lake with Sneeks, a barrel, and the letter K. The player can then climb up a small ledge to reach the first Kobble and a formation of bananas creating the letter R. The next section has some tightropes, and on the boards below the ropes, there is a Koin and the letter O. The player must then go downwards through a straight pathway to some Kobbles in a small alcove with a tightrope. Continuing to the other side reveals a tunnel with a Star Barrel.
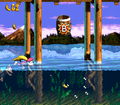
About halfway into the level, there is a DK Barrel and a large gap of water that must be swum through to reach another boardwalk. There, the player can find a Kobble and a small gap with the letter N above it. A pathway leading to a ledge is also located nearby. Jumping off this ledge causes the Kongs to land on a crate with Ellie in it. Near Ellie's crate, the player should defeat a Booty Bird to earn the letter G. After climbing over a raised piece of the boards, the Kongs reach a flat surface with a lone Kobble and No Animal Sign. Afterwards, the player can reach the Level Flag located nearby the sign.
Enemies[edit]

Booty Bird (1)

Kobble (6)

Sneek (5)


Items and objects[edit]


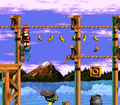
Banana (107)

Bear coin (4)

Blue Balloon (1)a

DK Barrel (2)

Green Balloon (1)b

Red Balloon (3)c


a - The Blue Balloon is above the last Kobble, right before the No Animal Sign.
b - The Green Balloon is hidden directly after the second Bonus Barrel.
c - The first two Red Balloons are hidden over the first and second houses respectively, while the third one is above the third house.
K-O-N-G Letters[edit]
- K: The letter K is floating in the air after the first Sneek.
- O: Shortly after the first DK Barrel is an area with some ropes and the Koin. The letter O is hovering on the lower rope, just above the Steel Barrel.
- N: After the Kongs cross the first water area from the Star Barrel, they find the letter N above a small gap.
- G: Near the end of the level, the Kongs must defeat a Booty Bird to get the letter G.
DK Coin[edit]
Right under the letter O, the Kongs can find the Koin and a Steel Barrel. The Kongs must pick up the Steel Barrel and throw it behind Koin on either side, whether it is facing left or right. The Steel Barrel then bounces off either wall and hits Koin from behind, defeating him and thus earning the Kongs the DK Coin.
Bonus Levels[edit]


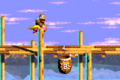
Lakeside Limbo has two Bonus Levels, listed by type:
- Collect 50 Stars!: To access the first Bonus Level, Dixie must use a team up throw for Kiddy to land on a crack in the boardwalk, next to a group of bananas shaped like an "A" (or "R" in the Game Boy Advance remake), which represents the button to use team up. The Kongs can go down the opened gap to enter a Bonus Barrel. In the Bonus Level, the Kongs must collect fifty stars within twenty seconds by using a horizontal rope in an open area. After the Kongs collect all the stars, the Bonus Coin appears.
- Grab 15 Bananas!: To reach the second Bonus Barrel, the Kongs must swim under a boardwalk with the letter N. They must continue forward and jump out the water and into the Bonus Barrel. In the Bonus Level, the Kongs have 30 seconds to collect 15 green bananas, which individually appear around a horizontal rope. After the Kongs collect every banana, the Bonus Coin appears.
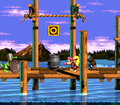
Warp Barrel[edit]

On the edge before the first DK Barrel, Kiddy must use team up and throw Dixie to the top-left. This will cause them to land in a hidden Warp Barrel, warping them directly to the Level Flag at the end.
Gallery[edit]
Super Nintendo Entertainment System[edit]
The Kongs at the start of the level
Dixie throwing a barrel at a Sneek

Dixie carrying Kiddy to a crack leading below into the first Bonus Barrel
The Kongs swim to the second Bonus Barrel
The location of Koin
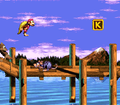
The location of the letter K
The location of the letter O
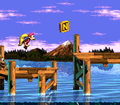
The location of the letter N
The location of the letter G
The Kongs and Ellie in the area where Ellie's Animal Crate was
Ellie throws a barrel at a Booty Bird
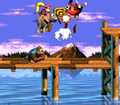
Dixie and Kiddy pull down on the Level Flag


Game Boy Advance[edit]
Dixie using team up at a crack in the boardwalk leading into a Bonus Barrel below
Dixie and Kiddy swimming in a lake
The Kongs jump down to Ellie's Animal Crate
Ellie defeats a Kobble with a barrel
The Kongs lead Ellie to a No Animal Sign
Grab 15 Bananas!


Names in other languages[edit]
| Language | Name | Meaning |
|---|---|---|
| Japanese | 湖のほとり Mizuumi no hotori |
The Bank of the Lake |
| French | Péril Du Lac |
Danger of the Lake |
| German | Lago Limbo |
Lago Limbo "Lago" is the Spanish name for "lake." |
| Italian | Controcorrente |
Countercurrent |
| Spanish | Entre Dos Aguas |
Between Two Lakes |