Surface Tension: Difference between revisions
mNo edit summary |
Scrooge200 (talk | contribs) (DK Wiki merge. The only thing I wasn't able to incorporate is that the paths combine near the end.) |
||
| Line 6: | Line 6: | ||
|after=[[Tundra Blunda|>>]] | |after=[[Tundra Blunda|>>]] | ||
}} | }} | ||
'''Surface Tension''' is the sixteenth level in | '''Surface Tension''' is the sixteenth level in ''[[Donkey Kong Land III]]''. Located in the north of [[Blackforest Plateau]], it takes place on the banks of the river that meanders through the area. The vegetation, unlike in ''[[Donkey Kong Country 3: Dixie Kong's Double Trouble!]]''<nowiki>'</nowiki>s river levels, is rather short and sparse, as it mostly consists of small conifers, mushrooms, and lichen. | ||
During this level, [[Dixie Kong]] and [[Kiddy Kong]] must thread their way on the river banks, through hordes of enemies. Surface Tension is quite similar to [[Riverbank Riot]], but it features many more baddies, making it slightly harder. Although they are likely to be very cold, since the northern area of Blackforest Plateau is occupied by [[wikipedia:taiga|taigas]], the waters are infested with | During this level, [[Dixie Kong]] and [[Kiddy Kong]] must thread their way on the river banks, through hordes of enemies. Surface Tension is quite similar to [[Riverbank Riot]], but it features many more baddies, making it slightly harder. Although they are likely to be very cold, since the northern area of Blackforest Plateau is occupied by [[wikipedia:taiga|taigas]], the waters are infested with [[Koco]]s and [[Bounty Bass]]es, along with a single [[Lurchin]]. On the banks, the [[Kong]]s encounter [[Buzz (enemy)|Buzzes]], [[Krimp]]s, [[Krumple]]s, [[Bristles]], and [[Sneek]]s. This wide variety of enemies forces the player to resort to different attacks because not all these baddies can be defeated the same way (for instance, Krimps can only be attacked from the back, while Bristles can only be attacked from the front; Krumples can only be defeated by Kiddy). | ||
This level's name is a pun of [[wikipedia:Surface tension|a property of the surface of water]]. | This level's name is a pun of [[wikipedia:Surface tension|a property of the surface of water]]. | ||
== | ==Layout== | ||
If Kiddy and Dixie head left after beginning the level, they will meet two Buzzes and a Krimp and have access to a [[Bonus Barrel]]. To the right is a straight pathway into a river of water. Crossing the river, the apes clamber down a rigid passageway, grabbing the letter K and dodging several enemies. Soon, they make their way into another pool of water and swim across to get back on another area of land. Again, they run across a rather flat pathway while dodging enemies. They eventually move into the letter O and cross a gap to find some ledges. Dropping down on these ledges, they soon find the next pool of water. Because the river at this point is not to large, the apes are able to jump across it and hit the nearby [[Star Barrel]]. | |||
About halfway through the level, the road becomes filled with gaps of water. The Kongs need to cross these gaps while avoiding some Buzzes and then move up a slanted pathway. At the top of this pathway, the heroes pass a few more Buzzes to find a barrel. The barrel blasts them across another abyss and to the letter N. Farther on, Dixie and Kiddy travel down a series of slanted pathways, avoiding enemies such as Krimps and Buzzes. Shortly after collecting the letter G, they can find a flagpole. If they touch the flagpole, they are taken to the [[Tundra Blunda|next level]]. | About halfway through the level, the road becomes filled with gaps of water. The Kongs need to cross these gaps while avoiding some Buzzes and then move up a slanted pathway. At the top of this pathway, the heroes pass a few more Buzzes to find a barrel. The barrel blasts them across another abyss and to the letter N. Farther on, Dixie and Kiddy travel down a series of slanted pathways, avoiding enemies such as Krimps and Buzzes. Shortly after collecting the letter G, they can find a flagpole. If they touch the flagpole, they are taken to the [[Tundra Blunda|next level]]. | ||
==Enemies== | |||
{|class="dktable-brown" width=10% | |||
|- | |||
!Name | |||
!Count | |||
|- | |||
| align=center| [[File:Krimp DKL3c sprite.png]]<br>[[Krimp]] | |||
| 4 | |||
|- | |||
| align=center| [[File:Buzz DKL3c sprite.png]]<br>[[Buzz]] | |||
| 11 | |||
|- | |||
| align=center| [[File:Knik-Knak DKL3c sprite.png]]<br>[[Knik-Knak]] | |||
| 4 | |||
|- | |||
| align=center| [[File:Koco DKL3c sprite.png]]<br>[[Koco]] | |||
| 4 | |||
|- | |||
| align=center| [[File:Bristles DKL3c sprite.png]]<br>[[Bristles]] | |||
| 5 | |||
|- | |||
| align=center| [[File:Krumple DKL3c sprite.png]]<br>[[Krumple]] | |||
| 4 | |||
|- | |||
| align=center| [[File:Lurchin DKL3c sprite.png]]<br>[[Lurchin]] | |||
| 1 | |||
|- | |||
| align=center| [[File:Bounty Bass DKL3c sprite.png]]<br>[[Bounty Bass]] | |||
| 10 | |||
|- | |||
| align=center| [[File:Sneek DKL3c sprite.png]]<br>[[Sneek]] | |||
| 2 | |||
|} | |||
==Items and objects== | |||
{|class="dktable-brown" width=10% | |||
|- | |||
!Name | |||
!Count | |||
|- | |||
|align="center"|[[File:DK Barrel DKL3c sprite.png]]<br>[[DK Barrel]] | |||
|2 | |||
|- | |||
|align="center"|[[File:Bear Coin DKLIII Sprite.png]]<br>[[Bear Coin]] | |||
|1 | |||
|- | |||
|align=center|[[File:Steel Barrel DKL3c sprite.png]]<br>[[Steel Keg|Steel Barrel]] | |||
|2 | |||
|} | |||
==Secrets== | ==Secrets== | ||
===Bonus Levels=== | ===Bonus Levels=== | ||
{|class="dktable-brown" width=75% | |||
|- | |||
!Image | |||
!Type and description | |||
|- | |||
|[[File:Surface Tension Bonus Level 1.png]] | |||
|'''Bash the Baddies!'''<br>After starting the level, Dixie or Kiddy should head to the left. If they sneak under two Buzzes without hitting the nearby Krimp, they can find a [[Bonus Barrel]]. It fires them into a [[Bonus Level]] where they need to bounce off of a few Knik-Knaks to cross a pool of water. If they make it to the end of the area in less than fifteen seconds after defeating every enemy, they can find a [[Bonus Coin]]. | |||
|- | |||
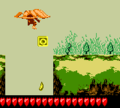
|[[File:Surface Tension Bonus Level 2.png]] | |||
|'''Find the Token!'''<br>About halfway into the level, the heroes find the letter O over a small gap. If they drop into the area right behind the letter, they land in a hidden Bonus Barrel. Once it blasts them into the special stage, they need to run across a long pathway, avoiding Buzzes. After they reach the end of that area, they fall into a river and swim west through a wide trench. If they make it to the end of this trench undamaged in less than twenty-five seconds, they earn another Bonus Coin. | |||
|} | |||
===DK Coin=== | ===DK Coin=== | ||
{|class="dktable-brown" width=70% | |||
|- | |||
!Screenshot | |||
!Location | |||
|- | |||
|[[File:Surface Tension DKL3c Koin.png]] | |||
|After the letter N, the Kongs can enter a Barrel Cannon. It blasts them to a platform with a [[Steel Keg|Steel Barrel]] on it. If the Kongs carry this barrel down the ledge to the left, they should find a [[Koin]] with the [[DK Coin]]. It can be defeated by standing on its shield, then throwing the Steel Barrel into the nearest wall. The barrel should bounce back and hit the Koin on the side, knocking him out. This gives the Kongs his DK Coin. | |||
|} | |||
===K-O-N-G Letters=== | |||
{|class="dktable-brown" width=70% | |||
|- | |||
!Letter | |||
!Location | |||
|- | |||
|[[File:Letter K DKL3c.png]] | |||
|To the right of the first Bristles | |||
|- | |||
|[[File:Letter O DKL3c.png]] | |||
|Above a gap next to three Krumples | |||
|- | |||
|[[File:Letter N DKL3c.png]] | |||
|Obtained after using a Barrel Cannon near the Koin | |||
|- | |||
|[[File:Letter G DKL3c.png]] | |||
|To the right of a Buzz near the end of the level | |||
|} | |||
==Gallery== | |||
<gallery> | |||
Surface Tension DKL3c Kocos.png|Kiddy swims near some Kocos. | |||
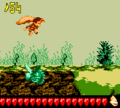
Surface Tension DKL3c Krumple.png|Dixie prepares to throw a Steel Barrel at a Krumple. | |||
Surface Tension DKL3c underwater.png|Dixie swims past a Bounty Bass to reach a Bear Coin. | |||
Surface Tension DKL3c O.png|The "O" letter | |||
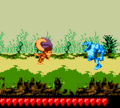
Surface Tension DKL3c Buzz.png|Dixie jumps over a Buzz. | |||
</gallery> | |||
== Names in other languages == | ==Names in other languages== | ||
{{foreign names | {{foreign names | ||
|Jap=ひょうめんのドキドキ | |Jap=ひょうめんのドキドキ | ||
Revision as of 22:46, June 12, 2019
Template:Levelbox Surface Tension is the sixteenth level in Donkey Kong Land III. Located in the north of Blackforest Plateau, it takes place on the banks of the river that meanders through the area. The vegetation, unlike in Donkey Kong Country 3: Dixie Kong's Double Trouble!'s river levels, is rather short and sparse, as it mostly consists of small conifers, mushrooms, and lichen.
During this level, Dixie Kong and Kiddy Kong must thread their way on the river banks, through hordes of enemies. Surface Tension is quite similar to Riverbank Riot, but it features many more baddies, making it slightly harder. Although they are likely to be very cold, since the northern area of Blackforest Plateau is occupied by taigas, the waters are infested with Kocos and Bounty Basses, along with a single Lurchin. On the banks, the Kongs encounter Buzzes, Krimps, Krumples, Bristles, and Sneeks. This wide variety of enemies forces the player to resort to different attacks because not all these baddies can be defeated the same way (for instance, Krimps can only be attacked from the back, while Bristles can only be attacked from the front; Krumples can only be defeated by Kiddy).
This level's name is a pun of a property of the surface of water.
Layout
If Kiddy and Dixie head left after beginning the level, they will meet two Buzzes and a Krimp and have access to a Bonus Barrel. To the right is a straight pathway into a river of water. Crossing the river, the apes clamber down a rigid passageway, grabbing the letter K and dodging several enemies. Soon, they make their way into another pool of water and swim across to get back on another area of land. Again, they run across a rather flat pathway while dodging enemies. They eventually move into the letter O and cross a gap to find some ledges. Dropping down on these ledges, they soon find the next pool of water. Because the river at this point is not to large, the apes are able to jump across it and hit the nearby Star Barrel.
About halfway through the level, the road becomes filled with gaps of water. The Kongs need to cross these gaps while avoiding some Buzzes and then move up a slanted pathway. At the top of this pathway, the heroes pass a few more Buzzes to find a barrel. The barrel blasts them across another abyss and to the letter N. Farther on, Dixie and Kiddy travel down a series of slanted pathways, avoiding enemies such as Krimps and Buzzes. Shortly after collecting the letter G, they can find a flagpole. If they touch the flagpole, they are taken to the next level.
Enemies
| Name | Count |
|---|---|
Krimp |
4 |
Buzz |
11 |
Knik-Knak |
4 |
Koco |
4 |
Bristles |
5 |
Krumple |
4 |
Lurchin |
1 |
Bounty Bass |
10 |
Sneek |
2 |
Items and objects
| Name | Count |
|---|---|
DK Barrel |
2 |
Bear Coin |
1 |
Steel Barrel |
2 |
Secrets
Bonus Levels
| Image | Type and description |
|---|---|

|
Bash the Baddies! After starting the level, Dixie or Kiddy should head to the left. If they sneak under two Buzzes without hitting the nearby Krimp, they can find a Bonus Barrel. It fires them into a Bonus Level where they need to bounce off of a few Knik-Knaks to cross a pool of water. If they make it to the end of the area in less than fifteen seconds after defeating every enemy, they can find a Bonus Coin. |

|
Find the Token! About halfway into the level, the heroes find the letter O over a small gap. If they drop into the area right behind the letter, they land in a hidden Bonus Barrel. Once it blasts them into the special stage, they need to run across a long pathway, avoiding Buzzes. After they reach the end of that area, they fall into a river and swim west through a wide trench. If they make it to the end of this trench undamaged in less than twenty-five seconds, they earn another Bonus Coin. |
DK Coin
| Screenshot | Location |
|---|---|

|
After the letter N, the Kongs can enter a Barrel Cannon. It blasts them to a platform with a Steel Barrel on it. If the Kongs carry this barrel down the ledge to the left, they should find a Koin with the DK Coin. It can be defeated by standing on its shield, then throwing the Steel Barrel into the nearest wall. The barrel should bounce back and hit the Koin on the side, knocking him out. This gives the Kongs his DK Coin. |
K-O-N-G Letters
| Letter | Location |
|---|---|
| To the right of the first Bristles | |
| Above a gap next to three Krumples | |
| Obtained after using a Barrel Cannon near the Koin | |
| To the right of a Buzz near the end of the level |
Gallery

Kiddy swims near some Kocos.
Dixie prepares to throw a Steel Barrel at a Krumple.
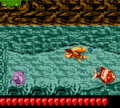
Dixie swims past a Bounty Bass to reach a Bear Coin.
The "O" letter
Dixie jumps over a Buzz.


Names in other languages
| Language | Name | Meaning |
|---|---|---|
| Japanese | ひょうめんのドキドキ Hyoumen no Doki Doki |
Heart-Pounding Surface |