Ripcurl Reef: Difference between revisions
(Per proposal) |
(check) |
||
| Line 1: | Line 1: | ||
{{more images|first bonus level & gba sprites}} | |||
{{Levelbox | {{Levelbox | ||
|image=[[File:Ripcurl Reef DKC3 GBA.png]] | |image=[[File:Ripcurl Reef DKC3 GBA.png]] | ||
|code=7 - 5 | |code=7 - 5 | ||
|world=[[Pacifica]] | |world=[[Pacifica]] | ||
|game=''[[Donkey Kong Country 3: Dixie Kong's Double Trouble!# | |game=''[[Donkey Kong Country 3: Dixie Kong's Double Trouble!#Differences in the Game Boy Advance version|Donkey Kong Country 3]]'' ([[Game Boy Advance]]) | ||
|song=Water World<br>Cavern Caprice | |song=Water World<br>Cavern Caprice | ||
|before=[[Cliffside Blast|<<]] | |before=[[Cliffside Blast|<<]] | ||
|after=[[Surf's Up|>>]] | |after=[[Surf's Up|>>]] | ||
}} | }} | ||
'''Ripcurl Reef''' is the thirty-fifth [[level]] in the [[Game Boy Advance]] remake of ''[[Donkey Kong Country 3: Dixie Kong's Double Trouble!]]'' | '''Ripcurl Reef''' is the thirty-fifth [[level]] in the [[Game Boy Advance]] remake of ''[[Donkey Kong Country 3: Dixie Kong's Double Trouble!|Donkey Kong Country 3]]'' and the fifth level of [[Pacifica]]. | ||
==Summary== | |||
Ripcurl Reef is an underwater level and is very similar to [[Gusty Glade (Donkey Kong Country 2: Diddy's Kong Quest)|Gusty Glade]] from ''[[Donkey Kong Country 2: Diddy's Kong Quest]]'', as it includes a shifting current that can sweep the [[Kong]]s around the area. [[Dixie Kong]] and [[Kiddy Kong]] must be careful while swimming or else the current could hit them into an enemy. Sometimes the current flow alternates between left and right. Near the end of the level, the current flows in the opposite direction that the Kongs must go in, but they can still bypass it. | |||
== | Ripcurl Reef features a unique green variant of [[Lurchin]]s, although they do not behave any differently from normal Lurchins. Like other underwater levels, a cavern is at the end of the level, where the [[Koin]] is located. A few regular Lurchins also appear in this area and in a [[Bonus Level]]. Other enemies in the level include [[Koco]]s and [[Bazza]]s. Some [[Bounty Bass]]es appear in the second [[Bonus Level]]. | ||
==Layout== | |||
When the level begins, the Kongs are pushed down the path by the current, floating between several oddly-colored Lurchins. Continuing through the level, the monkeys make a U turn on the coral reef and get pushed to the left by the strong current. After heading north, they pass a few Kocos and travel to the right. At this point, the reef becomes bumpier, so the currents can push the monkeys into the Lurchins around the area more easily. Once they find a pathway leading upwards, the Kongs must take it and swim through the area. They find themselves swimming along a narrow pathway as they continue, starting the head north, where they meet a few schools of the green Bazzas. After passing the barracudas, they find the letter O and be pushed to the east by a strong current. It pulls them around many Kocos, whom they must watch out for, as well as the [[Star Barrel]]. | When the level begins, the Kongs are pushed down the path by the current, floating between several oddly-colored Lurchins. Continuing through the level, the monkeys make a U turn on the coral reef and get pushed to the left by the strong current. After heading north, they pass a few Kocos and travel to the right. At this point, the reef becomes bumpier, so the currents can push the monkeys into the Lurchins around the area more easily. Once they find a pathway leading upwards, the Kongs must take it and swim through the area. They find themselves swimming along a narrow pathway as they continue, starting the head north, where they meet a few schools of the green Bazzas. After passing the barracudas, they find the letter O and be pushed to the east by a strong current. It pulls them around many Kocos, whom they must watch out for, as well as the [[Star Barrel]]. | ||
About halfway into the level, the heroes find a wide area below them infested with a school of Bazzas, swimming across the space. If the Kongs manage to pass these foes, they find a narrow passage to continue through. While they slowly hover downwards along the curvy path, another strong current push them around. Trying not to bump into the Lurchins in the perimeter of the area, they soon find the letter N below a school of Bazzas. Moving between two of the Bazzas, the apes must make their way over to a different pathway, where they find a fork in the road. If they swim upwards just a little bit, the current pushes them to the left, keeping them away from the other path. Continuing upwards, they dodge some Kocos and Lurchins through the now steady water. At the top of the area, [[Dixie Kong]] and [[Kiddy Kong]] suddenly are pushed by a strong current to the west. They must try to maneuver around some of the Lurchins around the area while uncontrollably heading through the path, until they begin to move upwards. At that point, the apes need to continue by going to the east. However, a strong current pushes them backwards in the pathway, so they need to swim as hard as possible. Slowly by surely, they make it through the current and head into a cave. Inside, they find the surface of the water, as well as a flagpole. Raising its flag ends the level. | About halfway into the level, the heroes find a wide area below them infested with a school of Bazzas, swimming across the space. If the Kongs manage to pass these foes, they find a narrow passage to continue through. While they slowly hover downwards along the curvy path, another strong current push them around. Trying not to bump into the Lurchins in the perimeter of the area, they soon find the letter N below a school of Bazzas. Moving between two of the Bazzas, the apes must make their way over to a different pathway, where they find a fork in the road. If they swim upwards just a little bit, the current pushes them to the left, keeping them away from the other path. Continuing upwards, they dodge some Kocos and Lurchins through the now steady water. At the top of the area, [[Dixie Kong]] and [[Kiddy Kong]] suddenly are pushed by a strong current to the west. They must try to maneuver around some of the Lurchins around the area while uncontrollably heading through the path, until they begin to move upwards. At that point, the apes need to continue by going to the east. However, a strong current pushes them backwards in the pathway, so they need to swim as hard as possible. Slowly by surely, they make it through the current and head into a cave. Inside, they find the surface of the water, as well as a flagpole. Raising its flag ends the level. | ||
== | ==Items and objects== | ||
=== | *[[Bear Coin]]: 2 | ||
* | *[[DK Barrel]]: 3 | ||
* | |||
===K-O-N-G Letters=== | |||
*'''K:''' Found by going above two Koco near a DK Barrel. | |||
*'''O:''' Located to the upper right corner of some Bazza enemies. | |||
*'''N:''' Underneath some Bazza near a DK Barrel. | |||
*'''G:''' Found between three Lurchin enemies and some Koco fish. | |||
===DK Coin=== | ===DK Coin=== | ||
{|class="dktable-brown" width=70% | |||
|- | |||
!Screenshot | |||
!Location | |||
|- | |||
|align=center|[[File:Ripcurl Reef GBA Koin.png]] | |||
|In the cavern at the end of the level, the Kongs must skip the Level Flag and pick up a Steel Barrel to the right. Dixie or Kiddy must throw the Steel Barrel from either on top of Koin or just left of the small gap dividing the Level Flag from Koin. This causes the Steel Barrel to bounce off the wall to the right and roll into Koin from behind. The Koin is defeated, and the Kongs obtain the [[DK Coin]]. | |||
|} | |||
==Bonus Levels== | |||
{|class="dktable-brown" width=70% | |||
|- | |||
!Image | |||
!Type and description | |||
|- | |||
| | |||
|'''''Collect 25 Stars!'''''<br>Shortly after starting the level, Dixie and Kiddy reach a fork in the path. Rather than taking the main, north path, the Kongs must continue east and go down a curved path. As they continue, Dixie and Kiddy get caught in a strong current and must avoid swimming into the Lurchins. After going down the path, the Kongs go in a small area with the [[Bonus Barrel]] to the right. | |||
In the Bonus Level, the Kongs have 40 seconds to swim through the water and collect 25 [[Star (Donkey Kong Country series)|star]]s. They must avoid Lurchins as they collect stars along the way. Once Dixie and Kiddy collect every star, the [[Bonus Coin]] appears in the center for them to collect. | |||
|- | |||
|[[File:Ripcurl Reef GBA Bonus Level 2.png]] | |||
|'''''Find the Coin!'''''<br>After the letter G, the Kongs must continue upward and take a path to the right. They must continue down and enter into a Bonus Barrel. In the Bonus Level, Dixie and Kiddy have 20 seconds to collect the Bonus Coin at the other side of the Bonus Level. They must avoid a few Bounty Basses along the way. | |||
|} | |||
==Gallery== | |||
<gallery> | |||
Ripcurl Reef GBA green Lurchins.png|Dixie and Kiddy swim through a passage with some green Lurchins | |||
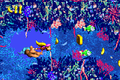
Ripcurl Reef GBA first Bonus Barrel.png|The Kongs find the first Bonus Barrel | |||
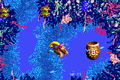
Ripcurl Reef GBA Letter K.png|Dixie and Kiddy swim to the letter K | |||
</gallery> | |||
==Names in other languages== | ==Names in other languages== | ||
Revision as of 17:54, October 3, 2019
It has been requested that more images be uploaded for this article. Remove this notice only after the additional image(s) have been added. Reason: first bonus level & gba sprites
Template:Levelbox Ripcurl Reef is the thirty-fifth level in the Game Boy Advance remake of Donkey Kong Country 3 and the fifth level of Pacifica.
Summary
Ripcurl Reef is an underwater level and is very similar to Gusty Glade from Donkey Kong Country 2: Diddy's Kong Quest, as it includes a shifting current that can sweep the Kongs around the area. Dixie Kong and Kiddy Kong must be careful while swimming or else the current could hit them into an enemy. Sometimes the current flow alternates between left and right. Near the end of the level, the current flows in the opposite direction that the Kongs must go in, but they can still bypass it.
Ripcurl Reef features a unique green variant of Lurchins, although they do not behave any differently from normal Lurchins. Like other underwater levels, a cavern is at the end of the level, where the Koin is located. A few regular Lurchins also appear in this area and in a Bonus Level. Other enemies in the level include Kocos and Bazzas. Some Bounty Basses appear in the second Bonus Level.
Layout
When the level begins, the Kongs are pushed down the path by the current, floating between several oddly-colored Lurchins. Continuing through the level, the monkeys make a U turn on the coral reef and get pushed to the left by the strong current. After heading north, they pass a few Kocos and travel to the right. At this point, the reef becomes bumpier, so the currents can push the monkeys into the Lurchins around the area more easily. Once they find a pathway leading upwards, the Kongs must take it and swim through the area. They find themselves swimming along a narrow pathway as they continue, starting the head north, where they meet a few schools of the green Bazzas. After passing the barracudas, they find the letter O and be pushed to the east by a strong current. It pulls them around many Kocos, whom they must watch out for, as well as the Star Barrel.
About halfway into the level, the heroes find a wide area below them infested with a school of Bazzas, swimming across the space. If the Kongs manage to pass these foes, they find a narrow passage to continue through. While they slowly hover downwards along the curvy path, another strong current push them around. Trying not to bump into the Lurchins in the perimeter of the area, they soon find the letter N below a school of Bazzas. Moving between two of the Bazzas, the apes must make their way over to a different pathway, where they find a fork in the road. If they swim upwards just a little bit, the current pushes them to the left, keeping them away from the other path. Continuing upwards, they dodge some Kocos and Lurchins through the now steady water. At the top of the area, Dixie Kong and Kiddy Kong suddenly are pushed by a strong current to the west. They must try to maneuver around some of the Lurchins around the area while uncontrollably heading through the path, until they begin to move upwards. At that point, the apes need to continue by going to the east. However, a strong current pushes them backwards in the pathway, so they need to swim as hard as possible. Slowly by surely, they make it through the current and head into a cave. Inside, they find the surface of the water, as well as a flagpole. Raising its flag ends the level.
Items and objects
K-O-N-G Letters
- K: Found by going above two Koco near a DK Barrel.
- O: Located to the upper right corner of some Bazza enemies.
- N: Underneath some Bazza near a DK Barrel.
- G: Found between three Lurchin enemies and some Koco fish.
DK Coin
| Screenshot | Location |
|---|---|

|
In the cavern at the end of the level, the Kongs must skip the Level Flag and pick up a Steel Barrel to the right. Dixie or Kiddy must throw the Steel Barrel from either on top of Koin or just left of the small gap dividing the Level Flag from Koin. This causes the Steel Barrel to bounce off the wall to the right and roll into Koin from behind. The Koin is defeated, and the Kongs obtain the DK Coin. |
Bonus Levels
| Image | Type and description |
|---|---|
| Collect 25 Stars! Shortly after starting the level, Dixie and Kiddy reach a fork in the path. Rather than taking the main, north path, the Kongs must continue east and go down a curved path. As they continue, Dixie and Kiddy get caught in a strong current and must avoid swimming into the Lurchins. After going down the path, the Kongs go in a small area with the Bonus Barrel to the right. In the Bonus Level, the Kongs have 40 seconds to swim through the water and collect 25 stars. They must avoid Lurchins as they collect stars along the way. Once Dixie and Kiddy collect every star, the Bonus Coin appears in the center for them to collect. | |

|
Find the Coin! After the letter G, the Kongs must continue upward and take a path to the right. They must continue down and enter into a Bonus Barrel. In the Bonus Level, Dixie and Kiddy have 20 seconds to collect the Bonus Coin at the other side of the Bonus Level. They must avoid a few Bounty Basses along the way. |
Gallery
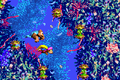
Dixie and Kiddy swim through a passage with some green Lurchins
The Kongs find the first Bonus Barrel
Dixie and Kiddy swim to the letter K


Names in other languages
| Language | Name | Meaning |
|---|---|---|
| Japanese | サンゴのもり Sango no mori |
Coral Forest |
| Italian | Mare in Poppa |
Stern Sea |
| Spanish | Arrecife Para Surf |
Surfing Reef |