Seabed Shanty: Difference between revisions
mNo edit summary |
(cleanup & summarizing) |
||
| Line 6: | Line 6: | ||
|after=[[Ford Knocks|>>]] | |after=[[Ford Knocks|>>]] | ||
}} | }} | ||
'''Seabed Shanty''' is the second level | '''Seabed Shanty''' is the second level of ''[[Donkey Kong Land III]]'' and of the first world, [[Cape Codswallop]]. It is located at the southeast corner of the world, and it takes place in the arm of the sea that separates the previous level, [[Red Wharf]], from the rest of the world. | ||
== Summary == | |||
[[File:Seabed Shanty shortcut.png|thumb|left|160px|The shortcut required to complete the level in Time Attack mode]] | |||
Seabed Shanty is the first underwater level in the game. It involves [[Dixie Kong]] and [[Kiddy Kong]] having to swim between the large coral reefs, avoiding the numerous [[Koco]]s, [[Bounty Bass]]es and [[Bazza]]s. Many [[Lurchin]]s are in the second half of the level. There are three [[Animal Barrel]]s of [[Enguarde the Swordfish|Enguarde]], each in a different part of the level. The [[Kong]]s can optionally transform into Enguarde, who can defeat the enemies in his path. The different paths of Seabed Shanty make it like a maze, although there are arrow-shaped [[banana]]s that point out the direction that the Kongs or Enguarde must go. Seabed Shanty, along with later underwater levels, are the only levels where the [[DK Coin]] is acquired without defeating a [[Koin]]. | |||
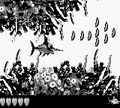
Seabed Shanty is one of the | Seabed Shanty is one of the twelve playable levels in the unlockable [[Donkey Kong Land III#Time Attack Mode|Time Attack]] mode, where it is renamed "Coral", after its level theme. In the mode, Dixie and Kiddy are required to reach the [[Level Flag]] within one minute and twenty seconds. The Kongs cannot swim fast enough to reach the Level Flag on time, so in order to reach it, the Kongs must take a hidden shortcut near the end of the level, where the Kongs swim up a long, slanted pathway of coral. If the Kongs swim into the wall, they are caught in a [[Barrel Cannon]], which blasts them between more Barrel Cannons until they finally reach the Level Flag. | ||
{{br}} | |||
== | ==Layout== | ||
The level begins with the monkeys swimming through a wide, underwater path. If they curve around the bend, they can find an [[Animal Barrel]] with Enguarde in it, though it is completely optional to get him. Traveling through more of the level, the heroes follow several arrows, directing them to an area occupied by some Bazzas. Avoiding the swift enemies, they continue along the path, making some twists and turns and occasionally meeting Bazzas. Hovering downwards from a group of Bazzas, the monkeys move past more fish foes and travel to the left at the bottom of the area. Soon, they pass a [[No Animal Sign]], which turns Enguarde back into the Kongs if he was used. Farther into the level, the apes swim along the long passageways and soon find the letter O, as well as the [[Star Barrel]]. | The level begins with the monkeys swimming through a wide, underwater path. If they curve around the bend, they can find an [[Animal Barrel]] with Enguarde in it, though it is completely optional to get him. Traveling through more of the level, the heroes follow several arrows, directing them to an area occupied by some Bazzas. Avoiding the swift enemies, they continue along the path, making some twists and turns and occasionally meeting Bazzas. Hovering downwards from a group of Bazzas, the monkeys move past more fish foes and travel to the left at the bottom of the area. Soon, they pass a [[No Animal Sign]], which turns Enguarde back into the Kongs if he was used. Farther into the level, the apes swim along the long passageways and soon find the letter O, as well as the [[Star Barrel]]. | ||
About halfway through the level, the heroes head downward through a long pathway. With the help of some banana trails, they soon reach the letter N. After they swim downwards a little more, they have to go east and swim through a slanted pathway around many Lurchins. Going north from here, they meet some Bazzas and then another Animal Barrel. Just as before, the Kongs can optionally turn into Enguarde. Continuing through the stage, the apes encounter more Lurchins and then have to travel downwards past the letter G. Moving down a long, wide pathway, they have to avoid even more enemies, and then follow an arrow to the east. If they swim through this pathway, they find a flagpole. Touching the flagpole ends the level. | About halfway through the level, the heroes head downward through a long pathway. With the help of some banana trails, they soon reach the letter N. After they swim downwards a little more, they have to go east and swim through a slanted pathway around many Lurchins. Going north from here, they meet some Bazzas and then another Animal Barrel. Just as before, the Kongs can optionally turn into Enguarde. Continuing through the stage, the apes encounter more Lurchins and then have to travel downwards past the letter G. Moving down a long, wide pathway, they have to avoid even more enemies, and then follow an arrow to the east. If they swim through this pathway, they find a flagpole. Touching the flagpole ends the level. | ||
== | ==Enemies== | ||
*[[Bazza]] channels: 8 (each spawn an indefinite number of Bazzas) | |||
* | *[[Bounty Bass]]: 7 (5 in the main level, 2 in a Bonus Level) | ||
* | *[[Koco]]: 17 (14 in the main level, 3 in a Bonus Level) | ||
*[[Lurchin]]: 18 | |||
==Items and objects== | |||
*[[Bear Coin]]s: 3 | |||
*[[DK Barrel]]s: 6 | |||
===K-O-N-G Letters=== | |||
{|class="wikitable" | |||
!Image | |||
!Location | |||
|- | |||
|[[File:Seabed Shanty GB letter K.png]] | |||
|Below an oval-shaped coral reef | |||
|- | |||
|[[File:Seabed Shanty GB letter O.png]] | |||
|Found while traveling normally through the level | |||
|- | |||
|[[File:Seabed Shanty GB letter N.png]] | |||
|To the right of an oval coral reef | |||
|- | |||
|[[File:Seabed Shanty GB letter G.png]] | |||
|Near a group of bananas shaping a down arrow | |||
|} | |||
===DK Coin=== | ===DK Coin=== | ||
{|class="wikitable" | |||
!Image | |||
!Location | |||
|- | |||
|[[File:Seabed Shanty GB DK Coin.png]] | |||
|Near the end of the level, there is a trail of bananas pointing downward. Instead of taking the main path, the Kongs or Enguarde must instead swim upwards while moving around the coral reefs and enemies. The [[DK Coin]] is located in the top corner of the coral reef. | |||
|} | |||
==Bonus Levels== | |||
{{more images|section=yes}} | |||
{|class="wikitable" | |||
!Image | |||
!Type and description | |||
|- | |||
| | |||
|'''Bash the Baddies!'''<br>When the Kongs find the letter N, they must swim down to the left until they reach the bottom of the area. They must pass two Lurchins in a small area to reach the nearby [[Bonus Barrel]]. In the [[Bonus Level]], the Kongs transform into Enguarde from an Animal Barrel. Enguarde has thirty seconds to swim around and defeat three Kocos and two Bounty Basses. After defeating every enemy, the [[Bonus Coin]] appears just below the starting point for Enguarde to collect. | |||
|- | |||
| | |||
|'''Collect the Stars!'''<br>After the letter G, the Kongs or Enguarde must swim through a long, wide pathway between the corals. They can find a nearby group of bananas shaping a right arrow. Instead of going in the specified direction, the Kongs or Enguarde must ignore it and swim below into a small oval-shaped area with the second Bonus Barrel. In the Bonus Level, the Kongs or Enguarde have 30 seconds to swim through a large and collect 45 [[Star (Donkey Kong Country series)|star]]s. After the Kongs or Enguarde collect every star, the Bonus Coin appears at the bottom-center of the area. | |||
|} | |||
==Gallery== | |||
<gallery> | |||
Seabed Shanty GB No Animal Sign.png|Enguarde near a No Animal Sign to the left | |||
Seabed Shanty GB banana right arrow.png|Enguarde at a group of bananas shaping a right arrow | |||
Seabed Shanty GB Level Flag.png|Enguarde reaches the Level Flag | |||
</gallery> | |||
==Names in other languages== | ==Names in other languages== | ||
| Line 31: | Line 82: | ||
|JapM=Bazza Lake | |JapM=Bazza Lake | ||
}} | }} | ||
{{DKL3}} | {{DKL3}} | ||
Revision as of 16:55, October 7, 2019
Template:Levelbox Seabed Shanty is the second level of Donkey Kong Land III and of the first world, Cape Codswallop. It is located at the southeast corner of the world, and it takes place in the arm of the sea that separates the previous level, Red Wharf, from the rest of the world.
Summary

Seabed Shanty is the first underwater level in the game. It involves Dixie Kong and Kiddy Kong having to swim between the large coral reefs, avoiding the numerous Kocos, Bounty Basses and Bazzas. Many Lurchins are in the second half of the level. There are three Animal Barrels of Enguarde, each in a different part of the level. The Kongs can optionally transform into Enguarde, who can defeat the enemies in his path. The different paths of Seabed Shanty make it like a maze, although there are arrow-shaped bananas that point out the direction that the Kongs or Enguarde must go. Seabed Shanty, along with later underwater levels, are the only levels where the DK Coin is acquired without defeating a Koin.
Seabed Shanty is one of the twelve playable levels in the unlockable Time Attack mode, where it is renamed "Coral", after its level theme. In the mode, Dixie and Kiddy are required to reach the Level Flag within one minute and twenty seconds. The Kongs cannot swim fast enough to reach the Level Flag on time, so in order to reach it, the Kongs must take a hidden shortcut near the end of the level, where the Kongs swim up a long, slanted pathway of coral. If the Kongs swim into the wall, they are caught in a Barrel Cannon, which blasts them between more Barrel Cannons until they finally reach the Level Flag.
Layout
The level begins with the monkeys swimming through a wide, underwater path. If they curve around the bend, they can find an Animal Barrel with Enguarde in it, though it is completely optional to get him. Traveling through more of the level, the heroes follow several arrows, directing them to an area occupied by some Bazzas. Avoiding the swift enemies, they continue along the path, making some twists and turns and occasionally meeting Bazzas. Hovering downwards from a group of Bazzas, the monkeys move past more fish foes and travel to the left at the bottom of the area. Soon, they pass a No Animal Sign, which turns Enguarde back into the Kongs if he was used. Farther into the level, the apes swim along the long passageways and soon find the letter O, as well as the Star Barrel.
About halfway through the level, the heroes head downward through a long pathway. With the help of some banana trails, they soon reach the letter N. After they swim downwards a little more, they have to go east and swim through a slanted pathway around many Lurchins. Going north from here, they meet some Bazzas and then another Animal Barrel. Just as before, the Kongs can optionally turn into Enguarde. Continuing through the stage, the apes encounter more Lurchins and then have to travel downwards past the letter G. Moving down a long, wide pathway, they have to avoid even more enemies, and then follow an arrow to the east. If they swim through this pathway, they find a flagpole. Touching the flagpole ends the level.
Enemies
- Bazza channels: 8 (each spawn an indefinite number of Bazzas)
- Bounty Bass: 7 (5 in the main level, 2 in a Bonus Level)
- Koco: 17 (14 in the main level, 3 in a Bonus Level)
- Lurchin: 18
Items and objects
- Bear Coins: 3
- DK Barrels: 6
K-O-N-G Letters
| Image | Location |
|---|---|

|
Below an oval-shaped coral reef |

|
Found while traveling normally through the level |

|
To the right of an oval coral reef |

|
Near a group of bananas shaping a down arrow |
DK Coin
| Image | Location |
|---|---|

|
Near the end of the level, there is a trail of bananas pointing downward. Instead of taking the main path, the Kongs or Enguarde must instead swim upwards while moving around the coral reefs and enemies. The DK Coin is located in the top corner of the coral reef. |
Bonus Levels
It has been requested that more images be uploaded for this section. Remove this notice only after the additional image(s) have been added.
| Image | Type and description |
|---|---|
| Bash the Baddies! When the Kongs find the letter N, they must swim down to the left until they reach the bottom of the area. They must pass two Lurchins in a small area to reach the nearby Bonus Barrel. In the Bonus Level, the Kongs transform into Enguarde from an Animal Barrel. Enguarde has thirty seconds to swim around and defeat three Kocos and two Bounty Basses. After defeating every enemy, the Bonus Coin appears just below the starting point for Enguarde to collect. | |
| Collect the Stars! After the letter G, the Kongs or Enguarde must swim through a long, wide pathway between the corals. They can find a nearby group of bananas shaping a right arrow. Instead of going in the specified direction, the Kongs or Enguarde must ignore it and swim below into a small oval-shaped area with the second Bonus Barrel. In the Bonus Level, the Kongs or Enguarde have 30 seconds to swim through a large and collect 45 stars. After the Kongs or Enguarde collect every star, the Bonus Coin appears at the bottom-center of the area. |
Gallery

Enguarde near a No Animal Sign to the left
Enguarde at a group of bananas shaping a right arrow
Enguarde reaches the Level Flag


Names in other languages
| Language | Name | Meaning |
|---|---|---|
| Japanese | バッザーの湖 Bazzā no mizuumi |
Bazza Lake |