Karbine Kaos: Difference between revisions
Master R.O.B (talk | contribs) mNo edit summary |
LinkTheLefty (talk | contribs) mNo edit summary |
||
| (26 intermediate revisions by 12 users not shown) | |||
| Line 1: | Line 1: | ||
{{level | {{level infobox | ||
|image=[[File:Karbine Kaos.png|160px]] | |||
|image=[[ | |code=4-4 | ||
|code=4 - 4 | |game=''[[Donkey Kong Land III]]'' | ||
|game=''[[Donkey Kong Land III]] | |||
|before=[[Deep Reef Grief|<<]] | |before=[[Deep Reef Grief|<<]] | ||
|after=[[Simian Shimmy|>>]] | |after=[[Simian Shimmy|>>]] | ||
}} | }} | ||
'''Karbine Kaos''' is the twenty-second level in ''[[Donkey Kong Land III]]'' | '''Karbine Kaos''' is the twenty-second level in ''[[Donkey Kong Land III]]'' and the fourth level of the [[Great Ape Lakes]], where it takes place in a large factory in the eastern section, on the edge of the woods. It features several [[Karbine]]s, which debut here, and molten pits of [[lava]]. [[Dixie Kong|Dixie]] and [[Kiddy Kong|Kiddy]] can use horizontal [[rope]]s to safely climb across the lava pits while avoiding the fireballs shot out by Karbines. In the first half, the [[Kong]]s can optionally transform into [[Squitter]] from an [[Animal Barrel]]. | ||
==Layout== | |||
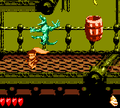
[[File:KarbineKaos-2.png|thumb|left|Dixie Kong dodging a Karbine]] | |||
The level begins with the Kongs hopping into a small gap. After defeating a few enemies, they make it into a barrel that blasts them into a long tightrope. Climbing across the rope, the Kongs meet some Karbines. The bird like enemies use their cannons to shoot the Kongs, so they need to be careful. Once they get [[KONG Letters|the letter K]] and hop off of the tightrope, the Kongs land in an [[Animal Barrel]]. This common barrel turns them into Squitter, who need to drop down to a lower level and attack a few Kobbles with his strong webs. Soon, the spider finds an area full of platform jutting out of the walls. While moving through this area, the spider is caught in a hidden barrel, which can blast him into the letter O. Farther on, Squitter passes a [[No Animal Sign]], turning him back into the Kongs. Once this is done, the Kongs head onward and jump up a small ledge. After passing a lone Bazuka, the apes jump into another gap and hit into the [[Star Barrel]]. | |||
About halfway through the level, the group makes their way up a stair-like area, beating a few enemies, such as Rekoils. Soon, Dixie and Kiddy make their way to a deep gap. If they jump into it, they progress into another area of the level. There, they should move around two small elevators and head down a few small platforms. When they reach one of the level's lowest areas, they need to travel to the east and defeat a few more enemies. Upon collecting the nearby letter N, the Kongs find themselves in a [[Blast Barrel]]. It blasts them to a high-up tightrope. On the long rope, they need to climb to the right and pass a few Karbines. At the end of the tightrope, they notice a small gap below them. Falling into the gap, they run through the stage's final area, grabbing the letter G and defeating a few enemies, including Krumples. At the end of this area, they find a flagpole. The level ends once they touch this flagpole. | |||
{{br|left}} | |||
== | ==Enemies== | ||
*[[Bazuka]] | |||
*[[Karbine]] | |||
*[[Kobble]] | |||
*[[Krumple]] | |||
*[[Re-Koil|Rekoil]] | |||
*[[Sneek]] | |||
==Items and objects== | |||
[[File:KarbineKaos-Bear.png|thumb|Squitter finds a bear coin]] | |||
The following items and object appear in the following quantities: | |||
*[[Bear coin]]: 3 | |||
*[[DK Barrel]]: 3 | |||
*[[Red Balloon|Extra Life Balloon]]: 1 | |||
===K-O-N-G Letters=== | |||
*K: East of the first Karbine | |||
*O: A Barrel Cannon will launch the heroes into the "O" Letter | |||
*N: In front of a Barrel Cannon east of some Rekoils | |||
*G: Above a Bristles near the [[Level Flag|End of Level Flag]] | |||
== | ===DK Coin=== | ||
[[File:Karbine Kaos DKL3 Koin.png|thumb|left|The location of the Koin]] | |||
After dropping down the first gap after the Star Barrel, the Kongs must go left and pass a Bazuka. A [[Iron Barrel|Steel Barrel]] is on a small platform jutting out of the wall. Dixie or Kiddy must pick up the Steel Barrel then jump down a few more platforms to go into an area below with the [[Koin]]. The Kong then has to throw the Steel Barrel at either the left or right wall, depending on which direction Koin is facing, for it to hit him in the side, defeating Koin and earning the Kongs the [[DK Coin]]. | |||
{{br|left}} | |||
== | ==Bonus Levels== | ||
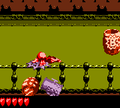
* | [[File:KarbineKaos-Bonus.png|thumb|The second Bonus Level of Karbine Kaos]] | ||
Karbine Kaos has two [[Bonus room|Bonus Levels]], listed by type: | |||
*'''Find the Token!''': When the Kongs transform into Squitter, he must continue onward until finding two Kobbles. Squitter must create web platforms to go up a small gap in the ceiling, which a few bananas are in, and jump to the right. There is a Bazuka which rapidly blasts barrels at Squitter. He must create web platforms to go above the barrels and enter a [[Bonus Barrel]] in the ceiling at a dead-end. In the [[Bonus Level]], Squitter has 30 seconds to collect the [[Bonus Coin (Donkey Kong franchise)|Bonus Coin]] on the other side. He must create web platforms to cross a wide gap while avoiding three Buzzes along the way. Squitter must avoid falling down into tubs of molten lava beneath the gap. The Bonus Coin is on a platform to the right. | |||
*'''Collect the Stars!''': Next to the letter N, the Kongs must enter a Barrel Cannon that blasts them up to a long tightrope. They must climb left past two Karbines and jump into a Bonus Barrel at the end. In the Bonus Level, the Kongs have 20 seconds to collect nine [[star (Donkey Kong franchise)|star]]s. The stars are between rotatable Barrel Cannons, and the Kongs can collect the stars by blasting over a molten lava pit. The last Barrel Cannon blasts the Kongs down to a platform, where the Bonus Coin appears after they have collected every star. | |||
{{br}} | |||
== | ==Gallery== | ||
<gallery> | |||
Karbine Kaos DKL3 Kobble.png|Dixie defeats a Kobble | |||
Karbine Kaos DKL3 first Bonus Barrel.png|Squitter goes to the first Bonus Barrel | |||
</gallery> | |||
== Names in | ==Names in other languages== | ||
{{ | {{foreign names | ||
|Jap= | |Jap=ファイアーボール カービン | ||
|JapR=Faiābōru Kābin | |JapR=Faiābōru Kābin | ||
|JapM=Fireball Karbine | |JapM=Fireball Karbine | ||
}} | }} | ||
{{DKL3}} | {{DKL3}} | ||
[[Category:Donkey Kong | [[Category:Donkey Kong Land III levels]] | ||
[[Category:Factories]] | |||
[[Category:Northern Kremisphere]] | [[Category:Northern Kremisphere]] | ||
Latest revision as of 21:26, January 2, 2024
| Level | |
|---|---|
| Karbine Kaos | |

| |
| Level code | 4-4 |
| Game | Donkey Kong Land III |
| << Directory of levels >> | |
Karbine Kaos is the twenty-second level in Donkey Kong Land III and the fourth level of the Great Ape Lakes, where it takes place in a large factory in the eastern section, on the edge of the woods. It features several Karbines, which debut here, and molten pits of lava. Dixie and Kiddy can use horizontal ropes to safely climb across the lava pits while avoiding the fireballs shot out by Karbines. In the first half, the Kongs can optionally transform into Squitter from an Animal Barrel.
Layout[edit]

The level begins with the Kongs hopping into a small gap. After defeating a few enemies, they make it into a barrel that blasts them into a long tightrope. Climbing across the rope, the Kongs meet some Karbines. The bird like enemies use their cannons to shoot the Kongs, so they need to be careful. Once they get the letter K and hop off of the tightrope, the Kongs land in an Animal Barrel. This common barrel turns them into Squitter, who need to drop down to a lower level and attack a few Kobbles with his strong webs. Soon, the spider finds an area full of platform jutting out of the walls. While moving through this area, the spider is caught in a hidden barrel, which can blast him into the letter O. Farther on, Squitter passes a No Animal Sign, turning him back into the Kongs. Once this is done, the Kongs head onward and jump up a small ledge. After passing a lone Bazuka, the apes jump into another gap and hit into the Star Barrel.
About halfway through the level, the group makes their way up a stair-like area, beating a few enemies, such as Rekoils. Soon, Dixie and Kiddy make their way to a deep gap. If they jump into it, they progress into another area of the level. There, they should move around two small elevators and head down a few small platforms. When they reach one of the level's lowest areas, they need to travel to the east and defeat a few more enemies. Upon collecting the nearby letter N, the Kongs find themselves in a Blast Barrel. It blasts them to a high-up tightrope. On the long rope, they need to climb to the right and pass a few Karbines. At the end of the tightrope, they notice a small gap below them. Falling into the gap, they run through the stage's final area, grabbing the letter G and defeating a few enemies, including Krumples. At the end of this area, they find a flagpole. The level ends once they touch this flagpole.
Enemies[edit]
Items and objects[edit]

The following items and object appear in the following quantities:
- Bear coin: 3
- DK Barrel: 3
- Extra Life Balloon: 1
K-O-N-G Letters[edit]
- K: East of the first Karbine
- O: A Barrel Cannon will launch the heroes into the "O" Letter
- N: In front of a Barrel Cannon east of some Rekoils
- G: Above a Bristles near the End of Level Flag
DK Coin[edit]

After dropping down the first gap after the Star Barrel, the Kongs must go left and pass a Bazuka. A Steel Barrel is on a small platform jutting out of the wall. Dixie or Kiddy must pick up the Steel Barrel then jump down a few more platforms to go into an area below with the Koin. The Kong then has to throw the Steel Barrel at either the left or right wall, depending on which direction Koin is facing, for it to hit him in the side, defeating Koin and earning the Kongs the DK Coin.
Bonus Levels[edit]

Karbine Kaos has two Bonus Levels, listed by type:
- Find the Token!: When the Kongs transform into Squitter, he must continue onward until finding two Kobbles. Squitter must create web platforms to go up a small gap in the ceiling, which a few bananas are in, and jump to the right. There is a Bazuka which rapidly blasts barrels at Squitter. He must create web platforms to go above the barrels and enter a Bonus Barrel in the ceiling at a dead-end. In the Bonus Level, Squitter has 30 seconds to collect the Bonus Coin on the other side. He must create web platforms to cross a wide gap while avoiding three Buzzes along the way. Squitter must avoid falling down into tubs of molten lava beneath the gap. The Bonus Coin is on a platform to the right.
- Collect the Stars!: Next to the letter N, the Kongs must enter a Barrel Cannon that blasts them up to a long tightrope. They must climb left past two Karbines and jump into a Bonus Barrel at the end. In the Bonus Level, the Kongs have 20 seconds to collect nine stars. The stars are between rotatable Barrel Cannons, and the Kongs can collect the stars by blasting over a molten lava pit. The last Barrel Cannon blasts the Kongs down to a platform, where the Bonus Coin appears after they have collected every star.
Gallery[edit]
Dixie defeats a Kobble
Squitter goes to the first Bonus Barrel


Names in other languages[edit]
| Language | Name | Meaning |
|---|---|---|
| Japanese | ファイアーボール カービン Faiābōru Kābin |
Fireball Karbine |