Deep Reef Grief: Difference between revisions
m (Robot: Changing template: Foreignname) |
LinkTheLefty (talk | contribs) mNo edit summary |
||
| (16 intermediate revisions by 10 users not shown) | |||
| Line 1: | Line 1: | ||
{{level | {{level infobox | ||
|image=[[File:Deep Reef Grief.png]] | |||
|image=[[File:Deep Reef Grief.png | |code=4-3 | ||
|code=4 - 3 | |game=''[[Donkey Kong Land III]]'' | ||
|game=''[[Donkey Kong Land III]] | |||
|before=[[Footloose Falls|<<]] | |before=[[Footloose Falls|<<]] | ||
|after=[[Karbine Kaos|>>]] | |after=[[Karbine Kaos|>>]] | ||
}} | }} | ||
'''Deep Reef Grief''' is the twenty-first level | '''Deep Reef Grief''' is the twenty-first level of ''[[Donkey Kong Land III]]'' and the third level of [[Great Ape Lakes]]. It takes place in a coral reef deep underwater, where [[Dixie Kong]] and [[Kiddy Kong]] must swim through a network of narrow passages, between massive coral reefs, while avoiding aquatic enemies along the way. Like other underwater levels, there are forks in the path leading to things such as [[Bonus Barrel]]s or the level's [[DK Coin]]. After the [[Star Barrel]], the Kongs can enter an [[Animal Barrel]] to transform into [[Enguarde]] for the rest of the level. | ||
==Layout== | |||
At the beginning of the level, the heroes begin their journey by swimming between the plants and corals around the area. After passing a few Bazzas, they find [[KONG Letters|the letter K]] and have to head on through the bending pathway, passing a few more enemies. Once the monkeys make their way through an upward, Lurchin-infested pathway, they start to float downwards to find the letter O. After they get this, they continue through the area and have to dodge several Lurchins. The pathway twists and turns throughout even more of the level, and the Kongs eventually meet some more Kocos and Bazzas as they move along the narrow areas. Avoiding numerous enemies, the heroes soon curve into a downwards pathway and find the [[Star Barrel]]. | |||
About halfway through the level, the Kongs make their way to an [[Animal Barrel]]. Upon entering this commonly found barrel, they turn into Enguarde. Enguarde should swim through the remaining portion of the level after this and travel between the narrow path of coral. With the area being full of sharp turns and sharp Lurchins, the swordfish's travels is not easy. After passing a school of Bazzas, the fish makes his way west to a [[No Animal Sign]], turning him back into the Kongs. At this point, the group should enter a large, open area full of many enemies. Eventually, they continue along another narrow path and have to avoid several more schools of Bazzas. They soon come up to the letter G. From there, they end up swimming through more of the narrow pathway, until they hover south and see a flagpole. After touching the flagpole, the level ends. | |||
==Enemies== | |||
*[[Bazza]] | |||
*[[Bounty Bass]] | |||
*[[Koco]] | |||
*[[Lurchin]] | |||
== | ==Items and objects== | ||
The following items and objects appear in the following quantities: | |||
*[[Animal Barrel]]: 1 | |||
*[[Bear coin]]s: 1 | |||
*[[DK Barrel]]s: 4 | |||
===K-O-N-G Letters=== | |||
*K: Underneath the first Bazza channel | |||
*O: Near a Koco and Lurchin | |||
*N: West of two Koco and Lurchin | |||
*G: On the path of a Bazza trail | |||
===DK Coin=== | |||
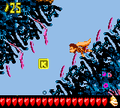
[[File:DeepReefGrief-Coin.png|thumb|The location of the DK Coin]] | |||
Like the other underwater levels, the DK Coin appears by itself without Koin. Right after the letter O, the Kongs must swim along the pathway until they find a group of bananas forming an arrow. If they swim right from there and pass a Lurchin, they enter an area with some Lurchins surrounding the [[DK Coin]]. | |||
{{br}} | |||
== | ==Bonus Levels== | ||
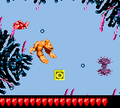
[[File:Deep Reef Grief DKL3 Bonus Level 1.png|thumb|The first Bonus Level]] | |||
*Where the letter O can be found, the | Deep Reef Grief has two [[Bonus room|Bonus Level]]s, listed by type: | ||
*Shortly after the letter N, the Kongs find an arrow pointing to the left. They | *'''Collect the Stars!''': Where the letter O can be found, the Kongs must swim right until coming up to a [[Bonus Barrel]], which is between two Lurchins. They must swim around them and enter the Bonus Barrel. In the [[Bonus Level]], the Kongs have 30 seconds to collect 32 [[star (Donkey Kong franchise)|star]]s, by swimming along the perimeter of the area. All of the stars are in groups of three except the last two stars in the center. After collecting the stars, Dixie and Kiddy can get the [[Bonus Coin (Donkey Kong franchise)|Bonus Coin]] at the southeast of the middle area. | ||
*'''Find the Token!''': Shortly after the letter N, the Kongs find an arrow pointing to the left. They must ignore it and pass few Bazzas to soon come across the Bonus Barrel. In the Bonus Level, the Kongs have 40 seconds to swim through a long, curvy area and collect the Bonus Coin at the end, while avoiding enemies along the way. | |||
== | ==Gallery== | ||
<gallery> | |||
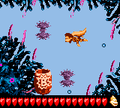
DeepReefGrief-K.png|The letter K | |||
DeepReefGrief-O.png|The letter O | |||
DeepReefGrief-BB.png|The first Bonus Barrel | |||
Deep Reef Grief DKL3 Enguarde.png|Enguarde swims between two Lurchins | |||
DeepReefGrief-G.png|The letter G | |||
</gallery> | |||
==Names in other languages== | ==Names in other languages== | ||
{{foreign names | {{foreign names | ||
|Jap= | |Jap=湖のめいろ | ||
|JapR=Mizuumi no Meiro | |JapR=Mizuumi no Meiro | ||
|JapM=Maze | |JapM=Lake Maze | ||
}} | }} | ||
{{DKL3}} | {{DKL3}} | ||
[[Category: | [[Category:Aquatic areas]] | ||
[[Category:Northern Kremisphere]] | [[Category:Northern Kremisphere]] | ||
[[Category: | [[Category:Donkey Kong Land III levels]] | ||
Latest revision as of 21:26, January 2, 2024
| Level | |
|---|---|
| Deep Reef Grief | |

| |
| Level code | 4-3 |
| Game | Donkey Kong Land III |
| << Directory of levels >> | |
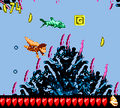
Deep Reef Grief is the twenty-first level of Donkey Kong Land III and the third level of Great Ape Lakes. It takes place in a coral reef deep underwater, where Dixie Kong and Kiddy Kong must swim through a network of narrow passages, between massive coral reefs, while avoiding aquatic enemies along the way. Like other underwater levels, there are forks in the path leading to things such as Bonus Barrels or the level's DK Coin. After the Star Barrel, the Kongs can enter an Animal Barrel to transform into Enguarde for the rest of the level.
Layout[edit]
At the beginning of the level, the heroes begin their journey by swimming between the plants and corals around the area. After passing a few Bazzas, they find the letter K and have to head on through the bending pathway, passing a few more enemies. Once the monkeys make their way through an upward, Lurchin-infested pathway, they start to float downwards to find the letter O. After they get this, they continue through the area and have to dodge several Lurchins. The pathway twists and turns throughout even more of the level, and the Kongs eventually meet some more Kocos and Bazzas as they move along the narrow areas. Avoiding numerous enemies, the heroes soon curve into a downwards pathway and find the Star Barrel.
About halfway through the level, the Kongs make their way to an Animal Barrel. Upon entering this commonly found barrel, they turn into Enguarde. Enguarde should swim through the remaining portion of the level after this and travel between the narrow path of coral. With the area being full of sharp turns and sharp Lurchins, the swordfish's travels is not easy. After passing a school of Bazzas, the fish makes his way west to a No Animal Sign, turning him back into the Kongs. At this point, the group should enter a large, open area full of many enemies. Eventually, they continue along another narrow path and have to avoid several more schools of Bazzas. They soon come up to the letter G. From there, they end up swimming through more of the narrow pathway, until they hover south and see a flagpole. After touching the flagpole, the level ends.
Enemies[edit]
Items and objects[edit]
The following items and objects appear in the following quantities:
- Animal Barrel: 1
- Bear coins: 1
- DK Barrels: 4
K-O-N-G Letters[edit]
- K: Underneath the first Bazza channel
- O: Near a Koco and Lurchin
- N: West of two Koco and Lurchin
- G: On the path of a Bazza trail
DK Coin[edit]

Like the other underwater levels, the DK Coin appears by itself without Koin. Right after the letter O, the Kongs must swim along the pathway until they find a group of bananas forming an arrow. If they swim right from there and pass a Lurchin, they enter an area with some Lurchins surrounding the DK Coin.
Bonus Levels[edit]

Deep Reef Grief has two Bonus Levels, listed by type:
- Collect the Stars!: Where the letter O can be found, the Kongs must swim right until coming up to a Bonus Barrel, which is between two Lurchins. They must swim around them and enter the Bonus Barrel. In the Bonus Level, the Kongs have 30 seconds to collect 32 stars, by swimming along the perimeter of the area. All of the stars are in groups of three except the last two stars in the center. After collecting the stars, Dixie and Kiddy can get the Bonus Coin at the southeast of the middle area.
- Find the Token!: Shortly after the letter N, the Kongs find an arrow pointing to the left. They must ignore it and pass few Bazzas to soon come across the Bonus Barrel. In the Bonus Level, the Kongs have 40 seconds to swim through a long, curvy area and collect the Bonus Coin at the end, while avoiding enemies along the way.
Gallery[edit]
The letter K
The letter O
The first Bonus Barrel
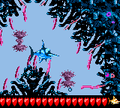
Enguarde swims between two Lurchins
The letter G


Names in other languages[edit]
| Language | Name | Meaning |
|---|---|---|
| Japanese | 湖のめいろ Mizuumi no Meiro |
Lake Maze |