Torchlight Trouble: Difference between revisions
Dinoshi 64 (talk | contribs) (Per proposal.) Tag: Mobile edit |
No edit summary |
||
| Line 1: | Line 1: | ||
{{DKC level infobox | {{DKC level infobox | ||
|image=[[File:Torchlight Trouble SNES 3.png]] | |image={{tabber|title1=Original|content1=[[File:Torchlight Trouble SNES 3.png]]|title2=Game Boy Color|content2=[[File:Torchlight Trouble GBC.png]]<br>Location of the letter O in the Game Boy Color version|title3=Game Boy Advance|content3=[[File:TorchlightTrouble-GBA-2.png]]<br>Donkey Kong jumps to a Krusha walking between an exit sign and a Mincer in the Game Boy Advance version}} | ||
|code=4 - 5 (SNES & GBC)<br>4 - 6 (GBA) | |code=4 - 5 (SNES & GBC)<br>4 - 6 (GBA) | ||
|game=''[[Donkey Kong Country]] | |game=''[[Donkey Kong Country]] | ||
| Line 9: | Line 9: | ||
|track=Cave Dweller Concert | |track=Cave Dweller Concert | ||
}} | }} | ||
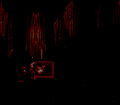
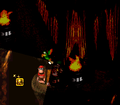
'''Torchlight Trouble''', also spelled '''Torch Light Trouble''',<ref>''Nintendo Magazine System'' (UK) issue 28, page 58.</ref> is the twenty-first [[level]] of ''[[Donkey Kong Country]]'' and the fifth level of [[Gorilla Glacier]]. In the [[Game Boy Advance]] | '''Torchlight Trouble''', also spelled '''Torch Light Trouble''',<ref>''Nintendo Magazine System'' (UK) issue 28, page 58.</ref> is the twenty-first [[level]] of ''[[Donkey Kong Country]]'' and the fifth level of [[Gorilla Glacier]]. In the [[Donkey Kong Country (Game Boy Advance)|Game Boy Advance version]], Torchlight Trouble was instead made sixth and last regular level of Gorilla Glacier, as it swapped places with [[Rope Bridge Rumble]], making it the twenty-second level overall. Torchlight Trouble takes place in a dark cavern, and it is the only level with [[Squawks]], whose [[animal crate]] is at the start (though the Game Boy Advance version has him appear the moment the level begins). Upon being freed, Squawks follows behind the Kongs, holding a flashlight to light the path ahead. Even if the Kongs did not open the Squawks Crate, Squawks still appears with his flashlight if the Kongs either reach the [[Star Barrel|Continue Barrel]] and lose a life afterward or after they leave a Bonus Level. | ||
Torchlight Trouble takes place in a dark cavern | |||
==Layout== | ==Layout== | ||
| Line 23: | Line 18: | ||
{{br}} | {{br}} | ||
==Enemies and obstacles== | ==Enemies and obstacles== | ||
The following enemies appear in the following quantities: | |||
<gallery> | |||
Klaptrap DKC.png|[[Klaptrap]] (1, Bonus Level only) | |||
Klump DKC sprite.png|[[Klump]] (5) | |||
Krusha_DKC_blue.png|[[Krusha]] (6) | |||
Mincer.png|[[Mincer]] (9) | |||
Oil Drum DKC.png|[[Oil drum]] (11) | |||
</gallery> | |||
=== | ==Items and objects== | ||
The following items and objects appear in the following quantities: | |||
<gallery> | |||
Banana DKC SNES.png|[[Banana]] (29) | |||
Barrel DKC.png|[[Barrel]] (2) | |||
DK Barrel DKC.png|[[DK Barrel]] (2) | |||
</gallery> | |||
===K-O-N-G Letters=== | |||
*'''K:''' A gap with the letter K in it is immediately after the first oil drum in the level. A super-jump is required to grab it safely. | |||
*'''O:''' The letter O is in the second abyss in the level, which must be crossed with the use of a moving platform. | |||
*'''N:''' The letter N is in the last abyss before the final area of Mincers and Krushas. A super-jump must be used to reach it safely. | |||
*'''G:''' In the second Bonus Level, the letter G can be seen hidden at the side of the area above the entrance. | |||
== | ===Key items=== | ||
*'''[[Photograph]]''' (Game Boy Advance version): The photograph is above the level exit. By collecting it, the Kongs obtain a picture of Squawks for the ninth page of the [[Scrapbook (Donkey Kong Country series)|scrapbook]]. | |||
=== | ==Bonus Levels== | ||
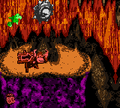
[[File:Torchlight Trouble SNES 5.png|thumb|The second Bonus Level]] | |||
Torchlight Trouble | *'''''Stop the Barrel!''''': After the Continue Barrel, the Kongs can find a barrel next to a Krusha. They must pick it up and throw it against the wall below to reveal an opening leading to the first [[Bonus Level]]. In the area, there are three barrels which quickly cycle between a banana, then a [[Banana Bunch]], and a [[Red Balloon|Life Balloon]]. The Kongs must match the picture on each barrel to win the depicted prize. After collecting the prize, the Kongs return to the main level. | ||
*'''''Bash the Baddies!''''': Another barrel appears after the letter N. The Kongs must pick it up and jump over the Mincer to fall to an area below with the level exit. They must blast away the wall to the left and enter the opening to enter a Bonus Level, where the Kongs must jump on a Klaptrap to earn many Banana Bunches. When the Kongs first jump on a Klaptrap, the Banana Bunch represents a single banana. For each hit that Klaptrap takes, the next Banana Bunch rewards an additional banana. The Klaptrap is defeated when it takes ten hits, causing it to release a whole Banana Bunch (10 bananas) when defeated. In addition, a [[Rambi]] [[animal token|Token]] also appears when Klaptrap is defeated, and the Kongs can collect it to return into the main level. | |||
== | ==Gallery== | ||
<gallery> | <gallery> | ||
Torchlight Trouble SNES 4.png|Donkey Kong finds the Squawks Crate | |||
TorchlightTrouble-GBA-3.png | Donkey Kong Country (U) (V1.2) !004.png|The location of the letter K | ||
Torchlight Trouble SNES.png|Diddy jumping on a [[Klump]] | |||
Donkey Kong Country (U) (V1.2) -!-005.png|The letter N | |||
Torchlight Trouble SNES 5.png|The letter G | |||
Torchlight Trouble GBC 2.png|The nearby exit sign in the [[Donkey Kong Country (Game Boy Color)|Game Boy Color version]] | |||
TorchlightTrouble-GBA-1.png|The first Bonus Level in the Game Boy Advance version | |||
TorchlightTrouble-GBA-3.png|Squawks pointing his flashlight at an Oil drum in the Game Boy Advance version | |||
TorchlightTrouble-GBA-4.png|The location of the photograph in the Game Boy Advance version | |||
</gallery> | </gallery> | ||
Revision as of 22:52, November 29, 2023
| Level | |
|---|---|
| Torchlight Trouble | |
  Location of the letter O in the Game Boy Color version  Donkey Kong jumps to a Krusha walking between an exit sign and a Mincer in the Game Boy Advance version | |
| Level code | 4 - 5 (SNES & GBC) 4 - 6 (GBA) |
| Game | Donkey Kong Country |
| Music track | Cave Dweller Concert |
| << Directory of levels (SNES & GBC) >> | |
| << Directory of levels (GBA) >> | |
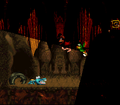
Torchlight Trouble, also spelled Torch Light Trouble,[1] is the twenty-first level of Donkey Kong Country and the fifth level of Gorilla Glacier. In the Game Boy Advance version, Torchlight Trouble was instead made sixth and last regular level of Gorilla Glacier, as it swapped places with Rope Bridge Rumble, making it the twenty-second level overall. Torchlight Trouble takes place in a dark cavern, and it is the only level with Squawks, whose animal crate is at the start (though the Game Boy Advance version has him appear the moment the level begins). Upon being freed, Squawks follows behind the Kongs, holding a flashlight to light the path ahead. Even if the Kongs did not open the Squawks Crate, Squawks still appears with his flashlight if the Kongs either reach the Continue Barrel and lose a life afterward or after they leave a Bonus Level.
Layout

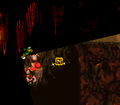
The Kongs can find a DK Barrel above them as soon as they enter the level. Squawks joins them as they walk in, lighting their path. A Klump marches to the left of a small gap with the letter K in it, which is surrounded by two oil drums. A lower platform holding another Klump is located on the right side of the abyss. Another platform carrying two additional oil drums and a third Klump is just ahead after a slightly larger pit. This is followed by a wide abyss that can only be crossed with the use of a platform that moves in a horizontal path across the pit. The letter O floats above it. A larger platform is on the opposite side of the abyss with two oil drums on the outside of it. A Klump patrols the area between them. Another small platform moves within an abyss nearby, but it moves in a vertical path. The Kongs must jump on it to reach a much larger piece of land with two more oil drums and a Klump on it. If the primates continue, they can find another platform moving in a vertical path above a pit. It can help them reach a higher piece of land with another pair of oil drums on it. There is an additional oil drum in a lower area after a nearby gap. The level's Continue Barrel waits next to it.
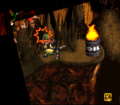
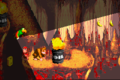
A low ceiling hangs in front of the heroes to the right of the barrel. They must crawl under it to pass it. As they crawl, they run into a DK Barrel and a few bananas. On the long, raised area of ground, the heroes can find a bumpy path leading past several Mincers. A Krusha marches between each Mincer, and a barrel also sits at the beginning of the area. A higher piece of land is after the third Mincer with two Krushas on it. After crossing a small gap, the two friends make their way onto a solid piece of land with two Mincers and a Krusha on it. A sign indicating that the level is almost over stands in the center of the platform. Once the Kongs jump over another small gap near here, they find themselves on a platform with a lone Mincer on it. This is followed by an abyss with a small, moving platform in it. It moves in a vertical path, so it can lift them up onto a higher area nearby. The letter N floats near the platform. Once the higher area is reached, the primates can find many Mincers ahead of them. A lone Krusha marches between the first two Mincers, while the final Mincer moves slightly up and down at the edge of a ledge. If the heroes drop down the ledge, they can find a wooden exit sign, indicating that the passage ahead leads out of the level.
Enemies and obstacles
The following enemies appear in the following quantities:


Items and objects
The following items and objects appear in the following quantities:


K-O-N-G Letters
- K: A gap with the letter K in it is immediately after the first oil drum in the level. A super-jump is required to grab it safely.
- O: The letter O is in the second abyss in the level, which must be crossed with the use of a moving platform.
- N: The letter N is in the last abyss before the final area of Mincers and Krushas. A super-jump must be used to reach it safely.
- G: In the second Bonus Level, the letter G can be seen hidden at the side of the area above the entrance.
Key items
- Photograph (Game Boy Advance version): The photograph is above the level exit. By collecting it, the Kongs obtain a picture of Squawks for the ninth page of the scrapbook.
Bonus Levels

- Stop the Barrel!: After the Continue Barrel, the Kongs can find a barrel next to a Krusha. They must pick it up and throw it against the wall below to reveal an opening leading to the first Bonus Level. In the area, there are three barrels which quickly cycle between a banana, then a Banana Bunch, and a Life Balloon. The Kongs must match the picture on each barrel to win the depicted prize. After collecting the prize, the Kongs return to the main level.
- Bash the Baddies!: Another barrel appears after the letter N. The Kongs must pick it up and jump over the Mincer to fall to an area below with the level exit. They must blast away the wall to the left and enter the opening to enter a Bonus Level, where the Kongs must jump on a Klaptrap to earn many Banana Bunches. When the Kongs first jump on a Klaptrap, the Banana Bunch represents a single banana. For each hit that Klaptrap takes, the next Banana Bunch rewards an additional banana. The Klaptrap is defeated when it takes ten hits, causing it to release a whole Banana Bunch (10 bananas) when defeated. In addition, a Rambi Token also appears when Klaptrap is defeated, and the Kongs can collect it to return into the main level.
Gallery
Donkey Kong finds the Squawks Crate
The location of the letter K
Diddy jumping on a Klump
The letter N
The letter G
The nearby exit sign in the Game Boy Color version

The first Bonus Level in the Game Boy Advance version
Squawks pointing his flashlight at an Oil drum in the Game Boy Advance version
The location of the photograph in the Game Boy Advance version

_(V1.2)_!004.png)

_(V1.2)_-!-005.png)


Names in other languages
| Language | Name | Meaning |
|---|---|---|
| Japanese | トーチライト トンネル Tōchiraito tonneru |
Torchlight Tunnel |
| German | Gühbirnen-Drama (SNES) Fackel-Fiasko (GBC) |
Light Bulb Drama Torch Fiasco |
| Italian | Trottola di Torce |
Top of Torches |
| Spanish | Dilema de Antorchas |
Torch Dilemma |
Trivia
- The flash that occurs when Squawks faces the screen was removed from Virtual Console ports of the game, presumably to reduce the risk of seizures.
References
- ^ Nintendo Magazine System (UK) issue 28, page 58.