Lava Lagoon (Donkey Kong Land 2): Difference between revisions
mNo edit summary |
No edit summary |
||
| (21 intermediate revisions by 12 users not shown) | |||
| Line 1: | Line 1: | ||
{{ | {{italic title|id=yes}} | ||
{{level infobox | |||
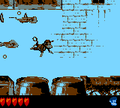
{{level | |image=[[File:Lava Lagoon DKL2.png]] | ||
|image=[[File: | |||
|code=2 - 3 | |code=2 - 3 | ||
|world=[[Krem Cauldron]] | |||
|game=''[[Donkey Kong Land 2]]'' | |game=''[[Donkey Kong Land 2]]'' | ||
| | |track=Lockjaw's Saga | ||
|before=[[Kannon's Klaim (Donkey Kong Land 2)|<<]] | |before=[[Kannon's Klaim (Donkey Kong Land 2)|<<]] | ||
|after=[[Redhot Ride|>>]] | |after=[[Redhot Ride|>>]] | ||
}} | }} | ||
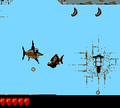
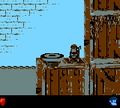
'''Lava Lagoon''' is the eighth level of ''[[Donkey Kong Land 2]]'' and the third | '''Lava Lagoon''' is the eighth level of ''[[Donkey Kong Land 2]]'' and the third level in [[Krem Cauldron]]. Lava Lagoon takes place in another hold of a crash galleon, though it is partially submerged in boiling water, which [[Diddy Kong|Diddy]] and [[Dixie Kong|Dixie]] cannot safely swim in. The only way for the [[Kong]]s to progress through the level is by jumping on [[Clapper]]s so that the water cools. The effect is only temporary, and the Kongs must quickly swim to the next area before the water starts to boil again. Three [[Animal Barrel]]s of [[Enguarde]] appear in the level. | ||
==Layout== | |||
== | |||
The Kongs begin the level under a DK Barrel on a pile of large crates and barrels. A Clapper is ahead of here with a pool of water next to it, which contains a pair of Flotsams that are surrounded by bananas. The heroes also can find a Banana Bunch in a small alcove as they swim through the underwater area. After they pass the Flotsams, they makes their way upwards to the surface of another part of the water, where they can find more large crates that they can walk on. The letter K is located on the other side of the water to the left of here, and some crates are in front of it that the duo can jump through. If they continue east from here, they come past a Klomp and a Clapper, who can cool down the nearby pool of water. As they swim through this water, they head down into a wide room with a Lockjaw and a Flotsam in it. An [[Animal Barrel]] that contains Enguarde is southwest of here, and if the primates continue after passing the barrel, they come into an area full of Lockjaws. The letter O is below the enemies in a small alcove. After they travel to the rightmost part of the underwater area, they must head upwards past more Lockjaws to find a No Animal Sign that makes Enguarde disappear when crossed. | The Kongs begin the level under a DK Barrel on a pile of large crates and barrels. A Clapper is ahead of here with a pool of water next to it, which contains a pair of Flotsams that are surrounded by bananas. The heroes also can find a Banana Bunch in a small alcove as they swim through the underwater area. After they pass the Flotsams, they makes their way upwards to the surface of another part of the water, where they can find more large crates that they can walk on. The letter K is located on the other side of the water to the left of here, and some crates are in front of it that the duo can jump through. If they continue east from here, they come past a Klomp and a Clapper, who can cool down the nearby pool of water. As they swim through this water, they head down into a wide room with a Lockjaw and a Flotsam in it. An [[Animal Barrel]] that contains Enguarde is southwest of here, and if the primates continue after passing the barrel, they come into an area full of Lockjaws. The letter O is below the enemies in a small alcove. After they travel to the rightmost part of the underwater area, they must head upwards past more Lockjaws to find a No Animal Sign that makes Enguarde disappear when crossed. | ||
[[File: | [[File:Lava Lagoon DKL2 shot 2.png|thumb|left|160px|Dixie Kong approaches a group of bananas shaping an up arrow, pointing out the Video Game Hero Coin.]] | ||
A large, flat pile of crates follows the sign, and it holds a Clapper that can cool down another pool of water located nearby. On the other side of the water's surface here, the Kongs can find a Banana Coin floating high in the air. As they swim through the underwater area, they head down through a wide passage with a pair of Puftups in it. After they pass the enemies, they discover another Animal Barrel that contains Enguarde and a group of bananas that form an arrow pointing to the right. There are two passages to the right of this arrow; the passage on the top leads to a Flotsam, while the other leads to a Puftup, another Flotsam, and a Banana Coin. Once the heroes reach the other side of the two passages, they can find a passage above them with a few Puftups in it. If they avoid these enemies and make their way the whole way up, they can find a No Animal Sign that makes Enguarde disappear when crossed and a pile of crates above the water that hold a Clapper. If the heroes pass the sign with Enguarde, they are also given a Banana Bunch as a prize. The nearby Clapper can be jumped on to cool down another water area, which contains more bananas and enemies. After the primates reach the bottom of the underwater section, they must travel east past some Flotsams and Puftups to progress. Soon, they can find a passage leading to the surface of the water. As they swim through the passage, they reach a lone Puftup and then a pile of large crates above the liquid that they can walk on. A Star Barrel and a DK Barrel are above the crates. | A large, flat pile of crates follows the sign, and it holds a Clapper that can cool down another pool of water located nearby. On the other side of the water's surface here, the Kongs can find a Banana Coin floating high in the air. As they swim through the underwater area, they head down through a wide passage with a pair of Puftups in it. After they pass the enemies, they discover another Animal Barrel that contains Enguarde and a group of bananas that form an arrow pointing to the right. There are two passages to the right of this arrow; the passage on the top leads to a Flotsam, while the other leads to a Puftup, another Flotsam, and a Banana Coin. Once the heroes reach the other side of the two passages, they can find a passage above them with a few Puftups in it. If they avoid these enemies and make their way the whole way up, they can find a No Animal Sign that makes Enguarde disappear when crossed and a pile of crates above the water that hold a Clapper. If the heroes pass the sign with Enguarde, they are also given a Banana Bunch as a prize. The nearby Clapper can be jumped on to cool down another water area, which contains more bananas and enemies. After the primates reach the bottom of the underwater section, they must travel east past some Flotsams and Puftups to progress. Soon, they can find a passage leading to the surface of the water. As they swim through the passage, they reach a lone Puftup and then a pile of large crates above the liquid that they can walk on. A Star Barrel and a DK Barrel are above the crates. | ||
The Kongs can find a Clapper and more hot liquid ahead of here. After the seal cools down the water, they can safely swim through it. As they begin swimming through the water, they make their way down a long, straight, passage with some bananas around it. Eventually, they reach a passage leading to the west, which contains some Flotsams and a Lockjaw. A small area is to the north of the Lockjaw, and it contains a Puftup and the letter N. If the primates continue to the right from | The Kongs can find a Clapper and more hot liquid ahead of here. After the seal cools down the water, they can safely swim through it. As they begin swimming through the water, they make their way down a long, straight, passage with some bananas around it. Eventually, they reach a passage leading to the west, which contains some Flotsams and a Lockjaw. A small area is to the north of the Lockjaw, and it contains a Puftup and the letter N. If the primates continue to the right from where this area is located, they reach a group of bananas that form the shape of an arrow pointing upwards. If they head to the east from here, they come past a Lockjaw and a Banana Bunch, which is located under a passage with a Video Game Hero Coin in it. If the Kongs instead follow the arrow, they make their way up through another long, straight passage with bananas around it. At the top of the area, they can find the surface of the water with some crates surrounding it. The group of crates to the left of here lead to a [[Bonus Barrel]], while the crates to the right of the water take the two friends to a ledge with another Clapper on it. | ||
If they swim through the water ahead of the seal after cooling it down, they make their way down into another passage that leads to the east. As they swim through here, they reach some Flotsams and a Puftup, along with a Banana Bunch in a small alcove. Another passage is to the north of the Banana Bunch, and the heroes come up to a Puftup as they swim through it. Shortly after dodging this foe, they approach a pile of crates that they can walk on to progress over the water. A DK Barrel and a Klomp are along these crates, as well as a Clapper, who can cool down another section of water. As the duo swims through here, they come towards a Lockjaw and a Flotsam, who both guard an Animal Barrel with Enguarde in it. A Banana Coin is to the left of this barrel in the corner of the area next to a dead end. A thin passage that the heroes must swim through to progress is near Enguarde's Animal Barrel, and once they swim through it, they enter a large room that contains a group of bananas that form the shape of an arrow pointing to the right. To the left of this arrow, they can find a few Lockjaws and a Banana Coin, along with a small alcove that contains the letter G. If the primates head to the right of the arrow, where it directs them to, they enter a wide passage leading upwards. As they journey through the passage, they reach a Puftup, a Flotsam, and a Banana Bunch, which is placed in a corner. After they pass the two enemies, they reach a No Animal Sign that makes Enguarde disappear when crossed. Some crates are above the surface of the water near here, and they hold a spring. If they jump on this spring, they complete the level successfully. | If they swim through the water ahead of the seal after cooling it down, they make their way down into another passage that leads to the east. As they swim through here, they reach some Flotsams and a Puftup, along with a Banana Bunch in a small alcove. Another passage is to the north of the Banana Bunch, and the heroes come up to a Puftup as they swim through it. Shortly after dodging this foe, they approach a pile of crates that they can walk on to progress over the water. A DK Barrel and a Klomp are along these crates, as well as a Clapper, who can cool down another section of water. As the duo swims through here, they come towards a Lockjaw and a Flotsam, who both guard an Animal Barrel with Enguarde in it. A Banana Coin is to the left of this barrel in the corner of the area next to a dead end. A thin passage that the heroes must swim through to progress is near Enguarde's Animal Barrel, and once they swim through it, they enter a large room that contains a group of bananas that form the shape of an arrow pointing to the right. To the left of this arrow, they can find a few Lockjaws and a Banana Coin, along with a small alcove that contains the letter G. If the primates head to the right of the arrow, where it directs them to, they enter a wide passage leading upwards. As they journey through the passage, they reach a Puftup, a Flotsam, and a Banana Bunch, which is placed in a corner. After they pass the two enemies, they reach a No Animal Sign that makes Enguarde disappear when crossed. Some crates are above the surface of the water near here, and they hold a spring. If they jump on this spring, they complete the level successfully. | ||
== | ==Enemies== | ||
==== | The following enemies appear in the following quantities, and enemies marked in '''bold''' make their debut: | ||
*K: At the surface of the end of the first area of water, the | |||
*O: After the | *[[Flotsam]]: 17 (5 of which are in a Bonus Level) | ||
*N: When the | *[[Klomp]]: 2 | ||
*G: As | *[[Lockjaw]]: 12 | ||
====Bonus Levels | *'''[[Puftup]]''': 11 | ||
[[File: | |||
*Near the end of the third pool of water, the Kongs | ==Items and objects== | ||
* | The following items and objects appear in the following quantities: | ||
*[[Banana Coin]]: 3 | |||
*[[DK Barrel]]: 2 | |||
*[[No Animal Sign]]: 3 | |||
===KONG Letters=== | |||
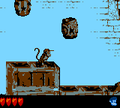
[[File:Lava-Lagoon-GBC-K.png|thumb|The letter K]] | |||
*K: At the surface of the end of the first area of water, the Kongs must jump up against a wall of crates. They can go through one of the crates to access an area that has the letter K. | |||
*O: After the Kongs pass the Enguarde Barrel in the second pool of water, they must continue downwards into an alcove with the letter O, under a Lockjaw. | |||
*N: When the Kongs reach the first pool of water from the Star Barrel, they must go to the bottom and slightly right to go up another passage. They can find the letter N to the top-left of some Puftups. | |||
*G: As Diddy and Dixie go through the third passage of water from the Star Barrel, they reach a group of bananas which form a right arrow. Instead of going right, the Kongs must continue left and enter an alcove with the letter G, under two Lockjaws. | |||
{{br}} | |||
===Cranky's Video Game Hero Coin=== | |||
The Kongs must swim through the first water passage after the Star Barrel. They eventually reach a group of bananas shaped like an up arrow. Instead of following it, the Kongs must continue east and then north through a passage to collect the hidden [[DK Coin|Video Game Hero]]. | |||
==Bonus Levels== | |||
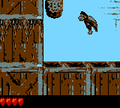
[[File:Lava Lagoon DKL2 Bonus Area 2.png|thumb|The second Bonus Level of Lava Lagoon]] | |||
Lava Lagoon has two [[Bonus room|Bonus Areas]], listed by type: | |||
*'''Find the Token!''': Near the end of the third pool of water, the Kongs encounter a Puftup next to a crate. They must swim behind the Puftup to enter a [[Bonus Barrel]]]. In the [[Bonus Level]], the Kongs have 20 seconds to travel through an underwater maze between many large crates and barrels and collect the [[Kremkoin]] to the northeast of the maze. | |||
*'''Find the Token!''': Right after leaving the first water passage from the Star Barrel, the Kongs must go left and enter a Bonus Barrel against the wall. In the Bonus Level, the Kongs have 20 seconds to swim around some Flotsams and collect the Kremkoin at the other side. | |||
==Gallery== | ==Gallery== | ||
<gallery | <gallery> | ||
Lava Lagoon DKL2 first Clapper.png|Diddy encounters the first Clapper of the level | |||
Lava Lagoon DKL2 Flotsams.png|Diddy swims away from some Flotsams | |||
Lava Lagoon DKL2 Enguarde and Lockjaw.png|Enguarde about to stab a Lockjaw | |||
Lava Lagoon DKL2 Star Barrel.png|Diddy standing under the Star Barrel | |||
Lava Lagoon DKL2 second Bonus Barrel.png|Dixie jumping to the second Bonus Barrel | |||
Lava Lagoon DKL2 End of Level Target.png|Diddy at the End of Level Target | |||
</gallery> | </gallery> | ||
{{ | ==Names in other languages== | ||
{{foreign names | |||
|Jap=しゃくねつダイビング | |||
|JapR=Shakunetsu Daibingu | |||
|JapM=Red-Hot Diving | |||
}} | |||
{{DKL2}} | {{DKL2}} | ||
[[Category:Donkey Kong Land 2 | [[Category:Aquatic areas]] | ||
[[Category:Pirate areas]] | |||
[[Category:Donkey Kong Land 2 levels]] | |||
[[Category:Crocodile Isle]] | [[Category:Crocodile Isle]] | ||
Latest revision as of 20:17, December 15, 2023
| Level | |
|---|---|
| Lava Lagoon | |

| |
| Level code | 2 - 3 |
| World | Krem Cauldron |
| Game | Donkey Kong Land 2 |
| Music track | Lockjaw's Saga |
| << Directory of levels >> | |
Lava Lagoon is the eighth level of Donkey Kong Land 2 and the third level in Krem Cauldron. Lava Lagoon takes place in another hold of a crash galleon, though it is partially submerged in boiling water, which Diddy and Dixie cannot safely swim in. The only way for the Kongs to progress through the level is by jumping on Clappers so that the water cools. The effect is only temporary, and the Kongs must quickly swim to the next area before the water starts to boil again. Three Animal Barrels of Enguarde appear in the level.
Layout[edit]
The Kongs begin the level under a DK Barrel on a pile of large crates and barrels. A Clapper is ahead of here with a pool of water next to it, which contains a pair of Flotsams that are surrounded by bananas. The heroes also can find a Banana Bunch in a small alcove as they swim through the underwater area. After they pass the Flotsams, they makes their way upwards to the surface of another part of the water, where they can find more large crates that they can walk on. The letter K is located on the other side of the water to the left of here, and some crates are in front of it that the duo can jump through. If they continue east from here, they come past a Klomp and a Clapper, who can cool down the nearby pool of water. As they swim through this water, they head down into a wide room with a Lockjaw and a Flotsam in it. An Animal Barrel that contains Enguarde is southwest of here, and if the primates continue after passing the barrel, they come into an area full of Lockjaws. The letter O is below the enemies in a small alcove. After they travel to the rightmost part of the underwater area, they must head upwards past more Lockjaws to find a No Animal Sign that makes Enguarde disappear when crossed.

A large, flat pile of crates follows the sign, and it holds a Clapper that can cool down another pool of water located nearby. On the other side of the water's surface here, the Kongs can find a Banana Coin floating high in the air. As they swim through the underwater area, they head down through a wide passage with a pair of Puftups in it. After they pass the enemies, they discover another Animal Barrel that contains Enguarde and a group of bananas that form an arrow pointing to the right. There are two passages to the right of this arrow; the passage on the top leads to a Flotsam, while the other leads to a Puftup, another Flotsam, and a Banana Coin. Once the heroes reach the other side of the two passages, they can find a passage above them with a few Puftups in it. If they avoid these enemies and make their way the whole way up, they can find a No Animal Sign that makes Enguarde disappear when crossed and a pile of crates above the water that hold a Clapper. If the heroes pass the sign with Enguarde, they are also given a Banana Bunch as a prize. The nearby Clapper can be jumped on to cool down another water area, which contains more bananas and enemies. After the primates reach the bottom of the underwater section, they must travel east past some Flotsams and Puftups to progress. Soon, they can find a passage leading to the surface of the water. As they swim through the passage, they reach a lone Puftup and then a pile of large crates above the liquid that they can walk on. A Star Barrel and a DK Barrel are above the crates.
The Kongs can find a Clapper and more hot liquid ahead of here. After the seal cools down the water, they can safely swim through it. As they begin swimming through the water, they make their way down a long, straight, passage with some bananas around it. Eventually, they reach a passage leading to the west, which contains some Flotsams and a Lockjaw. A small area is to the north of the Lockjaw, and it contains a Puftup and the letter N. If the primates continue to the right from where this area is located, they reach a group of bananas that form the shape of an arrow pointing upwards. If they head to the east from here, they come past a Lockjaw and a Banana Bunch, which is located under a passage with a Video Game Hero Coin in it. If the Kongs instead follow the arrow, they make their way up through another long, straight passage with bananas around it. At the top of the area, they can find the surface of the water with some crates surrounding it. The group of crates to the left of here lead to a Bonus Barrel, while the crates to the right of the water take the two friends to a ledge with another Clapper on it.
If they swim through the water ahead of the seal after cooling it down, they make their way down into another passage that leads to the east. As they swim through here, they reach some Flotsams and a Puftup, along with a Banana Bunch in a small alcove. Another passage is to the north of the Banana Bunch, and the heroes come up to a Puftup as they swim through it. Shortly after dodging this foe, they approach a pile of crates that they can walk on to progress over the water. A DK Barrel and a Klomp are along these crates, as well as a Clapper, who can cool down another section of water. As the duo swims through here, they come towards a Lockjaw and a Flotsam, who both guard an Animal Barrel with Enguarde in it. A Banana Coin is to the left of this barrel in the corner of the area next to a dead end. A thin passage that the heroes must swim through to progress is near Enguarde's Animal Barrel, and once they swim through it, they enter a large room that contains a group of bananas that form the shape of an arrow pointing to the right. To the left of this arrow, they can find a few Lockjaws and a Banana Coin, along with a small alcove that contains the letter G. If the primates head to the right of the arrow, where it directs them to, they enter a wide passage leading upwards. As they journey through the passage, they reach a Puftup, a Flotsam, and a Banana Bunch, which is placed in a corner. After they pass the two enemies, they reach a No Animal Sign that makes Enguarde disappear when crossed. Some crates are above the surface of the water near here, and they hold a spring. If they jump on this spring, they complete the level successfully.
Enemies[edit]
The following enemies appear in the following quantities, and enemies marked in bold make their debut:
Items and objects[edit]
The following items and objects appear in the following quantities:
- Banana Coin: 3
- DK Barrel: 2
- No Animal Sign: 3
KONG Letters[edit]

- K: At the surface of the end of the first area of water, the Kongs must jump up against a wall of crates. They can go through one of the crates to access an area that has the letter K.
- O: After the Kongs pass the Enguarde Barrel in the second pool of water, they must continue downwards into an alcove with the letter O, under a Lockjaw.
- N: When the Kongs reach the first pool of water from the Star Barrel, they must go to the bottom and slightly right to go up another passage. They can find the letter N to the top-left of some Puftups.
- G: As Diddy and Dixie go through the third passage of water from the Star Barrel, they reach a group of bananas which form a right arrow. Instead of going right, the Kongs must continue left and enter an alcove with the letter G, under two Lockjaws.
Cranky's Video Game Hero Coin[edit]
The Kongs must swim through the first water passage after the Star Barrel. They eventually reach a group of bananas shaped like an up arrow. Instead of following it, the Kongs must continue east and then north through a passage to collect the hidden Video Game Hero.
Bonus Levels[edit]

Lava Lagoon has two Bonus Areas, listed by type:
- Find the Token!: Near the end of the third pool of water, the Kongs encounter a Puftup next to a crate. They must swim behind the Puftup to enter a Bonus Barrel]. In the Bonus Level, the Kongs have 20 seconds to travel through an underwater maze between many large crates and barrels and collect the Kremkoin to the northeast of the maze.
- Find the Token!: Right after leaving the first water passage from the Star Barrel, the Kongs must go left and enter a Bonus Barrel against the wall. In the Bonus Level, the Kongs have 20 seconds to swim around some Flotsams and collect the Kremkoin at the other side.
Gallery[edit]

Diddy encounters the first Clapper of the level
Diddy swims away from some Flotsams
Enguarde about to stab a Lockjaw
Diddy standing under the Star Barrel
Dixie jumping to the second Bonus Barrel
Diddy at the End of Level Target


Names in other languages[edit]
| Language | Name | Meaning |
|---|---|---|
| Japanese | しゃくねつダイビング Shakunetsu Daibingu |
Red-Hot Diving |