Fiery Furnace (Donkey Kong Country 2: Diddy's Kong Quest)
Template:LevelboxDKL2 Fiery Furnace is the fourth level of the Lost World in Donkey Kong Country 2: Diddy's Kong Quest, as well as the third level of that world in Donkey Kong Land 2. It can be accessed via Klubba's Kiosk in Gloomy Gulch in Donkey Kong Country 2, or in the overworld for Donkey Kong Land 2.
This level is set in a volcano, and the Kongs must use special Steerable Barrels unique to the level in order to cross the lava. Since the Steerable Barrels are timed, and because Zingers are in the Kongs' path, it will take a lot of determination to get through this level. The barrels are scattered throughout the level, and the Kongs will have to maneuver around the area with them, without hitting enemies. Other than Zingers, the enemies here include Kutlass, Klampons, Krooks, Spinys, Flitters, and Cat-O-9-Tails.
In Donkey Kong Land 2, Steerable Barrels are not present, and are instead replaced with normal Blast Barrels. Several Hot Air Balloons, exactly like the one from Red-Hot Ride, can also be seen here, and are used much of the second half of the level. The enemies in this game's version also do not include Cat-0-9-Tails, unlike in Diddy's Kong Quest, and feature Klobbers and Kaboings instead. Luckily, Squitter the Spider appears in the level to help out.
Level Layout
Donkey Kong Country 2
At the start of the level, the Kongs must journey east and defeat some Spinies. Soon, they will come up to the firs Steerable Barrel, which should be used to float over a dangerous Kutlass. After that, the heroes will have to climb up a few ledges and dodge several Klampons, until they get to the first large abyss of the level. The Steerable Barrels above it must be used to cross, although the monkeys must be careful, as there is a time limit on them. Once on the other side, they will need to watch out for a few enemies and get into another Steerable Barrel. While watching the time limit, they must maneuver around many Zingers and soon get to the other side. Here, they will have to avoid some more foes, including more Spinies. Eventually, they will bounce off of a Flitter and continue to travel through the barrels. As they shoot to each Steerable Barrel, the monkeys will need to be aided by some Flitters, so they can bounce off of them and get to another barrel. Soon, they will be shot to a group of three Flitters, and they should hop off of them to reach land, where the Star Barrel is.
Halfway through the level, the heroes will need to dodge or beat a Kutlass and a Krook. Then they must hop aboard another Steerable Barrel and journey across a wide gap. If they can dodge the many Zingers scattered around, they will make it back to land again, and shortly plop right back into another barrel. After they blast their way to the other end of the gap with the many Steerable Barrels, they will have to avoid a few more enemies, including the pesky Cat-0-9-Tails. After passing these foes, the group must get in another barrel and steer their way to the next barrel. Although there is more time than usual on the barrel's limit, the other barrel is a longer distance away, so the monkey must move fast. When they get to land again, they must make a well-timed jump and defeat more Cat-0-9-Tails in their path. From there, they will have to get into more Steerable Barrels and float above a dangerous abyss. This time, many Zingers are moving about to attack the Kongs, but they can be avoided with some good skills. Once on the other side, the Kongs must beat more Cat-0-9-Tails and cross two small abysses, until they finally find the End of Level Target. It will take them out for the level when hit.
Donkey Kong Land 2
When they begin the level, the Kongs must travel down the path and dodge some enemies, such as Klampons and Klobbers. Soon, they will get to a large abyss, which must be crossed by using a few barrels and a good aim. When they get to the other side, they will have to continue along the rather flat land and watch out for more foes. Shortly after arriving back on land, they must get over another abyss via barrels. With the guidance of banana trails, the monkeys should aim and shoot themselves to the next area. Here, they will need to dodge only a few Spinies, and then hop onto a Hot Air Balloon. It will lead them across another abyss, although their weight is too much for the balloon, and it will sink into the fire if they aren't fast enough. After gliding through the air on the balloon and watching out for Zingers, they must jump into some barrels and blast to another Hot Air Balloon above them. They must use it to float over the rest of the large gap. Back on land, the group will have to jump up a few ledges and soon find the Star Barrel.
From there, the monkeys will need to continue down the path and turn into Squitter the Spider with an Animal Barrel. Squitter must build his trademark webs and form platforms with them. He should use the platforms he created to travel over another abyss. Soon, the spider will need to follow a banana trail back to solid ground and defeat the enemies in his path. Eventually, he will get to another gap, which, again, must be crossed using his web platforms. As he builds his way across, there are many Zingers trying to get in the way, so he needs to be careful. Once on the other side, the Animal Buddy will pass a No Animal Sign and turn back into the Kongs. The no longer transformed monkeys should then hop atop a Hot Air Balloon and begin to ride it. After a while, they will meet a Zinger in the way. From here, they must jump into the air and land on another balloon. Shortly after that, they will have to bounce off of a couple Flitters to reach yet another Hot Air Balloon. It will, as usual, take them to another balloon, followed by yet another balloon, until they finally reach land again. The group must dodge a few Klobbers here, and then hop into a barrel. With their skills, they will need to aim carefully and shoot to the other end of the wide abyss. Once they finally get to the other side, they will find a spring down the path. When they jump on it, it will bounce them out of the level.
Secrets
Donkey Kong Country 2
Bonus Level(s)
- Near the end of the level, the Kongs will notice a trail of bananas above a Cat-0-9-Tails leading up to a Steerable Barrel. They must use their Team Up move to throw a monkey into the barrel and pilot over the trail. Soon, they will reach the Bonus Barrel. In its Bonus Level, the heroes must maneuver through a bramble area inside the Steerable Barrel. The track is thin, and they may not hit the spikes on the side, as well as the Zingers. If they do hit them, they'll be taken out of the bonus. Once at the end of the stage, they must shoot out of the barrel and grab the DK Coin.
Golden Feather (GBA Only)
- While crossing the abyss where the letter O is found, they Kongs should come across the Golden Feather. It is between two Zingers, though, so they must use more of their skills to get it.
Photograph (GBA Only)
- When the Kongs reach the area under the letter G, they should see two Cat-0-9-Tails. If they defeat the foes, they are given a photograph for their scrapbook.
Donkey Kong Land 2
Bonus Level(s)
- Once shooting out of the level's final barrel, the heroes should travel to the left and jump over a Zinger. If they continue to the left, though, they will find the Bonus Barrel, leading to the Bonus Level. Here, they must hit a couple of Krochead Barrels. Krocheads will suddenly emerge from the fire, and the primates can use them as stepping stones. When they get to the end of the stage, they will find the DK Coin.
Names in Other Languages
Gallery
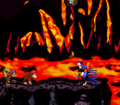
The heroes encounter a Cat-0-9-Tails.
- FireyFurnace65.jpg
The Kongs near a Kutlass.
