Blackout Basement: Difference between revisions
m (Protected "Blackout Basement" ([Edit=Allow only autoconfirmed users] (indefinite) [Move=Allow only autoconfirmed users] (indefinite))) |
No edit summary |
||
| (23 intermediate revisions by 8 users not shown) | |||
| Line 1: | Line 1: | ||
{{ | {{DKC level infobox | ||
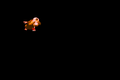
|image=[[File:Blackout Basement SNES.png]] | |image=[[File:Blackout Basement SNES.png]] | ||
|code=5 - 6 (SNES)<br>5 - 5 (GBA) | |code=5 - 6 (SNES & GBC)<br>5 - 5 (GBA) | ||
|game=''[[Donkey Kong Country]] | |game=''[[Donkey Kong Country]] | ||
| | |track=Fear Factory | ||
| | |before2=[[Mine Cart Madness|<<]] | ||
| | |after2=[[Boss Dumb Drum|>>]] | ||
| | |before3=[[Elevator Antics|<<]] | ||
| | |after3=[[Mine Cart Madness|>>]] | ||
}} | }} | ||
'''Blackout Basement''' is the twenty-eighth level in ''[[Donkey Kong Country]]'' and the sixth and final level of [[Kremkroc Industries, Inc.]] In the [[Game Boy Advance]] remake Blackout Basement and [[Mine Cart Madness]] switched positions, making Blackout Basement the fifth level of the world and the twenty-seventh overall level. | '''Blackout Basement''' is the twenty-eighth level in ''[[Donkey Kong Country]]'' and the sixth and final level of [[Kremkroc Industries, Inc.]] In the [[Game Boy Advance]] remake Blackout Basement and [[Mine Cart Madness]] switched positions, making Blackout Basement the fifth level of the world and the twenty-seventh overall level. Blackout Basement is both the second and last factory level, and it has a unique feature where the lights flicker on and off every few seconds. While the surroundings are entirely dark, the only things visible on-screen are the [[Kong]]s, items (such as [[banana]]s), [[barrel]]s, and faint outlines of platform edges. Because of the flickering lights, the Kongs must be cautious with their movements. The enemies are not visible while the level is dark. There are several pitfalls which [[Donkey Kong]] and [[Diddy Kong]] can cross by using floating platforms and swinging [[rope]]s. | ||
Blackout Basement is both the second and last factory level | |||
==Layout== | ==Layout== | ||
[[File: | {{multiframe|[[File:BlackoutBasement-GBC-2.png]] [[File:BlackoutBasement-GBA.png|180px]]|Blackout Basement's appearance in the Game Boy Color version, top, and the Game Boy Advance version, bottom|align=left|size=200}} | ||
At the beginning of the level, the Kongs travel down a long set of stairs with the level's first [[DK Barrel]] at the bottom of it. A Kritter marches along a flat piece of ground after a smaller stairway. Another stairway with a Kritter at the top of it can be found after a nearby abyss. The Kongs can find a second pit after the foe with the [[ | At the beginning of the level, the Kongs travel down a long set of stairs with the level's first [[DK Barrel]] at the bottom of it. A Kritter marches along a flat piece of ground after a smaller stairway. Another stairway with a Kritter at the top of it can be found after a nearby abyss. The Kongs can find a second pit after the foe with the [[KONG Letters|letter K]] above it. They come up to more Kritter enemies as they travel down a stairway located after this abyss. The enemies are followed by another abyss that can be crossed with the aid of a stationary platform floating in it. The duo can find a group of [[banana]]s on a flat area of ground near here, which is followed by a much wider pit containing three stationary platforms. An [[Enguarde]] [[animal token|Token]] hangs under the platform in the middle of this abyss, which is followed by a stairway holding a few Kritters. After climbing the stairs, the Kongs come up to an abyss containing a solid platform with a bouncy [[tire (object)|tire]] sticking out of it. The tire can assist them in crossing the abyss and reach a series of platforms that are connected by stairways that Kritters march along. A DK Barrel wobbles on the highest platform, which is then followed by a larger platform with a wide abyss after it. Three platforms float above this abyss, each with a bouncy tire on it that the primates must bounce on to jump higher. On the other side of the pit, the two friends can find a solid area of ground with a small section of it that can be broken to reveal the letter O. The level's [[Star Barrel|Continue Barrel]] floats above and abyss with a platform supporting a tire under it. | ||
After the Kongs cross this abyss, they reach a set of two platforms that are connected by a stairway that holds a Klump. An abyss is ahead of here, but the primates can easily cross it with a rope. On the opposite side of the pit, they can discover another pair of platforms that are connected by a set of stairs supporting a Klump. An abyss stands between these platforms and another, and a smaller platform hovers across it. The duo can use the platform to cross and then reach another abyss consisting of another small platform that moves in a vertical path above it. It can be used to cross the pit and reach a higher area that connects to another piece of ground with a stairway. A Klump travels along the stairs. A rope swings in a wide abyss ahead of here. The Kongs can grab onto it as it swings to glide over the abyss and then reach a large platform with a DK Barrel above it. They can discover a wide pit nearby with two smaller platforms moving in vertical paths above it. With the use of these platforms, they can make their way over the pit and onto another large platform with a bigger abyss after it. This can be crossed with the use of two more small platforms that both pull them across different parts of it. Two pieces of ground connected by another stairway can be found on the other side of the abyss with a Klaptrap on them. A set of three platforms set up in a similar way to these is located after a small abyss that can be crossed with the help of a small, black platform in it that begins to fall when landed on. Several Klaptraps stomp along the platforms, which are followed by a wide pit that can only be crossed with the use of a few black platforms found above it. These platforms descend and then fall when landed on. The Kongs can find a [[Iron Barrel|steel keg]] on the other side of the abyss that is followed by a long series of platforms that are connected by short stairways. After passing a Manky Kong in this area, they head past a sign indicating that the level is near complete and then travel up a longer stairway. At the top of the stairs is a group of Kritters, which march along the ground and on a raised platform with the letter G above it. The enemies are followed by a ledge that drops the duo into a lower area with an exit sign in it. Before passing the sign to complete the level, a Klaptrap attacks the Kongs. | |||
After the Kongs cross this abyss, they reach a set of two platforms that are connected by a stairway that holds a Klump. An abyss is ahead of here, but the primates can easily cross it with a rope. On the opposite side of the pit, they can discover another pair of platforms that are connected by a set of stairs supporting a Klump. An abyss stands between these platforms and another, and a smaller platform hovers across it. The duo can use the platform to cross and then reach another abyss consisting of another small platform that moves in a vertical path above it. It can be used to cross the pit and reach a higher area that connects to another piece of ground with a stairway. A Klump travels along the stairs. A rope swings in a wide abyss ahead of here. The Kongs can grab onto it as it swings to glide over the abyss and then reach a large platform with a DK Barrel above it. They can discover a wide pit nearby with two smaller platforms moving in vertical paths above it. With the use of these platforms, they can make their way over the pit and onto another large platform with a bigger abyss after it. This can be crossed with the use of two more small platforms that both pull them across different parts of it. | |||
Two pieces of ground connected by another stairway can be found on the other side of the abyss with a Klaptrap on them. A set of three platforms set up in a similar way to these is located after a small abyss that can be crossed with the help of a small, black platform in it that begins to fall when landed on. Several Klaptraps stomp along the platforms, which are followed by a wide pit that can only be crossed with the use of a few black platforms found above it. These platforms descend and then fall when landed on. The Kongs can find a [[ | |||
{{br|left}} | {{br|left}} | ||
==Enemies== | ==Enemies== | ||
The following enemies appear in the following quantities: | |||
<gallery> | |||
Klaptrap_DKC.png|[[Klaptrap]] (5) | |||
Klump DKC sprite.png|[[Klump]] (4) | |||
Kritter-DKC.png|[[Kritter]] (16) | |||
Manky_Kong_DKC.png|[[Manky Kong]] (1) | |||
</gallery> | |||
==Items and objects== | ==Items and objects== | ||
The following items and objects appear in the following quantities: | |||
<gallery> | |||
DK Barrel DKC.png|[[DK Barrel]] (3) | |||
Enguarde Token Sprite SNES.png|[[Enguarde]] [[animal token|Token]] (1) | |||
Steel_Keg_DKC.png|[[Iron Barrel|Steel keg]] (1) | |||
</gallery> | |||
===K-O-N-G Letters=== | ===K-O-N-G Letters=== | ||
[[File:BlackoutBasement-SNES-1.png|thumb|The location of the letter G]] | |||
*'''K:''' When the Kongs encounter the second Kritter, they must bounce on it to collect the letter K over a gap. | |||
*'''O:''' Just before the Continue Barrel is a gap that the Kongs can cross by jumping from three bouncing tires. From the last tire, they must bounce down onto an item cache, which then releases the letter O. | |||
*'''N:''' The letter N is in the center between all the barrels in the first [[Bonus Level]]. | |||
*'''G:''' Just before the end of the level, the letter G is hovering over a platform with four Kritters. | |||
{{br}} | |||
==Bonus Levels== | |||
[[File:DKC SNES Blackout Basement BonusRoomB.png|thumb|The second Bonus Level]] | |||
Blackout Basement has two Bonus Levels, listed by their type in the Game Boy Advance version: | |||
=== | |||
| | |||
*'''''Collect the Prizes!''''': Sometime after the Continue Barrel, the Kongs encounter three Klaptraps in a row. They must then from four arrow platforms pointing down. A banana is below the fourth and last platform, and the first [[Bonus Barrel]] is hidden below it. In the [[Bonus Level]], the Kongs must blast from eight [[Barrel Cannon]]s. Each of them have a short trail of a few bananas that lead to the letter N, which is centered between the Barrel Cannons. A pitfall is located between the left and right ends of the area. The Kongs can exit by either going down a pitfall or by exiting from the right side. | |||
*'''''Stop the Barrel!''''': After exiting the first Bonus Level, the Kongs land onto an item cache which releases a steel keg. The lead Kong must pick up the steel keg and go down, throw it at a wall to the left, and ride the steel keg for the remainder of the level. Eventually, the steel keg bumps against a wall to the level exit and rolls left into a wall, opening a path to the second Bonus Level. There, the Kongs must observe a [[Red Balloon|Life Balloon]] as it moves between four barrels until it stops in one. If the Kongs jump at the barrel that the Life Balloon stopped in, they win the Life Balloon as a prize. The Kongs leave the Bonus Level after either winning or losing. | |||
==Gallery== | ==Gallery== | ||
<gallery> | <gallery> | ||
Blackout Basement DKC.png|A trio of Klaptraps attacking the Kongs | |||
Blackout Basement DKC screen 2.png|Donkey Kong holds a barrel during the blackout | |||
DKC SNES Blackout Basement K.png|The letter K | |||
DKC SNES Blackout Basement K.png|The letter O | |||
DKC SNES Blackout Basement K.png|The letter N, in the first Bonus Level | |||
BlackoutBasement-SNES-2.png|The Kongs jump on a platform over an Enguarde Token, which can be reached by a roll-jump. | BlackoutBasement-SNES-2.png|The Kongs jump on a platform over an Enguarde Token, which can be reached by a roll-jump. | ||
BlackoutBasement-GBC.png|Donkey Kong on a platform in the Game Boy Color version | |||
Blackout Basement GBA darkness.png|The Kongs during the blackout in the Game Boy Advance version | |||
BlackoutBasement-GBC.png|Donkey Kong | |||
Blackout Basement GBA darkness.png|The Kongs in the | |||
</gallery> | </gallery> | ||
| Line 141: | Line 70: | ||
|Spa=Sótano Oscuro | |Spa=Sótano Oscuro | ||
|SpaM=Dark Basement | |SpaM=Dark Basement | ||
| | |Fre=Cave Camouflée (SNES)<br>Cave Noir (GBC)<br> Sous-sol nuit noire (GBA) | ||
| | |FreM=Camouflaged Basement<br>Dark Basement<br> Dark Night Underground (GBA) | ||
|Ger=Kaos-Keller (GBA) | |Ger=Kaos-Keller (GBA) | ||
|GerM=Chaos Basement | |GerM=Chaos Basement | ||
| Line 148: | Line 77: | ||
|ItaM=Bad Basement | |ItaM=Bad Basement | ||
}} | }} | ||
{{DKC}} | {{DKC}} | ||
{{DKC | {{DKC levels}} | ||
[[Category:Factories]] | [[Category:Factories]] | ||
[[Category:Donkey Kong Island]] | [[Category:Donkey Kong Island]] | ||
[[Category:Donkey Kong Country | [[Category:Donkey Kong Country levels]] | ||
Latest revision as of 14:39, January 20, 2024
| Level | |
|---|---|
| Blackout Basement | |

| |
| Level code | 5 - 6 (SNES & GBC) 5 - 5 (GBA) |
| Game | Donkey Kong Country |
| Music track | Fear Factory |
| << Directory of levels (SNES & GBC) >> | |
| << Directory of levels (GBA) >> | |
Blackout Basement is the twenty-eighth level in Donkey Kong Country and the sixth and final level of Kremkroc Industries, Inc. In the Game Boy Advance remake Blackout Basement and Mine Cart Madness switched positions, making Blackout Basement the fifth level of the world and the twenty-seventh overall level. Blackout Basement is both the second and last factory level, and it has a unique feature where the lights flicker on and off every few seconds. While the surroundings are entirely dark, the only things visible on-screen are the Kongs, items (such as bananas), barrels, and faint outlines of platform edges. Because of the flickering lights, the Kongs must be cautious with their movements. The enemies are not visible while the level is dark. There are several pitfalls which Donkey Kong and Diddy Kong can cross by using floating platforms and swinging ropes.
Layout


At the beginning of the level, the Kongs travel down a long set of stairs with the level's first DK Barrel at the bottom of it. A Kritter marches along a flat piece of ground after a smaller stairway. Another stairway with a Kritter at the top of it can be found after a nearby abyss. The Kongs can find a second pit after the foe with the letter K above it. They come up to more Kritter enemies as they travel down a stairway located after this abyss. The enemies are followed by another abyss that can be crossed with the aid of a stationary platform floating in it. The duo can find a group of bananas on a flat area of ground near here, which is followed by a much wider pit containing three stationary platforms. An Enguarde Token hangs under the platform in the middle of this abyss, which is followed by a stairway holding a few Kritters. After climbing the stairs, the Kongs come up to an abyss containing a solid platform with a bouncy tire sticking out of it. The tire can assist them in crossing the abyss and reach a series of platforms that are connected by stairways that Kritters march along. A DK Barrel wobbles on the highest platform, which is then followed by a larger platform with a wide abyss after it. Three platforms float above this abyss, each with a bouncy tire on it that the primates must bounce on to jump higher. On the other side of the pit, the two friends can find a solid area of ground with a small section of it that can be broken to reveal the letter O. The level's Continue Barrel floats above and abyss with a platform supporting a tire under it.
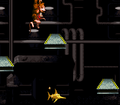
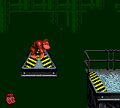
After the Kongs cross this abyss, they reach a set of two platforms that are connected by a stairway that holds a Klump. An abyss is ahead of here, but the primates can easily cross it with a rope. On the opposite side of the pit, they can discover another pair of platforms that are connected by a set of stairs supporting a Klump. An abyss stands between these platforms and another, and a smaller platform hovers across it. The duo can use the platform to cross and then reach another abyss consisting of another small platform that moves in a vertical path above it. It can be used to cross the pit and reach a higher area that connects to another piece of ground with a stairway. A Klump travels along the stairs. A rope swings in a wide abyss ahead of here. The Kongs can grab onto it as it swings to glide over the abyss and then reach a large platform with a DK Barrel above it. They can discover a wide pit nearby with two smaller platforms moving in vertical paths above it. With the use of these platforms, they can make their way over the pit and onto another large platform with a bigger abyss after it. This can be crossed with the use of two more small platforms that both pull them across different parts of it. Two pieces of ground connected by another stairway can be found on the other side of the abyss with a Klaptrap on them. A set of three platforms set up in a similar way to these is located after a small abyss that can be crossed with the help of a small, black platform in it that begins to fall when landed on. Several Klaptraps stomp along the platforms, which are followed by a wide pit that can only be crossed with the use of a few black platforms found above it. These platforms descend and then fall when landed on. The Kongs can find a steel keg on the other side of the abyss that is followed by a long series of platforms that are connected by short stairways. After passing a Manky Kong in this area, they head past a sign indicating that the level is near complete and then travel up a longer stairway. At the top of the stairs is a group of Kritters, which march along the ground and on a raised platform with the letter G above it. The enemies are followed by a ledge that drops the duo into a lower area with an exit sign in it. Before passing the sign to complete the level, a Klaptrap attacks the Kongs.
Enemies
The following enemies appear in the following quantities:

Klaptrap (5)

Klump (4)

Kritter (16)

Manky Kong (1)


Items and objects
The following items and objects appear in the following quantities:


K-O-N-G Letters

- K: When the Kongs encounter the second Kritter, they must bounce on it to collect the letter K over a gap.
- O: Just before the Continue Barrel is a gap that the Kongs can cross by jumping from three bouncing tires. From the last tire, they must bounce down onto an item cache, which then releases the letter O.
- N: The letter N is in the center between all the barrels in the first Bonus Level.
- G: Just before the end of the level, the letter G is hovering over a platform with four Kritters.
Bonus Levels

Blackout Basement has two Bonus Levels, listed by their type in the Game Boy Advance version:
- Collect the Prizes!: Sometime after the Continue Barrel, the Kongs encounter three Klaptraps in a row. They must then from four arrow platforms pointing down. A banana is below the fourth and last platform, and the first Bonus Barrel is hidden below it. In the Bonus Level, the Kongs must blast from eight Barrel Cannons. Each of them have a short trail of a few bananas that lead to the letter N, which is centered between the Barrel Cannons. A pitfall is located between the left and right ends of the area. The Kongs can exit by either going down a pitfall or by exiting from the right side.
- Stop the Barrel!: After exiting the first Bonus Level, the Kongs land onto an item cache which releases a steel keg. The lead Kong must pick up the steel keg and go down, throw it at a wall to the left, and ride the steel keg for the remainder of the level. Eventually, the steel keg bumps against a wall to the level exit and rolls left into a wall, opening a path to the second Bonus Level. There, the Kongs must observe a Life Balloon as it moves between four barrels until it stops in one. If the Kongs jump at the barrel that the Life Balloon stopped in, they win the Life Balloon as a prize. The Kongs leave the Bonus Level after either winning or losing.
Gallery

A trio of Klaptraps attacking the Kongs
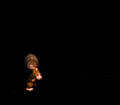
Donkey Kong holds a barrel during the blackout
The letter K
The letter O
The letter N, in the first Bonus Level
The Kongs jump on a platform over an Enguarde Token, which can be reached by a roll-jump.
Donkey Kong on a platform in the Game Boy Color version
The Kongs during the blackout in the Game Boy Advance version


Names in other languages
| Language | Name | Meaning |
|---|---|---|
| Japanese | オンボロこうじょう Onboro kōjō |
Worn-out Factory |
| French | Cave Camouflée (SNES) Cave Noir (GBC) Sous-sol nuit noire (GBA) |
Camouflaged Basement Dark Basement Dark Night Underground (GBA) |
| German | Kaos-Keller (GBA) |
Chaos Basement |
| Italian | Cantina Cattiva |
Bad Basement |
| Spanish | Sótano Oscuro |
Dark Basement |