Jungle Jinx (Donkey Kong Land 2): Difference between revisions
m (Text replacement - "\|notes=[^\n]*\n" to "") |
(dk wiki) |
||
| Line 1: | Line 1: | ||
{{ | {{italic title|Jungle Jinx (''Donkey Kong Land 2'')}} | ||
{{Levelbox | {{Levelbox | ||
|title=Jungle Jinx | |title=Jungle Jinx | ||
| Line 10: | Line 10: | ||
|after=[[Black Ice Battle (Donkey Kong Land 2)|>>]] | |after=[[Black Ice Battle (Donkey Kong Land 2)|>>]] | ||
}} | }} | ||
'''Jungle Jinx''' is the thirty-fifth [[level]] in ''[[Donkey Kong Land 2]]'' | '''Jungle Jinx''' is the thirty-fifth [[level]] in ''[[Donkey Kong Land 2]]'' and the first level of the [[Lost World (Donkey Kong Country 2: Diddy's Kong Quest)|Lost World]]. | ||
==Summary== | |||
Jungle Jinx introduces [[spike (obstacle)|spike]]s, which are large obstacles that stick out from the ground. [[Diddy Kong|Diddy]] and [[Dixie Kong|Dixie]] must avoid [[Klobber]]s, who try to knock them into spikes and abysses. Many [[Zinger]]s fly over the gaps, and there are [[Kruncha]]s who get in the [[Kong]]s' way. Only one [[Kaboing]] appears in the level. Some [[Banana Coin]]s can be found by taking offbeat paths. One example is where the Kongs must jump from hooks to progress through the level, but instead of taking the usual path, they must continue east of the hooks, and acquire the Banana Coin on a lower level beneath the letter O. | |||
== | Despite not being a bramble level, Jungle Jinx reuses the Stickerbrush Symphony theme from two earlier levels, [[Bramble Scramble (Donkey Kong Land 2)|Bramble Scramble]] and [[Bramble Blast (Donkey Kong Land 2)|Bramble Blast]]. | ||
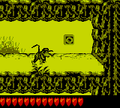
[[File:JungleJinx-Bridge.png|thumb|left|Diddy Kong approaching a | |||
==Layout== | |||
[[File:JungleJinx-Bridge.png|thumb|left|Diddy Kong approaching a Kruncha]] | |||
When they begin the level, the Kongs must travel east and dodge two Klampons. Then, they need to hop over a rather wide abyss, and drop down a couple ledges. After that, the monkeys have to walk across the path and avoid some more enemies, including the mighty Krunchas. From there, they must bounce off of a Klobber's head to reach a high ledge, and jump over some spikes. They should continue forward and avoid foes, until they get to a large abyss. They must cross it by using a few hooks, but while watching out for a nearby Zinger. After that, they need to keep going and get across three small gaps, followed by another one, which must be crossed with the aid of a Flitter flying around, or a well-timed jump. After dropping down a high ledge, Diddy and Dixie must use hooks to climb up several ledges, and then encounter the Star Barrel. | When they begin the level, the Kongs must travel east and dodge two Klampons. Then, they need to hop over a rather wide abyss, and drop down a couple ledges. After that, the monkeys have to walk across the path and avoid some more enemies, including the mighty Krunchas. From there, they must bounce off of a Klobber's head to reach a high ledge, and jump over some spikes. They should continue forward and avoid foes, until they get to a large abyss. They must cross it by using a few hooks, but while watching out for a nearby Zinger. After that, they need to keep going and get across three small gaps, followed by another one, which must be crossed with the aid of a Flitter flying around, or a well-timed jump. After dropping down a high ledge, Diddy and Dixie must use hooks to climb up several ledges, and then encounter the Star Barrel. | ||
At this point, the heroes need to continue east and cross a wide abyss with a good jump. Then, they must keep going forward and jump over another gap, which has a Zinger in the center of it. Once they get over this gap, they need to walk along the jungle path, where they'll find yet another abyss. The group should hop across this, and then travel eastward more. Eventually, they will have to drop down a ledge again and cross three wide gaps, while also dodging Zinger and Klampons. Once past this area, they need to avoid more foes through the crazy jungle. As they move on, the heroes will have to jump over two small abysses, and watch out for Zingers, Klobbers, and even a Kruncha. Soon, they will come up to an abyss, although a long log acts as a bridge to help them cross. The Kongs should carefully, cross and look out for the hazards around them, such as Zingers. After this, though, they will find a spring, and it will bounce them out of the level. | At this point, the heroes need to continue east and cross a wide abyss with a good jump. Then, they must keep going forward and jump over another gap, which has a Zinger in the center of it. Once they get over this gap, they need to walk along the jungle path, where they'll find yet another abyss. The group should hop across this, and then travel eastward more. Eventually, they will have to drop down a ledge again and cross three wide gaps, while also dodging Zinger and Klampons. Once past this area, they need to avoid more foes through the crazy jungle. As they move on, the heroes will have to jump over two small abysses, and watch out for Zingers, Klobbers, and even a Kruncha. Soon, they will come up to an abyss, although a long log acts as a bridge to help them cross. The Kongs should carefully, cross and look out for the hazards around them, such as Zingers. After this, though, they will find a spring, and it will bounce them out of the level. | ||
{{br|left}} | |||
==Enemies== | ==Enemies== | ||
*[[Kaboing]] | |||
*[[Klampon]] | |||
*[[Klobber]] | |||
*[[Kruncha]] | *[[Kruncha]] | ||
*[[Spiny (Donkey Kong Country 2: Diddy's Kong Quest)|Spiny]] | *[[Spiny (Donkey Kong Country 2: Diddy's Kong Quest)|Spiny]] | ||
*[[Zinger]] | *[[Zinger]] | ||
==Items== | ==Items and objects== | ||
*[[Banana Coin]]: 3 | *[[Banana Coin]]: 3 | ||
*[[DK Barrel]]: 3 | *[[DK Barrel]]: 3 | ||
===K-O-N-G Letters=== | ===K-O-N-G Letters=== | ||
*K: After a banana trail below a hook | *K: After a banana trail and below a hook near a Zinger. | ||
*O: Directly underneath the [[Star Barrel]]. | *O: Directly underneath the [[Star Barrel]]. | ||
*N: Above a spike pit past the Star Barrel. | *N: Above a spike pit past the Star Barrel. | ||
*G: Shortly proceeding a Flitter will be a banana trail that goes downward; Dixie should use her [[Helicopter Spin]] to instead jump and go east of the path to grab a hook that will lead her to the "G" Letter. | *G: Shortly proceeding a Flitter will be a banana trail that goes downward; Dixie should use her [[Helicopter Spin]] to instead jump and go east of the path to grab a hook that will lead her to the "G" Letter. | ||
==Bonus Level== | |||
{|class="wikitable" | |||
!Image | |||
!Description | |||
|- | |||
|[[File:JungleJinx-Bonus.png]] | |||
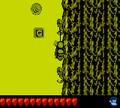
|'''Find the Token!'''<br>When the Kongs find the letter N, they must continue past to Neeks and a Spiny, who continues to walk down the path up until the [[Bonus Barrel]], which is hovering in midair next to the ground. In the Bonus Level, Diddy or Dixie have 10 seconds to reach the DK Coin at the end. They must continue forward and jump across a few gaps while avoiding Flitters and Zingers along the way. The Kongs must also jump over some large spikes along the way. | |||
|} | |||
==Gallery== | |||
<gallery> | <gallery> | ||
JungleJinx-O.png|The letter O | JungleJinx-O.png|The letter O | ||
JungleJinx-G.png|The letter G | JungleJinx-G.png|The letter G | ||
</gallery> | </gallery> | ||
==Names in other languages== | ==Names in other languages== | ||
| Line 53: | Line 63: | ||
==Trivia== | ==Trivia== | ||
* | *Jungle Jinx is called "Tire Jungle" in the Japanese version of ''Donkey Kong Land 2'. Despite this, the level does not have any tires, unlike the [[Jungle Jinx (Donkey Kong Country 2: Diddy's Kong Quest)|''Donkey Kong Country 2'' counterpart]]. | ||
{{DKL2}} | {{DKL2}} | ||
Revision as of 18:30, October 12, 2019
Template:Levelbox Jungle Jinx is the thirty-fifth level in Donkey Kong Land 2 and the first level of the Lost World.
Summary
Jungle Jinx introduces spikes, which are large obstacles that stick out from the ground. Diddy and Dixie must avoid Klobbers, who try to knock them into spikes and abysses. Many Zingers fly over the gaps, and there are Krunchas who get in the Kongs' way. Only one Kaboing appears in the level. Some Banana Coins can be found by taking offbeat paths. One example is where the Kongs must jump from hooks to progress through the level, but instead of taking the usual path, they must continue east of the hooks, and acquire the Banana Coin on a lower level beneath the letter O.
Despite not being a bramble level, Jungle Jinx reuses the Stickerbrush Symphony theme from two earlier levels, Bramble Scramble and Bramble Blast.
Layout

When they begin the level, the Kongs must travel east and dodge two Klampons. Then, they need to hop over a rather wide abyss, and drop down a couple ledges. After that, the monkeys have to walk across the path and avoid some more enemies, including the mighty Krunchas. From there, they must bounce off of a Klobber's head to reach a high ledge, and jump over some spikes. They should continue forward and avoid foes, until they get to a large abyss. They must cross it by using a few hooks, but while watching out for a nearby Zinger. After that, they need to keep going and get across three small gaps, followed by another one, which must be crossed with the aid of a Flitter flying around, or a well-timed jump. After dropping down a high ledge, Diddy and Dixie must use hooks to climb up several ledges, and then encounter the Star Barrel.
At this point, the heroes need to continue east and cross a wide abyss with a good jump. Then, they must keep going forward and jump over another gap, which has a Zinger in the center of it. Once they get over this gap, they need to walk along the jungle path, where they'll find yet another abyss. The group should hop across this, and then travel eastward more. Eventually, they will have to drop down a ledge again and cross three wide gaps, while also dodging Zinger and Klampons. Once past this area, they need to avoid more foes through the crazy jungle. As they move on, the heroes will have to jump over two small abysses, and watch out for Zingers, Klobbers, and even a Kruncha. Soon, they will come up to an abyss, although a long log acts as a bridge to help them cross. The Kongs should carefully, cross and look out for the hazards around them, such as Zingers. After this, though, they will find a spring, and it will bounce them out of the level.
Enemies
Items and objects
- Banana Coin: 3
- DK Barrel: 3
K-O-N-G Letters
- K: After a banana trail and below a hook near a Zinger.
- O: Directly underneath the Star Barrel.
- N: Above a spike pit past the Star Barrel.
- G: Shortly proceeding a Flitter will be a banana trail that goes downward; Dixie should use her Helicopter Spin to instead jump and go east of the path to grab a hook that will lead her to the "G" Letter.
Bonus Level
| Image | Description |
|---|---|

|
Find the Token! When the Kongs find the letter N, they must continue past to Neeks and a Spiny, who continues to walk down the path up until the Bonus Barrel, which is hovering in midair next to the ground. In the Bonus Level, Diddy or Dixie have 10 seconds to reach the DK Coin at the end. They must continue forward and jump across a few gaps while avoiding Flitters and Zingers along the way. The Kongs must also jump over some large spikes along the way. |
Gallery
The letter O
The letter G


Names in other languages
| Language | Name | Meaning |
|---|---|---|
| Japanese | タイヤジャングル Taiya Janguru |
Tire Jungle |
Trivia
- Jungle Jinx is called "Tire Jungle" in the Japanese version of Donkey Kong Land 2'. Despite this, the level does not have any tires, unlike the Donkey Kong Country 2 counterpart.