Chain Link Chamber (Donkey Kong Land 2): Difference between revisions
(rewrite) |
LinkTheLefty (talk | contribs) mNo edit summary |
||
| (8 intermediate revisions by 3 users not shown) | |||
| Line 1: | Line 1: | ||
{{italic title| | {{italic title|id=yes}} | ||
{{ | {{level infobox | ||
|image=[[File:Chain Link Chamber DKL2.png]] | |image=[[File:Chain Link Chamber DKL2.png]] | ||
|code=5 - 5 | |code=5 - 5 | ||
|world=[[K. Rool's Keep]] | |world=[[K. Rool's Keep]] | ||
|game=''[[Donkey Kong Land 2]]'' | |game=''[[Donkey Kong Land 2]]'' | ||
| | |track=Krook's March | ||
|before=[[Clapper's Cavern (Donkey Kong Land 2)|<<]] | |before=[[Clapper's Cavern (Donkey Kong Land 2)|<<]] | ||
|after=[[Toxic Tower (Donkey Kong Land 2)|>>]] | |after=[[Toxic Tower (Donkey Kong Land 2)|>>]] | ||
}} | }} | ||
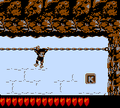
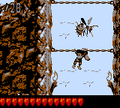
'''Chain Link Chamber''' is the thirty-second [[level]] in ''[[Donkey Kong Land 2]]'' and the fifth level of [[K. Rool's Keep]]. | '''Chain Link Chamber''' is the thirty-second [[level]] in ''[[Donkey Kong Land 2]]'' and the fifth level of [[K. Rool's Keep]]. It takes place in a castle with many chain links that [[Diddy Kong]] and [[Dixie Kong]] must climb to reach the end of the level. While doing so, the [[Kong]]s mainly have to avoid [[Klinger]]s and [[Zinger]]s, which are located around the chains. | ||
==Layout== | ==Layout== | ||
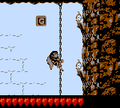
[[File:Chain Link Chamber DKL2 screenshot.png|thumb|left|Dixie climbing between a Klinger and a Zinger]] | [[File:Chain Link Chamber DKL2 screenshot.png|thumb|left|Dixie climbing between a Klinger and a Zinger]] | ||
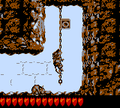
When they start the level, the Kongs must climb up many twisting and overlapping chains. They will have to pull themselves up to the area above the start and avoid a few Klingers sliding down the dungeon chains. Once at top of these chains, they will need to jump off to the right and walk along the path. The heroes must begin to climb straight up another rope. They will enter a large chamber of Zingers and Klingers. They will also notice that there are two different directions to travel. If they take the chains upward on the right corner of the area, they must dodge a few Klingers, while on the other side, they have to avoid several more enemies and begin to travel upwards. Either way, though, they will meet up at the same point, and have to climb up yet another chain. As they make their way up, they will encounter several Krooks. They will throw their sharp hooks at the Kongs, to they have to carefully watch where they are going. After passing the four foes, they will need to continue upwards and move up some more chains, until finally, they find the Star Barrel. | When they start the level, the Kongs must climb up many twisting and overlapping chains. They will have to pull themselves up to the area above the start and avoid a few Klingers sliding down the dungeon chains. Once at top of these chains, they will need to jump off to the right and walk along the path. The heroes must begin to climb straight up another rope. They will enter a large chamber of Zingers and Klingers. They will also notice that there are two different directions to travel. If they take the chains upward on the right corner of the area, they must dodge a few Klingers, while on the other side, they have to avoid several more enemies and begin to travel upwards. Either way, though, they will meet up at the same point, and have to climb up yet another chain. As they make their way up, they will encounter several Krooks. They will throw their sharp hooks at the Kongs, to they have to carefully watch where they are going. After passing the four foes, they will need to continue upwards and move up some more chains, until finally, they find the Star Barrel. | ||
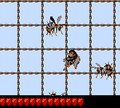
Halfway through the level, the heroes will need to travel on east, and then hop up some chains going north. While hopping up the rows of bars and ropes, they will find a few dangerous foes; Zingers and a Krook. They should try to dodge both enemies and climb up the next chain above. Once they proceed up the whole length of the short chain, the monkeys will have to jump up some more ropes. A little while after that though, they will meet several more Zingers in another large chamber. They must travel to the far left corner safely and then make way up a lone chain. At the top of this, the group will need to watch out for a Zinger and reach the far end of the floor they are on. Then, they must climb up the chains above. This chain is long, and a few Klinger will be found sliding down it. Once they get to the top, they must climb down a smaller rope, and proceed up another one. After avoiding the dangerous hazards on this chain, the monkeys will have to jump to the right and defeat a lone Kannon, without hitting the [[kannonball]]s he shoots at them. From there, they must travel up another chain and soon have to leap up a few ledges, as well as watch out for another Kannon. At that point, they'll find yet another chain. As usual, they must climb up it. It will lead them into another chamber, which they must exit almost unharmed by Zingers, who will be seen scattered all around the area. At the top of the chamber, the group should bounce to the left and walk down the path, where they'll see a spring. When jumped on, it will fling them out of the level. | Halfway through the level, the heroes will need to travel on east, and then hop up some chains going north. While hopping up the rows of bars and ropes, they will find a few dangerous foes; Zingers and a Krook. They should try to dodge both enemies and climb up the next chain above. Once they proceed up the whole length of the short chain, the monkeys will have to jump up some more ropes. A little while after that though, they will meet several more Zingers in another large chamber. They must travel to the far left corner safely and then make way up a lone chain. At the top of this, the group will need to watch out for a Zinger and reach the far end of the floor they are on. Then, they must climb up the chains above. This chain is long, and a few Klinger will be found sliding down it. Once they get to the top, they must climb down a smaller rope, and proceed up another one. After avoiding the dangerous hazards on this chain, the monkeys will have to jump to the right and defeat a lone Kannon, without hitting the [[Cannonball|kannonball]]s he shoots at them. From there, they must travel up another chain and soon have to leap up a few ledges, as well as watch out for another Kannon. At that point, they'll find yet another chain. As usual, they must climb up it. It will lead them into another chamber, which they must exit almost unharmed by Zingers, who will be seen scattered all around the area. At the top of the chamber, the group should bounce to the left and walk down the path, where they'll see a spring. When jumped on, it will fling them out of the level. | ||
==Enemies== | ==Enemies== | ||
| Line 30: | Line 26: | ||
==Items and objects== | ==Items and objects== | ||
*[[Banana | The following items and objects appear in the following quantities: | ||
*[[Banana Coin]]: 1 | |||
*[[DK Barrel]]: 3 | *[[DK Barrel]]: 3 | ||
===KONG Letters=== | |||
=== | |||
*K: Found in the upper right corner of the starting area. | *K: Found in the upper right corner of the starting area. | ||
*O: Sticking to the left side of a fork in the path and climbing the chain up, the player needs to take the detour right which will lead to the "O" Letter near a Neek. | *O: Sticking to the left side of a fork in the path and climbing the chain up, the player needs to take the detour right which will lead to the "O" Letter near a Neek. | ||
| Line 39: | Line 35: | ||
*G: In the room with two Kannons, climbing the chain on the east side to the top will lead to the "G" letter. | *G: In the room with two Kannons, climbing the chain on the east side to the top will lead to the "G" letter. | ||
=== | ===Cranky's Video Game Hero Coin=== | ||
After the Star Barrel, the Kongs encounter the first Krook on the left. They must defeat it and go left into the path behind it. They must avoid a Zinger, then climb down a rope into a small area with the [[DK Coin|Video Game Hero Coin]]. | |||
==Bonus Levels== | ==Bonus Levels== | ||
*'''Collect the Stars!''': When the Kongs encounter the second Krook, they must defeat it and go in the narrow path behind it. They must climb up a vertical chain and jump into a [[Bonus Barrel]] to the right. In the [[Bonus Level]], Diddy or Dixie must collect 16 [[ | *'''Collect the Stars!''': When the Kongs encounter the second Krook, they must defeat it and go in the narrow path behind it. They must climb up a vertical chain and jump into a [[Bonus Barrel]] to the right. In the [[Bonus Level]], Diddy or Dixie must collect 16 [[star (Donkey Kong franchise)|star]]s within 20 seconds. They can collect the stars by jumping from small platforms. Many of the stars are at the top, and some are floating in the gaps between the platforms. After collecting every star, the [[Kremkoin]] appears at the bottom-center of the area. | ||
*'''Destroy them All!''': Shortly after the | *'''Destroy them All!''': Shortly after the Video Game Hero Coin, the Kongs go into a chain grid area with Zingers. They must jump up the area from the right side until they find a vertical rope above them. They must cling on the rope and climb up to enter the second Bonus Barrel. In the second Bonus Level, the Kongs have 15 seconds to defeat three Kaboings and a Spiny in a relatively flat area. After defeating them, the Kremkoin appears at the end of the area. | ||
==Gallery== | ==Gallery== | ||
| Line 56: | Line 52: | ||
</gallery> | </gallery> | ||
==Names in other languages== | |||
{{foreign names | |||
|Jap=クサリのとう | |||
|JapR=Kusari no Tō | |||
|JapM=Chain Tower | |||
}} | |||
{{DKL2}} | {{DKL2}} | ||
[[Category:Donkey Kong Land 2 | [[Category:Donkey Kong Land 2 levels]] | ||
[[Category:Crocodile Isle]] | [[Category:Crocodile Isle]] | ||
[[Category:Dungeons]] | [[Category:Dungeons]] | ||
Latest revision as of 20:21, January 2, 2024
| Level | |
|---|---|
| Chain Link Chamber | |

| |
| Level code | 5 - 5 |
| World | K. Rool's Keep |
| Game | Donkey Kong Land 2 |
| Music track | Krook's March |
| << Directory of levels >> | |
Chain Link Chamber is the thirty-second level in Donkey Kong Land 2 and the fifth level of K. Rool's Keep. It takes place in a castle with many chain links that Diddy Kong and Dixie Kong must climb to reach the end of the level. While doing so, the Kongs mainly have to avoid Klingers and Zingers, which are located around the chains.
Layout[edit]

When they start the level, the Kongs must climb up many twisting and overlapping chains. They will have to pull themselves up to the area above the start and avoid a few Klingers sliding down the dungeon chains. Once at top of these chains, they will need to jump off to the right and walk along the path. The heroes must begin to climb straight up another rope. They will enter a large chamber of Zingers and Klingers. They will also notice that there are two different directions to travel. If they take the chains upward on the right corner of the area, they must dodge a few Klingers, while on the other side, they have to avoid several more enemies and begin to travel upwards. Either way, though, they will meet up at the same point, and have to climb up yet another chain. As they make their way up, they will encounter several Krooks. They will throw their sharp hooks at the Kongs, to they have to carefully watch where they are going. After passing the four foes, they will need to continue upwards and move up some more chains, until finally, they find the Star Barrel.
Halfway through the level, the heroes will need to travel on east, and then hop up some chains going north. While hopping up the rows of bars and ropes, they will find a few dangerous foes; Zingers and a Krook. They should try to dodge both enemies and climb up the next chain above. Once they proceed up the whole length of the short chain, the monkeys will have to jump up some more ropes. A little while after that though, they will meet several more Zingers in another large chamber. They must travel to the far left corner safely and then make way up a lone chain. At the top of this, the group will need to watch out for a Zinger and reach the far end of the floor they are on. Then, they must climb up the chains above. This chain is long, and a few Klinger will be found sliding down it. Once they get to the top, they must climb down a smaller rope, and proceed up another one. After avoiding the dangerous hazards on this chain, the monkeys will have to jump to the right and defeat a lone Kannon, without hitting the kannonballs he shoots at them. From there, they must travel up another chain and soon have to leap up a few ledges, as well as watch out for another Kannon. At that point, they'll find yet another chain. As usual, they must climb up it. It will lead them into another chamber, which they must exit almost unharmed by Zingers, who will be seen scattered all around the area. At the top of the chamber, the group should bounce to the left and walk down the path, where they'll see a spring. When jumped on, it will fling them out of the level.
Enemies[edit]
Items and objects[edit]
The following items and objects appear in the following quantities:
- Banana Coin: 1
- DK Barrel: 3
KONG Letters[edit]
- K: Found in the upper right corner of the starting area.
- O: Sticking to the left side of a fork in the path and climbing the chain up, the player needs to take the detour right which will lead to the "O" Letter near a Neek.
- N: In the area with a large grid of chains and several Zingers, sticking to the path to the far left and climbing up the chain will lead the player to the "N" letter.
- G: In the room with two Kannons, climbing the chain on the east side to the top will lead to the "G" letter.
Cranky's Video Game Hero Coin[edit]
After the Star Barrel, the Kongs encounter the first Krook on the left. They must defeat it and go left into the path behind it. They must avoid a Zinger, then climb down a rope into a small area with the Video Game Hero Coin.
Bonus Levels[edit]
- Collect the Stars!: When the Kongs encounter the second Krook, they must defeat it and go in the narrow path behind it. They must climb up a vertical chain and jump into a Bonus Barrel to the right. In the Bonus Level, Diddy or Dixie must collect 16 stars within 20 seconds. They can collect the stars by jumping from small platforms. Many of the stars are at the top, and some are floating in the gaps between the platforms. After collecting every star, the Kremkoin appears at the bottom-center of the area.
- Destroy them All!: Shortly after the Video Game Hero Coin, the Kongs go into a chain grid area with Zingers. They must jump up the area from the right side until they find a vertical rope above them. They must cling on the rope and climb up to enter the second Bonus Barrel. In the second Bonus Level, the Kongs have 15 seconds to defeat three Kaboings and a Spiny in a relatively flat area. After defeating them, the Kremkoin appears at the end of the area.
Gallery[edit]
The letter K
The letter O

Diddy climbs a vertical rope, just beneath a Krook
Dixie hanging on a horizontal rope beneath a Zinger
Dixie encounters two Zingers
The letter G


Names in other languages[edit]
| Language | Name | Meaning |
|---|---|---|
| Japanese | クサリのとう Kusari no Tō |
Chain Tower |