Stalagmite Frights: Difference between revisions
LinkTheLefty (talk | contribs) mNo edit summary |
|||
| (47 intermediate revisions by 23 users not shown) | |||
| Line 1: | Line 1: | ||
{{level | {{level infobox | ||
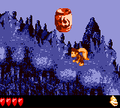
|image=[[ | |image=[[File:Stalagmite Frights.png]] | ||
|code=5-6 | |||
|code=5 - 6 | |game=''[[Donkey Kong Land III]]'' | ||
|game=''[[Donkey Kong Land III]] | |||
|before=[[Ugly Ducting|<<]] | |before=[[Ugly Ducting|<<]] | ||
|after=[[ | |after=[[K Rool Duel|>>]] | ||
}} | }} | ||
'''Stalagmite Frights''' is the thirtieth level | '''Stalagmite Frights''' is the thirtieth level of ''[[Donkey Kong Land III]]'' and the sixth and last level of [[Tin Can Valley]]. The level introduces [[Boo Barrel|Ghost Barrel]]s, and the [[Kong]]s must enter them to blast up to higher areas. About halfway through the level, Dixie and Kiddy can transform into [[Squitter]] from his [[Animal Barrel]]. There are two [[No Animal Sign]]s: one is the normal path another high above the first one, only reachable by using Squitter's web platforms, and the second No Animal Sign's area is where the [[Koin]] is. | ||
==Layout== | |||
From the start of the level, the heroes must head east and defeat some enemies. Soon, they will come up to a [[Booster Barrel]]. It will lead them to a higher area, where the Kongs must begin to travel west. When they see the second Ghost Barrel, they should wait until it aims upwards and then shoot up to an even higher area with it. There, the heroes must start to head west again. They will come up to some [[Re-Koil|Rekoil]]s, a [[Krumple]], a [[Krimp]], and a [[Bristles]] until they find a gap with an [[Animal Barrel]] in it. The Kongs should get into the barrel and turn into Squitter. From there, the transformed Kongs, now as Squitter, must continue east, beating many [[Buzz (enemy)|Buzz]]es with webs. Squitter will soon find a barrel, which he should jump into and get to a lower part of the level. There, he will suddenly be forced in the [[Star Barrel]]. | |||
Halfway the spider will need to start going west again and, as before, defeat several different kinds of enemies. At some point, the spider will find himself near a [[No Animal Sign]]. When this is passed, he will turn into the Kongs again. From there, the group must drop down a ledge and walk more westward. Soon, they will find a barrel. If they jump into it, they will be blasted to an even lower section of Stalagmite Frights. Down there, the heroes must journey to the east. However, this trip is not as easy as the trials that were endured before. This time, the Kongs must watch out for the appearing and disappearing Ghost Barrels. If the Kongs are caught in them, they will be shot into a Buzz. Therefore, they should be extra careful in this area. After this part is passed, [[Dixie Kong]] and [[Kiddy Kong]] must shoot up a Ghost Barrel to get up a ledge. Up on this ledge, they will come up to an area filled with many Buzzes around a Ghost Barrel. When this barrel is aiming to the lower-right corner of the screen, the Kongs must quickly jump into it and continue through the level. After going east and defeating many enemies, the Kongs find the [[Level Flag|End of Level Flag]], guarded by a [[Kuchuka]]. The Kongs must avoid the enemy to activate it. | |||
== | ==Enemies== | ||
*[[Buzz (enemy)|Buzz]] | |||
*[[Sneek]] | |||
*[[Re-Koil|Rekoil]] | |||
*[[Krumple]] | |||
*[[Bristles]] | |||
*[[Kuchuka]] | |||
==Items and objects== | |||
The following items and objects appear in the following quantities: | |||
*[[Animal Barrel|Squitter Barrel]]: 2 | |||
*[[Bear coin]]: 1 | |||
*[[DK Barrel]]s: 4 | |||
===K-O-N-G Letters=== | |||
*K: Encountered shorty after the first Booster Barrel. | |||
*O: Located at a depression in the path after becoming Squitter. | |||
*N: In an upper left crook of the cavern wall near some Sneek and Bristles. | |||
*G: Near the End of Level Flag, Kiddy must jump onto a Krumple to reach [[KONG Letters|the letter G]]. | |||
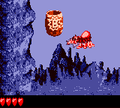
== | ===DK Coin=== | ||
[[File:Stalagmite Frights DKL3 Koin.png|thumb|The Koin of Stalagmite Frights]] | |||
After the letter N, Squitter must continue until finding a lone banana at the top of the screen. With his web platforms, Squitter must go to the banana and travel up a gap in the ceiling. Squitter finds a nearby [[Iron Barrel|Steel Barrel]], which he cannot pick up, so he must walk across a nearby No Animal Sign to transform back into the Kongs. Dixie or Kiddy must pick up the Steel Barrel and throw it at the left wall behind [[Koin]]. The Steel Barrel bounces into Koin from behind, defeating him and rewarding the [[DK Coin]] to the Kongs. | |||
{{br}} | |||
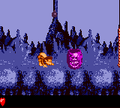
== | ==Bonus Levels== | ||
[[File:Stalagmite Frights DKL3 Bonus Level 2.png|thumb|The second Bonus Level of Stalagmite Frights]] | |||
Stalagmite Frights has two [[Bonus Level]]s, listed by type: | |||
*'''Find the Token!''': Shortly after the letter O, Squitter finds a Barrel Cannon. Instead of going into the Barrel Cannon, Squitter must create web platforms around it and continue up into a gap in the ceiling. A Ghost Barrel is within the gap, and Squitter must enter it to blast up to a high ledge and then continue west. Squitter encounters some Rekoils and Buzzes along the way before entering the [[Bonus Barrel]] itself. In the [[Bonus Level]], Squitter has twenty seconds to get the [[Bonus Coin (Donkey Kong franchise)|Bonus Coin]] on the other side, and he must dodge several Kopters as they descend from above. | |||
*'''Find the Token!''': To find the second Bonus Level, the Kongs must go past the letter N and continue along the path. When they reach a downward-pointing Barrel Cannon, the Kongs must jump over it and land on a hidden ledge to the left. By continuing left, the Kongs are caught into another Barrel Cannon, which blasts them to a second one, and into the Bonus Barrel. In the Bonus Level, the Kongs have 30 seconds to collect the Bonus Coin at the end. The Bonus Level takes place in a cave area shaped like a mirrored 'c', and Dixie or Kiddy must blast from Ghost Barrels to reach the top. The active Kong must avoid Buzzes along the way and some Ghost Barrels which blast them into a Buzz. | |||
==Gallery== | |||
<gallery> | |||
Stalagmite Frights DKL3 Boo Barrel.png|Dixie under a Ghost Barrel | |||
Stalagmite Frights DKL3 letter O.png|Squitter goes up to the letter O | |||
Stalagmite Frights DKL3 first Bonus Barrel.png|Squitter is on a web platform near the first Bonus Barrel | |||
Stalagmite Frights DKL3 Kuchuka.png|Dixie encounters a Kuchuka right before the End of Level Flag | |||
</gallery> | |||
== Names in | ==Names in other languages== | ||
{{ | {{foreign names | ||
|Jap= | |Jap=おばけタルのどうくつ | ||
|JapR=Obake Taru no | |JapR=Obake Taru no Dōkutsu | ||
|JapM=Cave of the Ghost Barrels | |||
}} | }} | ||
{{DKL3}} | {{DKL3}} | ||
[[ | [[Category:Donkey Kong Land III levels]] | ||
[[Category:Underground areas]] | |||
[[Category: | |||
Latest revision as of 21:33, January 2, 2024
| Level | |
|---|---|
| Stalagmite Frights | |

| |
| Level code | 5-6 |
| Game | Donkey Kong Land III |
| << Directory of levels >> | |
Stalagmite Frights is the thirtieth level of Donkey Kong Land III and the sixth and last level of Tin Can Valley. The level introduces Ghost Barrels, and the Kongs must enter them to blast up to higher areas. About halfway through the level, Dixie and Kiddy can transform into Squitter from his Animal Barrel. There are two No Animal Signs: one is the normal path another high above the first one, only reachable by using Squitter's web platforms, and the second No Animal Sign's area is where the Koin is.
Layout[edit]
From the start of the level, the heroes must head east and defeat some enemies. Soon, they will come up to a Booster Barrel. It will lead them to a higher area, where the Kongs must begin to travel west. When they see the second Ghost Barrel, they should wait until it aims upwards and then shoot up to an even higher area with it. There, the heroes must start to head west again. They will come up to some Rekoils, a Krumple, a Krimp, and a Bristles until they find a gap with an Animal Barrel in it. The Kongs should get into the barrel and turn into Squitter. From there, the transformed Kongs, now as Squitter, must continue east, beating many Buzzes with webs. Squitter will soon find a barrel, which he should jump into and get to a lower part of the level. There, he will suddenly be forced in the Star Barrel.
Halfway the spider will need to start going west again and, as before, defeat several different kinds of enemies. At some point, the spider will find himself near a No Animal Sign. When this is passed, he will turn into the Kongs again. From there, the group must drop down a ledge and walk more westward. Soon, they will find a barrel. If they jump into it, they will be blasted to an even lower section of Stalagmite Frights. Down there, the heroes must journey to the east. However, this trip is not as easy as the trials that were endured before. This time, the Kongs must watch out for the appearing and disappearing Ghost Barrels. If the Kongs are caught in them, they will be shot into a Buzz. Therefore, they should be extra careful in this area. After this part is passed, Dixie Kong and Kiddy Kong must shoot up a Ghost Barrel to get up a ledge. Up on this ledge, they will come up to an area filled with many Buzzes around a Ghost Barrel. When this barrel is aiming to the lower-right corner of the screen, the Kongs must quickly jump into it and continue through the level. After going east and defeating many enemies, the Kongs find the End of Level Flag, guarded by a Kuchuka. The Kongs must avoid the enemy to activate it.
Enemies[edit]
Items and objects[edit]
The following items and objects appear in the following quantities:
- Squitter Barrel: 2
- Bear coin: 1
- DK Barrels: 4
K-O-N-G Letters[edit]
- K: Encountered shorty after the first Booster Barrel.
- O: Located at a depression in the path after becoming Squitter.
- N: In an upper left crook of the cavern wall near some Sneek and Bristles.
- G: Near the End of Level Flag, Kiddy must jump onto a Krumple to reach the letter G.
DK Coin[edit]

After the letter N, Squitter must continue until finding a lone banana at the top of the screen. With his web platforms, Squitter must go to the banana and travel up a gap in the ceiling. Squitter finds a nearby Steel Barrel, which he cannot pick up, so he must walk across a nearby No Animal Sign to transform back into the Kongs. Dixie or Kiddy must pick up the Steel Barrel and throw it at the left wall behind Koin. The Steel Barrel bounces into Koin from behind, defeating him and rewarding the DK Coin to the Kongs.
Bonus Levels[edit]

Stalagmite Frights has two Bonus Levels, listed by type:
- Find the Token!: Shortly after the letter O, Squitter finds a Barrel Cannon. Instead of going into the Barrel Cannon, Squitter must create web platforms around it and continue up into a gap in the ceiling. A Ghost Barrel is within the gap, and Squitter must enter it to blast up to a high ledge and then continue west. Squitter encounters some Rekoils and Buzzes along the way before entering the Bonus Barrel itself. In the Bonus Level, Squitter has twenty seconds to get the Bonus Coin on the other side, and he must dodge several Kopters as they descend from above.
- Find the Token!: To find the second Bonus Level, the Kongs must go past the letter N and continue along the path. When they reach a downward-pointing Barrel Cannon, the Kongs must jump over it and land on a hidden ledge to the left. By continuing left, the Kongs are caught into another Barrel Cannon, which blasts them to a second one, and into the Bonus Barrel. In the Bonus Level, the Kongs have 30 seconds to collect the Bonus Coin at the end. The Bonus Level takes place in a cave area shaped like a mirrored 'c', and Dixie or Kiddy must blast from Ghost Barrels to reach the top. The active Kong must avoid Buzzes along the way and some Ghost Barrels which blast them into a Buzz.
Gallery[edit]
Dixie under a Ghost Barrel

Squitter goes up to the letter O
Squitter is on a web platform near the first Bonus Barrel
Dixie encounters a Kuchuka right before the End of Level Flag


Names in other languages[edit]
| Language | Name | Meaning |
|---|---|---|
| Japanese | おばけタルのどうくつ Obake Taru no Dōkutsu |
Cave of the Ghost Barrels |