Kuchuka Karnage: Difference between revisions
Master R.O.B (talk | contribs) mNo edit summary |
LinkTheLefty (talk | contribs) mNo edit summary |
||
| (41 intermediate revisions by 20 users not shown) | |||
| Line 1: | Line 1: | ||
{{level | {{more images|Original Game Boy version of the level}} | ||
|image=[[ | {{level infobox | ||
|image=[[File:Kuchuka Karnage DKL3c.png]] | |||
|code=6 - 2 | |code=6-2 | ||
|game=''[[Donkey Kong Land III]] | |game=''[[Donkey Kong Land III]]'' | ||
|before=[[Whiplash Dash|<<]] | |before=[[Whiplash Dash|<<]] | ||
|after=[[Haunted Hollows|>>]] | |after=[[Haunted Hollows|>>]] | ||
}} | }} | ||
'''Kuchuka Karnage''' is the thirty-second level | '''Kuchuka Karnage''' is the thirty-second level of ''[[Donkey Kong Land III]]'' and the second level of [[Lost World (Donkey Kong Land III)|the Lost World]]. Kuchuka Karnage is a factory level that is similar to two earlier factory levels, [[Karbine Kaos]] and [[Bazuka Bombard]], which are named after an enemy. All three levels do not feature the named enemy throughout. In Kuchuka Karnage, [[Kuchuka]]s are primarily found at the start of the level but not so much beyond. The level primarily involves [[Dixie Kong]] and [[Kiddy Kong]] crossing over abysses and lava pits through various means. This includes blasting from [[Barrel Cannon]]s, which also help them go higher in the level, by using moving platforms to cross pits, climbing across horizontal [[rope]]s guarded by [[Karbine]]s, and jumping from barrels shot by [[Bazuka]]s. that help the [[Kong]]s move across large pits. The Kongs can transform into [[Squawks]] but only during the second [[Bonus Level]]. | ||
==Layout== | |||
At the beginning of the level, the Kongs have to walk through the dark factory and dodge a few Kuchukas. They eventually encounter a barrel perched at the end of the floor. They must jump in it and blast to a higher area. After that, they need to climb along a long tightrope and dodge enemies, such as Karbines and Klasps, until they find a safe area to stand again. From there, they need to hop over a Bazuka to enter an area full of elevators, moving up and down. Once they get over each elevator, they have to avoid another Bazuka and hop into a barrel to reach a higher area. There, they have to jump onto a small platform to find another barrel. This barrel shoots the Kongs to an area where they need to defeat a few Sneeks and get in yet another barrel. This barrel shoots them to a higher ledge from there, and then climb along another long rope. At the very end of the rope, they need to fall downwards to find the [[Star Barrel]]. | |||
Halfway through the level, the group need to ride up an elevator and beat some Rekoils. After crossing a small abyss, they need to dodge a Bazuka and cross another pit to find a barrel. It shoots them into a chain of barrels. The last barrel is a [[Spinner Barrel|Rotatable Barrel]], which they have to aim to the right to continue through the level. At this point, the apes have to avoid some Karbines and shoot through another barrel to grab onto a long tightrope. Climbing across it, they have to dodge more Karbines and some Buzzes. At the end of the long rope, they must drop down and land in another barrel. It shoots them farther downwards. There, [[Kiddy Kong]] and [[Dixie Kong]] need to drop down one last ledge to see the [[Level Flag|End of Level Flag]]. | |||
== | ==Enemies== | ||
*[[Bazuka]] | |||
*[[Buzz (enemy)|Buzz]] | |||
*[[Karbine]] | |||
*[[Kobble]] | |||
*[[Koin]] | |||
*[[Knik-Knak|Niknak]] | |||
*[[Re-Koil|Rekoil]] | |||
==Items== | |||
*[[Animal Barrel]]: 1 | |||
*[[Bear coin]]: 2 | |||
*[[DK Barrel]]: 3 | |||
===K-O-N-G Letters=== | |||
*K: On a tightrope, found after two Karbines. | |||
*O: Obtained after getting launched out of a barrel cannon following a part of the level where a gap is traversed by moving platforms. | |||
*N: Obtained by going east at the fork in the level's path with a [[Spinner Barrel|Rotatable Barrel]]. | |||
*G: A Barrel Cannon will launch the duo into the "G" letter found normally in the level. | |||
===DK Coin=== | |||
The [[Iron Barrel|Steel Barrel]] is right before the [[Level Flag|End of Level Flag]]. Dixie or Kiddy must pick it up and carry it beyond the End of Level Flag where they can find the [[Koin]]. The Kongs must throw the Steel Barrel at the wall behind Koin for it to ricochet into Koin from behind. This defeats Koin, and the Kongs earn the [[DK Coin]]. | |||
== | ==Bonus Levels== | ||
Kuchuka Karnage has two [[Bonus room|Bonus Levels]], listed by type: | |||
*Near the | *'''Collect the Stars!''': Near the start of the level, the Kongs go in a section filled with three elevator platforms. On the third and final platform, the Kongs must jump to a banana at the bottom right to land in a [[Bonus Barrel]] directly below. In the [[Bonus Level]], Dixie and Kiddy have 20 seconds to collect 18 [[star (Donkey Kong franchise)|star]]s. The stars are found in groups of three. The Kongs must avoid a few enemies that they encounter, in order: Bazuka, Karbine, Kuchuka, and another Karbine. When the Kongs collect every star, a [[Bonus Coin (Donkey Kong franchise)|Bonus Coin]] appears at the end. | ||
*Shortly after the Star Barrel, the Kongs | *'''Collect the Stars!''': Shortly after the Star Barrel, the Kongs must go into a Barrel Cannon, then blast into another, and then into a [[Spinner Barrel|Rotatable Barrel]], which they must aim left to blast into another Barrel Cannon. This barrel shoots them up to the second Bonus Barrel. In the Bonus Level, Dixie or Kiddy must jump in an [[Animal Barrel]] to transform into [[Squawks]]. They have 20 seconds to collect 13 stars. Squawks must obtain the stars while flying up the area and watching out for Bazukas. After Squawks obtains every star, a Bonus Coin appears on a ledge, next to the [[No Animal Sign]]. | ||
==Gallery== | |||
<gallery> | |||
Kuchuka Karnage DKL3c screenshot.png|Kiddy moving between two Karbines | |||
KuchukaKarnage-3.png|A Klasp approaches Dixie | |||
KuchukaKarnage-4.png|The second Bonus Area | |||
</gallery> | |||
== Names in | ==Names in other languages== | ||
{{ | {{foreign names | ||
|Jap= | |Jap=クチャカのぎゃくしゅう | ||
|JapR=Kuchaka no | |JapR=Kuchaka no Gyakushū | ||
|JapM=Kuchuka Counterattack | |||
}} | }} | ||
{{DKL3}} | {{DKL3}} | ||
[[Category:Donkey Kong Land III levels]] | |||
[[Category:Donkey Kong Land III | |||
[[Category:Factories]] | [[Category:Factories]] | ||
[[Category:Northern Kremisphere]] | |||
[[Category:Secret levels]] | |||
Latest revision as of 20:14, January 2, 2024
It has been requested that more images be uploaded for this article. Remove this notice only after the additional image(s) have been added. Reason: Original Game Boy version of the level
| Level | |
|---|---|
| Kuchuka Karnage | |

| |
| Level code | 6-2 |
| Game | Donkey Kong Land III |
| << Directory of levels >> | |
Kuchuka Karnage is the thirty-second level of Donkey Kong Land III and the second level of the Lost World. Kuchuka Karnage is a factory level that is similar to two earlier factory levels, Karbine Kaos and Bazuka Bombard, which are named after an enemy. All three levels do not feature the named enemy throughout. In Kuchuka Karnage, Kuchukas are primarily found at the start of the level but not so much beyond. The level primarily involves Dixie Kong and Kiddy Kong crossing over abysses and lava pits through various means. This includes blasting from Barrel Cannons, which also help them go higher in the level, by using moving platforms to cross pits, climbing across horizontal ropes guarded by Karbines, and jumping from barrels shot by Bazukas. that help the Kongs move across large pits. The Kongs can transform into Squawks but only during the second Bonus Level.
Layout[edit]
At the beginning of the level, the Kongs have to walk through the dark factory and dodge a few Kuchukas. They eventually encounter a barrel perched at the end of the floor. They must jump in it and blast to a higher area. After that, they need to climb along a long tightrope and dodge enemies, such as Karbines and Klasps, until they find a safe area to stand again. From there, they need to hop over a Bazuka to enter an area full of elevators, moving up and down. Once they get over each elevator, they have to avoid another Bazuka and hop into a barrel to reach a higher area. There, they have to jump onto a small platform to find another barrel. This barrel shoots the Kongs to an area where they need to defeat a few Sneeks and get in yet another barrel. This barrel shoots them to a higher ledge from there, and then climb along another long rope. At the very end of the rope, they need to fall downwards to find the Star Barrel.
Halfway through the level, the group need to ride up an elevator and beat some Rekoils. After crossing a small abyss, they need to dodge a Bazuka and cross another pit to find a barrel. It shoots them into a chain of barrels. The last barrel is a Rotatable Barrel, which they have to aim to the right to continue through the level. At this point, the apes have to avoid some Karbines and shoot through another barrel to grab onto a long tightrope. Climbing across it, they have to dodge more Karbines and some Buzzes. At the end of the long rope, they must drop down and land in another barrel. It shoots them farther downwards. There, Kiddy Kong and Dixie Kong need to drop down one last ledge to see the End of Level Flag.
Enemies[edit]
Items[edit]
- Animal Barrel: 1
- Bear coin: 2
- DK Barrel: 3
K-O-N-G Letters[edit]
- K: On a tightrope, found after two Karbines.
- O: Obtained after getting launched out of a barrel cannon following a part of the level where a gap is traversed by moving platforms.
- N: Obtained by going east at the fork in the level's path with a Rotatable Barrel.
- G: A Barrel Cannon will launch the duo into the "G" letter found normally in the level.
DK Coin[edit]
The Steel Barrel is right before the End of Level Flag. Dixie or Kiddy must pick it up and carry it beyond the End of Level Flag where they can find the Koin. The Kongs must throw the Steel Barrel at the wall behind Koin for it to ricochet into Koin from behind. This defeats Koin, and the Kongs earn the DK Coin.
Bonus Levels[edit]
Kuchuka Karnage has two Bonus Levels, listed by type:
- Collect the Stars!: Near the start of the level, the Kongs go in a section filled with three elevator platforms. On the third and final platform, the Kongs must jump to a banana at the bottom right to land in a Bonus Barrel directly below. In the Bonus Level, Dixie and Kiddy have 20 seconds to collect 18 stars. The stars are found in groups of three. The Kongs must avoid a few enemies that they encounter, in order: Bazuka, Karbine, Kuchuka, and another Karbine. When the Kongs collect every star, a Bonus Coin appears at the end.
- Collect the Stars!: Shortly after the Star Barrel, the Kongs must go into a Barrel Cannon, then blast into another, and then into a Rotatable Barrel, which they must aim left to blast into another Barrel Cannon. This barrel shoots them up to the second Bonus Barrel. In the Bonus Level, Dixie or Kiddy must jump in an Animal Barrel to transform into Squawks. They have 20 seconds to collect 13 stars. Squawks must obtain the stars while flying up the area and watching out for Bazukas. After Squawks obtains every star, a Bonus Coin appears on a ledge, next to the No Animal Sign.
Gallery[edit]
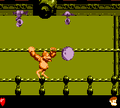
Kiddy moving between two Karbines
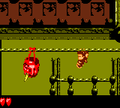
A Klasp approaches Dixie
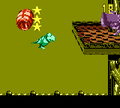
The second Bonus Area


Names in other languages[edit]
| Language | Name | Meaning |
|---|---|---|
| Japanese | クチャカのぎゃくしゅう Kuchaka no Gyakushū |
Kuchuka Counterattack |