Rope Ravine: Difference between revisions
mNo edit summary |
No edit summary |
||
| (20 intermediate revisions by 14 users not shown) | |||
| Line 1: | Line 1: | ||
{{level | {{level infobox | ||
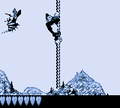
|image=[[File:Rope Ravine.png]] | |||
|image=[[ | |code=1-5 | ||
|code=1 - 5 | |||
|game=''[[Donkey Kong Land]]'' | |game=''[[Donkey Kong Land]]'' | ||
|after=[[Tyre Trail|>>]] | |||
|after=[[ | |||
|before=[[Deck Trek|<<]] | |before=[[Deck Trek|<<]] | ||
}} | }} | ||
'''Rope Ravine''' is the fifth level in | '''Rope Ravine'''<ref>''Donkey Kong Land'' instruction booklet, page 16.</ref> is the fifth level in ''[[Donkey Kong Land]]'' and of the first world, [[Gangplank Galleon Ahoy!]] The [[Kong]]s have a choice to either complete it or [[Tyre Trail]] it to progress to the level, [[Riggin' Rumble]]. Rope Ravine is the second level to take place in a snowy area, after [[Freezing Fun]], and it also has a slippery ground. As the name suggests, Rope Ravine has many abysses, which [[Donkey Kong]] and [[Diddy Kong]] can cross by using [[rope]]s. Some gaps can be crossed using a [[Barrel Cannon]]. Rope Ravine is the only other level besides [[Kremlantis Kaos]] where the [[Kong]]s can pass an [[end of stage]] to find an additional portion of the level and a second end of stage. | ||
==Layout== | |||
When they begin the level, the Kongs must travel to the left and grab onto a rope. It will take them over to another rope. They should quickly jump over to this rope, and then ride to land. Traveling a little farther from here will take them to another rope. Once grabbed onto, the rope will move east and pull the heroes over a wide abyss. As it moves, though, they will have to jump over to two other ropes and also watch out for Zingers. Once they get passed the abyss, the Kongs must defeat two Gnawties and hop onto yet another rope. This one won't go too long, and they will have to soon jump to some barrels below them. With careful aim, they will shoot to each barrel and cling to another rope. This one will lead them to an area with the [[Continue Point]]. | |||
Halfway through the level, the heroes must ride on the next rope they see and get over a large pit. Back on land, they will have to slide down a steep slope and grab onto another rope before they slip off of the platform they are on. The rope will take them to a barrel, which will then blast the group to the letter N on a platform. If the Kongs journey to the east a little bit more, they will make it to yet another rope. It will guide them to the following two ropes. As they ride along these ropes, they will have to move up and down on them to avoid several Zingers in their path. Soon, they will make it to a slippery area, which they should walk down to find a barrel. It will shoot the heroes to the letter G, and then to another barrel. With precise aim, the group must shoot through this barrel, following the nearby banana trial. They will end up on land again if they shoot to the correct area. Looking a little farther ahead, the Kongs will notice an exit portal. | |||
==Enemies== | |||
The following enemies appear in the following quantities: | |||
==Bonus | *[[Gnawty]]: 3 | ||
*After | *[[Zinger]]: 8 | ||
* | |||
==Objects== | |||
The following objects appear in the following quantities: | |||
*[[DK Barrel]]: 2 | |||
==Items== | |||
===K-O-N-G Letters=== | |||
*K: Found while on a rope after a Zinger. | |||
*O: Hovering above a cannon barrel leading to a bonus room, and before the check point. | |||
*N: The Kongs are launched via barrel cannon to the "N" while going through the level normally. | |||
*G: As with the "N", Kongs are launched into the "G". | |||
==Bonus Areas== | |||
{{multiframe|[[File:Rope Ravine DKL Bonus Area 1.png]] [[File:Rope Ravine DKL Bonus Area 2.png]]|size=340|The first and second Bonus Levels respectively}} | |||
Rope Ravine has two [[Bonus room|Bonus Areas]]: | |||
*After shooting from the first three Barrel Cannons, the Kongs grab on a rope that takes them to the letter O. After the letter, the Kongs must jump directly below into a [[Blast Barrel]] that blasts them to the first [[Bonus Area]]. The Bonus Area takes place in a jungle area where the Kongs must jump on a button to release their [[Kong Token]]s from a [[Barrel Cannon]] individually. The Kongs earn an [[extra life]] for each Kong Token that they catch. Once the Kongs run out of Kong Tokens, they return into the main level. | |||
*After letter N, the Kongs can jump down into the gap below to land into a Blast Barrel, which takes them to another Bonus Area. The second Bonus Area has an underwater setting where the Kongs can collect many bananas and a few Kong Tokens. After doing so, they can exit from the left side. | |||
==Gallery== | |||
<gallery> | |||
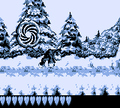
Rope Ravine DKL screenshot.png|Donkey Kong passes a Zinger while holding on a rope | |||
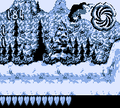
Rope Ravine DKL first exit.png|Donkey Kong reaches the first exit | |||
Rope Ravine DKL second exit.png|Donkey Kong reaches the second exit | |||
</gallery> | |||
==Names in other languages== | |||
{{foreign names | |||
|Jap=ロープの谷 | |||
|JapR=Rōpu no tani | |||
|JapM=Valley of the ropes | |||
|Spa=Recorriendo la cañada | |||
|SpaM=Traversing the ravine | |||
|Ita=La corda<ref>''[[Donkey Kong Land]]'' Italian booklet, pag. 16</ref> | |||
|ItaM=The rope | |||
}} | |||
==References== | |||
<references/> | |||
{{DKL}} | {{DKL}} | ||
[[Category:Snowscapes]] | [[Category:Snowscapes]] | ||
[[Category:Donkey Kong Land levels]] | |||
Latest revision as of 11:53, December 15, 2023
| Level | |
|---|---|
| Rope Ravine | |

| |
| Level code | 1-5 |
| Game | Donkey Kong Land |
| << Directory of levels >> | |
Rope Ravine[1] is the fifth level in Donkey Kong Land and of the first world, Gangplank Galleon Ahoy! The Kongs have a choice to either complete it or Tyre Trail it to progress to the level, Riggin' Rumble. Rope Ravine is the second level to take place in a snowy area, after Freezing Fun, and it also has a slippery ground. As the name suggests, Rope Ravine has many abysses, which Donkey Kong and Diddy Kong can cross by using ropes. Some gaps can be crossed using a Barrel Cannon. Rope Ravine is the only other level besides Kremlantis Kaos where the Kongs can pass an end of stage to find an additional portion of the level and a second end of stage.
Layout[edit]
When they begin the level, the Kongs must travel to the left and grab onto a rope. It will take them over to another rope. They should quickly jump over to this rope, and then ride to land. Traveling a little farther from here will take them to another rope. Once grabbed onto, the rope will move east and pull the heroes over a wide abyss. As it moves, though, they will have to jump over to two other ropes and also watch out for Zingers. Once they get passed the abyss, the Kongs must defeat two Gnawties and hop onto yet another rope. This one won't go too long, and they will have to soon jump to some barrels below them. With careful aim, they will shoot to each barrel and cling to another rope. This one will lead them to an area with the Continue Point.
Halfway through the level, the heroes must ride on the next rope they see and get over a large pit. Back on land, they will have to slide down a steep slope and grab onto another rope before they slip off of the platform they are on. The rope will take them to a barrel, which will then blast the group to the letter N on a platform. If the Kongs journey to the east a little bit more, they will make it to yet another rope. It will guide them to the following two ropes. As they ride along these ropes, they will have to move up and down on them to avoid several Zingers in their path. Soon, they will make it to a slippery area, which they should walk down to find a barrel. It will shoot the heroes to the letter G, and then to another barrel. With precise aim, the group must shoot through this barrel, following the nearby banana trial. They will end up on land again if they shoot to the correct area. Looking a little farther ahead, the Kongs will notice an exit portal.
Enemies[edit]
The following enemies appear in the following quantities:
Objects[edit]
The following objects appear in the following quantities:
- DK Barrel: 2
Items[edit]
K-O-N-G Letters[edit]
- K: Found while on a rope after a Zinger.
- O: Hovering above a cannon barrel leading to a bonus room, and before the check point.
- N: The Kongs are launched via barrel cannon to the "N" while going through the level normally.
- G: As with the "N", Kongs are launched into the "G".
Bonus Areas[edit]


Rope Ravine has two Bonus Areas:
- After shooting from the first three Barrel Cannons, the Kongs grab on a rope that takes them to the letter O. After the letter, the Kongs must jump directly below into a Blast Barrel that blasts them to the first Bonus Area. The Bonus Area takes place in a jungle area where the Kongs must jump on a button to release their Kong Tokens from a Barrel Cannon individually. The Kongs earn an extra life for each Kong Token that they catch. Once the Kongs run out of Kong Tokens, they return into the main level.
- After letter N, the Kongs can jump down into the gap below to land into a Blast Barrel, which takes them to another Bonus Area. The second Bonus Area has an underwater setting where the Kongs can collect many bananas and a few Kong Tokens. After doing so, they can exit from the left side.
Gallery[edit]
Donkey Kong passes a Zinger while holding on a rope
Donkey Kong reaches the first exit
Donkey Kong reaches the second exit


Names in other languages[edit]
| Language | Name | Meaning |
|---|---|---|
| Japanese | ロープの谷 Rōpu no tani |
Valley of the ropes |
| Italian | La corda[2] |
The rope |
| Spanish | Recorriendo la cañada |
Traversing the ravine |
References[edit]
- ^ Donkey Kong Land instruction booklet, page 16.
- ^ Donkey Kong Land Italian booklet, pag. 16