Deck Trek: Difference between revisions
m (Text replacement - "<references/> {{" to "<references/> {{") |
No edit summary |
||
| (7 intermediate revisions by 4 users not shown) | |||
| Line 1: | Line 1: | ||
{{ | {{level infobox | ||
|image=[[File:Deck Trek.png]] | |image=[[File:Deck Trek.png]] | ||
|code=1-4 | |code=1-4 | ||
| Line 6: | Line 6: | ||
|before=[[Simian Swing|<<]] | |before=[[Simian Swing|<<]] | ||
}} | }} | ||
'''Deck Trek'''<ref>''Donkey Kong Land'' instruction booklet, page 16.</ref> is the fourth level in ''[[Donkey Kong Land]]'' and of the first world, [[Gangplank Galleon Ahoy!]]. | '''Deck Trek'''<ref>''Donkey Kong Land'' instruction booklet, page 16.</ref> is the fourth level in ''[[Donkey Kong Land]]'' and of the first world, [[Gangplank Galleon Ahoy!]]. It is the first level to take place on a ship mast. It is a vertical level where [[Donkey Kong]] and [[Diddy Kong]] must get to the top by jumping from masts, climbing [[rope]]s, and blasting from [[Barrel Cannon]]s. An explosive barrel is at the end, just before the [[end of stage]], and it can blow up either of the two boulders on the world map: the top boulder leads to [[Rope Ravine]] and the bottom one leads to [[Tyre Trail]]. After using the explosive barrel, the Kongs can replay Deck Trek to obtain one again and blow up the other boulder. | ||
An explosive barrel is at the end, just before the | |||
The music for Deck Trek and other ship levels is taken from [[Gang-Plank Galleon]] in ''[[Donkey Kong Country]]''. It lacks the segue into the more intense section of the song. This theme is recursively given to Gang-Plank Galleon in the [[Game Boy Color]] remake of ''Donkey Kong Country''. | The music for Deck Trek and other ship levels is taken from [[Gang-Plank Galleon]] in ''[[Donkey Kong Country]]''. It lacks the segue into the more intense section of the song. This theme is recursively given to Gang-Plank Galleon in the [[Game Boy Color]] remake of ''Donkey Kong Country''. | ||
==Layout== | ==Layout== | ||
From the start of the level, the Kongs must jump up a ledge and climb up a set of ropes to reach a yard. They have to head to the left and find another set of ropes to climb. When they hop up to the next yard from there, the must hop up a few more yards and soon come up to a lone rope. As they travel up this, they must avoid a few Mini- | From the start of the level, the Kongs must jump up a ledge and climb up a set of ropes to reach a yard. They have to head to the left and find another set of ropes to climb. When they hop up to the next yard from there, the must hop up a few more yards and soon come up to a lone rope. As they travel up this, they must avoid a few Mini-Neckys and eventually jump to the left to land in a barrel. It shoots them to a rope. They should jump over to another barrel there. This barrel blasts them to a set of ropes, which must be climbed to reach a yard, where the [[Continue Point]] can be found. | ||
Once they hit the Continue Point, the Kongs should journey east and hop up a few yards. When they walk across the whole way, they must grab onto a lone rope and begin to climb it. While they move up, they have to watch out for several Mini- | Once they hit the Continue Point, the Kongs should journey east and hop up a few yards. When they walk across the whole way, they must grab onto a lone rope and begin to climb it. While they move up, they have to watch out for several Mini-Neckys shooting eggs at them. When they get to the end of this rope, they should jump off and hit another Continue Point. | ||
From there, the Kongs must walk east again and travel up a rope to find another row of masts. There, they have to defeat a Mini-Necky to reach a large set of ropes. This must be climbed to get to more yards. When they are at the top of these ropes, the group must travel east and hop up a platform to find another rope. Once this is climbed, the heroes should head a little farther to the left and jump up several more small yards to reach yet another rope. After this thin rope is journeyed up, the Kongs must jump up some more masts, without bumping into any Gnawties. They soon have to bounce up several more smaller yards again, trying not to hit any Slippas above them. At the top mast, they should jump to the left and land in a barrel. It shoots them into an explosive barrel near the exit portal. | From there, the Kongs must walk east again and travel up a rope to find another row of masts. There, they have to defeat a Mini-Necky to reach a large set of ropes. This must be climbed to get to more yards. When they are at the top of these ropes, the group must travel east and hop up a platform to find another rope. Once this is climbed, the heroes should head a little farther to the left and jump up several more small yards to reach yet another rope. After this thin rope is journeyed up, the Kongs must jump up some more masts, without bumping into any Gnawties. They soon have to bounce up several more smaller yards again, trying not to hit any Slippas above them. At the top mast, they should jump to the left and land in a barrel. It shoots them into an explosive barrel near the exit portal. | ||
==Enemies== | ==Enemies== | ||
The following enemies appear in the following quantities: | |||
*[[Gnawty]]: 4 | *[[Gnawty]]: 4 | ||
*[[Kritter]]: 4 | *[[Kritter]]: 4 | ||
| Line 30: | Line 27: | ||
*[[Zinger]]: 3 | *[[Zinger]]: 3 | ||
==Items== | ==Items and objects== | ||
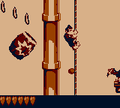
[[File:DeckTrek-KongToken.png|thumb|Diddy Kong climbing toward some Kong Tokens]] | [[File:DeckTrek-KongToken.png|thumb|Diddy Kong climbing toward some Kong Tokens]] | ||
The following items and objects appear in the following quantities: | |||
*[[DK Barrel]]: 1 | *[[DK Barrel]]: 1 | ||
*[[Extra Life Balloon]]: Found by taking the Barrel Cannon where the first pair of Kong Tokens are found. | *[[Extra Life Balloon]]: Found by taking the Barrel Cannon where the first pair of Kong Tokens are found. | ||
| Line 39: | Line 38: | ||
**Pair 3: Found by making a detour from a very long rope to the right. | **Pair 3: Found by making a detour from a very long rope to the right. | ||
*[[TNT Barrel]]: 2 | *[[TNT Barrel]]: 2 | ||
{{br | {{br}} | ||
==Bonus Areas== | ==Bonus Areas== | ||
{ | {{multiframe|[[File:DeckTrek-O.png]] [[File:Deck Trek Bonus Level 2.png]]|size=340|The first and second Bonus Areas respectively}} | ||
Deck Trek has two [[Bonus room|Bonus Areas]]: | |||
*Right after the Continue Point, the Kongs must go right and jump into a [[Blast Barrel]] that takes them to the first [[Bonus Area]]. The area takes place on buildings in a construction site-themed area, where the Kongs must collect the letter O circled by two [[Mincer]]s. After doing so, they can exit from a Blast Barrel to the right. | |||
*Beyond the second TNT Barrel is a Blast Barrel to the upper left of two Gnawtys, and entering it takes the Kongs to the second Bonus Area. Here, the Kongs must break an [[Animal Crate]] to free [[Expresso]]. They must then glide across an abyss, collecting the letter N and letter G along the way. Eventually, the Kongs and Expresso land on a platform to the right, with an opening that leads back into the main level. | |||
|[[File:DeckTrek-O.png]] | |||
|Right after the Continue Point, the Kongs must go right and jump into a [[Blast Barrel]] that takes them to the first [[Bonus Area]]. The area takes place on buildings in a construction site-themed area, where the Kongs must collect the letter O circled by two | |||
==Gallery== | ==Gallery== | ||
| Line 65: | Line 58: | ||
|JapM=Pirate Ship 1 | |JapM=Pirate Ship 1 | ||
|Spa=Todos a cubierta | |Spa=Todos a cubierta | ||
|SpaM=}} | |SpaM=Everyone on deck | ||
|Ita=Il ponte<ref>''[[Donkey Kong Land]]'' Italian booklet, pag. 16</ref> | |||
|ItaM=The deck | |||
}} | |||
==Trivia== | ==Trivia== | ||
| Line 74: | Line 70: | ||
{{DKL}} | {{DKL}} | ||
[[Category:Donkey Kong Land | [[Category:Pirate areas]] | ||
[[Category:Donkey Kong Land levels]] | |||
Latest revision as of 23:41, December 14, 2023
| Level | |
|---|---|
| Deck Trek | |

| |
| Level code | 1-4 |
| Game | Donkey Kong Land |
| << Directory of levels >> | |
Deck Trek[1] is the fourth level in Donkey Kong Land and of the first world, Gangplank Galleon Ahoy!. It is the first level to take place on a ship mast. It is a vertical level where Donkey Kong and Diddy Kong must get to the top by jumping from masts, climbing ropes, and blasting from Barrel Cannons. An explosive barrel is at the end, just before the end of stage, and it can blow up either of the two boulders on the world map: the top boulder leads to Rope Ravine and the bottom one leads to Tyre Trail. After using the explosive barrel, the Kongs can replay Deck Trek to obtain one again and blow up the other boulder.
The music for Deck Trek and other ship levels is taken from Gang-Plank Galleon in Donkey Kong Country. It lacks the segue into the more intense section of the song. This theme is recursively given to Gang-Plank Galleon in the Game Boy Color remake of Donkey Kong Country.
Layout[edit]
From the start of the level, the Kongs must jump up a ledge and climb up a set of ropes to reach a yard. They have to head to the left and find another set of ropes to climb. When they hop up to the next yard from there, the must hop up a few more yards and soon come up to a lone rope. As they travel up this, they must avoid a few Mini-Neckys and eventually jump to the left to land in a barrel. It shoots them to a rope. They should jump over to another barrel there. This barrel blasts them to a set of ropes, which must be climbed to reach a yard, where the Continue Point can be found.
Once they hit the Continue Point, the Kongs should journey east and hop up a few yards. When they walk across the whole way, they must grab onto a lone rope and begin to climb it. While they move up, they have to watch out for several Mini-Neckys shooting eggs at them. When they get to the end of this rope, they should jump off and hit another Continue Point.
From there, the Kongs must walk east again and travel up a rope to find another row of masts. There, they have to defeat a Mini-Necky to reach a large set of ropes. This must be climbed to get to more yards. When they are at the top of these ropes, the group must travel east and hop up a platform to find another rope. Once this is climbed, the heroes should head a little farther to the left and jump up several more small yards to reach yet another rope. After this thin rope is journeyed up, the Kongs must jump up some more masts, without bumping into any Gnawties. They soon have to bounce up several more smaller yards again, trying not to hit any Slippas above them. At the top mast, they should jump to the left and land in a barrel. It shoots them into an explosive barrel near the exit portal.
Enemies[edit]
The following enemies appear in the following quantities:
Items and objects[edit]

The following items and objects appear in the following quantities:
- DK Barrel: 1
- Extra Life Balloon: Found by taking the Barrel Cannon where the first pair of Kong Tokens are found.
- Kong Token: All 6 Kong Tokens in this level appear in pairs:
- Pair 1: Going left at the start into a Barrel Cannon which blasts the Kongs to the Kong Tokens.
- Pair 2: Located directly above the first jumping Kritter.
- Pair 3: Found by making a detour from a very long rope to the right.
- TNT Barrel: 2
Bonus Areas[edit]


Deck Trek has two Bonus Areas:
- Right after the Continue Point, the Kongs must go right and jump into a Blast Barrel that takes them to the first Bonus Area. The area takes place on buildings in a construction site-themed area, where the Kongs must collect the letter O circled by two Mincers. After doing so, they can exit from a Blast Barrel to the right.
- Beyond the second TNT Barrel is a Blast Barrel to the upper left of two Gnawtys, and entering it takes the Kongs to the second Bonus Area. Here, the Kongs must break an Animal Crate to free Expresso. They must then glide across an abyss, collecting the letter N and letter G along the way. Eventually, the Kongs and Expresso land on a platform to the right, with an opening that leads back into the main level.
Gallery[edit]
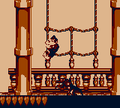
Donkey Kong holds on a rope above a bouncing Kritter
Donkey Kong climbs up a rope past a Mini-Necky
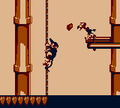
Diddy climbs toward a Mini-Necky, who spits a nut at him.


Names in other languages[edit]
| Language | Name | Meaning |
|---|---|---|
| Japanese | 海賊船1 Kaizoku-sen 1 |
Pirate Ship 1 |
| Italian | Il ponte[2] |
The deck |
| Spanish | Todos a cubierta |
Everyone on deck |
Trivia[edit]
- Deck Trek, along with Riggin' Rumble, are very similar to the rigging levels of Donkey Kong Country 2: Diddy's Kong Quest, as the Kongs must go up many yards to reach the highest point on a ship.
References[edit]
- ^ Donkey Kong Land instruction booklet, page 16.
- ^ Donkey Kong Land Italian booklet, pag. 16