Snake Charmer's Challenge: Difference between revisions
mNo edit summary |
(dkwiki merge) |
||
| Line 1: | Line 1: | ||
{{levelbox | {{levelbox | ||
|image=[[File:Slippa Jar.png]] | |||
|image=[[File:Slippa Jar.png | |||
|code=2-4 | |code=2-4 | ||
|game=''[[Donkey Kong Land]]'' | |game=''[[Donkey Kong Land]]'' | ||
| Line 7: | Line 6: | ||
|before=[[Reef Rampage|<<]] | |before=[[Reef Rampage|<<]] | ||
}} | }} | ||
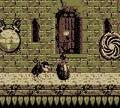
'''Snake Charmer's Challenge''' is the thirteenth level | '''Snake Charmer's Challenge''' is the thirteenth level in ''[[Donkey Kong Land]]'' and the fourth level of [[Kremlantis]]. Either it or [[Chomp's Coliseum]] can be completed for an explosive barrel that is used to blow up a rock obstructing the path to the level, [[Nautilus Chase]]. | ||
Snake Charmer's Challenge is the second temple level. It is filled with [[Basket of snakes|baskets of snakes]] that shoot [[Slippa]]s at [[Donkey Kong|Donkey]] and [[Diddy Kong]]. Some basket of snakes roll down steps of the temple and must be avoided. The level has one [[Swirlwind]], who first appear in the level, although they later appear as the main and titular obstacle of [[Swirlwind Storm]]. Along the way, there are a few gaps that the [[Kong]]s must cross from a few [[rope]]s. Other enemies in the level include [[Gnawty|Gnawties]], a single [[Klaptrap]], and [[Zinger]]s. Two [[Mincer]]s appear in a [[Bonus Level]]. | |||
== | ==Layout== | ||
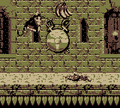
[[File:Snake Charmer's Challenge.png|thumb|left|160px|Donkey Kong using TNT Barrels to destroy the enemies.]] | [[File:Snake Charmer's Challenge.png|thumb|left|160px|Donkey Kong using TNT Barrels to destroy the enemies.]] | ||
From the start of the level, the Kongs should travel east and grab onto the nearby rope. It will move right and left. When it gets by the next ledge, they need to jump off, and continue on. They will soon find the level's first [[basket of snakes]], shooting Slippas at them. When it is passed, the heroes should use a Swirlwind to get an extra boost on hopping over a gap. Then, they should bounce off of a tire and grab a [[Kong Token]], and keep going east after that. They'll later dodge a basket of snakes, along with its contents, and soon grab onto a rope. It will take them over a large abyss, where they can find the [[K-O-N-G Letters|letter K]]. When back on land, they need to continue east, avoid a basket of snakes, and grab onto yet another rope. As the rope before, it will guide them over a huge gap. As they go, there will a Zinger flying around to knock them off. After that, the Kongs will have to keep going forward and travel under another Zinger. After jumping over a rather small abyss, they will find the [[Continue Point]]. | From the start of the level, the Kongs should travel east and grab onto the nearby rope. It will move right and left. When it gets by the next ledge, they need to jump off, and continue on. They will soon find the level's first [[basket of snakes]], shooting Slippas at them. When it is passed, the heroes should use a Swirlwind to get an extra boost on hopping over a gap. Then, they should bounce off of a tire and grab a [[Kong Token]], and keep going east after that. They'll later dodge a basket of snakes, along with its contents, and soon grab onto a rope. It will take them over a large abyss, where they can find the [[K-O-N-G Letters|letter K]]. When back on land, they need to continue east, avoid a basket of snakes, and grab onto yet another rope. As the rope before, it will guide them over a huge gap. As they go, there will a Zinger flying around to knock them off. After that, the Kongs will have to keep going forward and travel under another Zinger. After jumping over a rather small abyss, they will find the [[Continue Point]]. | ||
| Line 17: | Line 16: | ||
Halfway through the level, they Kongs will come up to two baskets of snakes, which can be destroyed with the [[TNT Barrel]]s nearby. From there, they must leap across a small gap and continue east. They'll soon find the letter N, and have to hop over another small gap. There is a basket of snakes after this, as well as yet another small gap. Both obstacles can be overcome easily, and the Kongs should be able to move on. After they drop down a large ledge, they must cross a few big abysses. One of these abysses must be cross with the aid of a floating basket of snakes, which the Kongs can step on. After that, the heroes must avoid another basket of snakes and grab onto a rope. As it takes them over the large abyss below, they need to watch out for the Zinger buzzing around them. There is another rope after this in mid-air, and it will, as usual, move when the Kongs get on it. More Zingers than before are here, and they are flying all around. Soon, though, the group will reach land again, where they can exit the level. | Halfway through the level, they Kongs will come up to two baskets of snakes, which can be destroyed with the [[TNT Barrel]]s nearby. From there, they must leap across a small gap and continue east. They'll soon find the letter N, and have to hop over another small gap. There is a basket of snakes after this, as well as yet another small gap. Both obstacles can be overcome easily, and the Kongs should be able to move on. After they drop down a large ledge, they must cross a few big abysses. One of these abysses must be cross with the aid of a floating basket of snakes, which the Kongs can step on. After that, the heroes must avoid another basket of snakes and grab onto a rope. As it takes them over the large abyss below, they need to watch out for the Zinger buzzing around them. There is another rope after this in mid-air, and it will, as usual, move when the Kongs get on it. More Zingers than before are here, and they are flying all around. Soon, though, the group will reach land again, where they can exit the level. | ||
{{br|left}} | {{br|left}} | ||
==Bonus | ==Enemies== | ||
* | *[[Gnawty]]: 3 | ||
*[[Klaptrap]]: 1 | |||
*[[Mincer]]: 2 (Bonus room) | |||
*[[Swirlwind]]: 1 | |||
*[[Zinger]]: 7 | |||
==Items and objects== | |||
*[[DK Barrel]]: 4 | |||
*[[TNT Barrel]]: 4 | |||
*[[Kong Token]]: 1 | |||
===K-O-N-G Letters=== | |||
*'''K:''' Found during a rope climbing section. | |||
*'''O:''' At the end of the first bonus room. | |||
*'''N:''' Hovering above an upwards slope with Slippa Jars rolling down. | |||
*'''G:''' In a rope section with a few Zingers. | |||
==Bonus Level== | |||
{|class="dktable-brown" | |||
!Image | |||
!Description | |||
|- | |||
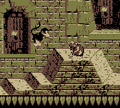
|[[File:Snake Charmer's Challenge Bonus Level.png]] | |||
|Just before the Continue Point is the first TNT Barrel. The active Kong must pick it up and throw it at a basket of snakes. They must bounce on a [[Tire (object)|tire]] in the hole to go right to the [[Bonus Level]]. In the Bonus Level, Donkey Kong and Diddy are in a cloudy area with platforms that move a set path. There are some Zingers and Mincers, which the Kongs can avoid by jumping over. The Kongs can collect [[Banana Bunch]]es along the way until they reach a dead-end with an Auto-Fire Barrel (which the letter O is above) that sends them back to the main level. | |||
|} | |||
==Gallery== | |||
<gallery> | |||
Snake Charmer's Challenge DKL start.png|Diddy jumps at a Klaptrap at the start | |||
Snake Charmer's Challenge DKL Swirlwind.png|Diddy bounces on a Swirlwind | |||
Snake Charmer's Challenge DKL Gnawty.png|Diddy jumps at a Gnawty | |||
Snake Charmer's Challenge DKL letter N.png|Donkey Kong jumps to the letter N | |||
Snake Charmer's Challenge DKL gap.png|Donkey Kong jumps to a basket of snakes to cross a gap | |||
Snake Charmer's Challenge DKL end.png|Diddy reaches the end of the level and an explosive barrel | |||
</gallery> | |||
==Names in other languages== | ==Names in other languages== | ||
| Line 28: | Line 61: | ||
|SpaM=Literal translation}} | |SpaM=Literal translation}} | ||
{{DKL}} | {{DKL}} | ||
[[Category:Temples and Shrines]] | [[Category:Temples and Shrines]] | ||
[[Category:Donkey Kong Land Levels]] | [[Category:Donkey Kong Land Levels]] | ||
Revision as of 02:08, November 15, 2019
Template:Levelbox Snake Charmer's Challenge is the thirteenth level in Donkey Kong Land and the fourth level of Kremlantis. Either it or Chomp's Coliseum can be completed for an explosive barrel that is used to blow up a rock obstructing the path to the level, Nautilus Chase.
Snake Charmer's Challenge is the second temple level. It is filled with baskets of snakes that shoot Slippas at Donkey and Diddy Kong. Some basket of snakes roll down steps of the temple and must be avoided. The level has one Swirlwind, who first appear in the level, although they later appear as the main and titular obstacle of Swirlwind Storm. Along the way, there are a few gaps that the Kongs must cross from a few ropes. Other enemies in the level include Gnawties, a single Klaptrap, and Zingers. Two Mincers appear in a Bonus Level.
Layout

From the start of the level, the Kongs should travel east and grab onto the nearby rope. It will move right and left. When it gets by the next ledge, they need to jump off, and continue on. They will soon find the level's first basket of snakes, shooting Slippas at them. When it is passed, the heroes should use a Swirlwind to get an extra boost on hopping over a gap. Then, they should bounce off of a tire and grab a Kong Token, and keep going east after that. They'll later dodge a basket of snakes, along with its contents, and soon grab onto a rope. It will take them over a large abyss, where they can find the letter K. When back on land, they need to continue east, avoid a basket of snakes, and grab onto yet another rope. As the rope before, it will guide them over a huge gap. As they go, there will a Zinger flying around to knock them off. After that, the Kongs will have to keep going forward and travel under another Zinger. After jumping over a rather small abyss, they will find the Continue Point.
Halfway through the level, they Kongs will come up to two baskets of snakes, which can be destroyed with the TNT Barrels nearby. From there, they must leap across a small gap and continue east. They'll soon find the letter N, and have to hop over another small gap. There is a basket of snakes after this, as well as yet another small gap. Both obstacles can be overcome easily, and the Kongs should be able to move on. After they drop down a large ledge, they must cross a few big abysses. One of these abysses must be cross with the aid of a floating basket of snakes, which the Kongs can step on. After that, the heroes must avoid another basket of snakes and grab onto a rope. As it takes them over the large abyss below, they need to watch out for the Zinger buzzing around them. There is another rope after this in mid-air, and it will, as usual, move when the Kongs get on it. More Zingers than before are here, and they are flying all around. Soon, though, the group will reach land again, where they can exit the level.
Enemies
Items and objects
- DK Barrel: 4
- TNT Barrel: 4
- Kong Token: 1
K-O-N-G Letters
- K: Found during a rope climbing section.
- O: At the end of the first bonus room.
- N: Hovering above an upwards slope with Slippa Jars rolling down.
- G: In a rope section with a few Zingers.
Bonus Level
| Image | Description |
|---|---|

|
Just before the Continue Point is the first TNT Barrel. The active Kong must pick it up and throw it at a basket of snakes. They must bounce on a tire in the hole to go right to the Bonus Level. In the Bonus Level, Donkey Kong and Diddy are in a cloudy area with platforms that move a set path. There are some Zingers and Mincers, which the Kongs can avoid by jumping over. The Kongs can collect Banana Bunches along the way until they reach a dead-end with an Auto-Fire Barrel (which the letter O is above) that sends them back to the main level. |
Gallery
Diddy jumps at a Klaptrap at the start
Diddy bounces on a Swirlwind
Diddy jumps at a Gnawty
- Snake Charmer's Challenge DKL letter N.png
Donkey Kong jumps to the letter N
Donkey Kong jumps to a basket of snakes to cross a gap
Diddy reaches the end of the level and an explosive barrel


Names in other languages
| Language | Name | Meaning |
|---|---|---|
| Japanese | スリッパーの遺跡 Surippā no iseki |
Slippa Ruins |
| Spanish | Desafío del encantador de serpientes |
Literal translation |