Track Attack: Difference between revisions
No edit summary |
No edit summary |
||
| (24 intermediate revisions by 12 users not shown) | |||
| Line 1: | Line 1: | ||
{{level | {{level infobox | ||
|image=[[File:Track Attack.png]] | |||
|image=[[ | |code=3-3 | ||
|code=3 - 3 | |||
|game=''[[Donkey Kong Land]] | |game=''[[Donkey Kong Land]] | ||
| | |track=Sky | ||
|after=[[Spiky Tyre Trail|>>]] | |after=[[Spiky Tyre Trail|>>]] | ||
|before=[[Mountain Mayhem|<<]] | |before=[[Mountain Mayhem|<<]] | ||
}} | }} | ||
'''Track Attack''' is the nineteenth level in | '''Track Attack'''<ref>''Donkey Kong Land'' instruction booklet, page 18.</ref> is the nineteenth level in ''[[Donkey Kong Land]]'' and the third level of [[Monkey Mountains & Chimpanzee Clouds]]. It is a cloud level taking place above the skies of Monkey Mountains. [[Donkey Kong]] and [[Diddy Kong]] get across the level by moving from cloud platforms, as well as by walking on clouds. [[Zinger]]s are encountered in the paths followed by the platforms. | ||
==Layout== | |||
From the start of the level, the Kongs must walk into a nearby [[Blast Barrel]]. It will shoot them to another barrel, which will then shoot them to a platform. This platform will move over a blue line. As the Kongs ride on this platform, they must try to dodge all the Zingers flying by. After the third Zinger is passed, they should hop off the platform before it falls and get on a large, solid cloud. The Kongs should carry on and defeat a few Kritters to reach the second platform. This time, the platform will travel a shorter distance, while the Kongs dodge a Zinger and a Hogwash in the way. Soon, they will see a trail of bananas leading to another platform. They must jump to this platform before the one they are on collapses, and then continue to ride. After beating two Hogwashes, the heroes should make it to another cloud to journey across. Defeating more Kritters will take them to the next platform. It will carry them a short distance into a few Zinger, whom the Kongs must try to jump over. Once they see a formation of bananas creating an arrow, the group will have to hop off the platform they are on and walk across another cloud. They will find the [[Continue Point]] here. | |||
At this point, the Kongs must hop aboard the next platform. This one will take them a rather long distance. As it moves in a wavy path, the heroes will have to dodge all the Hogwashes and Zingers that come in their way. They will soon have to leap onto a small cloud platform, which will fade away once touched. The Kongs must quickly jump off of it, and get onto a solid cloud. Here, they will need to jump up to another platform and ride along. This platform will only go so far, and after passing a single Hogwash, it will fall down. Before it falls off screen, the Kongs will have to hop to the platform to the right. This time, the platform will go a longer distance. Luckily, though, there is only one foe on the way. Eventually, the Kongs will see another platform, and they must quickly jump onto it. This one will go a very short distance. In fact, as soon as they start to move, the heroes should make a well timed jump and land on a large, solid cloud. If Donkey and Diddy Kong walk a little farther, they will find a portal. It will take them out of the level. | |||
==Enemies== | |||
The following enemies appear in the following quantities: | |||
*[[Hogwash]]: 4 | |||
*[[Gnawty]]: 1 | |||
*[[Mincer]]: 1 | |||
*[[Kritter]]: 6 | |||
*[[Zinger]]: 6 | |||
==Items and objects== | |||
The following items and objects appear in the following quantities: | |||
*[[DK Barrel]]s: 3 | |||
*[[Kong Token]]s: 2 | |||
===K-O-N-G Letters=== | |||
*K: Above a Kritter after the first Track section | |||
*O: In the first bonus room, above the Mincer | |||
*N: Above a Zinger | |||
*G: Can be reached by jumping off a Hogwash | |||
==Bonus Areas== | |||
{{multiframe|[[File:Track Attack Bonus Level 1.png]] [[File:Track Attack Bonus Level 2.png]]|size=340|The first and second Bonus Levels respectively}} | |||
Track Attack has two [[Bonus room|Bonus Levels]]: | |||
*When the Kongs are on the second platform, they must jump past a Zinger to the right to land into a [[Blast Barrel]] that takes them into the [[Bonus Area]]. The Bonus Area is in a small cave area, and the letter O appears just before the right end. A Mincer moves under the letter O back and forth horizontally. The Kongs can jump to the letter O and then exit to the right. | |||
*Near the end of the level are two Hogwashes flying close together. The Kongs must jump onto them and move right in midair to enter a Blast Barrel that takes them to the second Bonus Area. There, the Kongs can collect many bananas arranged in a heart shape and a Kong Token. They can exit from a Blast Barrel to the right. | |||
== | ==Gallery == | ||
<gallery> | |||
Track Attack DKL letter K.png|Diddy reaches the letter K | |||
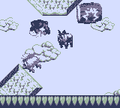
Track Attack DKL letter N.png|Donkey Kong jumps to the letter N | |||
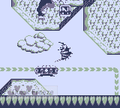
Track Attack DKL Hogwashes.png|Donkey Kong bounces from two Hogwashes to reach a Blast Barrel leading to the second Bonus Level | |||
</gallery> | |||
==Names in other languages== | ==Names in other languages== | ||
{{ | {{foreign names | ||
|Jap=リフト・アタック | |Jap=リフト・アタック | ||
|JapR=Rifuto Atakku | |JapR=Rifuto Atakku | ||
|JapM=Lift Attack}} | |JapM=Lift Attack | ||
|Spa=Ataque en el sendero | |||
|SpaM=Attack on the track | |||
|Ita=L'attacco sulla pista<ref>''[[Donkey Kong Land]]'' Italian booklet, pag. 18</ref> | |||
|ItaM=Attack on the track | |||
}} | |||
==References== | |||
<references/> | |||
{{DKL}} | {{DKL}} | ||
[[Category: | [[Category:Sky areas]] | ||
[[Category:Donkey Kong Land levels]] | |||
[[Category:Donkey Kong Land | |||
Latest revision as of 14:25, December 15, 2023
| Level | |
|---|---|
| Track Attack | |

| |
| Level code | 3-3 |
| Game | Donkey Kong Land |
| Music track | Sky |
| << Directory of levels >> | |
Track Attack[1] is the nineteenth level in Donkey Kong Land and the third level of Monkey Mountains & Chimpanzee Clouds. It is a cloud level taking place above the skies of Monkey Mountains. Donkey Kong and Diddy Kong get across the level by moving from cloud platforms, as well as by walking on clouds. Zingers are encountered in the paths followed by the platforms.
Layout[edit]
From the start of the level, the Kongs must walk into a nearby Blast Barrel. It will shoot them to another barrel, which will then shoot them to a platform. This platform will move over a blue line. As the Kongs ride on this platform, they must try to dodge all the Zingers flying by. After the third Zinger is passed, they should hop off the platform before it falls and get on a large, solid cloud. The Kongs should carry on and defeat a few Kritters to reach the second platform. This time, the platform will travel a shorter distance, while the Kongs dodge a Zinger and a Hogwash in the way. Soon, they will see a trail of bananas leading to another platform. They must jump to this platform before the one they are on collapses, and then continue to ride. After beating two Hogwashes, the heroes should make it to another cloud to journey across. Defeating more Kritters will take them to the next platform. It will carry them a short distance into a few Zinger, whom the Kongs must try to jump over. Once they see a formation of bananas creating an arrow, the group will have to hop off the platform they are on and walk across another cloud. They will find the Continue Point here.
At this point, the Kongs must hop aboard the next platform. This one will take them a rather long distance. As it moves in a wavy path, the heroes will have to dodge all the Hogwashes and Zingers that come in their way. They will soon have to leap onto a small cloud platform, which will fade away once touched. The Kongs must quickly jump off of it, and get onto a solid cloud. Here, they will need to jump up to another platform and ride along. This platform will only go so far, and after passing a single Hogwash, it will fall down. Before it falls off screen, the Kongs will have to hop to the platform to the right. This time, the platform will go a longer distance. Luckily, though, there is only one foe on the way. Eventually, the Kongs will see another platform, and they must quickly jump onto it. This one will go a very short distance. In fact, as soon as they start to move, the heroes should make a well timed jump and land on a large, solid cloud. If Donkey and Diddy Kong walk a little farther, they will find a portal. It will take them out of the level.
Enemies[edit]
The following enemies appear in the following quantities:
Items and objects[edit]
The following items and objects appear in the following quantities:
- DK Barrels: 3
- Kong Tokens: 2
K-O-N-G Letters[edit]
- K: Above a Kritter after the first Track section
- O: In the first bonus room, above the Mincer
- N: Above a Zinger
- G: Can be reached by jumping off a Hogwash
Bonus Areas[edit]


Track Attack has two Bonus Levels:
- When the Kongs are on the second platform, they must jump past a Zinger to the right to land into a Blast Barrel that takes them into the Bonus Area. The Bonus Area is in a small cave area, and the letter O appears just before the right end. A Mincer moves under the letter O back and forth horizontally. The Kongs can jump to the letter O and then exit to the right.
- Near the end of the level are two Hogwashes flying close together. The Kongs must jump onto them and move right in midair to enter a Blast Barrel that takes them to the second Bonus Area. There, the Kongs can collect many bananas arranged in a heart shape and a Kong Token. They can exit from a Blast Barrel to the right.
Gallery[edit]
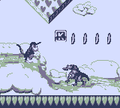
Diddy reaches the letter K
Donkey Kong jumps to the letter N
Donkey Kong bounces from two Hogwashes to reach a Blast Barrel leading to the second Bonus Level


Names in other languages[edit]
| Language | Name | Meaning |
|---|---|---|
| Japanese | リフト・アタック Rifuto Atakku |
Lift Attack |
| Italian | L'attacco sulla pista[2] |
Attack on the track |
| Spanish | Ataque en el sendero |
Attack on the track |
References[edit]
- ^ Donkey Kong Land instruction booklet, page 18.
- ^ Donkey Kong Land Italian booklet, pag. 18