Risky Reef: Difference between revisions
m (Undo revision 1468587 by SuperMario150 (talk)I'd say it counts as a body of water) |
No edit summary |
||
| (21 intermediate revisions by 10 users not shown) | |||
| Line 1: | Line 1: | ||
{{ | {{level infobox | ||
|image=[[ | |image=[[File:Risky Reef.png]] | ||
| | |world=[[Aqua World]] | ||
| | |game=''[[DK: King of Swing]]'' | ||
|before=[[Fire Necky's Nest|<<]] | |||
|after=[[Kremling Kamp|>>]] | |||
}} | }} | ||
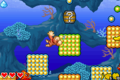
'''Risky Reef''' is a level in the [[Aqua World]] area of ''[[DK: King of Swing]]'', and | '''Risky Reef''' is a level in the [[Aqua World]] area of ''[[DK: King of Swing]]''. It is the first underwater level, and enemies of the level include [[Lockjaw]]s and [[Shuri]]s. Because the level is underwater, [[Donkey Kong]] moves slower than on land. This allows Donkey Kong to control his movement more easily when jumping from pegs. Obstacles in this level include [[barrel]]s, [[Barrel Cannon]]s, [[tire]]s, [[Peg Board]]s, and pegs that move in a large circle and sway with the water. Either Risky Reef or [[Lockjaw Falls]] can be completed to unlock [[Kremling Kamp]]. | ||
==Layout== | |||
At the beginning of the level, there are two rows of four single pegs that sway slightly to the left and right. A trio of peg boards are above. A [[banana]] rests on each of the three boards. A fourth peg board is above them with two walls around it. Donkey Kong can reach the top of the walls and use them as platforms. Two separate rows of four pegs are on the pair of walls. The pegs sway a little bit with the water. Three stationary pegs are above, and a Lockjaw floats above them. Two peg boards are to the left and right of the foe, with one banana resting on each of them. Trios of pegs are above the two peg boards, and a third trio of pegs is between them higher up. It can help Donkey Kong climb to a Peg Board with another banana on it. | |||
Two platforms stand on the sides of the board, and four pegs sway on the left platform. A [[Bonus Barrel]] is above a Lockjaw in the center of the area and can be reached by using the pegs. He must take the platform to the right of the area to continue to the second section. | |||
[[File:Risky Reef DKKoS.png|thumb|left|A wall of barrels block the path]] | |||
In the second section, Donkey Kong must climb up Peg Boards in a narrow path while avoiding the Shuris along the way. As Donkey Kong climbs, he comes up to a barrel in a small alcove that he can break to find a Banana Bunch. A pair of Shuris attack him in this area, and a trio of barrels are soon after them that block the Kong's path. The curvy trail of peg boards continues after the barrels, which more Shuris swim around. Another barrel sits in an alcove above a few of the boards. Shortly after, three more barrels block the ape's path, and the trail of peg boards goes on ahead, with a third barrel being seen in a small alcove. As before, Shuris attack Donkey Kong as he approaches a wall of three barrels that block his path. A few peg boards following the barrels have a ledge next to them that leads into the third and final part of the level. | |||
In the last section, Peg Boards of all sizes are scattered around the area. Near the center of the area, a barrel can be found that makes a small peg board appear when destroyed. The Peg Board can help Donkey Kong reach another one at the end of the section, which has a barrel with a large Banana Bunch in it. A Barrel Cannon is right under it that shoots Donkey Kong back towards the cluster of peg boards. Lockjaws patrol the areas around the peg boards. Near the bottom of the area, the ape can locate a barrel that can broken to make a peg board appear next to a rock wall. If he breaks through it, he can find a large alcove at the southeast corner of the area with Barrel Cannons that blast him to the Banana Bunches through the alcove and then back to the Peg Boards. Trios of pegs above some of the boards can help the Kong reach a group of pegs that move in a large circle. Tires are placed around them, as well as a Question Barrel that can be broken to reveal a trail of single pegs that lead up to a hidden ledge with another barrel on it. When it is destroyed, a bronze medal is released. A Barrel Cannon is above the medal, and it can blast Donkey Kong through some bananas and back towards the circle of pegs. If Donkey Kong breaks the barrel to the right of these pegs, he can reveal some new pegs farther to the right that can help him reach a high ledge with the exit sign. | |||
==Key items== | |||
< | [[File:Risky Reef Bronze Medal.png|thumb|Location of the bronze medal]] | ||
{{ | *'''[[Crystal Coconut]]:''' Rewarded for completing the [[Bonus Level]]. | ||
*'''[[Medal (DK: King of Swing)|Bronze medal]]:''' In the third and last section, after breaking a [[Question Barrel]], Donkey Kong can jump from some individual pegs until reaching a blue Peg Board with a barrel next to it. He can break the barrel to reveal the bronze medal. | |||
[[Category: | |||
[[Category:DK: King of Swing | ==Bonus Level== | ||
The Bonus Barrel is guarded by a Lockjaw near the end of the first section. In the [[Bonus Level]], Donkey Kong 40 seconds to collect many [[Banana Bunch]]es by using many individual pegs placed far apart from each over a large gap. After collecting all the Banana Bunches, Donkey Kong can grab the [[Crystal Coconut]] at the end. | |||
==Gallery== | |||
<gallery> | |||
Risky Reef beginning.png|The start of the level | |||
Risky Reef barrel.png|DK near a Barrel | |||
</gallery> | |||
==Names in other languages== | |||
{{foreign names | |||
|Jap=ゆらゆらうみのそこ | |||
|JapR=Yurayura umi no soko | |||
|JapM=Swaying Seabottom | |||
|Ita=Barriera dentiera | |||
|ItaM=Denture reef | |||
}} | |||
{{DKKOS}} | |||
[[Category:Aquatic areas]] | |||
[[Category:DK: King of Swing levels]] | |||
Latest revision as of 15:34, December 22, 2023
| Level | |
|---|---|
| Risky Reef | |

| |
| World | Aqua World |
| Game | DK: King of Swing |
| << Directory of levels >> | |
Risky Reef is a level in the Aqua World area of DK: King of Swing. It is the first underwater level, and enemies of the level include Lockjaws and Shuris. Because the level is underwater, Donkey Kong moves slower than on land. This allows Donkey Kong to control his movement more easily when jumping from pegs. Obstacles in this level include barrels, Barrel Cannons, tires, Peg Boards, and pegs that move in a large circle and sway with the water. Either Risky Reef or Lockjaw Falls can be completed to unlock Kremling Kamp.
Layout[edit]
At the beginning of the level, there are two rows of four single pegs that sway slightly to the left and right. A trio of peg boards are above. A banana rests on each of the three boards. A fourth peg board is above them with two walls around it. Donkey Kong can reach the top of the walls and use them as platforms. Two separate rows of four pegs are on the pair of walls. The pegs sway a little bit with the water. Three stationary pegs are above, and a Lockjaw floats above them. Two peg boards are to the left and right of the foe, with one banana resting on each of them. Trios of pegs are above the two peg boards, and a third trio of pegs is between them higher up. It can help Donkey Kong climb to a Peg Board with another banana on it.
Two platforms stand on the sides of the board, and four pegs sway on the left platform. A Bonus Barrel is above a Lockjaw in the center of the area and can be reached by using the pegs. He must take the platform to the right of the area to continue to the second section.

In the second section, Donkey Kong must climb up Peg Boards in a narrow path while avoiding the Shuris along the way. As Donkey Kong climbs, he comes up to a barrel in a small alcove that he can break to find a Banana Bunch. A pair of Shuris attack him in this area, and a trio of barrels are soon after them that block the Kong's path. The curvy trail of peg boards continues after the barrels, which more Shuris swim around. Another barrel sits in an alcove above a few of the boards. Shortly after, three more barrels block the ape's path, and the trail of peg boards goes on ahead, with a third barrel being seen in a small alcove. As before, Shuris attack Donkey Kong as he approaches a wall of three barrels that block his path. A few peg boards following the barrels have a ledge next to them that leads into the third and final part of the level.
In the last section, Peg Boards of all sizes are scattered around the area. Near the center of the area, a barrel can be found that makes a small peg board appear when destroyed. The Peg Board can help Donkey Kong reach another one at the end of the section, which has a barrel with a large Banana Bunch in it. A Barrel Cannon is right under it that shoots Donkey Kong back towards the cluster of peg boards. Lockjaws patrol the areas around the peg boards. Near the bottom of the area, the ape can locate a barrel that can broken to make a peg board appear next to a rock wall. If he breaks through it, he can find a large alcove at the southeast corner of the area with Barrel Cannons that blast him to the Banana Bunches through the alcove and then back to the Peg Boards. Trios of pegs above some of the boards can help the Kong reach a group of pegs that move in a large circle. Tires are placed around them, as well as a Question Barrel that can be broken to reveal a trail of single pegs that lead up to a hidden ledge with another barrel on it. When it is destroyed, a bronze medal is released. A Barrel Cannon is above the medal, and it can blast Donkey Kong through some bananas and back towards the circle of pegs. If Donkey Kong breaks the barrel to the right of these pegs, he can reveal some new pegs farther to the right that can help him reach a high ledge with the exit sign.
Key items[edit]

- Crystal Coconut: Rewarded for completing the Bonus Level.
- Bronze medal: In the third and last section, after breaking a Question Barrel, Donkey Kong can jump from some individual pegs until reaching a blue Peg Board with a barrel next to it. He can break the barrel to reveal the bronze medal.
Bonus Level[edit]
The Bonus Barrel is guarded by a Lockjaw near the end of the first section. In the Bonus Level, Donkey Kong 40 seconds to collect many Banana Bunches by using many individual pegs placed far apart from each over a large gap. After collecting all the Banana Bunches, Donkey Kong can grab the Crystal Coconut at the end.
Gallery[edit]

The start of the level
DK near a Barrel


Names in other languages[edit]
| Language | Name | Meaning |
|---|---|---|
| Japanese | ゆらゆらうみのそこ Yurayura umi no soko |
Swaying Seabottom |
| Italian | Barriera dentiera |
Denture reef |