Homecoming Hijinxs: Difference between revisions
m (Robot: Changing template: DKC:TF) |
TheRaoul1992 (talk | contribs) No edit summary |
||
| (20 intermediate revisions by 13 users not shown) | |||
| Line 1: | Line 1: | ||
{{level | {{level infobox | ||
|image=[[File:Homecoming Hijinxs DKCTF 1.jpg|300px]] | |image=[[File:Homecoming Hijinxs DKCTF 1.jpg|300px]] | ||
|code=6 - 1 | |code=6-1 | ||
|world=[[Donkey Kong Island (world)|Donkey Kong Island]] | |||
|game=''[[Donkey Kong Country: Tropical Freeze]]'' | |game=''[[Donkey Kong Country: Tropical Freeze]]'' | ||
| | |track=Snowmads Theme | ||
|before=[[ | |before=[[Punch Bowl|<<]] | ||
|after=[[Seashore War|>>]] | |after=[[Seashore War|>>]] | ||
}} | }} | ||
'''Homecoming Hijinxs''' is the first level of [[Donkey Kong Island]] in ''[[Donkey Kong Country: Tropical Freeze]]''. This level is reminiscent of the [[Jungle]] levels of ''[[Donkey Kong Country Returns]]'', but it | '''Homecoming Hijinxs''' is the first level of [[Donkey Kong Island (world)|Donkey Kong Island]] in ''[[Donkey Kong Country: Tropical Freeze]]'' and its Nintendo Switch [[Donkey Kong Country: Tropical Freeze (Nintendo Switch)|port of the same name]]. This level is reminiscent of the [[Jungle (Donkey Kong Country Returns)|Jungle]] levels of ''[[Donkey Kong Country Returns]]'', but it has become a snowscape due to the invasion and influence of the [[Snowmads]] on the island. | ||
The | The level has icy terrain, making it difficult to retain traction. There are more ice obstacles, such as many of the ice platforms in the level crumble if jumped on more than twice, and objects such as [[Barrel Cannon]]s and climbable, vine-covered walls are often connected to crumbling ice structures. On many occasions, the [[Kong]]s must remain in the Barrel Cannons until the ice breaks and aims the barrels in the correct direction, or they must hold onto the crumbling walls until the vines slide toward a platform that the Kongs can reach. The level also features areas where the Kongs must climb the walls quickly, before the vines slide into an abyss. Alongside these obstacles, enemies here include [[Tucks]], [[Pointy Tucks]], [[Hootz]]es, [[Blue Hootz]]es, and [[Archy|Archies]]. | ||
In the background, the Snowmad ship is shown to be atop the [[Volcano]]. Homecoming Hijinxs takes place on a parallel path to [[Jungle Hijinxs (Donkey Kong Country Returns)|Jungle Hijinxs]] from ''[[Donkey Kong Country Returns]]'', as a few elements from Jungle Hijinxs appear in the background of Homecoming Hijinxs, including [[DK's Tree House]] at the start and two [[Mugly]] statues at the first checkpoint. | |||
In [[Donkey Kong Country: Tropical Freeze#Time Attack|Time Attack]] mode, a time of 1:10.00 is required to get a gold medal, a time of 1:27.00 for silver, and a time of 1:37.00 for bronze. | |||
The | ==Layout== | ||
[[File:Homecoming Hijinxs DKCTF 4.jpg|thumb|left|The start of the level, where DK's Tree House is visible in the background]] | |||
The level starts off by showing some Snowmads doing various things, such as sliding across the ice or juggling bananas, before the camera pans to the Kongs starting the level. The Kongs start at a beach with frozen water. A [[DK Barrel]] appears right after the starting point, followed by an ice block and a few icy platforms, which break if the Kongs jump on them twice. A [[Tucks]] is on a platform above a row of icicle-like spikes. Afterward, the Kongs must enter an ice cavern and jump into a [[Barrel Cannon]] attached to a tall ice structure; when the Kongs jump into the Barrel Cannon, the structure tilts to next the Barrel Cannon. The Kongs must blast from a few more Barrel Cannons attached to icy structures, and the last Barrel Cannon falls from the ceiling and crushes a [[Chum Chucker Charlie]]. The Barrel Cannon blasts the Kongs to an ice-covered wooden bridge that curves down slightly. The Kongs must jump onto a short platform with a Tucks, then onto an even shorter platform, and cling onto snow-covered [[climbing grass]] above. When the Kongs grab on the climbing grass, it flips them up before falling into the abyss below. The Kongs must jump across the gap and cross the first [[checkpoint]]. | |||
After the checkpoint, the Kongs must jump a icy stone platform and then to a lower platform with a [[Painguin Tucks]]. The [[KONG Letters|letter K]] is floating above the platform with a Painguin Tucks, next to a pair of [[Blue Hootz]]es. The Kongs must jump over an abyss to land into another Barrel Cannon which blasts them into another ice cave. The Kongs are blasted at a ceiling with a rod and then fall into the gap below. The Kongs' impact from hitting the ceiling causes the ice to collapse into the gap right after the Kongs reach the bottom. The Kongs must continue beneath a spiked ceiling that slowly lowers, and the Kongs must perform a [[Kong Roll]] to quickly move to the other side. They must then jump over an abyss and cling onto climbing grass on a wall to the right. The Kongs must quickly go up the climbing grass before it collapses into the pit. At the top, the Kongs must jump on a short snow platform to the left and then onto another wooden platform to the left with a red [[Archy (fire)|Archy]]. They must jump onto a smaller snow platform that directly above the slightly larger one and jump onto a blue Archy. The latter O is above a Barrel Cannon in a pit ahead, under a Hootz. Afterward, the Kongs must pass a Painguin Tucks, then jump on an ice platform with another red Archy, and then onto another ice platform, where they must jump above to grab the climbing grass on the ceiling. By doing so, a large chunk of ice flips the Kongs around to three small ice platforms. They must jump from them and then pass an Archy to activate the second checkpoint. | |||
The path ahead is blocked by ice, and the Kongs must grab onto climbing grass on a wooden platform attached to the right wall, causing it to fall. As it falls, the Kongs must instantly jump left to grab on a large patch of climbing grass on another wooden platform to the left. They must jump on the ground to the right and continue past a [[Harey]]. The Kongs must then jump into another Barrel Cannon on a tilting ice platform and blast through ice blocks within a short tunnel of a large structure to land on a narrow ice plank. The Kongs must jump on a short platform to break down the plank, allowing them to go down on an ice block below. From there, they must jump left and right between a few patches of climbing crass in a thin, vertical passage with ice spikes between them. When the Kongs reach the top, they must jump on a small platform, which the letter G and a Blue Hootz is directly underneath. The Kongs must then grab on a patch of climbing grass, causing the ice to flip them down to the next patch of climbing grass before breaking off. The Kongs must repeat this two more times; the third chunk of ice flips to the left of a wall of spikes to the right and then falls onto a thin ice platform, defeating another Chum Chucker Charlie. The [[Slot Machine Barrel]] is to the right, floating up between two small ice platforms. | |||
==Collectibles== | ==Collectibles== | ||
=== | ===KONG Letters=== | ||
*K: The letter K is found immediately after the first checkpoint next to two Blue | *K: The letter K is found immediately after the first checkpoint next to two Blue Hootzes. To reach it, the Kongs must bounce on the nearby Hootz or Painguin. | ||
*O: The letter O is located above a Barrel Cannon in a pit, which is found shortly after passing the second checkpoint. | *O: The letter O is located above a Barrel Cannon in a pit, which is found shortly after passing the second checkpoint. | ||
*N: After shooting through an arched structure from a Barrel Cannon, which is placed immediately after a Harey, the player can find the letter N at the end of a crumbling structure. | *N: After shooting through an arched structure from a Barrel Cannon, which is placed immediately after a Harey, the player can find the letter N at the end of a crumbling structure. Three [[Banana Coin]]s are next to this letter. The Kongs must quickly move to it before the platform falls. | ||
*G: The letter G is located above a Blue Hootz following the vertical section of falling vine walls. A roll-jump is required to collect it safely. | *G: The letter G is located above a Blue Hootz following the vertical section of falling vine walls. A roll-jump is required to collect it safely. | ||
===Puzzle Pieces=== | ===Puzzle Pieces=== | ||
#After the first Barrel Cannon section, another Barrel Cannon leading to a [[Bonus Level]] can be found hidden in the pit just crossed. In the Bonus Level, the Kongs must use two large trampolines to collect many | #After the first Barrel Cannon section, another Barrel Cannon leading to a [[Bonus Level]] can be found hidden in the pit just crossed. In the Bonus Level, the Kongs must use two large trampolines to collect many [[banana]]s and [[Banana Bunch]]es. If all the bananas are collected within thirty seconds, a Puzzle Piece appears. | ||
#The second Puzzle Piece is located at the far bottom of the clingy vine wall after the first checkpoint. Donkey Kong must collect it and advance quickly before the vine wall crumbles. | #The second Puzzle Piece is located at the far bottom of the clingy vine wall after the first checkpoint. Donkey Kong must collect it and advance quickly before the vine wall crumbles. | ||
# | #After the second checkpoint, the Kongs must bounce on a Harey to cling on climbing grass above. It leads around to a treasure chest containing the third Puzzle Piece. | ||
#In an area of crumbling vine walls, located before the letter G, the Kongs can find the fourth Puzzle Piece in an alcove. The alcove is hidden by a wooden board. Donkey Kong must collect it before the vine walls fall. | #In an area of crumbling vine walls, located before the letter G, the Kongs can find the fourth Puzzle Piece in an alcove. The alcove is hidden by a wooden board. Donkey Kong must collect it before the vine walls fall. | ||
#A Puzzle Piece over a Barrel Cannon appears under the Slot Machine Barrel when the Kongs collect all the Banana Bunches at the end of the level. If Donkey Kong jumps on the platforms here more than once, they will fall. | #A Puzzle Piece over a Barrel Cannon appears under the Slot Machine Barrel when the Kongs collect all the Banana Bunches at the end of the level. If Donkey Kong jumps on the platforms here more than once, they will fall. | ||
==Enemies== | ==Enemies== | ||
*[[ | *[[Tucks]] | ||
*[[Pointy | *[[Pointy Tucks]] | ||
*[[Hootz]] | *[[Painguin Tucks]] | ||
*[[Blue Hootz]] | *[[Harey]]s | ||
*[[Archy]] | *[[Hootz]]es | ||
*[[Blue Hootz]]es | |||
*[[Archy|Archies]] | |||
==Gallery== | ==Gallery== | ||
<gallery> | <gallery> | ||
Homecoming Hijinxs DKCTF 5.jpg|The Kongs, in the barrel to the left, must wait for the ice to break before the barrel is aimed to the next barrel. | |||
Homecoming Hijinxs DKCTF 2.jpg|The Kongs must escape this passage before the ceiling closes on them. | |||
Homecoming Hijinxs DKCTF 3.jpg|The walls ahead of here crumble as Donkey Kong climbs them. | |||
</gallery> | </gallery> | ||
==Names in other languages== | |||
==Additional names== | |||
===Internal names=== | |||
{{internal names | |||
|game1=''[[Donkey Kong Country: Tropical Freeze]]'' | |||
|file1=<tt>content/Worlds/w06_frozen/l01_frozen_jungleHomecoming.pak</tt> | |||
|name1=l01_frozen_jungleHomecoming.pak | |||
|meaning1=Frozen Level 1: Jungle Homecoming | |||
}} | |||
===Names in other languages=== | |||
{{foreign names | {{foreign names | ||
|Jap=トロピカルフリーズ | |Jap=トロピカルフリーズ | ||
| Line 54: | Line 70: | ||
|Spa=Temporada helada | |Spa=Temporada helada | ||
|SpaM=Frosty Season | |SpaM=Frosty Season | ||
| | |Fre=Jungle des givrés | ||
| | |FreM=Snowmad Jungle | ||
|Ger=Trautes Heim, Eis Allein | |Ger=Trautes Heim, Eis Allein | ||
|GerM=Home Sweet Home, Ice Alone | |GerM=Home Sweet Home, Ice Alone | ||
| Line 64: | Line 80: | ||
==Trivia== | ==Trivia== | ||
*The name of this level is a reference to [[Jungle Hijinxs]], the first level of ''[[Donkey Kong Country]]'' and ''Donkey Kong Country Returns''. | *The name of this level is a reference to [[Jungle Hijinxs]], the first level of ''[[Donkey Kong Country]]'' and ''Donkey Kong Country Returns''. | ||
{{DKCTF}} | {{DKCTF}} | ||
[[Category:Donkey Kong Country: Tropical Freeze | [[Category:Snowscapes]] | ||
[[Category:Jungles]] | |||
[[Category:Donkey Kong Country: Tropical Freeze levels]] | |||
[[Category:Donkey Kong Island]] | [[Category:Donkey Kong Island]] | ||
Latest revision as of 13:20, February 3, 2024
| Level | |
|---|---|
| Homecoming Hijinxs | |

| |
| Level code | 6-1 |
| World | Donkey Kong Island |
| Game | Donkey Kong Country: Tropical Freeze |
| Music track | Snowmads Theme |
| << Directory of levels >> | |
Homecoming Hijinxs is the first level of Donkey Kong Island in Donkey Kong Country: Tropical Freeze and its Nintendo Switch port of the same name. This level is reminiscent of the Jungle levels of Donkey Kong Country Returns, but it has become a snowscape due to the invasion and influence of the Snowmads on the island.
The level has icy terrain, making it difficult to retain traction. There are more ice obstacles, such as many of the ice platforms in the level crumble if jumped on more than twice, and objects such as Barrel Cannons and climbable, vine-covered walls are often connected to crumbling ice structures. On many occasions, the Kongs must remain in the Barrel Cannons until the ice breaks and aims the barrels in the correct direction, or they must hold onto the crumbling walls until the vines slide toward a platform that the Kongs can reach. The level also features areas where the Kongs must climb the walls quickly, before the vines slide into an abyss. Alongside these obstacles, enemies here include Tucks, Pointy Tucks, Hootzes, Blue Hootzes, and Archies.
In the background, the Snowmad ship is shown to be atop the Volcano. Homecoming Hijinxs takes place on a parallel path to Jungle Hijinxs from Donkey Kong Country Returns, as a few elements from Jungle Hijinxs appear in the background of Homecoming Hijinxs, including DK's Tree House at the start and two Mugly statues at the first checkpoint.
In Time Attack mode, a time of 1:10.00 is required to get a gold medal, a time of 1:27.00 for silver, and a time of 1:37.00 for bronze.
Layout[edit]

The level starts off by showing some Snowmads doing various things, such as sliding across the ice or juggling bananas, before the camera pans to the Kongs starting the level. The Kongs start at a beach with frozen water. A DK Barrel appears right after the starting point, followed by an ice block and a few icy platforms, which break if the Kongs jump on them twice. A Tucks is on a platform above a row of icicle-like spikes. Afterward, the Kongs must enter an ice cavern and jump into a Barrel Cannon attached to a tall ice structure; when the Kongs jump into the Barrel Cannon, the structure tilts to next the Barrel Cannon. The Kongs must blast from a few more Barrel Cannons attached to icy structures, and the last Barrel Cannon falls from the ceiling and crushes a Chum Chucker Charlie. The Barrel Cannon blasts the Kongs to an ice-covered wooden bridge that curves down slightly. The Kongs must jump onto a short platform with a Tucks, then onto an even shorter platform, and cling onto snow-covered climbing grass above. When the Kongs grab on the climbing grass, it flips them up before falling into the abyss below. The Kongs must jump across the gap and cross the first checkpoint.
After the checkpoint, the Kongs must jump a icy stone platform and then to a lower platform with a Painguin Tucks. The letter K is floating above the platform with a Painguin Tucks, next to a pair of Blue Hootzes. The Kongs must jump over an abyss to land into another Barrel Cannon which blasts them into another ice cave. The Kongs are blasted at a ceiling with a rod and then fall into the gap below. The Kongs' impact from hitting the ceiling causes the ice to collapse into the gap right after the Kongs reach the bottom. The Kongs must continue beneath a spiked ceiling that slowly lowers, and the Kongs must perform a Kong Roll to quickly move to the other side. They must then jump over an abyss and cling onto climbing grass on a wall to the right. The Kongs must quickly go up the climbing grass before it collapses into the pit. At the top, the Kongs must jump on a short snow platform to the left and then onto another wooden platform to the left with a red Archy. They must jump onto a smaller snow platform that directly above the slightly larger one and jump onto a blue Archy. The latter O is above a Barrel Cannon in a pit ahead, under a Hootz. Afterward, the Kongs must pass a Painguin Tucks, then jump on an ice platform with another red Archy, and then onto another ice platform, where they must jump above to grab the climbing grass on the ceiling. By doing so, a large chunk of ice flips the Kongs around to three small ice platforms. They must jump from them and then pass an Archy to activate the second checkpoint.
The path ahead is blocked by ice, and the Kongs must grab onto climbing grass on a wooden platform attached to the right wall, causing it to fall. As it falls, the Kongs must instantly jump left to grab on a large patch of climbing grass on another wooden platform to the left. They must jump on the ground to the right and continue past a Harey. The Kongs must then jump into another Barrel Cannon on a tilting ice platform and blast through ice blocks within a short tunnel of a large structure to land on a narrow ice plank. The Kongs must jump on a short platform to break down the plank, allowing them to go down on an ice block below. From there, they must jump left and right between a few patches of climbing crass in a thin, vertical passage with ice spikes between them. When the Kongs reach the top, they must jump on a small platform, which the letter G and a Blue Hootz is directly underneath. The Kongs must then grab on a patch of climbing grass, causing the ice to flip them down to the next patch of climbing grass before breaking off. The Kongs must repeat this two more times; the third chunk of ice flips to the left of a wall of spikes to the right and then falls onto a thin ice platform, defeating another Chum Chucker Charlie. The Slot Machine Barrel is to the right, floating up between two small ice platforms.
Collectibles[edit]
KONG Letters[edit]
- K: The letter K is found immediately after the first checkpoint next to two Blue Hootzes. To reach it, the Kongs must bounce on the nearby Hootz or Painguin.
- O: The letter O is located above a Barrel Cannon in a pit, which is found shortly after passing the second checkpoint.
- N: After shooting through an arched structure from a Barrel Cannon, which is placed immediately after a Harey, the player can find the letter N at the end of a crumbling structure. Three Banana Coins are next to this letter. The Kongs must quickly move to it before the platform falls.
- G: The letter G is located above a Blue Hootz following the vertical section of falling vine walls. A roll-jump is required to collect it safely.
Puzzle Pieces[edit]
- After the first Barrel Cannon section, another Barrel Cannon leading to a Bonus Level can be found hidden in the pit just crossed. In the Bonus Level, the Kongs must use two large trampolines to collect many bananas and Banana Bunches. If all the bananas are collected within thirty seconds, a Puzzle Piece appears.
- The second Puzzle Piece is located at the far bottom of the clingy vine wall after the first checkpoint. Donkey Kong must collect it and advance quickly before the vine wall crumbles.
- After the second checkpoint, the Kongs must bounce on a Harey to cling on climbing grass above. It leads around to a treasure chest containing the third Puzzle Piece.
- In an area of crumbling vine walls, located before the letter G, the Kongs can find the fourth Puzzle Piece in an alcove. The alcove is hidden by a wooden board. Donkey Kong must collect it before the vine walls fall.
- A Puzzle Piece over a Barrel Cannon appears under the Slot Machine Barrel when the Kongs collect all the Banana Bunches at the end of the level. If Donkey Kong jumps on the platforms here more than once, they will fall.
Enemies[edit]
Gallery[edit]
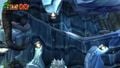
The Kongs, in the barrel to the left, must wait for the ice to break before the barrel is aimed to the next barrel.
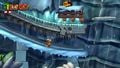
The Kongs must escape this passage before the ceiling closes on them.
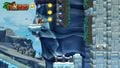
The walls ahead of here crumble as Donkey Kong climbs them.


Additional names[edit]
Internal names[edit]
| Game | File | Name | Meaning
|
|---|---|---|---|
| Donkey Kong Country: Tropical Freeze | content/Worlds/w06_frozen/l01_frozen_jungleHomecoming.pak | l01_frozen_jungleHomecoming.pak | Frozen Level 1: Jungle Homecoming |
Names in other languages[edit]
| Language | Name | Meaning |
|---|---|---|
| Japanese | トロピカルフリーズ Toropikaru Furīzu |
Tropical Freeze |
| French | Jungle des givrés |
Snowmad Jungle |
| German | Trautes Heim, Eis Allein |
Home Sweet Home, Ice Alone |
| Italian | Percorso Pericolante |
Unsafe Route |
| Spanish | Temporada helada |
Frosty Season |
Trivia[edit]
- The name of this level is a reference to Jungle Hijinxs, the first level of Donkey Kong Country and Donkey Kong Country Returns.