Arctic Barrel Arsenal: Difference between revisions
Tag: Mobile edit |
(dk wiki merger) |
||
| Line 1: | Line 1: | ||
{{levelbox | {{levelbox | ||
|image=[[File:Arctic Barrel Arsenal.png]] | |||
|image=[[File:Arctic Barrel Arsenal.png | |||
|code=1-9 | |code=1-9 | ||
|game=''[[Donkey Kong Land]]'' | |game=''[[Donkey Kong Land]]'' | ||
| Line 7: | Line 6: | ||
|before=[[Congo Carnage|<<]] | |before=[[Congo Carnage|<<]] | ||
}} | }} | ||
'''Arctic Barrel Arsenal''' is the ninth level | '''Arctic Barrel Arsenal''' is the ninth level of ''[[Donkey Kong Land]]''. It is also the ninth and final regular level of [[Gangplank Galleon Ahoy!]]. | ||
==Summary== | |||
As stated in the level name, Arctic Barrel Arsenal is a snow level that features numerous [[Barrel Cannon]]s, much like [[Snow Barrel Blast]] from ''[[Donkey Kong Country]]''. The Barrel Cannons are primarily used to blast across several wide gaps, and many Barrel Cannons require timed launches from [[Donkey Kong]] and [[Diddy Kong]]. There are parts in which the Kongs must move across the icy, slippery ground, where they encounter [[Gnawty|Gnawties]], [[Kritter]]s, and [[Klaptrap]]s. Many [[Zinger]]s appear around the Barrel Cannons. | |||
==Layout== | |||
===Normal exit=== | |||
From the start of the level, the Kongs must walk into a barrel and shoot to a [[DK Barrel]], then travel east. As they walk down this path, they will have to defeat a few Kritters and come up to another barrel. This one will shoot them across an abyss. On the other side, the heroes must drop down a few small ledges to reach another barrel. When they get in this barrel, it will move to the right, where the Kongs must shoot to another barrel. They must continue to shoot to more barrels until they make it to the other end of the wide pit below them. Once they area across this pit, they must make their way to the next barrel and shoot to more barrels to, again, cross a wide gap. On the other side of this gap, the heroes will have to defeat a few enemies, such as Kritters, and find another barrel. This one will shoot them up to the level's [[Continue Point]]. | From the start of the level, the Kongs must walk into a barrel and shoot to a [[DK Barrel]], then travel east. As they walk down this path, they will have to defeat a few Kritters and come up to another barrel. This one will shoot them across an abyss. On the other side, the heroes must drop down a few small ledges to reach another barrel. When they get in this barrel, it will move to the right, where the Kongs must shoot to another barrel. They must continue to shoot to more barrels until they make it to the other end of the wide pit below them. Once they area across this pit, they must make their way to the next barrel and shoot to more barrels to, again, cross a wide gap. On the other side of this gap, the heroes will have to defeat a few enemies, such as Kritters, and find another barrel. This one will shoot them up to the level's [[Continue Point]]. | ||
At this point, the group should jump into a nearby barrel and shoot across another wide abyss with the help of several other barrels. On the last barrel, they must shoot diagonally back to solid ground and walk down a short pathway to find another barrel. Once in this, they will have to blast through several more barrels to cross yet another abyss. This time, they will encounter a few Zingers and soon end up in a spinning barrel. With good aim, they should shoot from this barrel and follow the banana trail to a platform with a tire. They must bounce off of the tire to get over a lone Zinger and slide down a small slope to make it in the next barrel. Again, they will need to shoot barrel-to-barrel, getting over a wide gap, as well as trying not to hit any enemies. When they are passed this gap, the heroes must jump over a very small pit and walk to the right to soon find a portal. It will take them out of this level. | At this point, the group should jump into a nearby barrel and shoot across another wide abyss with the help of several other barrels. On the last barrel, they must shoot diagonally back to solid ground and walk down a short pathway to find another barrel. Once in this, they will have to blast through several more barrels to cross yet another abyss. This time, they will encounter a few Zingers and soon end up in a spinning barrel. With good aim, they should shoot from this barrel and follow the banana trail to a platform with a tire. They must bounce off of the tire to get over a lone Zinger and slide down a small slope to make it in the next barrel. Again, they will need to shoot barrel-to-barrel, getting over a wide gap, as well as trying not to hit any enemies. When they are passed this gap, the heroes must jump over a very small pit and walk to the right to soon find a portal. It will take them out of this level. | ||
===Secret | ===Secret exit=== | ||
When the Kongs begin the level, they should jump over the first Barrel Cannon and travel down the path to the next Barrel Cannon. Instead of entering it, the Kongs must jump over it and move slightly to the left in mid-air. If done correctly, they will land in a portal, which will take them to [[Wild Sting Fling|the next level]] much faster than the other portal. | |||
When the Kongs begin the level, they should jump over the first | |||
==Enemies== | ==Enemies== | ||
| Line 28: | Line 26: | ||
*[[Zinger]]s: 5 | *[[Zinger]]s: 5 | ||
==Items== | ==Items and objects== | ||
*[[DK Barrel]]: 2 | *[[DK Barrel]]: 2 | ||
*[[Tire]]: 1 | *[[Tire]]: 1 | ||
===KONG Letters=== | ===KONG Letters=== | ||
[[File:ArcticBarrelArsenal-K.png|thumb|The letter | [[File:ArcticBarrelArsenal-K.png|thumb|The letter K]] | ||
*K: After being launched over a gap, the "K" is hovering right before a Klaptrap. | *K: After being launched over a gap, the "K" is hovering right before a Klaptrap. | ||
*O: Between two Barrel Cannons. | *O: Between two Barrel Cannons. | ||
| Line 39: | Line 38: | ||
==Bonus Areas== | ==Bonus Areas== | ||
*At the very | *At the very start, the Kongs must enter the first Barrel Cannon blast upwards. Instead of going right, the Kongs must launch themselves to the left and land into an Auto-Fire Barrel, which shoots them to a [[Bonus Area]]. The area takes place in a jungle area, where the Kongs can stomp on a button to release their [[Kong Token]]s and collect them for [[Extra Life|extra lives]]. Once Donkey Kong and Diddy Kong use all of their Kong Tokens, they are automatically redirected back into the main level. | ||
* | *After the [[Continue Point]], the Kongs must blast through some Barrel Cannons. From the fourth Barrel Cannon, the Kongs must blast out when it is at the very left to land into an off-screen Auto-Fire Barrel, which blasts them to the second Bonus Area. Alternatively, from the third Barrel Cannon, the Kongs can blast out shortly after it rises from its lowest point. In the Bonus Area, the Kongs must walk across a construction site with a floating group of bananas formed to spell "KONG". The Kongs can exit the Bonus Area by entering an Auto-Fire Barrel at the top-right of the area, causing it to blast them down and out of the Bonus Level. | ||
==Gallery== | |||
<gallery> | |||
Arctic Barrel Arsenal DK Barrel 1.png|Donkey Kong blasts between a DK Barrel and an Auto-Fire Barrel to the first Bonus Area | |||
Arctic Barrel Arsenal alternate exit.png|Donkey Kong falls to the alternate exit | |||
Arctic Barrel Arsenal Barrel Cannons.png|Donkey Kong blasts between two Barrel Cannons just after the Star Barrel | |||
Arctic Barrel Arsenal Kritter.png|Donkey Kong jumps toward a Kritter | |||
Arctic Barrel Arsenal second Bonus Level.png|Donkey Kong in the second Bonus Level | |||
</gallery> | |||
==Names in other languages== | ==Names in other languages== | ||
Revision as of 00:23, October 13, 2019
Template:Levelbox Arctic Barrel Arsenal is the ninth level of Donkey Kong Land. It is also the ninth and final regular level of Gangplank Galleon Ahoy!.
Summary
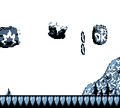
As stated in the level name, Arctic Barrel Arsenal is a snow level that features numerous Barrel Cannons, much like Snow Barrel Blast from Donkey Kong Country. The Barrel Cannons are primarily used to blast across several wide gaps, and many Barrel Cannons require timed launches from Donkey Kong and Diddy Kong. There are parts in which the Kongs must move across the icy, slippery ground, where they encounter Gnawties, Kritters, and Klaptraps. Many Zingers appear around the Barrel Cannons.
Layout
Normal exit
From the start of the level, the Kongs must walk into a barrel and shoot to a DK Barrel, then travel east. As they walk down this path, they will have to defeat a few Kritters and come up to another barrel. This one will shoot them across an abyss. On the other side, the heroes must drop down a few small ledges to reach another barrel. When they get in this barrel, it will move to the right, where the Kongs must shoot to another barrel. They must continue to shoot to more barrels until they make it to the other end of the wide pit below them. Once they area across this pit, they must make their way to the next barrel and shoot to more barrels to, again, cross a wide gap. On the other side of this gap, the heroes will have to defeat a few enemies, such as Kritters, and find another barrel. This one will shoot them up to the level's Continue Point.
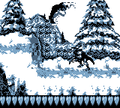
At this point, the group should jump into a nearby barrel and shoot across another wide abyss with the help of several other barrels. On the last barrel, they must shoot diagonally back to solid ground and walk down a short pathway to find another barrel. Once in this, they will have to blast through several more barrels to cross yet another abyss. This time, they will encounter a few Zingers and soon end up in a spinning barrel. With good aim, they should shoot from this barrel and follow the banana trail to a platform with a tire. They must bounce off of the tire to get over a lone Zinger and slide down a small slope to make it in the next barrel. Again, they will need to shoot barrel-to-barrel, getting over a wide gap, as well as trying not to hit any enemies. When they are passed this gap, the heroes must jump over a very small pit and walk to the right to soon find a portal. It will take them out of this level.
Secret exit
When the Kongs begin the level, they should jump over the first Barrel Cannon and travel down the path to the next Barrel Cannon. Instead of entering it, the Kongs must jump over it and move slightly to the left in mid-air. If done correctly, they will land in a portal, which will take them to the next level much faster than the other portal.
Enemies
Items and objects
KONG Letters

- K: After being launched over a gap, the "K" is hovering right before a Klaptrap.
- O: Between two Barrel Cannons.
- N: In the second bonus room.
- G: The "G" is obtained by going into the last barrel cannon near the end.
Bonus Areas
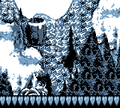
- At the very start, the Kongs must enter the first Barrel Cannon blast upwards. Instead of going right, the Kongs must launch themselves to the left and land into an Auto-Fire Barrel, which shoots them to a Bonus Area. The area takes place in a jungle area, where the Kongs can stomp on a button to release their Kong Tokens and collect them for extra lives. Once Donkey Kong and Diddy Kong use all of their Kong Tokens, they are automatically redirected back into the main level.
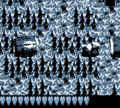
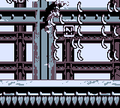
- After the Continue Point, the Kongs must blast through some Barrel Cannons. From the fourth Barrel Cannon, the Kongs must blast out when it is at the very left to land into an off-screen Auto-Fire Barrel, which blasts them to the second Bonus Area. Alternatively, from the third Barrel Cannon, the Kongs can blast out shortly after it rises from its lowest point. In the Bonus Area, the Kongs must walk across a construction site with a floating group of bananas formed to spell "KONG". The Kongs can exit the Bonus Area by entering an Auto-Fire Barrel at the top-right of the area, causing it to blast them down and out of the Bonus Level.
Gallery
Donkey Kong blasts between a DK Barrel and an Auto-Fire Barrel to the first Bonus Area
Donkey Kong falls to the alternate exit
Donkey Kong blasts between two Barrel Cannons just after the Star Barrel
Donkey Kong jumps toward a Kritter
Donkey Kong in the second Bonus Level


Names in other languages
| Language | Name | Meaning |
|---|---|---|
| Japanese | 雪山のタル置場 Yukiyama no taru okiba |
Snow mountain of barrel yard |
| Spanish | Bodega en las montañas |
|