Swirlwind Storm: Difference between revisions
mNo edit summary |
(updated info) |
||
| Line 1: | Line 1: | ||
{{levelbox | {{levelbox | ||
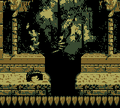
|image=[[File:Swirlwind Storm.png]] | |||
|image=[[File:Swirlwind Storm.png | |||
|code=2-7 | |code=2-7 | ||
|game=''[[Donkey Kong Land]] | |game=''[[Donkey Kong Land]] | ||
| Line 7: | Line 6: | ||
|before=[[Nautilus Chase|<<]] | |before=[[Nautilus Chase|<<]] | ||
}} | }} | ||
'''Swirlwind Storm''' is the sixteenth level | '''Swirlwind Storm''' is the sixteenth level of ''[[Donkey Kong Land]]'' and the seventh and last regular level of [[Kremlantis]]. | ||
Swirlwind Storm takes place at a template. As its name suggests, Swirlwind Storm features several [[Swirlwind]]s, which are obstacles that [[Donkey Kong]] and [[Diddy Kong]] can bounce on to cross gaps, avoid enemies, and reach hidden areas. The [[Kong]]s must avoid walking into a Swirlwind as this damages them. Some [[tire (object)|tire]]s also appear in the level. There are a few moving [[rope]]s which the Kongs can use to get across large abysses. Some [[Zinger]]s also appear in the level. | |||
== | ==Layout== | ||
From the start of this level, the Kongs must travel east. They will have to jump over a Zinger and onto a Swirlwind. With it, they must bounce over to the next Zinger and jump over it. They will get off the tire, and soon climb up a small ledge to another Swirlwind. They must use this to bounce farther in mid-air, until they get to a ledge that will block the tire's path. After that, they should bounce off another tire over a small ledge and then get on another Swirlwind. It won't take them a long distance through the air, tough, as not long after they get on, it will fall right into a hole. After this, they must use a stationary [[tire]] to cross a gap, and then get to yet another Swirlwind. They don't need to get on it, however, since it won't take them too far at all. From this point, the heroes need to hop over two gaps, while avoiding Kremlings, and get on a rope. It will move to the right when they get on, so they can ride along it until they are able to reach the next ledge, where they'll need to use another Swirlwind to grab onto the next rope. Again, it will move to the right, and the heroes will have to dodge a few Zingers as it moves. They can jump off to the next ledge when it makes its way to the other side. They must continue east from here, where they will find the [[Continue Point]]. | From the start of this level, the Kongs must travel east. They will have to jump over a Zinger and onto a Swirlwind. With it, they must bounce over to the next Zinger and jump over it. They will get off the tire, and soon climb up a small ledge to another Swirlwind. They must use this to bounce farther in mid-air, until they get to a ledge that will block the tire's path. After that, they should bounce off another tire over a small ledge and then get on another Swirlwind. It won't take them a long distance through the air, tough, as not long after they get on, it will fall right into a hole. After this, they must use a stationary [[tire]] to cross a gap, and then get to yet another Swirlwind. They don't need to get on it, however, since it won't take them too far at all. From this point, the heroes need to hop over two gaps, while avoiding Kremlings, and get on a rope. It will move to the right when they get on, so they can ride along it until they are able to reach the next ledge, where they'll need to use another Swirlwind to grab onto the next rope. Again, it will move to the right, and the heroes will have to dodge a few Zingers as it moves. They can jump off to the next ledge when it makes its way to the other side. They must continue east from here, where they will find the [[Continue Point]]. | ||
After this, the heroes must keep going east and drop down a few ledges to another Swirlwind. It will help them bounce over a Zinger. When the Swirlwind falls into the hole in the ground, the group should hop over the nearby gap and use another Swirlwind to cross the following gap. Then, they will have to keep moving on, until they see another Swirlwind. If the Kongs want the [[K-O-N-G Letters|letter N]] in the nearby hole, though, they should try to jump over this Swirlwind. They must continue east after that, and later use another Swirlwind to bounce them up to a high up rope, and then jump off to the ledge on the right side of them. From here, the group will see two Swirlwinds near each other. They may use these if they like, but the tires are not important at this part of the level. Then, they must cross a small abyss. After this point, the Kongs need to jump high into the air to get up ledges, which have Swirlwinds right in the end of them. If the Kongs don't jump high enough, they'll get hurt from one of the obstacles. Once up these ledges, the group should get on the next Swirlwind and ride down a few small ledges with it. When it falls in a hole, they must leave it and keep moving eastward, where they'll find several bananas, as well as a portal. It will take them out of the level. | After this, the heroes must keep going east and drop down a few ledges to another Swirlwind. It will help them bounce over a Zinger. When the Swirlwind falls into the hole in the ground, the group should hop over the nearby gap and use another Swirlwind to cross the following gap. Then, they will have to keep moving on, until they see another Swirlwind. If the Kongs want the [[K-O-N-G Letters|letter N]] in the nearby hole, though, they should try to jump over this Swirlwind. They must continue east after that, and later use another Swirlwind to bounce them up to a high up rope, and then jump off to the ledge on the right side of them. From here, the group will see two Swirlwinds near each other. They may use these if they like, but the tires are not important at this part of the level. Then, they must cross a small abyss. After this point, the Kongs need to jump high into the air to get up ledges, which have Swirlwinds right in the end of them. If the Kongs don't jump high enough, they'll get hurt from one of the obstacles. Once up these ledges, the group should get on the next Swirlwind and ride down a few small ledges with it. When it falls in a hole, they must leave it and keep moving eastward, where they'll find several bananas, as well as a portal. It will take them out of the level. | ||
==Bonus Area | ==Enemies== | ||
*[[Army]]: 1 | |||
*[[Kritter]]: 3 | |||
*[[Slippa]]: 1 | |||
*[[Swirlwind]] | |||
*[[Zinger]]: 6 | |||
==Items and objects== | |||
*[[DK Barrel]]: 3 | |||
*[[Extra Life Balloon]]: 1 | |||
*[[Kong Token]]: 5 | |||
===K-O-N-G Letters=== | |||
*K: Near a Swirlwind. The Kong will have to lure the whirlwind away from the "K" to grab it. | |||
*O: The "O" is hovering high over a gap near a Swirlwind. | |||
*N: In a pit near a Swirlwind. Similar to the "K", the whirlwind must be lured away. | |||
*G: In a deep pit near a Slippa. | |||
==Bonus Area== | |||
{|class="dktable-brown" | |||
!Image | |||
!Description | |||
|- | |||
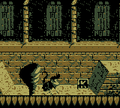
|[[File:Swirlwind Storm Bonus Level.png]] | |||
|When the Kongs bounce on the second Swirlwind after the letter O, they must go left with it and bounce up to a banana floating in the air. This takes them to a [[Bonus Area]], which is themed after a construction site. There the Kongs must bounce on a few stationary tires and collect several bananas along the way to the exit. Four Kong Tokens are located to the left of the starting point, and the Kongs can get a Red Balloon at the end. At the end of the level, the Kongs can enter an Auto-Fire Barrel to return into the main level. | |||
|} | |||
==Gallery== | |||
<gallery> | |||
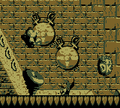
Swirlwind Storm DKL Kong Token.png|Diddy bounces up to a Kong Token | |||
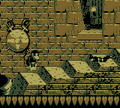
Swirlwind Storm DKL Zinger.png|Diddy bounces on a tire to the left of a Zinger | |||
Swirlwind Storm DKL letter K.png|Diddy lands near the letter K | |||
Swirlwind Storm DKL bouncing.png|Donkey Kong bounces to the left of a Zinger | |||
Swirlwind Storm DKL Slippa.png|Diddy encounters a Slippa | |||
</gallery> | |||
==Names in other languages== | ==Names in other languages== | ||
Revision as of 17:54, November 11, 2019
Template:Levelbox Swirlwind Storm is the sixteenth level of Donkey Kong Land and the seventh and last regular level of Kremlantis.
Swirlwind Storm takes place at a template. As its name suggests, Swirlwind Storm features several Swirlwinds, which are obstacles that Donkey Kong and Diddy Kong can bounce on to cross gaps, avoid enemies, and reach hidden areas. The Kongs must avoid walking into a Swirlwind as this damages them. Some tires also appear in the level. There are a few moving ropes which the Kongs can use to get across large abysses. Some Zingers also appear in the level.
Layout
From the start of this level, the Kongs must travel east. They will have to jump over a Zinger and onto a Swirlwind. With it, they must bounce over to the next Zinger and jump over it. They will get off the tire, and soon climb up a small ledge to another Swirlwind. They must use this to bounce farther in mid-air, until they get to a ledge that will block the tire's path. After that, they should bounce off another tire over a small ledge and then get on another Swirlwind. It won't take them a long distance through the air, tough, as not long after they get on, it will fall right into a hole. After this, they must use a stationary tire to cross a gap, and then get to yet another Swirlwind. They don't need to get on it, however, since it won't take them too far at all. From this point, the heroes need to hop over two gaps, while avoiding Kremlings, and get on a rope. It will move to the right when they get on, so they can ride along it until they are able to reach the next ledge, where they'll need to use another Swirlwind to grab onto the next rope. Again, it will move to the right, and the heroes will have to dodge a few Zingers as it moves. They can jump off to the next ledge when it makes its way to the other side. They must continue east from here, where they will find the Continue Point.
After this, the heroes must keep going east and drop down a few ledges to another Swirlwind. It will help them bounce over a Zinger. When the Swirlwind falls into the hole in the ground, the group should hop over the nearby gap and use another Swirlwind to cross the following gap. Then, they will have to keep moving on, until they see another Swirlwind. If the Kongs want the letter N in the nearby hole, though, they should try to jump over this Swirlwind. They must continue east after that, and later use another Swirlwind to bounce them up to a high up rope, and then jump off to the ledge on the right side of them. From here, the group will see two Swirlwinds near each other. They may use these if they like, but the tires are not important at this part of the level. Then, they must cross a small abyss. After this point, the Kongs need to jump high into the air to get up ledges, which have Swirlwinds right in the end of them. If the Kongs don't jump high enough, they'll get hurt from one of the obstacles. Once up these ledges, the group should get on the next Swirlwind and ride down a few small ledges with it. When it falls in a hole, they must leave it and keep moving eastward, where they'll find several bananas, as well as a portal. It will take them out of the level.
Enemies
Items and objects
- DK Barrel: 3
- Extra Life Balloon: 1
- Kong Token: 5
K-O-N-G Letters
- K: Near a Swirlwind. The Kong will have to lure the whirlwind away from the "K" to grab it.
- O: The "O" is hovering high over a gap near a Swirlwind.
- N: In a pit near a Swirlwind. Similar to the "K", the whirlwind must be lured away.
- G: In a deep pit near a Slippa.
Bonus Area
| Image | Description |
|---|---|

|
When the Kongs bounce on the second Swirlwind after the letter O, they must go left with it and bounce up to a banana floating in the air. This takes them to a Bonus Area, which is themed after a construction site. There the Kongs must bounce on a few stationary tires and collect several bananas along the way to the exit. Four Kong Tokens are located to the left of the starting point, and the Kongs can get a Red Balloon at the end. At the end of the level, the Kongs can enter an Auto-Fire Barrel to return into the main level. |
Gallery

Diddy bounces up to a Kong Token
Diddy bounces on a tire to the left of a Zinger
Diddy lands near the letter K
Donkey Kong bounces to the left of a Zinger
Diddy encounters a Slippa


Names in other languages
| Language | Name | Meaning |
|---|---|---|
| Japanese | トルネードの遺跡 Torunēdo no iseki |
Tornado Ruins |
| Spanish | Ruinas Tornado |
Tornado Ruins |