Poppin' Planks: Difference between revisions
No edit summary |
m (Text replacement - "dktable-brown" to "wikitable dk") |
||
| (26 intermediate revisions by 13 users not shown) | |||
| Line 1: | Line 1: | ||
{{level | {{level infobox | ||
|image=[[File:Poppin' Planks DKCR.png|250px]] | |||
|image=[[File: | |code=2-1 | ||
|code=2 - 1 | |||
|world=[[Beach]] | |world=[[Beach]] | ||
|game=''[[Donkey Kong Country Returns]]'' (''[[Donkey Kong Country Returns 3D|3D]]'') | |game=''[[Donkey Kong Country Returns]]'' (''[[Donkey Kong Country Returns 3D|3D]]'') | ||
|before=[[Crazy Cart|<<]] | |before=[[Crazy Cart|<<]] | ||
|after=[[Sloppy Sands|>>]] | |after=[[Sloppy Sands|>>]] | ||
| | |track=Poppin' Planks | ||
}} | }} | ||
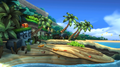
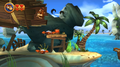
'''Poppin' Planks''' is the eighth level in ''[[Donkey Kong Country Returns]]'' and ''[[Donkey Kong Country Returns 3D]]'', as well as the first stage of the [[Beach]] world. | '''Poppin' Planks''' is the eighth level in ''[[Donkey Kong Country Returns]]'' and ''[[Donkey Kong Country Returns 3D]]'', as well as the first stage of the [[Beach]] world. | ||
While some of this level takes place along the sandy beach, most of it involves [[Donkey Kong|Donkey]] and [[Diddy Kong]] jumping along moving planks above the water. The [[Kong]]s cannot swim, so they must stay on the platforms | While some of this level takes place along the sandy beach, most of it involves [[Donkey Kong|Donkey]] and [[Diddy Kong]] jumping along a series of moving planks and shipwreck above the water. The [[Kong]]s cannot swim, so they must stay on the platforms. This level is also the first to feature [[Scale Lift|lifts]] similar to those from ''[[Super Mario Bros.]]'', which lower when something stands on it and causes the platform on the opposite side of the weight to rise. As the first beach-themed level, Poppin' Planks is basic, to introduce treasure chests and wooden pegs that can be Ground Pounded to reveal items and bonuses. | ||
In the [[Donkey Kong Country Returns#Time Attack|Time Attack]] mode of the game, a time of 1:03:00 is needed to get a gold medal, a time of 1:25:00 for silver, and a time of 2:20:00 for bronze. | In the [[Donkey Kong Country Returns#Time Attack|Time Attack]] mode of the game, a time of 1:03:00 is needed to get a gold medal, a time of 1:25:00 for silver, and a time of 2:20:00 for bronze. | ||
==Overview== | ==Overview== | ||
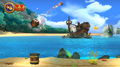
[[File:Poppin' | [[File:DKCR Poppin' Planks 2.png|thumb|left|250px|The Kongs prepare to open a treasure chest near the beginning of the level]] | ||
The level begins with a sandy pathway out of the jungle that is covered by a few | The level begins with a sandy pathway out of the jungle that is covered by a few [[Snippys]]. As Donkey and Diddy pass two high, wooden platforms, they can find a large peg that can be pounded on to make another peg appear under the platforms. They can use it reach the platforms and collect some bananas. Farther ahead is a [[DK Barrel]] and some small platforms surrounded by spikes. Two wooden planks are above these platforms, the first one with the letter K of the [[KONG Letters|K-O-N-G Letters]] on it, and the second with two [[Banana Coin]]s. After this area, the Kongs can find a treasure chest with a [[Red Balloon]] near a Snippys. As the heroes progress more, they come up to some floating [[Banana|Banana Bunch]]es and crab enemies. They also approach some pegs that can be pounded into the ground to make another peg appear somewhere else in the area. One of these pegs needs to be pounded to release another from the ground so it can be used as a platform to jump over a wall with dandelions growing on it. On the other side of the wall is a giant switch; if it is pounded on, a whale surfaces in the background and shoots bananas out of its blowhole. The bananas land in the following area, where there is a wavy bridge that can shoot the Kongs into the air. The bridge can help them reach some hanging platforms at the end of it. | ||
More hanging platforms are after this platform, and the second of the platforms has a few breakable crates on it. After passing a platform with a | More hanging platforms are after this platform, and the second of the platforms has a few breakable crates on it. After passing a platform with a Snippys on it, the primates can get to another platform that moves them over the water and to a solid and flat bridge. The letter O is high in the air at the end of this bridge, but it can only be reached if the Kongs use the weights following it. One side of these weights tilt with the weight of the Kongs or any enemy on it, including the [[Pinchly]] that is placed on it; the enemy must be defeated to balance out the weight. Below the weights is another bridge, so the Kongs do not have to worry about sinking in this area. However, right after the weights is another area with a swinging platform that is above water and has some crates on it. A platform that repeatedly rises and falls is placed next to this with a Snippys on it. The plank can help pull the Kongs to the next platform, which holds a few barrels under it. The Kongs can break the ropes supporting it by pounding on it, causing the plank to fall and float over the water. As the Kongs float over the water, they come up to some flying Tikis and bananas floating in the air. When they finally reach land again, they meet the [[Professor Chops|Tutorial Pig]], who marks the checkpoint. | ||
As the Kongs progress across another sandy beach, they pass some crab enemies, a treasure chest, and a stray cannon. A wooden platform holding a DK Barrel is also in this area. Following the beach area are some ship parts floating atop the wavy water. They can use it as platforms to reach the next area. As they cross the gaps between each platform, they come up to some floating collectibles; however, at the same time, Snaggles jump out at them. The letter N is also located above one of these ship parts. On the other side of the water is another area of land, where the Kongs come up to some dandelions and a Pinchly in front of a crashed ship. Near here is another wavy bridge. This bridge has spikes on it, but they flip over when the bridge creates a large wave that travels across it. The waves can help the primates not only grab many collectibles in the air, but also help them reach another hanging platform. The following hanging platforms just after it move either vertically or horizontally. | As the Kongs progress across another sandy beach, they pass some crab enemies, a treasure chest, and a stray cannon. A wooden platform holding a DK Barrel is also in this area. Following the beach area are some ship parts floating atop the wavy water. They can use it as platforms to reach the next area. As they cross the gaps between each platform, they come up to some floating collectibles; however, at the same time, Snaggles jump out at them. The letter N is also located above one of these ship parts. On the other side of the water is another area of land, where the Kongs come up to some dandelions and a Pinchly in front of a crashed ship. Near here is another wavy bridge. This bridge has spikes on it, but they flip over when the bridge creates a large wave that travels across it. The waves can help the primates not only grab many collectibles in the air, but also help them reach another hanging platform. The following hanging platforms just after it move either vertically or horizontally. | ||
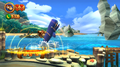
[[File:DKCR Poppin' Planks 3.png|thumb|250px|Donkey and Diddy stand on a moving platform]] | |||
The Kongs must travel along the planks, which are attached by large cranes in the background, to advance to a lower area of these moving platforms. More enemies appear as they advance, including Tiki Buzzes and Snippys. Crates are also placed on some of the platforms. Eventually, the Kongs jump off of a plank moving in a horizontal path to reach a swinging platform with a Banana Bunch on it. A platform that moves up and down with a Banana Bunch on it is just ahead, but a Yellow Snaggles jumps out in front of it. Another platform that moves up and down is right after this with the letter G on it, and it is followed by another swinging platform with a Banana Bunch. As with the first platform, Snaggles jump out of the water between each of these planks. Eventually, the Kongs can reach a floating ship part with some crates on it that can aid the primates in reaching more moving planks; there are three remaining planks after the ship, and each of them move up and down. Snaggles also jump in front of them. After the last platform is the level's [[Slot Machine Barrel]]. | |||
{{br}} | |||
[[File: | ==Enemies== | ||
{|class="wikitable dk" width=25% | |||
|- | |||
!Image | |||
!Name | |||
!Amount | |||
|- | |||
|align="center"|[[File:Pinchly Render.png|x50px]] | |||
|align="center"|[[Pinchly]] | |||
|13 | |||
|- | |||
|align="center"|[[File:Snaggles-DKCR.png|x50px]] | |||
|align="center"|[[Snaggles]] | |||
|6 | |||
|- | |||
|align="center"|[[File:Snaps_closeup.png|x50px]] | |||
|align="center"|[[Snippys]] | |||
|10 | |||
|- | |||
|align="center"|[[File:TikiBuzz.png|x50px]] | |||
|align="center"|[[Tiki Buzz]] | |||
|6 | |||
|- | |||
|align="center"|[[File:DKCTF_Super_Snaggles.png|x50px]] | |||
|align="center"|[[Yellow Snaggles]] | |||
|3 | |||
|} | |||
== | ==Items== | ||
{|class="wikitable dk" width=25% | |||
|- | |||
!Image | |||
!Name | |||
!Amount | |||
|- | |||
|align="center"|[[File:BananacoinDKCR.png|x50px]] | |||
|align="center"|[[Banana Coin]] | |||
|7 | |||
|- | |||
|align="center"|[[File:BarrelDKCR.png|x50px]] | |||
|align="center"|[[Barrel]] | |||
|1 | |||
|- | |||
|align="center"|[[File:DKBarrelDKCR.png|x50px]] | |||
|align="center"|[[DK Barrel]] | |||
|2 | |||
|- | |||
|align="center"|[[File:Heart.png|x50px]] | |||
|align="center"|[[Heart (item)|Heart]] | |||
|4 | |||
|- | |||
|align="center"|[[File:BalloonDKCR.png|x50px]] | |||
|align="center"|[[Red Balloon]] | |||
|1 | |||
|} | |||
===K-O-N-G Letters=== | ===K-O-N-G Letters=== | ||
{|class="wikitable dk" width=70% | |||
|- | |||
!Image | |||
!Letter | |||
!Location | |||
|- | |||
|align="center"|[[File:DKCR Poppin' Planks Letter K.png|250px]] | |||
|align="center"|K | |||
|After the DK Barrel, the letter K is found on a high platform between two groups of spikes. It can be reached by jumping on a raised narrow stone and then jumping to the platform. | |||
|- | |||
|align="center"|[[File:DKCR Poppin' Planks Letter O.png|250px]] | |||
|align="center"|O | |||
|When the Kongs reach the level's only weight platforms, they can stand on the right platform to make the weight of the left move up. If they quickly jump up to the left weight and then jump off the opposite side before it weighs down, they can come up to the letter O above a solid bridge. | |||
|- | |||
|align="center"|[[File:DKCR Poppin' Planks Letter N.png|250px]] | |||
|align="center"|N | |||
|After the fifth [[Puzzle Piece (Donkey Kong Country series)|Puzzle Piece]], the Kongs can find a few ship parts bobbing out of the water to be used as platforms. The letter N is on the second of these ship parts. | |||
|- | |||
|align="center"|[[File:DKCR Poppin' Planks Letter G.png|250px]] | |||
|align="center"|G | |||
|Near the end of the level, a few yellow Snaggles jump out at the Kongs, they can find the letter G on a suspended platform that moves in a vertical path. | |||
|} | |||
===Puzzle Pieces=== | ===Puzzle Pieces=== | ||
[[File:Poppin' | {|class="wikitable dk" width=70% | ||
|- | |||
!Image | |||
!Number | |||
!Location | |||
|- | |||
|align="center"|[[File:DKCR Poppin' Planks Puzzle Piece 1.png|250px]] | |||
|align="center"|1 | |||
|The Kongs must pound the first wooden peg to make a second one to the left appear; they must use this peg to reach the wooden platforms to the left and get the Puzzle Piece at the end of the second platform. | |||
|- | |||
|align="center"|[[File:DKCR Poppin' Planks Puzzle Piece 2.png|250px]] | |||
|align="center"|2 | |||
|Shortly after the letter K is a sunken ship in the background. By pounding a peg in front of it, the Kongs can make a [[Barrel Cannon]] appear from underground. The barrel shoots them into the sunken ship, where the Kongs must defeat two Pinchlys to find the second Puzzle Piece. | |||
|- | |||
|align="center"|[[File:DKCR Poppin' Planks Puzzle Piece 3.png|250px]] | |||
|align="center"|3 | |||
|Right after exiting sunken ship with the second Puzzle Piece, the Kongs come up to another peg. If they pound on it, a treasure chest with the third Puzzle Piece appears. | |||
|- | |||
|align="center"|[[File:DKCR Poppin' Planks Puzzle Piece 4.png|250px]] | |||
|align="center"|4 | |||
|If the Kongs pound open the treasure chest right after the checkpoint, they can find a Puzzle Piece in it. | |||
|- | |||
|align="center"|[[File:DKCR Poppin' Planks Bonus.png|250px]] | |||
|align="center"|5 | |||
|Shortly after the fourth Puzzle Piece, the Kongs can find a stray cannon. If they pound on it, it shoots a cannonball at the remains of a crashed ship, which then falls down to an area that the Kongs can reach. If they hop into the remains, they can enter a [[bonus room]], where they have 30 seconds to shoot back and forth between two Barrel Cannons and collect many bananas and two Banana Coins. They must avoid the Blast Barrel in the center. Once Donkey Kong and Diddy collect all the items, the Puzzle Piece appears. | |||
|} | |||
==Gallery== | |||
<gallery> | |||
PoppinPlanksFirst.png|The start of the level | |||
PoppinPlanksBonus.png|The Auto-Fire Barrel to the second Puzzle Piece | |||
PoppinPlanksSuperAwesomeWhaleTime.png|The whale that gives out bananas | |||
PoppinPlanksBarrelRaft.png|Riding on the raft | |||
PoppinPlanksBonus3.png|The large barrel to the bonus room | |||
</gallery> | |||
==Names in other languages== | ==Names in other languages== | ||
{{foreign names | {{foreign names | ||
|Jap=リフトのはまべ | |Jap=リフトのはまべ | ||
|JapR=Rifuto no Hamabe | |JapR=Rifuto no Hamabe | ||
|JapM=Seaside Lifts | |JapM=Seaside Lifts | ||
|Spa=Postes y Plataformas | |Spa=Postes y Plataformas | ||
|SpaM=Poles and Platforms | |SpaM=Poles and Platforms | ||
| | |FreA=Planches et Bariles | ||
| | |FreAM=Planks and Barrels | ||
|Ger=Planken-Parcours | |Ger=Planken-Parcours | ||
|GerM=Plank Parcours}} | |GerM=Plank Parcours | ||
|Ita=Scalo dondolo | |||
|ItaM=Swinging Climb | |||
|Chi=升降机海滩 | |||
|ChiR=Shēngjiàngjī Hǎitān | |||
|ChiM=Lift Beach | |||
}} | |||
{{DKCR}} | {{DKCR}} | ||
[[Category:Beaches]] | [[Category:Beaches]] | ||
[[Category: | [[Category:Pirate areas]] | ||
[[Category:Donkey Kong Country Returns | [[Category:Donkey Kong Country Returns levels]] | ||
Revision as of 14:21, February 3, 2024
| Level | |
|---|---|
| Poppin' Planks | |

| |
| Level code | 2-1 |
| World | Beach |
| Game | Donkey Kong Country Returns (3D) |
| Music track | Poppin' Planks |
| << Directory of levels >> | |
Poppin' Planks is the eighth level in Donkey Kong Country Returns and Donkey Kong Country Returns 3D, as well as the first stage of the Beach world.
While some of this level takes place along the sandy beach, most of it involves Donkey and Diddy Kong jumping along a series of moving planks and shipwreck above the water. The Kongs cannot swim, so they must stay on the platforms. This level is also the first to feature lifts similar to those from Super Mario Bros., which lower when something stands on it and causes the platform on the opposite side of the weight to rise. As the first beach-themed level, Poppin' Planks is basic, to introduce treasure chests and wooden pegs that can be Ground Pounded to reveal items and bonuses.
In the Time Attack mode of the game, a time of 1:03:00 is needed to get a gold medal, a time of 1:25:00 for silver, and a time of 2:20:00 for bronze.
Overview

The level begins with a sandy pathway out of the jungle that is covered by a few Snippys. As Donkey and Diddy pass two high, wooden platforms, they can find a large peg that can be pounded on to make another peg appear under the platforms. They can use it reach the platforms and collect some bananas. Farther ahead is a DK Barrel and some small platforms surrounded by spikes. Two wooden planks are above these platforms, the first one with the letter K of the K-O-N-G Letters on it, and the second with two Banana Coins. After this area, the Kongs can find a treasure chest with a Red Balloon near a Snippys. As the heroes progress more, they come up to some floating Banana Bunches and crab enemies. They also approach some pegs that can be pounded into the ground to make another peg appear somewhere else in the area. One of these pegs needs to be pounded to release another from the ground so it can be used as a platform to jump over a wall with dandelions growing on it. On the other side of the wall is a giant switch; if it is pounded on, a whale surfaces in the background and shoots bananas out of its blowhole. The bananas land in the following area, where there is a wavy bridge that can shoot the Kongs into the air. The bridge can help them reach some hanging platforms at the end of it.
More hanging platforms are after this platform, and the second of the platforms has a few breakable crates on it. After passing a platform with a Snippys on it, the primates can get to another platform that moves them over the water and to a solid and flat bridge. The letter O is high in the air at the end of this bridge, but it can only be reached if the Kongs use the weights following it. One side of these weights tilt with the weight of the Kongs or any enemy on it, including the Pinchly that is placed on it; the enemy must be defeated to balance out the weight. Below the weights is another bridge, so the Kongs do not have to worry about sinking in this area. However, right after the weights is another area with a swinging platform that is above water and has some crates on it. A platform that repeatedly rises and falls is placed next to this with a Snippys on it. The plank can help pull the Kongs to the next platform, which holds a few barrels under it. The Kongs can break the ropes supporting it by pounding on it, causing the plank to fall and float over the water. As the Kongs float over the water, they come up to some flying Tikis and bananas floating in the air. When they finally reach land again, they meet the Tutorial Pig, who marks the checkpoint.
As the Kongs progress across another sandy beach, they pass some crab enemies, a treasure chest, and a stray cannon. A wooden platform holding a DK Barrel is also in this area. Following the beach area are some ship parts floating atop the wavy water. They can use it as platforms to reach the next area. As they cross the gaps between each platform, they come up to some floating collectibles; however, at the same time, Snaggles jump out at them. The letter N is also located above one of these ship parts. On the other side of the water is another area of land, where the Kongs come up to some dandelions and a Pinchly in front of a crashed ship. Near here is another wavy bridge. This bridge has spikes on it, but they flip over when the bridge creates a large wave that travels across it. The waves can help the primates not only grab many collectibles in the air, but also help them reach another hanging platform. The following hanging platforms just after it move either vertically or horizontally.

The Kongs must travel along the planks, which are attached by large cranes in the background, to advance to a lower area of these moving platforms. More enemies appear as they advance, including Tiki Buzzes and Snippys. Crates are also placed on some of the platforms. Eventually, the Kongs jump off of a plank moving in a horizontal path to reach a swinging platform with a Banana Bunch on it. A platform that moves up and down with a Banana Bunch on it is just ahead, but a Yellow Snaggles jumps out in front of it. Another platform that moves up and down is right after this with the letter G on it, and it is followed by another swinging platform with a Banana Bunch. As with the first platform, Snaggles jump out of the water between each of these planks. Eventually, the Kongs can reach a floating ship part with some crates on it that can aid the primates in reaching more moving planks; there are three remaining planks after the ship, and each of them move up and down. Snaggles also jump in front of them. After the last platform is the level's Slot Machine Barrel.
Enemies
| Image | Name | Amount |
|---|---|---|

|
Pinchly | 13 |
| Snaggles | 6 | |

|
Snippys | 10 |

|
Tiki Buzz | 6 |

|
Yellow Snaggles | 3 |
Items
| Image | Name | Amount |
|---|---|---|
| Banana Coin | 7 | |
| Barrel | 1 | |
| DK Barrel | 2 | |

|
Heart | 4 |
| Red Balloon | 1 |
K-O-N-G Letters
| Image | Letter | Location |
|---|---|---|

|
K | After the DK Barrel, the letter K is found on a high platform between two groups of spikes. It can be reached by jumping on a raised narrow stone and then jumping to the platform. |

|
O | When the Kongs reach the level's only weight platforms, they can stand on the right platform to make the weight of the left move up. If they quickly jump up to the left weight and then jump off the opposite side before it weighs down, they can come up to the letter O above a solid bridge. |

|
N | After the fifth Puzzle Piece, the Kongs can find a few ship parts bobbing out of the water to be used as platforms. The letter N is on the second of these ship parts. |

|
G | Near the end of the level, a few yellow Snaggles jump out at the Kongs, they can find the letter G on a suspended platform that moves in a vertical path. |
Puzzle Pieces
| Image | Number | Location |
|---|---|---|

|
1 | The Kongs must pound the first wooden peg to make a second one to the left appear; they must use this peg to reach the wooden platforms to the left and get the Puzzle Piece at the end of the second platform. |

|
2 | Shortly after the letter K is a sunken ship in the background. By pounding a peg in front of it, the Kongs can make a Barrel Cannon appear from underground. The barrel shoots them into the sunken ship, where the Kongs must defeat two Pinchlys to find the second Puzzle Piece. |

|
3 | Right after exiting sunken ship with the second Puzzle Piece, the Kongs come up to another peg. If they pound on it, a treasure chest with the third Puzzle Piece appears. |

|
4 | If the Kongs pound open the treasure chest right after the checkpoint, they can find a Puzzle Piece in it. |

|
5 | Shortly after the fourth Puzzle Piece, the Kongs can find a stray cannon. If they pound on it, it shoots a cannonball at the remains of a crashed ship, which then falls down to an area that the Kongs can reach. If they hop into the remains, they can enter a bonus room, where they have 30 seconds to shoot back and forth between two Barrel Cannons and collect many bananas and two Banana Coins. They must avoid the Blast Barrel in the center. Once Donkey Kong and Diddy collect all the items, the Puzzle Piece appears. |
Gallery
The start of the level
The Auto-Fire Barrel to the second Puzzle Piece
The whale that gives out bananas
Riding on the raft
The large barrel to the bonus room


Names in other languages
| Language | Name | Meaning |
|---|---|---|
| Japanese | リフトのはまべ Rifuto no Hamabe |
Seaside Lifts |
| Chinese | 升降机海滩 Shēngjiàngjī Hǎitān |
Lift Beach |
| French (NOA) | Planches et Bariles |
Planks and Barrels |
| German | Planken-Parcours |
Plank Parcours |
| Italian | Scalo dondolo |
Swinging Climb |
| Spanish | Postes y Plataformas |
Poles and Platforms |