Button Bash: Difference between revisions
Bro Hammer (talk | contribs) (→Trivia) |
m (Text replacement - "dktable-brown" to "wikitable dk") |
||
| (47 intermediate revisions by 28 users not shown) | |||
| Line 1: | Line 1: | ||
{{level | {{level infobox | ||
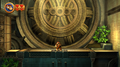
|image=[[File:Button Bash DKCR shot.png|250px]] | |||
|image=[[File: | |code=3-2 | ||
|code=3 - 2 | |world=[[Ruins]] | ||
|game=''[[Donkey Kong Country Returns]] | |game=''[[Donkey Kong Country Returns]]'' (''[[Donkey Kong Country Returns 3D|3D]]'') | ||
| | |||
|before=[[Wonky Waterway|<<]] | |before=[[Wonky Waterway|<<]] | ||
|after=[[Mast Blast|>>]] | |after=[[Mast Blast|>>]] | ||
|track=Voices of the Temple Returns | |||
}} | }} | ||
'''Button Bash''' is the seventeenth level in ''[[Donkey Kong Country Returns]]'', | '''Button Bash''' is the seventeenth [[level]] in ''[[Donkey Kong Country Returns]]'' and ''[[Donkey Kong Country Returns 3D]]'', and it is the second level of the [[Ruins]] world. Its name might be a pun on "button mash." | ||
==Summary== | |||
Button Bash is a level that mostly takes place in a temple. [[Donkey Kong]] and [[Diddy Kong]] must press various buttons to alter their surroundings, such as to create passageways. There are many [[Blast Barrel]]s, and unlike most other ones, these Blast Barrels quickly move to different angles while staying in place. A variety of enemies appear in the level, such as [[Humzee]]s. In the lower level of the temple, the [[Kong]]s encounter some [[Tiki Goon]]s and [[Tiki Zing]]s. One part of the level involves them blasting along buttons on the wall between two Blast Barrels. At the end of the level, the Kongs must shoot into the mouth of a giant, rotating statue twice, though they only have four attempts. | |||
In the [[Time Attack | In the [[Donkey Kong Country Returns#Time Attack|Time Attack]] mode, a time of 2:24:00 is needed to get a gold medal, a time of 2:35:00 for silver, and a time of 2:49:00 for bronze. | ||
==Overview== | ==Overview== | ||
The level starts out in a small jungle area with a [[DK Barrel]]. Ahead is a Barrel Cannon that can shoot them to another cannon, and then into the mouth of a large statue. In its mouth is the inside of a temple, where the primates land in a large, open area with a Stilts enemy. Near the enemy is a switch that activates one of three Auto Fire Barrels whenever it is pounded on. When it is pounded on three times, the Kongs can access the three barrels, which are being held in the hands of three strange statues. The first barrel shoots them into the air, where they must move to the right to land in the second, and then the third. The third Barrel Cannons shoots them into the air where they can land on a solid piece of ground. A Tiki Tank with the letter K of the [[K-O-N-G Letters]] above its head is here. At the end of the solid platform is a Barrel Cannon that aims in three different directions, changing its aim every second. A button is on the ceiling that the Kongs must shoot to in order to open a wall, which they can then fire past. There is a straight pathway ahead that leads into an empty room. Humzees attack the heroes in here, but once they are all defeated two Barrel Cannons appear, parallel to each other. | The level starts out in a small jungle area with a [[DK Barrel]]. Ahead is a Barrel Cannon that can shoot them to another cannon, and then into the mouth of a large statue. In its mouth is the inside of a temple, where the primates land in a large, open area with a Stilts enemy. Near the enemy is a switch that activates one of three Auto Fire Barrels whenever it is pounded on. When it is pounded on three times, the Kongs can access the three barrels, which are being held in the hands of three strange statues. The first barrel shoots them into the air, where they must move to the right to land in the second, and then the third. The third Barrel Cannons shoots them into the air where they can land on a solid piece of ground. A Tiki Tank with the letter K of the [[KONG Letters|K-O-N-G Letters]] above its head is here. At the end of the solid platform is a Barrel Cannon that aims in three different directions, changing its aim every second. A button is on the ceiling that the Kongs must shoot to in order to open a wall, which they can then fire past. There is a straight pathway ahead that leads into an empty room. Humzees attack the heroes in here, but once they are all defeated two Barrel Cannons appear, parallel to each other. | ||
When entered, markings appear between the two barrels. The Kongs must shoot across the lines of markings to make an Auto Fire Barrel appear. It can blast the primates underground, where they create a crater in the ground due to the impact of them landing on it. Next to two Tiki Goons here is an area of Barrel Cannons. The first barrel can shoot them past a single Tiki Zing, and then to another barrel that is able to shoot them to a button on the ceiling. When the button is hit, a Barrel Cannon appears below it. This Barrel Cannon can move them under a thin wall of spikes to another Barrel Cannon, which then shoots them to an Auto Fire Barrel and a second moving Barrel Cannon. This moving Barrel Cannon is able to fire them to the top of a large, solid platform, where a Stilts is located with the letter O above its head. After the foe is a long, straight pathway that leads to a large switch. When it is pounded into the ground, the wall in the background falls, revealing an area far back. Barrel Cannons can shoot them to this area, where the [[Tutorial Pig]] and the checkpoint are placed. | When entered, markings appear between the two barrels. The Kongs must shoot across the lines of markings to make an Auto Fire Barrel appear. It can blast the primates underground, where they create a crater in the ground due to the impact of them landing on it. Next to two Tiki Goons here is an area of Barrel Cannons. The first barrel can shoot them past a single Tiki Zing, and then to another barrel that is able to shoot them to a button on the ceiling. When the button is hit, a Barrel Cannon appears below it. This Barrel Cannon can move them under a thin wall of spikes to another Barrel Cannon, which then shoots them to an Auto Fire Barrel and a second moving Barrel Cannon. This moving Barrel Cannon is able to fire them to the top of a large, solid platform, where a Stilts is located with the letter O above its head. After the foe is a long, straight pathway that leads to a large switch. When it is pounded into the ground, the wall in the background falls, revealing an area far back. Barrel Cannons can shoot them to this area, where the [[Professor Chops|Tutorial Pig]] and the checkpoint are placed. | ||
[[File: | [[File:Button Bash DKCR.png|thumb|left|250px|The Kongs approach a Tiki Torch]] | ||
Immediately after the checkpoint is the second DK Barrel and two Tiki Tank enemies. Above them is a wall covered in a green, grassy turf that the group can climb on. On the west side of this turf is a strange plant that the Kongs can break open to find a hidden Barrel Cannon that leads to a [[Bonus Level]], while if they head east while climbing on this turf, they progress to a different Barrel Cannon moving below them. When it moves directly under them, they should drop down into it to have it pull them to the right, where another Barrel Cannon is positioned. They should use this moving Barrel Cannon to smash four buttons placed side-to-side on the ceiling; once the buttons are hit, they flip over to reveal spikes. However, once they are all hit, the spikes move into the wall, leaving a path through the air for the primates to shoot to some grassy turf on the ceiling. The turf can be climbed across to land in a small area of ground with a Tiki Torch on it. Above the ceiling here are spikes. | Immediately after the checkpoint is the second DK Barrel and two Tiki Tank enemies. Above them is a wall covered in a green, grassy turf that the group can climb on. On the west side of this turf is a strange plant that the Kongs can break open to find a hidden Barrel Cannon that leads to a [[Bonus Level]], while if they head east while climbing on this turf, they progress to a different Barrel Cannon moving below them. When it moves directly under them, they should drop down into it to have it pull them to the right, where another Barrel Cannon is positioned. They should use this moving Barrel Cannon to smash four buttons placed side-to-side on the ceiling; once the buttons are hit, they flip over to reveal spikes. However, once they are all hit, the spikes move into the wall, leaving a path through the air for the primates to shoot to some grassy turf on the ceiling. The turf can be climbed across to land in a small area of ground with a Tiki Torch on it. Above the ceiling here are spikes. | ||
[[File: | [[File:Button Bash DKCR shot 2.png|thumb|250px|The heroes slide down the slanted bridge]] | ||
On the other side of the spikes is some more grassy turf that can help the heroes cross spikes on the ground and reach a larger room, where another Tiki Torch stands. To the right of this enemy is a curved pathway of turf leading to a hidden [[Puzzle Piece (Donkey Kong Country Returns)|Puzzle Piece]], while above it is a wall covered in more of the grassy, climbable turf. When the group gets to the end of the turf, they can notice a Barrel Cannon nearby. They can jump into it to be able to blast into a button on the wall, which causes the wall on the other side of the area to flip and reveal more turf to climb on. If they climb up this, they make their way onto solid ground. A slanted bridge is ahead that the Kongs must slide down to progress to a large area of Barrel Cannons. By avoiding a few Tiki Zings and using the cannons, most of which aim in three directions, as shown by markings on the walls, the Kongs can blast towards the nearest wall, where there is a button. The letter N is in the stationary Auto Fire Barrel right after the button. | On the other side of the spikes is some more grassy turf that can help the heroes cross spikes on the ground and reach a larger room, where another Tiki Torch stands. To the right of this enemy is a curved pathway of turf leading to a hidden [[Puzzle Piece (Donkey Kong Country Returns)|Puzzle Piece]], while above it is a wall covered in more of the grassy, climbable turf. When the group gets to the end of the turf, they can notice a Barrel Cannon nearby. They can jump into it to be able to blast into a button on the wall, which causes the wall on the other side of the area to flip and reveal more turf to climb on. If they climb up this, they make their way onto solid ground. A slanted bridge is ahead that the Kongs must slide down to progress to a large area of Barrel Cannons. By avoiding a few Tiki Zings and using the cannons, most of which aim in three directions, as shown by markings on the walls, the Kongs can blast towards the nearest wall, where there is a button. The letter N is in the stationary Auto Fire Barrel right after the button. | ||
When this button is hit, the structures holding the Barrel Cannons flip, making the Kongs' surroundings different. The primates must advance through this newly changed area by blasting up towards the small group of Tiki Zings nearby. When they get into the Barrel Cannon, which moves back and fourth, right under them, the heroes can aim to another barrel below. This Barrel Cannon moves across the area as well. If they manage to reach the cannon after this Barrel Cannon, they are shot to an Auto Fire Barrel and then to the Tutorial Pig on solid ground. Ahead of the second checkpoint is a small group of Stilts foes, who do no have feathers or stilts. When these chicken enemies are defeated, a switch appears from out of the ground. If it is pounded on three times, window-like platforms in the background begin to constantly open and close. | When this button is hit, the structures holding the Barrel Cannons flip, making the Kongs' surroundings different. The primates must advance through this newly changed area by blasting up towards the small group of Tiki Zings nearby. When they get into the Barrel Cannon, which moves back and fourth, right under them, the heroes can aim to another barrel below. This Barrel Cannon moves across the area as well. If they manage to reach the cannon after this Barrel Cannon, they are shot to an Auto Fire Barrel and then to the Tutorial Pig on solid ground. Ahead of the second checkpoint is a small group of Stilts foes, who do no have feathers or stilts. When these chicken enemies are defeated, a switch appears from out of the ground. If it is pounded on three times, window-like platforms in the background begin to constantly open and close. | ||
[[File: | [[File:Button Bash DKCR shot 3.png|thumb|left|250px|The Kongs aim into the mouth of the statue]] | ||
When the fast-moving windows open they create small platforms that the primates can stand on to climb the area. However, as soon as new windows open, the latter windows close, dropping the Kongs if they are still standing on them. Therefore, the heroes should notice the spinning nobs on the windows, which only spin when the window is about to open. The letter G is in a high part of this room, along with a Barrel Cannon that shoots the heroes around a giant statue. They are blasted high into the air, and when they reach the highest point in the area, they are aimed directly towards the mouth of the statue. When they shoot into the mouth, they are blasted out by an Auto Fire Barrel inside. At this point, the statue begins to spin. With only four chances, the Kongs must shoot into the mouth of the spinning statue twice to progress. When they get into its mouth twice, the statue is destroyed, with the [[Slot Machine Barrel]] in view. | When the fast-moving windows open they create small platforms that the primates can stand on to climb the area. However, as soon as new windows open, the latter windows close, dropping the Kongs if they are still standing on them. Therefore, the heroes should notice the spinning nobs on the windows, which only spin when the window is about to open. The letter G is in a high part of this room, along with a Barrel Cannon that shoots the heroes around a giant statue. They are blasted high into the air, and when they reach the highest point in the area, they are aimed directly towards the mouth of the statue. When they shoot into the mouth, they are blasted out by an Auto Fire Barrel inside. At this point, the statue begins to spin. With only four chances, the Kongs must shoot into the mouth of the spinning statue twice to progress. When they get into its mouth twice, the statue is destroyed, with the [[Slot Machine Barrel]] in view. | ||
{{br}} | |||
== | ==Enemies== | ||
{|class="wikitable dk"width=25% | |||
|- | |||
!Image | |||
!Name | |||
!Amount | |||
|- | |||
|align="center"|[[File:Humzees.png|x50px]] | |||
|align="center"|[[Humzee]] | |||
|6 | |||
|- | |||
|align="center"|[[File:Stilts_DKCR.png|x50px]] | |||
|align="center"|[[Stilts (enemy)|Stilts]] | |||
|6 | |||
|- | |||
|align="center"|[[File:TikiGoon.png|x50px]] | |||
|align="center"|[[Tiki Goon]] | |||
|4 | |||
|- | |||
|align="center"|[[File:DKCR Tiki Tank Artwork.png|x50px]] | |||
|align="center"|[[Tiki Tank]] | |||
|2 | |||
|- | |||
|align="center"|[[File:Tiki_Torch.png|x50px]] | |||
|align="center"|[[Tiki Torch]] | |||
|2 | |||
|- | |||
|align="center"|[[File:Tiki_Zing.png|x50px]] | |||
|align="center"|[[Tiki Zing]] | |||
|5 | |||
|} | |||
==Items== | |||
{|class="wikitable dk"width=25% | |||
|- | |||
!Image | |||
!Name | |||
!Amount | |||
|- | |||
|align="center"|[[File:BananacoinDKCR.png|x50px]] | |||
|align="center"|[[Banana Coin]] | |||
|5 | |||
|- | |||
|align="center"|[[File:DKBarrelDKCR.png|x50px]] | |||
|align="center"|[[DK Barrel]] | |||
|2 | |||
|- | |||
|align="center"|[[File:BalloonDKCR.png|x50px]] | |||
|align="center"|[[Extra Life Balloon]] | |||
|1 | |||
|- | |||
|align="center"|[[File:Heart.png|x50px]] | |||
|align="center"|[[Heart (item)|Heart]] | |||
|2 | |||
|} | |||
===K-O-N-G Letters=== | ===K-O-N-G Letters=== | ||
{|class="wikitable dk"width=70% | |||
|- | |||
!Image | |||
!Letter | |||
!Location | |||
|- | |||
|align="center"|[[File:DKCR Button Bash Letter K.png|250px]] | |||
|align="center"|K | |||
|When the Kongs encounter the first Tiki Tank, they must bounce on it to reach the letter K above its head. | |||
|- | |||
|align="center"|[[File:DKCR Button Bash Letter O.png|250px]] | |||
|align="center"|O | |||
|Shortly before the first checkpoint, the Kongs must bounce on a Stilts to reach the letter O. | |||
|- | |||
|align="center"|[[File:DKCR Button Bash Letter N.png|250px]] | |||
|align="center"|N | |||
|After a large sequence of Barrel Cannons just before the second checkpoint, the Kongs must activate a button to bring out a Barrel Cannon, which shoots them to the letter N. | |||
|- | |||
|align="center"|[[File:ButtonBashG.png|250px]] | |||
|align="center"|G | |||
|In the area with the window platforms, just before the large statue at the end, the letter G is at a high part of the area. | |||
|} | |||
===Puzzle Pieces=== | ===Puzzle Pieces=== | ||
[[File: | {|class="wikitable dk"width=70% | ||
|- | |||
!Image | |||
!Number | |||
!Location | |||
|- | |||
|align="center"|[[File:DKCR Button Bash Puzzle Piece 1.png|250px]] | |||
|align="center"|1 | |||
|At the very start, the Kongs must turn left and [[Ground Pound]] to break a few small, wooden poles supporting a structure, causing it to collapse. The Kongs must quickly move right to avoid being crushed by the structure. After the structure falls into the ground, the Kongs can go up it to collect the first Puzzle Piece. | |||
|- | |||
|align="center"|[[File:DKCR Button Bash Puzzle Piece 2.png|250px]] | |||
|align="center"|2 | |||
|Right after the Kongs are blasted into the temple, they must go left and Ground Pound a plant to reveal the second Puzzle Piece. | |||
|- | |||
|align="center"|[[File:DKCR Button Bash Puzzle Piece 3.png|250px]] | |||
|align="center"|3 | |||
|When the Kongs get on the platform with the first Tiki Tank and the letter K, they must roll-jump to the left and cling on some Climbing Grass. They must continue climbing to the bottom-left to collect the third Puzzle Piece. | |||
|- | |||
|align="center"|[[File:DKCR Button Bash Bonus Room 1.png|250px]] | |||
|align="center"|4 | |||
|In the Barrel Cannon right before the platform with the letter O and a Stilts, the Kongs must blast to a cracked part of the wall to enter a Bonus Level. There, they have 30 seconds to blast between two Barrel Cannons to collect 80 [[banana]]s and two [[Banana Coin]]s which move up and down. There is a Blast Barrel in the center which also moves up and down, and by entering it, the Kongs are blasted down and out of the Bonus Level. The Kongs must avoid entering the Blast Barrel until they collect every item, causing the Puzzle Piece to appear below the Blast Barrel. | |||
|- | |||
|align="center"|[[File:Button Bash DKCR Bonus Stage 2.png|250px]] | |||
|align="center"|5 | |||
|After the checkpoint, the Kongs must cling on some Climbing Grass above them and go to the upper-left. They must Ground Pound a plant to make a Blast Barrel appear. By entering it, the Kongs are blasted into a stone wall in the background. In the Bonus Level, the Kongs have 30 seconds to blast from a horizontally-moving Barrel Cannon to collect two Banana Coins, an [[Extra Life Balloon]], and 60 bananas above them. Once the Kongs collect every item, the Puzzle Piece appears. | |||
|- | |||
|align="center"|[[File:DKCR Button Bash Puzzle Piece 6.png|250px]] | |||
|align="center"|6 | |||
|Shortly after an area where the Kongs must push four buttons to progress to Climbing Grass on the ceiling is a Tiki Torch. The Kongs must jump over the enemy and then climb around some Climbing Grass on a circular structure to the right and collect the Puzzle Piece beneath it. | |||
|- | |||
|align="center"|[[File:DKCR Button Bash Puzzle Piece 7.png|250px]] | |||
|align="center"|7 | |||
|In the same room as the letter G, the Kongs must jump from the window platforms and go onto a hidden alcove to the top-left. A circular structure on the alcove moves back, revealing the last Puzzle Piece. | |||
|} | |||
==Names in | ==Gallery== | ||
{{ | <gallery> | ||
Button Bash DKCR circular structure.png|The Kongs in a room with a massive circular structure | |||
Button Bash DKCR buttons on ceiling.png|A Barrel Cannon moving below four red buttons on a ceiling | |||
</gallery> | |||
==Names in other languages== | |||
{{foreign names | |||
|Jap=タルたいほうメイズ | |||
|JapR=Taru Taihō Meizu | |||
|JapM=Barrel Cannon Maze | |||
|Spa=Botones Voluminosos | |Spa=Botones Voluminosos | ||
|SpaM=Bulky Buttons}} | |SpaM=Bulky Buttons | ||
|FreA=Réflexes Express | |||
|FreAM=Express Reflexes | |||
|Ger=Knopf-Knüppelei | |||
|GerM=Button Bashing | |||
|Ita=Attacco diroccato | |||
|ItaM=Crumbling Attack | |||
|Chi=木桶大炮迷宫 | |||
|ChiR=Mùtǒng Dàpào Mígōng | |||
|ChiM=Barrel Cannon Maze | |||
}} | |||
==Trivia== | ==Trivia== | ||
*The big monkey statue appears wearing | *The big monkey statue at the beginning appears wearing a USA flag-patterned tie. This [[Easter egg]] is a reference to [[wikipedia:Billy Mitchell (gamer)|Billy Mitchell]], a gamer who was formerly renowned for achieving world-record scores in the arcade games ''[[Donkey Kong (game)|Donkey Kong]]'' and ''[[Donkey Kong Jr. (game)|Donkey Kong Jr.]]''<ref>http://www.nintendoeverything.com/56215/</ref> | ||
*In the windows area, at the left corner is a statue | *In the windows area, at the left corner is a statue which is a reference to the {{wp|Three Wise Monkeys}}. | ||
< | |||
==References== | |||
<references/> | |||
{{DKCR}} | {{DKCR}} | ||
[[Category:Donkey Kong Country Returns levels]] | |||
[[Category:Temples]] | |||
[[Category:Donkey Kong Country Returns]] | |||
[[Category:Temples | |||
Latest revision as of 14:18, February 3, 2024
| Level | |
|---|---|
| Button Bash | |

| |
| Level code | 3-2 |
| World | Ruins |
| Game | Donkey Kong Country Returns (3D) |
| Music track | Voices of the Temple Returns |
| << Directory of levels >> | |
Button Bash is the seventeenth level in Donkey Kong Country Returns and Donkey Kong Country Returns 3D, and it is the second level of the Ruins world. Its name might be a pun on "button mash."
Summary[edit]
Button Bash is a level that mostly takes place in a temple. Donkey Kong and Diddy Kong must press various buttons to alter their surroundings, such as to create passageways. There are many Blast Barrels, and unlike most other ones, these Blast Barrels quickly move to different angles while staying in place. A variety of enemies appear in the level, such as Humzees. In the lower level of the temple, the Kongs encounter some Tiki Goons and Tiki Zings. One part of the level involves them blasting along buttons on the wall between two Blast Barrels. At the end of the level, the Kongs must shoot into the mouth of a giant, rotating statue twice, though they only have four attempts.
In the Time Attack mode, a time of 2:24:00 is needed to get a gold medal, a time of 2:35:00 for silver, and a time of 2:49:00 for bronze.
Overview[edit]
The level starts out in a small jungle area with a DK Barrel. Ahead is a Barrel Cannon that can shoot them to another cannon, and then into the mouth of a large statue. In its mouth is the inside of a temple, where the primates land in a large, open area with a Stilts enemy. Near the enemy is a switch that activates one of three Auto Fire Barrels whenever it is pounded on. When it is pounded on three times, the Kongs can access the three barrels, which are being held in the hands of three strange statues. The first barrel shoots them into the air, where they must move to the right to land in the second, and then the third. The third Barrel Cannons shoots them into the air where they can land on a solid piece of ground. A Tiki Tank with the letter K of the K-O-N-G Letters above its head is here. At the end of the solid platform is a Barrel Cannon that aims in three different directions, changing its aim every second. A button is on the ceiling that the Kongs must shoot to in order to open a wall, which they can then fire past. There is a straight pathway ahead that leads into an empty room. Humzees attack the heroes in here, but once they are all defeated two Barrel Cannons appear, parallel to each other.
When entered, markings appear between the two barrels. The Kongs must shoot across the lines of markings to make an Auto Fire Barrel appear. It can blast the primates underground, where they create a crater in the ground due to the impact of them landing on it. Next to two Tiki Goons here is an area of Barrel Cannons. The first barrel can shoot them past a single Tiki Zing, and then to another barrel that is able to shoot them to a button on the ceiling. When the button is hit, a Barrel Cannon appears below it. This Barrel Cannon can move them under a thin wall of spikes to another Barrel Cannon, which then shoots them to an Auto Fire Barrel and a second moving Barrel Cannon. This moving Barrel Cannon is able to fire them to the top of a large, solid platform, where a Stilts is located with the letter O above its head. After the foe is a long, straight pathway that leads to a large switch. When it is pounded into the ground, the wall in the background falls, revealing an area far back. Barrel Cannons can shoot them to this area, where the Tutorial Pig and the checkpoint are placed.

Immediately after the checkpoint is the second DK Barrel and two Tiki Tank enemies. Above them is a wall covered in a green, grassy turf that the group can climb on. On the west side of this turf is a strange plant that the Kongs can break open to find a hidden Barrel Cannon that leads to a Bonus Level, while if they head east while climbing on this turf, they progress to a different Barrel Cannon moving below them. When it moves directly under them, they should drop down into it to have it pull them to the right, where another Barrel Cannon is positioned. They should use this moving Barrel Cannon to smash four buttons placed side-to-side on the ceiling; once the buttons are hit, they flip over to reveal spikes. However, once they are all hit, the spikes move into the wall, leaving a path through the air for the primates to shoot to some grassy turf on the ceiling. The turf can be climbed across to land in a small area of ground with a Tiki Torch on it. Above the ceiling here are spikes.

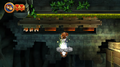
On the other side of the spikes is some more grassy turf that can help the heroes cross spikes on the ground and reach a larger room, where another Tiki Torch stands. To the right of this enemy is a curved pathway of turf leading to a hidden Puzzle Piece, while above it is a wall covered in more of the grassy, climbable turf. When the group gets to the end of the turf, they can notice a Barrel Cannon nearby. They can jump into it to be able to blast into a button on the wall, which causes the wall on the other side of the area to flip and reveal more turf to climb on. If they climb up this, they make their way onto solid ground. A slanted bridge is ahead that the Kongs must slide down to progress to a large area of Barrel Cannons. By avoiding a few Tiki Zings and using the cannons, most of which aim in three directions, as shown by markings on the walls, the Kongs can blast towards the nearest wall, where there is a button. The letter N is in the stationary Auto Fire Barrel right after the button.
When this button is hit, the structures holding the Barrel Cannons flip, making the Kongs' surroundings different. The primates must advance through this newly changed area by blasting up towards the small group of Tiki Zings nearby. When they get into the Barrel Cannon, which moves back and fourth, right under them, the heroes can aim to another barrel below. This Barrel Cannon moves across the area as well. If they manage to reach the cannon after this Barrel Cannon, they are shot to an Auto Fire Barrel and then to the Tutorial Pig on solid ground. Ahead of the second checkpoint is a small group of Stilts foes, who do no have feathers or stilts. When these chicken enemies are defeated, a switch appears from out of the ground. If it is pounded on three times, window-like platforms in the background begin to constantly open and close.

When the fast-moving windows open they create small platforms that the primates can stand on to climb the area. However, as soon as new windows open, the latter windows close, dropping the Kongs if they are still standing on them. Therefore, the heroes should notice the spinning nobs on the windows, which only spin when the window is about to open. The letter G is in a high part of this room, along with a Barrel Cannon that shoots the heroes around a giant statue. They are blasted high into the air, and when they reach the highest point in the area, they are aimed directly towards the mouth of the statue. When they shoot into the mouth, they are blasted out by an Auto Fire Barrel inside. At this point, the statue begins to spin. With only four chances, the Kongs must shoot into the mouth of the spinning statue twice to progress. When they get into its mouth twice, the statue is destroyed, with the Slot Machine Barrel in view.
Enemies[edit]
| Image | Name | Amount |
|---|---|---|
| Humzee | 6 | |

|
Stilts | 6 |
| Tiki Goon | 4 | |

|
Tiki Tank | 2 |
| Tiki Torch | 2 | |
| Tiki Zing | 5 |
Items[edit]
| Image | Name | Amount |
|---|---|---|
| Banana Coin | 5 | |
| DK Barrel | 2 | |
| Extra Life Balloon | 1 | |

|
Heart | 2 |
K-O-N-G Letters[edit]
| Image | Letter | Location |
|---|---|---|

|
K | When the Kongs encounter the first Tiki Tank, they must bounce on it to reach the letter K above its head. |

|
O | Shortly before the first checkpoint, the Kongs must bounce on a Stilts to reach the letter O. |

|
N | After a large sequence of Barrel Cannons just before the second checkpoint, the Kongs must activate a button to bring out a Barrel Cannon, which shoots them to the letter N. |

|
G | In the area with the window platforms, just before the large statue at the end, the letter G is at a high part of the area. |
Puzzle Pieces[edit]
| Image | Number | Location |
|---|---|---|

|
1 | At the very start, the Kongs must turn left and Ground Pound to break a few small, wooden poles supporting a structure, causing it to collapse. The Kongs must quickly move right to avoid being crushed by the structure. After the structure falls into the ground, the Kongs can go up it to collect the first Puzzle Piece. |

|
2 | Right after the Kongs are blasted into the temple, they must go left and Ground Pound a plant to reveal the second Puzzle Piece. |

|
3 | When the Kongs get on the platform with the first Tiki Tank and the letter K, they must roll-jump to the left and cling on some Climbing Grass. They must continue climbing to the bottom-left to collect the third Puzzle Piece. |

|
4 | In the Barrel Cannon right before the platform with the letter O and a Stilts, the Kongs must blast to a cracked part of the wall to enter a Bonus Level. There, they have 30 seconds to blast between two Barrel Cannons to collect 80 bananas and two Banana Coins which move up and down. There is a Blast Barrel in the center which also moves up and down, and by entering it, the Kongs are blasted down and out of the Bonus Level. The Kongs must avoid entering the Blast Barrel until they collect every item, causing the Puzzle Piece to appear below the Blast Barrel. |

|
5 | After the checkpoint, the Kongs must cling on some Climbing Grass above them and go to the upper-left. They must Ground Pound a plant to make a Blast Barrel appear. By entering it, the Kongs are blasted into a stone wall in the background. In the Bonus Level, the Kongs have 30 seconds to blast from a horizontally-moving Barrel Cannon to collect two Banana Coins, an Extra Life Balloon, and 60 bananas above them. Once the Kongs collect every item, the Puzzle Piece appears. |

|
6 | Shortly after an area where the Kongs must push four buttons to progress to Climbing Grass on the ceiling is a Tiki Torch. The Kongs must jump over the enemy and then climb around some Climbing Grass on a circular structure to the right and collect the Puzzle Piece beneath it. |

|
7 | In the same room as the letter G, the Kongs must jump from the window platforms and go onto a hidden alcove to the top-left. A circular structure on the alcove moves back, revealing the last Puzzle Piece. |
Gallery[edit]
The Kongs in a room with a massive circular structure
A Barrel Cannon moving below four red buttons on a ceiling


Names in other languages[edit]
| Language | Name | Meaning |
|---|---|---|
| Japanese | タルたいほうメイズ Taru Taihō Meizu |
Barrel Cannon Maze |
| Chinese | 木桶大炮迷宫 Mùtǒng Dàpào Mígōng |
Barrel Cannon Maze |
| French (NOA) | Réflexes Express |
Express Reflexes |
| German | Knopf-Knüppelei |
Button Bashing |
| Italian | Attacco diroccato |
Crumbling Attack |
| Spanish | Botones Voluminosos |
Bulky Buttons |
Trivia[edit]
- The big monkey statue at the beginning appears wearing a USA flag-patterned tie. This Easter egg is a reference to Billy Mitchell, a gamer who was formerly renowned for achieving world-record scores in the arcade games Donkey Kong and Donkey Kong Jr.[1]
- In the windows area, at the left corner is a statue which is a reference to the Three Wise Monkeys.