Underwater Ruins: Difference between revisions
Fawfulfury65 (talk | contribs) m (→Level Layout) |
No edit summary |
||
| (23 intermediate revisions by 14 users not shown) | |||
| Line 1: | Line 1: | ||
{{ | {{level infobox | ||
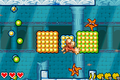
|image=[[File: | |image=[[File:UnderwaterRuins1.png]] | ||
| | |world=[[Ice World]] | ||
| | |game=''[[DK: King of Swing]]'' | ||
| | |before=[[Cold Cold Forest|<<]] [[Ice Castle|<<]] | ||
|after=[[Ice Castle|>>]] [[Sassy Squatch's Lair|>>]] | |||
}} | }} | ||
'''Underwater Ruins''' is a level in the [[Ice World]] area of ''[[DK: King of Swing]]''. It is | '''Underwater Ruins''' is a level in the [[Ice World]] area of ''[[DK: King of Swing]]''. It is the second and last level taking place underwater. The water slows down [[Donkey Kong]]'s movements, and the level has a lot of [[Shuri]]s and [[Lockjaw]]s. Underwater Ruins is the only level to have [[peg]]s that rise out from gaps in the ground. There are also many obstacles returning in this level, such as switches and levers, [[barrel]]s, [[Spike Trap|spike]]s, pegs, and [[Peg Board]]s. On many occasions in the level, the switches and levers either move Peg Boards or open walls. | ||
==Layout== | |||
[[File:DKKOSDKUnderwaterRuins.png|thumb|left|Donkey Kong pulling a Switch Peg in the second section]] | |||
At the start, Donkey Kong is next to a gap in the ground. Pegs float out of this gap, and Donkey Kong can hold on them to climb to the top of a high ledge just ahead. At the top-left is a peg surrounded by three [[banana]]s. Donkey Kong must continue right and climb across three [[Peg Board]]s that are circled by two Shuris. He must then climb up some more rising pegs. Donkey Kong can find three more bananas surrounding a peg to the left. There are spikes on the ceiling, which cause the pegs to break once they hit it. Donkey Kong can go right to continue into the second section; the left path has three more Peg Boards, two Lockjaws, and a Question Barrel at the end. Donkey Kong can break the Question Barrel to open an alcove with the bronze medal. | |||
The second section starts out similar to [[Puzzling Pyramid]]: Donkey Kong must go up a small Peg Board and pull a [[Jack Peg]] multiple times to separate two walls pushed together, much like in [[Puzzling Pyramid]]. Donkey Kong must quickly climb up the Peg Boards above because the walls quickly close on him. He can collect two [[Banana Bunch]]es along the way. After going above the closing walls, Donkey Kong must pull another Jack Peg and quickly climb up some more Peg Boards. Donkey Kong must pull down on an orange [[Switch Peg]] to make a small Peg Board appear, enabling him to reach another small Peg Board above and over the closing walls. Donkey Kong must go right to enter the third and final section. | |||
{{br|left}} | |||
Donkey Kong starts the last section on the flat ground. He must climb Peg Boards in the air while avoiding two Lockjaws patrolling the low area. A Switch Peg is to the right, and Donkey Kong can pull it to make two Peg Boards appear above. Three bananas are in an alcove to the very right. After climbing the two Peg Boards, Donkey Kong must then pull down on another Switch Peg, causing some Peg Boards to appear to the left. A third Switch Peg is above the leftmost Peg Board. By pulling it, Donkey Kong summons more Peg Boards to the right and opens and alcove with three Shuris, who then roam around the area. Donkey Kong can either avoid or defeat the enemies and continue to another Jack Peg over some spikes on a platform below. He must pull down on the Jack Peg to move a Peg Board near him. Donkey Kong must hold on the Peg Board as it returns to its original position. He can optionally jump right to a smaller Peg Board, over some spikes, to collect three bananas. Donkey Kong must pull on another Switch Peg to open a wall and go down into a room with a few large Peg Boards and Shuris. Donkey Kong must pull on another Switch Peg below to open another wall. Two Peg Boards are below, and one of them has a [[barrel]] on it. Donkey Kong can break the barrel to collect a Banana Bunch. Donkey Kong must avoid the spikes below and jump right onto a platform with the exit sign to finish the level. | |||
{{br}} | |||
==Key items== | |||
*'''[[Crystal Coconut]]:''' Rewarded for defeating a Shuri released from a wall in the third and final section. | |||
*'''[[Medal (DK: King of Swing)|Bronze medal]]:''' At the end of the first section, the Kong must climb some Peg Boards to the left and charge into a [[Question Barrel]]. Doing so causes the left wall to open, and the Kong can charge into the barrel in the alcove to reveal and obtain the medal. | |||
== | ==Gallery== | ||
<gallery> | |||
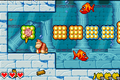
Underwater Ruins DKKoS Shuris.png|Donkey Kong encounters two Shuris in the first section | |||
Underwater Ruins DKKoS bronze medal.png|Donkey Kong next to the bronze medal | |||
Underwater Ruins DKKoS lever.png|Donkey Kong at the start of the second section | |||
UnderwaterRuins2.png|Donkey Kong grabbing toward a lever in the third section | |||
</gallery> | |||
==Names in other languages== | |||
{{foreign names | |||
|Jap=つめたいうみのいせき | |||
|JapR=Tsumetai umi no iseki | |||
|JapM=Cold Sea Ruins | |||
{{ | |Ita=Rocca sommersa | ||
[[Category: | |ItaM=Submerged rock | ||
}} | |||
[[Category:DK: King of Swing | {{DKKOS}} | ||
[[Category:Aquatic areas]] | |||
[[Category:DK: King of Swing levels]] | |||
Latest revision as of 15:49, December 22, 2023
| Level | |
|---|---|
| Underwater Ruins | |

| |
| World | Ice World |
| Game | DK: King of Swing |
| << << Directory of levels >> >> | |
Underwater Ruins is a level in the Ice World area of DK: King of Swing. It is the second and last level taking place underwater. The water slows down Donkey Kong's movements, and the level has a lot of Shuris and Lockjaws. Underwater Ruins is the only level to have pegs that rise out from gaps in the ground. There are also many obstacles returning in this level, such as switches and levers, barrels, spikes, pegs, and Peg Boards. On many occasions in the level, the switches and levers either move Peg Boards or open walls.
Layout[edit]

At the start, Donkey Kong is next to a gap in the ground. Pegs float out of this gap, and Donkey Kong can hold on them to climb to the top of a high ledge just ahead. At the top-left is a peg surrounded by three bananas. Donkey Kong must continue right and climb across three Peg Boards that are circled by two Shuris. He must then climb up some more rising pegs. Donkey Kong can find three more bananas surrounding a peg to the left. There are spikes on the ceiling, which cause the pegs to break once they hit it. Donkey Kong can go right to continue into the second section; the left path has three more Peg Boards, two Lockjaws, and a Question Barrel at the end. Donkey Kong can break the Question Barrel to open an alcove with the bronze medal.
The second section starts out similar to Puzzling Pyramid: Donkey Kong must go up a small Peg Board and pull a Jack Peg multiple times to separate two walls pushed together, much like in Puzzling Pyramid. Donkey Kong must quickly climb up the Peg Boards above because the walls quickly close on him. He can collect two Banana Bunches along the way. After going above the closing walls, Donkey Kong must pull another Jack Peg and quickly climb up some more Peg Boards. Donkey Kong must pull down on an orange Switch Peg to make a small Peg Board appear, enabling him to reach another small Peg Board above and over the closing walls. Donkey Kong must go right to enter the third and final section.
Donkey Kong starts the last section on the flat ground. He must climb Peg Boards in the air while avoiding two Lockjaws patrolling the low area. A Switch Peg is to the right, and Donkey Kong can pull it to make two Peg Boards appear above. Three bananas are in an alcove to the very right. After climbing the two Peg Boards, Donkey Kong must then pull down on another Switch Peg, causing some Peg Boards to appear to the left. A third Switch Peg is above the leftmost Peg Board. By pulling it, Donkey Kong summons more Peg Boards to the right and opens and alcove with three Shuris, who then roam around the area. Donkey Kong can either avoid or defeat the enemies and continue to another Jack Peg over some spikes on a platform below. He must pull down on the Jack Peg to move a Peg Board near him. Donkey Kong must hold on the Peg Board as it returns to its original position. He can optionally jump right to a smaller Peg Board, over some spikes, to collect three bananas. Donkey Kong must pull on another Switch Peg to open a wall and go down into a room with a few large Peg Boards and Shuris. Donkey Kong must pull on another Switch Peg below to open another wall. Two Peg Boards are below, and one of them has a barrel on it. Donkey Kong can break the barrel to collect a Banana Bunch. Donkey Kong must avoid the spikes below and jump right onto a platform with the exit sign to finish the level.
Key items[edit]
- Crystal Coconut: Rewarded for defeating a Shuri released from a wall in the third and final section.
- Bronze medal: At the end of the first section, the Kong must climb some Peg Boards to the left and charge into a Question Barrel. Doing so causes the left wall to open, and the Kong can charge into the barrel in the alcove to reveal and obtain the medal.
Gallery[edit]
Donkey Kong encounters two Shuris in the first section
Donkey Kong next to the bronze medal

Donkey Kong at the start of the second section
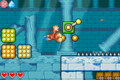
Donkey Kong grabbing toward a lever in the third section


Names in other languages[edit]
| Language | Name | Meaning |
|---|---|---|
| Japanese | つめたいうみのいせき Tsumetai umi no iseki |
Cold Sea Ruins |
| Italian | Rocca sommersa |
Submerged rock |