Underwater Ruins: Difference between revisions
Scrooge200 (talk | contribs) No edit summary |
(collectibles section. wip) |
||
| Line 1: | Line 1: | ||
{{KoSBox | {{KoSBox | ||
|image=[[File:UnderwaterRuins1.png | |image=[[File:UnderwaterRuins1.png]] | ||
|location=[[Ice World]] | |location=[[Ice World]] | ||
|levels=[[Cold Cold Forest]]<br>[[Raging Ravine]]<br>[[Ice Castle]] | |levels=[[Cold Cold Forest]]<br>[[Raging Ravine]]<br>[[Ice Castle]] | ||
}} | }} | ||
'''Underwater Ruins''' is a level in the [[Ice World]] area of ''[[DK: King of Swing]]''. It is one of the four levels that must be completed to unlock the | '''Underwater Ruins''' is a level in the [[Ice World]] area of ''[[DK: King of Swing]]''. It is one of the four levels that must be completed to unlock the boss level, [[Sassy Squatch's Lair]]. | ||
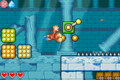
Underwater Ruins is the second and final level to take place underwater. The water slows down the [[Kong|Kong's]] movements, and it is inhabited by a large population of [[Shuri]]s and [[Lockjaw]]s. Pegs that rise upwards from a gap in the ground appear for the first and only time in this level. There are also many obstacles returning in this level, such as switches and levers, [[barrel]]s, spikes, and normal pegs and peg boards. On many occasions in the level, the switches and levers move peg boards or open walls. | |||
== | ==Layout== | ||
[[File:DKKOSDKUnderwaterRuins.png|thumb|left|240px]] | [[File:DKKOSDKUnderwaterRuins.png|thumb|left|240px]] | ||
At the beginning of the level, the Kong can find a gap in the ground. Pegs float out of this gap, which the hero can use to climb to the top of a high ledge just ahead. In the top-left corner of the room, a peg with a trio of [[banana]]s surrounding it can be seen, while to the right of the area along the ledge the primate can find a set of three peg boards with two Shuris patrolling the area around them. A gap surrounded by spikes is farther down an alcove right after the peg boards, and next to it is a peg with a Banana Bunch next to it. Pegs rise out of the gap in this area, allowing the Kong to travel upwards to a ledge that leads into the second part of the level. If the | At the beginning of the level, the Kong can find a gap in the ground. Pegs float out of this gap, which the hero can use to climb to the top of a high ledge just ahead. In the top-left corner of the room, a peg with a trio of [[banana]]s surrounding it can be seen, while to the right of the area along the ledge the primate can find a set of three peg boards with two Shuris patrolling the area around them. A gap surrounded by spikes is farther down an alcove right after the peg boards, and next to it is a peg with a Banana Bunch next to it. Pegs rise out of the gap in this area, allowing the Kong to travel upwards to a ledge that leads into the second part of the level. If the Kong goes left, they can find a path of peg boards surrounded by two Lockjaws. If the Kong goes right, they can continue to the next section. | ||
In the second part of the level, the hero can find a lever above a peg board. With on hand positioned on the base of it and the other on the lever, he can pull the switch several times to make a wall blocking his path above open. Peg boards and two Banana Bunches are beneath the wall. Once he climbs past the wall, which slowly closes as he stops pulling the lever, he can locate another lever above a lone peg board. When he pulls this, a long wall blocking his path opens, revealing more peg boards and a red switch. If the switch is pulled, peg boards appear above that can let him climb above the closing wall to a ledge that leads into the third section of the level. | In the second part of the level, the hero can find a lever above a peg board. With on hand positioned on the base of it and the other on the lever, he can pull the switch several times to make a wall blocking his path above open. Peg boards and two Banana Bunches are beneath the wall. Once he climbs past the wall, which slowly closes as he stops pulling the lever, he can locate another lever above a lone peg board. When he pulls this, a long wall blocking his path opens, revealing more peg boards and a red switch. If the switch is pulled, peg boards appear above that can let him climb above the closing wall to a ledge that leads into the third section of the level. | ||
{{br|left}} | |||
Here, two Lockjaws can be seen patrolling the area around a set of peg boards. A switch is near them that, when pulled, makes peg boards appear to help the primate climb upwards. Bananas are also placed in an alcove nearby. The peg boards lead to another switch that makes some more peg boards appear when activated. Similar to before, the boards help the hero climb to a switch that he can pull to make additional peg boards appear, but this time, a wall also opens, freeing a trio of Shuris from an alcove. The newly formed peg boards can aid the Kong in reaching a lever above some spikes. If he pulls the lever down a few times, a peg board moves towards him to help him cross the spikes and find another switch. A peg board with bananas on it floats over some spikes near here. When the switch is pulled, a wall opens, allowing the Kong to access a room full of Shuris and large peg board. Yet another switch is at the bottom of the area to open another wall, which has a peg board on the other side of it. A barrel covers the middle of the board, and an exit sign is on a raised piece of land next to it. When the hero lands by the sign, the level is completed. | |||
{{br}} | |||
==Collectibles== | |||
{|class="dktable-brown" width=45% | |||
|- | |||
!Item | |||
!Location | |||
|- | |||
|align=center|[[File:DKKOSCrystalCoconut.png]]<br>[[Crystal Coconut]] | |||
|Rewarded for defeating a Shuri released from a wall in the third and final section. | |||
|- | |||
|align=center|[[File:DKKOSBronze.png]]<br>[[Medal (DK: King of Swing)|Bronze medal]] | |||
|At the end of the first section, the Kong must climb some Peg Boards to the left and charge into a [[Question Barrel]]. Doing so causes the left wall to open, and the Kong can charge into the barrel in the alcove to reveal and obtain the medal. | |||
|} | |||
==Gallery== | |||
<gallery> | |||
UnderwaterRuins2.png|Donkey Kong swings toward a lever in the third section | |||
</gallery> | |||
{{DKKOS}} | {{DKKOS}} | ||
[[Category:Bodies of Water]] | [[Category:Bodies of Water]] | ||
[[Category:DK: King of Swing Levels]] | [[Category:DK: King of Swing Levels]] | ||
Revision as of 20:59, October 28, 2019
Template:KoSBox Underwater Ruins is a level in the Ice World area of DK: King of Swing. It is one of the four levels that must be completed to unlock the boss level, Sassy Squatch's Lair.
Underwater Ruins is the second and final level to take place underwater. The water slows down the Kong's movements, and it is inhabited by a large population of Shuris and Lockjaws. Pegs that rise upwards from a gap in the ground appear for the first and only time in this level. There are also many obstacles returning in this level, such as switches and levers, barrels, spikes, and normal pegs and peg boards. On many occasions in the level, the switches and levers move peg boards or open walls.
Layout

At the beginning of the level, the Kong can find a gap in the ground. Pegs float out of this gap, which the hero can use to climb to the top of a high ledge just ahead. In the top-left corner of the room, a peg with a trio of bananas surrounding it can be seen, while to the right of the area along the ledge the primate can find a set of three peg boards with two Shuris patrolling the area around them. A gap surrounded by spikes is farther down an alcove right after the peg boards, and next to it is a peg with a Banana Bunch next to it. Pegs rise out of the gap in this area, allowing the Kong to travel upwards to a ledge that leads into the second part of the level. If the Kong goes left, they can find a path of peg boards surrounded by two Lockjaws. If the Kong goes right, they can continue to the next section.
In the second part of the level, the hero can find a lever above a peg board. With on hand positioned on the base of it and the other on the lever, he can pull the switch several times to make a wall blocking his path above open. Peg boards and two Banana Bunches are beneath the wall. Once he climbs past the wall, which slowly closes as he stops pulling the lever, he can locate another lever above a lone peg board. When he pulls this, a long wall blocking his path opens, revealing more peg boards and a red switch. If the switch is pulled, peg boards appear above that can let him climb above the closing wall to a ledge that leads into the third section of the level.
Here, two Lockjaws can be seen patrolling the area around a set of peg boards. A switch is near them that, when pulled, makes peg boards appear to help the primate climb upwards. Bananas are also placed in an alcove nearby. The peg boards lead to another switch that makes some more peg boards appear when activated. Similar to before, the boards help the hero climb to a switch that he can pull to make additional peg boards appear, but this time, a wall also opens, freeing a trio of Shuris from an alcove. The newly formed peg boards can aid the Kong in reaching a lever above some spikes. If he pulls the lever down a few times, a peg board moves towards him to help him cross the spikes and find another switch. A peg board with bananas on it floats over some spikes near here. When the switch is pulled, a wall opens, allowing the Kong to access a room full of Shuris and large peg board. Yet another switch is at the bottom of the area to open another wall, which has a peg board on the other side of it. A barrel covers the middle of the board, and an exit sign is on a raised piece of land next to it. When the hero lands by the sign, the level is completed.
Collectibles
| Item | Location |
|---|---|
Crystal Coconut |
Rewarded for defeating a Shuri released from a wall in the third and final section. |
Bronze medal |
At the end of the first section, the Kong must climb some Peg Boards to the left and charge into a Question Barrel. Doing so causes the left wall to open, and the Kong can charge into the barrel in the alcove to reveal and obtain the medal. |
Gallery
Donkey Kong swings toward a lever in the third section
