Puzzling Pyramid: Difference between revisions
m (Robot: Removing template: BoxTop) |
GlobinGoblin (talk | contribs) (→Names in other languages: Spanish) |
||
| (16 intermediate revisions by 10 users not shown) | |||
| Line 1: | Line 1: | ||
{{ | {{level infobox | ||
|image=[[File: | |image=[[File:Puzzling Pyramind DKKoS shot.png]] | ||
| | |world=[[Jungle World]] | ||
| | |game=''[[DK: King of Swing]]'' | ||
| | |before=[[Tropical Treetops (DK: King of Swing)|<<]] [[Contraption Cave|<<]] | ||
|after=[[Congazuma's Castle|>>]] | |||
}} | }} | ||
'''Puzzling Pyramid''' is | '''Puzzling Pyramid''' is the fourth level of the [[Jungle World]] of ''[[DK: King of Swing]]''. It is unlocked after completing either [[Contraption Cave]] or [[Tropical Treetops (DK: King of Swing)|Tropical Treetops]]. In the first two sections, [[Donkey Kong]] must use [[Handle Peg]]s in order to progress. The first two Handle Pegs function differently: one of them is used to move the blocks over Donkey Kong, and the next one is for moving [[Peg Board]]s into view. The second section has two more Handle Pegs, both of which are used to rotate individual groups of [[peg]]s, allowing Donkey Kong to climb higher. There are some round [[tire]]s that Donkey Kong can bounce from. [[Neek]]s and [[Flitter]]s are in the first two sections of the level. One [[Kritter|Kremling]] appears in the level, repeatedly pulling the Jack Peg to prevent Donkey Kong from progressing. The background of the level shows statues resembling [[Congazuma]] and green hieroglyphs of Kremlings. | ||
== | ==Layout== | ||
[[File:Puzzling Pyramind DKKoS shot 2.png|left|thumb|Donkey Kong pulls the lever to open the walls.]] | |||
At the start of the level, there is a large Peg Board with a Handle Peg in the center. By turning the wheel, the blocks above Donkey Kong's path move, creating a small space for him to go through. More peg boards are above, some of which that have Neeks climbing all over them. Pairs of [[banana]]s are located on the peg boards with the Neeks on them. Another wheel is ahead, and it is surrounded by single pegs. When it is turned, a peg board emerges from the wall above. Donkey Kong can use the new board to climb upwards. A trio of bananas and a Flitter are located around the peg board, which is followed by a rectangular peg board with some barrels on the boards ahead of it. The barrels must be destroyed to progress to a solid ledge that leads to the second area of the level. | |||
In the second section, there are a few pegs that lead up to another wheel. Bananas and tires are along the walls here. As the ape turns the wheel, the pegs around it rotate so he can climb higher to some more pegs with a wheel above them. They are surrounded by Flitter enemies and four bananas. With the wheel, Donkey Kong can rotate the pegs so that they move above him. If he climbs up them while they are in this position, he can reach a ledge that leads to the third area of the level. | |||
{{ | The third and final section starts out with a Kremling repeatedly pulling a [[Jack Peg]], preventing Donkey Kong from progressing. After he defeats the Kremling, Donkey Kong can pull the Jack Peg a few times to temporarily push back the two walls blocking his path. Donkey Kong must quickly climb the long blue Peg Board before the two walls close in on him. After passing the walls, Donkey Kong can jump on a ledge to the right, with the exit sign, marking the end of the level. | ||
[[Category: | ==Key items== | ||
[[Category:DK: King of Swing | *'''[[Crystal Coconut]]:''' In the second section, Donkey Kong must charge into a Flitter to the left to obtain the Crystal Coconut it was guarding. | ||
*'''[[Medal (DK: King of Swing)|Silver Medal]]:''' Just before the level exit, Donkey Kong can charge into a wooden [[barrel]] to break it open and reveal the silver medal. | |||
==Gallery== | |||
<gallery> | |||
Puzzling Pyramid start.png|Donkey Kong starting the level | |||
Puzzling Pyramid peg rotation.png|Donkey Kong using a Handle Peg to rotate individual pegs | |||
Puzzling Pyramid Kremling.png|Donkey Kong about to charge into the Kritter above him | |||
Puzzling Pyramid silver medal.png|Donkey Kong collecting the silver medal | |||
</gallery> | |||
== Names in other languages == | |||
{{foreign names | |||
|Jap=なぞのいせき | |||
|JapR=Nazo no iseki | |||
|JapM=Puzzling Ruins | |||
|Ger=Puzzlepyramide | |||
|GerM=Puzzle Pyramid | |||
|Ita=Piramide enigma | |||
|ItaM=Puzzle pyramid | |||
|Spa=Pirámide misteriosa | |||
|SpaM=Mysterious Pyramid | |||
}} | |||
{{DKKOS}} | |||
[[Category:Temples]] | |||
[[Category:DK: King of Swing levels]] | |||
Latest revision as of 06:56, January 10, 2024
| Level | |
|---|---|
| Puzzling Pyramid | |

| |
| World | Jungle World |
| Game | DK: King of Swing |
| << << Directory of levels >> | |
Puzzling Pyramid is the fourth level of the Jungle World of DK: King of Swing. It is unlocked after completing either Contraption Cave or Tropical Treetops. In the first two sections, Donkey Kong must use Handle Pegs in order to progress. The first two Handle Pegs function differently: one of them is used to move the blocks over Donkey Kong, and the next one is for moving Peg Boards into view. The second section has two more Handle Pegs, both of which are used to rotate individual groups of pegs, allowing Donkey Kong to climb higher. There are some round tires that Donkey Kong can bounce from. Neeks and Flitters are in the first two sections of the level. One Kremling appears in the level, repeatedly pulling the Jack Peg to prevent Donkey Kong from progressing. The background of the level shows statues resembling Congazuma and green hieroglyphs of Kremlings.
Layout[edit]

At the start of the level, there is a large Peg Board with a Handle Peg in the center. By turning the wheel, the blocks above Donkey Kong's path move, creating a small space for him to go through. More peg boards are above, some of which that have Neeks climbing all over them. Pairs of bananas are located on the peg boards with the Neeks on them. Another wheel is ahead, and it is surrounded by single pegs. When it is turned, a peg board emerges from the wall above. Donkey Kong can use the new board to climb upwards. A trio of bananas and a Flitter are located around the peg board, which is followed by a rectangular peg board with some barrels on the boards ahead of it. The barrels must be destroyed to progress to a solid ledge that leads to the second area of the level.
In the second section, there are a few pegs that lead up to another wheel. Bananas and tires are along the walls here. As the ape turns the wheel, the pegs around it rotate so he can climb higher to some more pegs with a wheel above them. They are surrounded by Flitter enemies and four bananas. With the wheel, Donkey Kong can rotate the pegs so that they move above him. If he climbs up them while they are in this position, he can reach a ledge that leads to the third area of the level.
The third and final section starts out with a Kremling repeatedly pulling a Jack Peg, preventing Donkey Kong from progressing. After he defeats the Kremling, Donkey Kong can pull the Jack Peg a few times to temporarily push back the two walls blocking his path. Donkey Kong must quickly climb the long blue Peg Board before the two walls close in on him. After passing the walls, Donkey Kong can jump on a ledge to the right, with the exit sign, marking the end of the level.
Key items[edit]
- Crystal Coconut: In the second section, Donkey Kong must charge into a Flitter to the left to obtain the Crystal Coconut it was guarding.
- Silver Medal: Just before the level exit, Donkey Kong can charge into a wooden barrel to break it open and reveal the silver medal.
Gallery[edit]
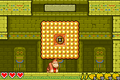
Donkey Kong starting the level
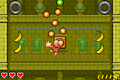
Donkey Kong using a Handle Peg to rotate individual pegs
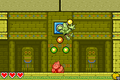
Donkey Kong about to charge into the Kritter above him
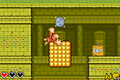
Donkey Kong collecting the silver medal


Names in other languages[edit]
| Language | Name | Meaning |
|---|---|---|
| Japanese | なぞのいせき Nazo no iseki |
Puzzling Ruins |
| German | Puzzlepyramide |
Puzzle Pyramid |
| Italian | Piramide enigma |
Puzzle pyramid |
| Spanish | Pirámide misteriosa |
Mysterious Pyramid |