K. Kruizer III Hull: Difference between revisions
Fawfulfury65 (talk | contribs) No edit summary |
No edit summary |
||
| (20 intermediate revisions by 13 users not shown) | |||
| Line 1: | Line 1: | ||
{{ | {{level infobox | ||
|image=[[File: | |image=[[File:K Kruiser III Hull start.png]] | ||
| | |world=[[K. Kruizer III]] | ||
| | |game=''[[DK: King of Swing]]'' | ||
|before=[[K. Kruizer III Artillery|<<]] | |||
|after=[[K. Kruizer III Engine|>>]] | |||
}} | }} | ||
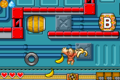
'''K. Kruizer III Hull''' is a level in the [[K. Kruizer III]] area of ''[[DK: King of Swing]]''. | '''K. Kruizer III Hull''' is a level in the [[K. Kruizer III]] area of ''[[DK: King of Swing]]''. It takes place in the hull of the K. Kruizer III, which is full of a multitude of obstacles. The obstacles include [[Spike Trap|spike]]s, conveyor belts, [[barrel]]s, rocks that can be thrown, [[tire]]s, [[Barrel Cannon]]s, blue wheels that can throw the Kong high into the air (if he holds onto them with the correct hand) and other wheels that can alter the hero's surroundings. [[Kritter]]s also appear in the level occasionally to throw rocks at [[Donkey Kong]] (or [[Diddy Kong]] in Diddy mode). The enemies can also spin wheels to rotate sets of floating spikes. | ||
==Layout== | |||
The level begins on a platform with a low wall at the end of it. There is a spike ball floating back and forth on the small wall. A lone peg floats nearby with a trail of [[banana]]s following it. The trail leads over the floating spike to a [[Spinning Peg]] above some spikes. Another wall with a spike on it is next to it, and more spikes are on the other side. The Kong must grab and swing from a Spinning Peg to go over the wall to a second peg located above the spikes. The Kong must swing from this to reach a wheel connected to a long, yellow bar that stretches across the whole room. When the Kong swings around the wheel, it moves along the bar. The wheel can pull the Kong to a ledge that leads to the second area of the level, or by a tire that they can bounce on to enter a Barrel Cannon; the cannon shoots the Kong into a [[Bonus Barrel]] when entered. | |||
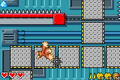
[[File:KKruizerIIIHull1.png|thumb|left|240px|Donkey Kong travels in one of the three pathways]] | |||
At the start of the second part, the Kong can find sets of conveyor belts, peg boards, and a few pegs surrounding a large Peg Board with a Kritter. The Kritter swings on a Spinning Peg in the center, causing several groups of three floating spikes to move around in a circle. The Kong can defeat the Kritter to stop the floating spikes from rotating. Bananas are scattered along some of the conveyor belts in this area as well. If the hero continues upwards, he can find three different pathways that he can travel through: the first pathway can be passed by swinging from a Spinning Peg at the start, the second path involves the Kong climbing up moving pegs to progress, and the third passage requires the Kong to use his "Going Bananas" move to smash through crates. Each path is surrounded by spikes. Once one of the three pathways are crossed, the Kong can find some more conveyor belts and peg boards scattered all around the area. Bananas and floating spikes surround these objects. There is also a lever at the top that opens a gate into the third and final area. | |||
The last section has more conveyor belts and spikes. A long trail of spikes leads over a path of conveyor belts. A crate with a large Banana Bunch in it is at the end of one of the conveyor belt pathways; an optional shortcut can be found by breaking a crate, making a Barrel Cannon at the bottom-right corner available. It can be traveled through by using Barrel Cannons, pegs, and a switch, which can open a gate. Another line of conveyor belts nearby leads farther up the area, where there are more spikes along the walls and floor. The path curves towards a gate that blocks the primate's path. In order to open it, he must break a barrel floating above the spikes to the left. A trio of conveyor belts and a rock are at the other side of the gate, as well as more spikes. The stone can be used to defeat a Kritter spinning on a peg above another conveyor belt and a rock. A second gate blocks the hero's path near here, but it can be opened if the Kong breaks a barrel above some spikes higher up with a rock. A trio of bananas float in the air by this barrel. On the other side of the gate, a Barrel Cannon can be found that shoots the Kong towards other cannons. These Barrel Cannons can send him to a straight path of conveyor belts that leads to another gate. A barrel sits in front of the gate that can be destroyed to open the wall. The exit lies ahead of the gate, and when the primate lands by it, the level is completed, and [[K. Kruizer III Artillery]] is unlocked. | |||
==Key items== | |||
*'''[[Crystal Coconut]]:''' Rewarded for completing the Bonus Level. | |||
{{ | *'''[[Medal (DK: King of Swing)|Medal]]:''' Obtained by taking the shortcut in the third and last section. | ||
==Bonus Level== | |||
[[Category:DK: King of Swing | [[File:K Kruizer III Hull Bonus Level.png|thumb]] | ||
Donkey Kong has forty seconds to ride a [[Booster Barrel]] and collect bananas, which are arranged in circles surrounding the tires. When Donkey Kong gets all the bananas, a [[Crystal Coconut]] appears. | |||
==Gallery== | |||
<gallery> | |||
KKruizerIIIHull2.png|The location of the Bonus Barrel | |||
K Kruizer III Hull conveyor path.png|Donkey Kong climbs across a conveyor path | |||
</gallery> | |||
==Names in other languages== | |||
{{foreign names | |||
|Jap=キングクルーザーⅢないぶ | |||
|JapR=Kingu kurūzā Ⅲ naibu | |||
|JapM=K. Kruizer III Interior | |||
|Ita=Skafo Korazzata K. III | |||
|ItaM=K. Kruizer III Hull; ''scafo'' (hull) has the "c" replaced with a "k" | |||
}} | |||
{{DKKOS}} | |||
[[Category:DK: King of Swing levels]] | |||
Latest revision as of 16:00, December 22, 2023
| Level | |
|---|---|
| K. Kruizer III Hull | |

| |
| World | K. Kruizer III |
| Game | DK: King of Swing |
| << Directory of levels >> | |
K. Kruizer III Hull is a level in the K. Kruizer III area of DK: King of Swing. It takes place in the hull of the K. Kruizer III, which is full of a multitude of obstacles. The obstacles include spikes, conveyor belts, barrels, rocks that can be thrown, tires, Barrel Cannons, blue wheels that can throw the Kong high into the air (if he holds onto them with the correct hand) and other wheels that can alter the hero's surroundings. Kritters also appear in the level occasionally to throw rocks at Donkey Kong (or Diddy Kong in Diddy mode). The enemies can also spin wheels to rotate sets of floating spikes.
Layout[edit]
The level begins on a platform with a low wall at the end of it. There is a spike ball floating back and forth on the small wall. A lone peg floats nearby with a trail of bananas following it. The trail leads over the floating spike to a Spinning Peg above some spikes. Another wall with a spike on it is next to it, and more spikes are on the other side. The Kong must grab and swing from a Spinning Peg to go over the wall to a second peg located above the spikes. The Kong must swing from this to reach a wheel connected to a long, yellow bar that stretches across the whole room. When the Kong swings around the wheel, it moves along the bar. The wheel can pull the Kong to a ledge that leads to the second area of the level, or by a tire that they can bounce on to enter a Barrel Cannon; the cannon shoots the Kong into a Bonus Barrel when entered.

At the start of the second part, the Kong can find sets of conveyor belts, peg boards, and a few pegs surrounding a large Peg Board with a Kritter. The Kritter swings on a Spinning Peg in the center, causing several groups of three floating spikes to move around in a circle. The Kong can defeat the Kritter to stop the floating spikes from rotating. Bananas are scattered along some of the conveyor belts in this area as well. If the hero continues upwards, he can find three different pathways that he can travel through: the first pathway can be passed by swinging from a Spinning Peg at the start, the second path involves the Kong climbing up moving pegs to progress, and the third passage requires the Kong to use his "Going Bananas" move to smash through crates. Each path is surrounded by spikes. Once one of the three pathways are crossed, the Kong can find some more conveyor belts and peg boards scattered all around the area. Bananas and floating spikes surround these objects. There is also a lever at the top that opens a gate into the third and final area.
The last section has more conveyor belts and spikes. A long trail of spikes leads over a path of conveyor belts. A crate with a large Banana Bunch in it is at the end of one of the conveyor belt pathways; an optional shortcut can be found by breaking a crate, making a Barrel Cannon at the bottom-right corner available. It can be traveled through by using Barrel Cannons, pegs, and a switch, which can open a gate. Another line of conveyor belts nearby leads farther up the area, where there are more spikes along the walls and floor. The path curves towards a gate that blocks the primate's path. In order to open it, he must break a barrel floating above the spikes to the left. A trio of conveyor belts and a rock are at the other side of the gate, as well as more spikes. The stone can be used to defeat a Kritter spinning on a peg above another conveyor belt and a rock. A second gate blocks the hero's path near here, but it can be opened if the Kong breaks a barrel above some spikes higher up with a rock. A trio of bananas float in the air by this barrel. On the other side of the gate, a Barrel Cannon can be found that shoots the Kong towards other cannons. These Barrel Cannons can send him to a straight path of conveyor belts that leads to another gate. A barrel sits in front of the gate that can be destroyed to open the wall. The exit lies ahead of the gate, and when the primate lands by it, the level is completed, and K. Kruizer III Artillery is unlocked.
Key items[edit]
- Crystal Coconut: Rewarded for completing the Bonus Level.
- Medal: Obtained by taking the shortcut in the third and last section.
Bonus Level[edit]

Donkey Kong has forty seconds to ride a Booster Barrel and collect bananas, which are arranged in circles surrounding the tires. When Donkey Kong gets all the bananas, a Crystal Coconut appears.
Gallery[edit]
The location of the Bonus Barrel
Donkey Kong climbs across a conveyor path


Names in other languages[edit]
| Language | Name | Meaning |
|---|---|---|
| Japanese | キングクルーザーⅢないぶ Kingu kurūzā Ⅲ naibu |
K. Kruizer III Interior |
| Italian | Skafo Korazzata K. III |
K. Kruizer III Hull; scafo (hull) has the "c" replaced with a "k" |