Jelly Jamboree: Difference between revisions
mNo edit summary |
TheRaoul1992 (talk | contribs) No edit summary |
||
| (29 intermediate revisions by 14 users not shown) | |||
| Line 1: | Line 1: | ||
{{ | {{level infobox | ||
|image=[[File:1312-18-Donkey-Kong-Tropical-Freeze-12.jpg| | |image=[[File:1312-18-Donkey-Kong-Tropical-Freeze-12.jpg|250px]] | ||
|code=5 - 5 | |code=5-5 | ||
|world=[[Juicy Jungle]] | |world=[[Juicy Jungle]] | ||
|game=''[[Donkey Kong Country: Tropical Freeze]]'' | |game=''[[Donkey Kong Country: Tropical Freeze]]'' | ||
| | |track=Fruit Bounce | ||
|before=[[Panicky Paddles|<<]] | |before=[[Panicky Paddles|<<]] | ||
|after=[[Frosty Fruits|>>]] [[Platform Problems|^^]] | |after=[[Frosty Fruits|>>]] [[Platform Problems|^^]] | ||
}} | }} | ||
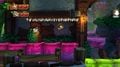
'''Jelly Jamboree''' is the fifth | '''Jelly Jamboree''' is the fifth level of [[Juicy Jungle]] in ''[[Donkey Kong Country: Tropical Freeze]]'' and its Nintendo Switch [[Donkey Kong Country: Tropical Freeze (Nintendo Switch)|port of the same name]]. | ||
The level takes place in a factory cache that stores gelatinous blocks, produced from fruit that had been processed during previous levels. | The level takes place in a factory cache that stores gelatinous blocks, produced from fruit that had been processed during previous levels. In the background at the start of the level is system of glass pipes filled with gelatin. Hoards of '''jelly blocks''',<ref>von Esmarch, Nick, and Cory van Grier. ''Donkey Kong Country: Tropical Freeze'' PRIMA Official Game Guide. Page 24.</ref> the main gimmick of the level, must be bounced on to advance. With purple jelly blocks being the standard type, there are also green ones that help the Kongs gain more height, as well as blue jelly blocks that act as switches to rotate other jelly blocks, so they can be used. Items are usually located inside jelly blocks, and can be retrieved by jumping on any adjacent jelly block. These include [[Banana Bunch]]es, but [[Watermelon Fuse Bomb]]s also appear inside the blocks, and explode shortly after being released. | ||
In [[Donkey Kong Country: Tropical Freeze#Time Attack|Time Attack]] mode, a time of 1:40.00 is required to get a gold medal, a time of 1:54.00 for silver, and a time of 2:08.00 for bronze. | |||
[[ | ==Layout== | ||
The level begins with many purple jelly blocks for the [[Kong]]s to bounce on, along with some bouncing [[Tucks]] infesting the area. A circle of [[banana]]s is above a group of jelly blocks, and it widens and narrows as it moves back and forth. After bouncing from two more jelly blocks (the second of which has a bouncing Tucks) is a [[DK Barrel]] on a platform. After that, the Kongs encounter a series of jelly blobs that have Tucks bouncing on them; some of these jelly blocks contain an item, which comes out when jumped on. The items can be either Bananas, [[Banana Coin]]s, [[heart (item)|heart]]s, or even bombs similar to those carried by certain Snomads. A spiked ceiling is at the end of the section, followed by a few green jelly blocks below. A [[Barrel Cannon]] is above, and it can launch the Kongs onto a wooden ledge above. More jelly blocks follow, this time with blue ones that flip movable platforms when jumped on. The Kongs are required to land on the first blue jelly block for some purple jelly blocks to rotate into view. As they continue, the Kongs encounter some [[Tuffton]]s moving around the purple and green jelly blocks. A few [[Buzzy|Buzzies]] patrol the area. Afterwards, the Kongs are blasted from two skull [[Blast Barrel]]s in a background plane, next to the first [[checkpoint]]. | |||
More | [[File:JellyJamboree2.jpg|thumb|220px|left|DK switches two jelly blocks]] | ||
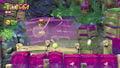
The stage continues to take place in the same plane as the checkpoint. The Kongs must bounce from more jelly blocks and jump from a few platforms carried by [[Hootz]]es. A bouncing Tucks in the distance uses a blue jelly block to switch other blocks in the Kongs' path. Shortly after, the Kongs must enter a [[Blast Barrel]], which blasts them into a pile of jelly blocks. The player must shake the [[Wii#Wii Remote|Wii Remote]] to blast away the pile and have the Kongs continue to the second checkpoint, now located in a foreground plane. | |||
More bouncing Tucks appear, followed by another Blast Barrel which ricochets the Kongs into a few jellies. The path ahead is strewn with more Tufftons, along with a few vines, and some additional jelly blocks. After passing a platform, a few more blocks and vines appear, as well as some Barrel Cannons leading between two massive wooden ducts processing jelly. The [[Slot Machine Barrel]] is directly above several obstructing blocks flipped by bouncing Tucks. | |||
{{br}} | {{br}} | ||
==Collectibles== | ==Collectibles== | ||
=== | ===KONG Letters=== | ||
*K: Upon entering the first Barrel Cannon, the Kongs must time their launch to obtain the letter K. | *K: Upon entering the first Barrel Cannon, the Kongs must time their launch to obtain the letter K. | ||
*O: When reaching a blue | *O: When reaching a blue jelly block on the bottom, the Kongs must make sure that the upper purple jelly block is accessible, then bounce on it and move over to the left to obtain the letter O. | ||
*N: Upon reaching the first checkpoint, the Kongs must head left and bounce on the | *N: Upon reaching the first checkpoint, the Kongs must head left and bounce on the jelly blocks to obtain the letter N. | ||
*G: After jumping from the first vine, the Kongs must bounce on the green | *G: After jumping from the first vine, the Kongs must bounce on the green jelly blocks immediately after to reveal the letter G. | ||
===Puzzle Pieces=== | ===Puzzle Pieces=== | ||
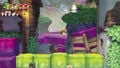
[[File: | [[File:JellyJamboree1.jpg|thumb|220px|The skull [[Blast Barrel]] that leads the Kongs to the third Puzzle Piece can be seen under a [[Puffton]].]] | ||
#Immediately at the start of the level, the Kongs must head left and hit a | #Immediately at the start of the level, the Kongs must head left and hit a jelly block to reveal the [[Puzzle Piece (Donkey Kong Country series)|Puzzle Piece]]. | ||
#Upon reaching the end of an elevated set of | #Upon reaching the end of an elevated set of jelly blocks, the Kongs must jump up and climb up a hidden grassy alcove at the top right and pound a [[Container#Donkey Kong Country: Tropical Freeze|Flower Bulb]] to collect the Puzzle Piece. | ||
#Immediately after the letter O, the Kongs must take out a [[Puffton]] and enter a skull Blast Barrel directly below it to be led to a [[Bonus Area]]. As with all other Bonus Areas, the Kongs must collect all bananas before time runs out to get the Puzzle Piece. | #Immediately after the letter O, the Kongs must take out a [[Puffton]] and enter a skull Blast Barrel directly below it to be led to a [[Bonus Area]]. As with all other Bonus Areas, the Kongs must collect all bananas before time runs out to get the Puzzle Piece. | ||
#Upon reaching two consecutive blue | #Upon reaching two consecutive blue jelly blocks, the Kongs must activate the second one, and bounce high enough to reach a platform with the Puzzle Piece on it. | ||
#The Kongs must collect the first nine bananas after the second checkpoint, then collect nine more to reveal the Puzzle Piece. | #The Kongs must collect the first nine bananas after the second checkpoint, then collect nine more to reveal the Puzzle Piece. | ||
#Upon reaching the first [[Tuff Tucks]], located just after the letter G, the Kongs must throw it at a [[Burlap Hanging Sack]] to reveal the Puzzle Piece. | #Upon reaching the first [[Tuff Tucks]], located just after the letter G, the Kongs must throw it at a [[Burlap Hanging Sack]] to reveal the Puzzle Piece. | ||
#Not too long after passing some Tufftons and bouncing on some | #Not too long after passing some Tufftons and bouncing on some jelly blocks to a platform, the Kongs must pound a container on the platform's underside to reveal the Puzzle Piece. | ||
==Enemies== | ==Enemies== | ||
*[[Hootz]]es | *[[Hootz]]es | ||
*[[ | *[[Tucks]] (bouncing) | ||
*[[Buzzy|Buzzies]] | *[[Buzzy|Buzzies]] | ||
*[[Tuffton]]s | *[[Tuffton]]s | ||
*[[Puffton]]s | *[[Puffton]]s | ||
*[[Tuff Tucks]] | *[[Tuff Tucks]] | ||
==Gallery== | ==Gallery== | ||
<gallery> | <gallery> | ||
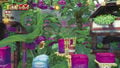
DKCTF Jelly Block purple Prima.jpg|Purple | 1312-18-Donkey-Kong-Tropical-Freeze-11.jpg|Donkey Kong and Cranky near a ceiling with spikes | ||
DKCTF Jelly Block green Prima.jpg|Green | DKCTF Jelly Block purple Prima.jpg|Purple jelly blocks | ||
DKCTF Jelly Block blue Prima.jpg|A blue | DKCTF Jelly Block green Prima.jpg|Green jelly blocks | ||
DKCTF Jelly Block blue Prima.jpg|A blue jelly block | |||
</gallery> | </gallery> | ||
==Names in other languages== | ==Additional names== | ||
===Internal names=== | |||
{{internal names | |||
|game1=''[[Donkey Kong Country: Tropical Freeze]]'' | |||
|file1=<tt>content/Worlds/w05_juice/l05_juice_bounce.pak</tt> | |||
|name1=l05_juice_bounce.pak | |||
|meaning1=Juice Level 5: Bounce | |||
}} | |||
===Names in other languages=== | |||
{{foreign names | {{foreign names | ||
|Jap=ゼリートランポリン | |Jap=ゼリートランポリン | ||
|JapR=Zerī Toranporin | |JapR=Zerī Toranporin | ||
|JapM=Jelly Trampoline | |JapM=Jelly Trampoline | ||
|SpaA=Gelatina saltarina | |||
|SpaAM=Jumping Jelly | |||
|Ger=Gelee Fatal | |||
|GerM=Jelly Fatal | |||
|Ita=Gelatina Gelatosa | |||
|ItaM=Ice Cream-y/Gelatinous Jelly | |||
}} | }} | ||
== | ==References== | ||
<references/> | <references/> | ||
{{ | |||
{{DKCTF}} | |||
[[Category:Donkey Kong Country: Tropical Freeze | [[Category:Jungles]] | ||
[[Category:Food areas]] | |||
[[Category:Donkey Kong Country: Tropical Freeze levels]] | |||
Latest revision as of 22:55, February 2, 2024
| Level | |
|---|---|
| Jelly Jamboree | |

| |
| Level code | 5-5 |
| World | Juicy Jungle |
| Game | Donkey Kong Country: Tropical Freeze |
| Music track | Fruit Bounce |
| << Directory of levels >> ^^ | |
Jelly Jamboree is the fifth level of Juicy Jungle in Donkey Kong Country: Tropical Freeze and its Nintendo Switch port of the same name.
The level takes place in a factory cache that stores gelatinous blocks, produced from fruit that had been processed during previous levels. In the background at the start of the level is system of glass pipes filled with gelatin. Hoards of jelly blocks,[1] the main gimmick of the level, must be bounced on to advance. With purple jelly blocks being the standard type, there are also green ones that help the Kongs gain more height, as well as blue jelly blocks that act as switches to rotate other jelly blocks, so they can be used. Items are usually located inside jelly blocks, and can be retrieved by jumping on any adjacent jelly block. These include Banana Bunches, but Watermelon Fuse Bombs also appear inside the blocks, and explode shortly after being released.
In Time Attack mode, a time of 1:40.00 is required to get a gold medal, a time of 1:54.00 for silver, and a time of 2:08.00 for bronze.
Layout[edit]
The level begins with many purple jelly blocks for the Kongs to bounce on, along with some bouncing Tucks infesting the area. A circle of bananas is above a group of jelly blocks, and it widens and narrows as it moves back and forth. After bouncing from two more jelly blocks (the second of which has a bouncing Tucks) is a DK Barrel on a platform. After that, the Kongs encounter a series of jelly blobs that have Tucks bouncing on them; some of these jelly blocks contain an item, which comes out when jumped on. The items can be either Bananas, Banana Coins, hearts, or even bombs similar to those carried by certain Snomads. A spiked ceiling is at the end of the section, followed by a few green jelly blocks below. A Barrel Cannon is above, and it can launch the Kongs onto a wooden ledge above. More jelly blocks follow, this time with blue ones that flip movable platforms when jumped on. The Kongs are required to land on the first blue jelly block for some purple jelly blocks to rotate into view. As they continue, the Kongs encounter some Tufftons moving around the purple and green jelly blocks. A few Buzzies patrol the area. Afterwards, the Kongs are blasted from two skull Blast Barrels in a background plane, next to the first checkpoint.

The stage continues to take place in the same plane as the checkpoint. The Kongs must bounce from more jelly blocks and jump from a few platforms carried by Hootzes. A bouncing Tucks in the distance uses a blue jelly block to switch other blocks in the Kongs' path. Shortly after, the Kongs must enter a Blast Barrel, which blasts them into a pile of jelly blocks. The player must shake the Wii Remote to blast away the pile and have the Kongs continue to the second checkpoint, now located in a foreground plane.
More bouncing Tucks appear, followed by another Blast Barrel which ricochets the Kongs into a few jellies. The path ahead is strewn with more Tufftons, along with a few vines, and some additional jelly blocks. After passing a platform, a few more blocks and vines appear, as well as some Barrel Cannons leading between two massive wooden ducts processing jelly. The Slot Machine Barrel is directly above several obstructing blocks flipped by bouncing Tucks.
Collectibles[edit]
KONG Letters[edit]
- K: Upon entering the first Barrel Cannon, the Kongs must time their launch to obtain the letter K.
- O: When reaching a blue jelly block on the bottom, the Kongs must make sure that the upper purple jelly block is accessible, then bounce on it and move over to the left to obtain the letter O.
- N: Upon reaching the first checkpoint, the Kongs must head left and bounce on the jelly blocks to obtain the letter N.
- G: After jumping from the first vine, the Kongs must bounce on the green jelly blocks immediately after to reveal the letter G.
Puzzle Pieces[edit]

- Immediately at the start of the level, the Kongs must head left and hit a jelly block to reveal the Puzzle Piece.
- Upon reaching the end of an elevated set of jelly blocks, the Kongs must jump up and climb up a hidden grassy alcove at the top right and pound a Flower Bulb to collect the Puzzle Piece.
- Immediately after the letter O, the Kongs must take out a Puffton and enter a skull Blast Barrel directly below it to be led to a Bonus Area. As with all other Bonus Areas, the Kongs must collect all bananas before time runs out to get the Puzzle Piece.
- Upon reaching two consecutive blue jelly blocks, the Kongs must activate the second one, and bounce high enough to reach a platform with the Puzzle Piece on it.
- The Kongs must collect the first nine bananas after the second checkpoint, then collect nine more to reveal the Puzzle Piece.
- Upon reaching the first Tuff Tucks, located just after the letter G, the Kongs must throw it at a Burlap Hanging Sack to reveal the Puzzle Piece.
- Not too long after passing some Tufftons and bouncing on some jelly blocks to a platform, the Kongs must pound a container on the platform's underside to reveal the Puzzle Piece.
Enemies[edit]
Gallery[edit]
Donkey Kong and Cranky near a ceiling with spikes
Purple jelly blocks
Green jelly blocks
A blue jelly block


Additional names[edit]
Internal names[edit]
| Game | File | Name | Meaning
|
|---|---|---|---|
| Donkey Kong Country: Tropical Freeze | content/Worlds/w05_juice/l05_juice_bounce.pak | l05_juice_bounce.pak | Juice Level 5: Bounce |
Names in other languages[edit]
| Language | Name | Meaning |
|---|---|---|
| Japanese | ゼリートランポリン Zerī Toranporin |
Jelly Trampoline |
| German | Gelee Fatal |
Jelly Fatal |
| Italian | Gelatina Gelatosa |
Ice Cream-y/Gelatinous Jelly |
| Spanish (NOA) | Gelatina saltarina |
Jumping Jelly |
References[edit]
- ^ von Esmarch, Nick, and Cory van Grier. Donkey Kong Country: Tropical Freeze PRIMA Official Game Guide. Page 24.