Rope Bridge Rumble: Difference between revisions
mNo edit summary |
No edit summary |
||
| (21 intermediate revisions by 8 users not shown) | |||
| Line 1: | Line 1: | ||
{{more images| | {{more images|the first Bonus Level}} | ||
{{ | {{DKC level infobox | ||
|image=[[File:Rope Bridge Rumble 3.png]] | |image=[[File:Rope Bridge Rumble 3.png]] | ||
|code=4 - 6 (SNES)<br>4 - 5 (GBA) | |code=4 - 6 (SNES & GBC)<br>4 - 5 (GBA) | ||
|game=''[[Donkey Kong Country]] | |game=''[[Donkey Kong Country]] | ||
| | |before2=[[Torchlight Trouble|<<]] | ||
| | |after2=[[Really Gnawty Rampage|>>]] | ||
| | |before3=[[Ice Age Alley|<<]] | ||
| | |after3=[[Torchlight Trouble|>>]] | ||
| | |track=Treetop Rock | ||
}} | }} | ||
'''Rope Bridge Rumble''' is the twenty-second level of ''[[Donkey Kong Country]]'' and the sixth and final level of [[Gorilla Glacier]]. In the [[Game Boy Advance]] | '''Rope Bridge Rumble''' is the twenty-second level of ''[[Donkey Kong Country]]'' and the sixth and final level of [[Gorilla Glacier]]. In the [[Donkey Kong Country (Game Boy Advance)|Game Boy Advance version]], the level switched positions with [[Torchlight Trouble]], making it the fifth level of Gorilla Glacier and the twenty-first level overall. Rope Bridge Rumble is a treetop level that has a light blue background compared to that of Tree Top Town. Throughout the level, [[Donkey Kong]] and [[Diddy Kong]] must bounce from several [[tire (object)|tire]]s to get across abysses. Many of the tires are on moving platforms, and some of them are out of reach. Like most levels, the [[Kong]]s encounter several [[Zinger]]s in the air and around the gaps. They encounter bouncing yellow and regular [[Kritter]]s on land, as well as a few [[Army|Armies]]. An [[animal crate]] of [[Winky]] is at the end of the first [[Bonus Level]], and the Kongs can ride him to the end of the level. | ||
Rope Bridge Rumble is | |||
==Layout== | ==Layout== | ||
[[File:Rope Bridge Rumble | {{multiframe|[[File:RopeBridgeRumble-GBC-1.png]] [[File:RopeBridgeRumble-GBA-1.png|180px]]|Rope Bridge Rumble's appearance in the Game Boy Color version, top, and the Game Boy Advance version, bottom|align=left|size=200}} | ||
At the beginning of the level, the primates travel along several wooden planks that surround a tree. A gap with stationary platform supporting a tire within it follows. They can use the platform to their advantage by crossing the large gap with it. A Kritter marches on a solid bridge platform next to a ledge with another tire at the top of it. The Kongs must use the tire to bounce over a wide abyss and land on a separate platform with a third tire on it. As the heroes travel along this platform, an Army attacks them. They can reach a platform placed at a higher elevation with the assistance of a rubber tire protruding from the ground. This platform holds another tire that stands at the edge of it. An additional tire is placed on the following platform after a small gap. A platform supporting a tire floats inside of the gap. The [[ | At the beginning of the level, the primates travel along several wooden planks that surround a tree. A gap with stationary platform supporting a tire within it follows. They can use the platform to their advantage by crossing the large gap with it. A Kritter marches on a solid bridge platform next to a ledge with another tire at the top of it. The Kongs must use the tire to bounce over a wide abyss and land on a separate platform with a third tire on it. As the heroes travel along this platform, an Army attacks them. They can reach a platform placed at a higher elevation with the assistance of a rubber tire protruding from the ground. This platform holds another tire that stands at the edge of it. An additional tire is placed on the following platform after a small gap. A platform supporting a tire floats inside of the gap. The [[KONG Letters|letter K]] hovers above it, while a Zinger orbits the platform. | ||
Once they cross the gap and cross the area of planks, they can find a tire at the edge of the bridge. It can be used to cross an abyss just ahead with a Zinger flying above it. Another Zinger can be discovered orbiting a platform with a tire on it in the next abyss. The bridge platform following this has an additional tire at the end of it after a small ledge. The tire is required to reach a higher piece of ground, where another tire can be found. A gap is immediately after the tire with a small platform in it. A Zinger surrounds this platform, trying to attack the Kongs when they approach. Once the gap is crossed, the duo can find a [[DK Barrel]] wobbling on a bridge platform. A wide abyss is ahead with four platforms in it. A tire stands on each platform, and Zingers orbit some of them. The objects can be used to cross the pit and reach a bridge platform with some [[banana]]s hovering over it. Another platform like this just after a small gap holds the level's [[Star Barrel]]. | Once they cross the gap and cross the area of planks, they can find a tire at the edge of the bridge. It can be used to cross an abyss just ahead with a Zinger flying above it. Another Zinger can be discovered orbiting a platform with a tire on it in the next abyss. The bridge platform following this has an additional tire at the end of it after a small ledge. The tire is required to reach a higher piece of ground, where another tire can be found. A gap is immediately after the tire with a small platform in it. A Zinger surrounds this platform, trying to attack the Kongs when they approach. Once the gap is crossed, the duo can find a [[DK Barrel]] wobbling on a bridge platform. A wide abyss is ahead with four platforms in it. A tire stands on each platform, and Zingers orbit some of them. The objects can be used to cross the pit and reach a bridge platform with some [[banana]]s hovering over it. Another platform like this just after a small gap holds the level's [[Star Barrel|Continue Barrel]]. | ||
After passing the barrel, the heroes discover a small gap with a Kritter bouncing along the edges of it. The letter O floats in the pit. Two bridge platforms are ahead, and they are both connected by a long, straight bridge with several bananas on it. The bananas are too high up to reach with a jump, but the two friends can get to them if they bounce on a nearby tire to land on a platform that moves under them. After the second bridge platform, they approach another gap with two Kritters hopping over it. A Banana Bunch is suspended over the pit, which is followed by a bridge platform supporting a Kritter. A platform holding a bouncy tire moves back and forth in a horizontal path in the abyss to the right of here. The letter N is located in the air above it. On the opposite side of the abyss, the heroes can find a bridge platform with another gap on the other side of it. The gap must be crossed with the use of two moving platforms that support tires. | After passing the barrel, the heroes discover a small gap with a Kritter bouncing along the edges of it. The letter O floats in the pit. Two bridge platforms are ahead, and they are both connected by a long, straight bridge with several bananas on it. The bananas are too high up to reach with a jump, but the two friends can get to them if they bounce on a nearby tire to land on a platform that moves under them. After the second bridge platform, they approach another gap with two Kritters hopping over it. A Banana Bunch is suspended over the pit, which is followed by a bridge platform supporting a Kritter. A platform holding a bouncy tire moves back and forth in a horizontal path in the abyss to the right of here. The letter N is located in the air above it. On the opposite side of the abyss, the heroes can find a bridge platform with another gap on the other side of it. The gap must be crossed with the use of two moving platforms that support tires. | ||
| Line 28: | Line 23: | ||
==Enemies== | ==Enemies== | ||
The following enemies appear in the following quantities: | |||
<gallery> | |||
Army_DKC_sprite.png|[[Army]] (3) | |||
Kritter_DKC_green.png|[[Kritter]] (green) (4) | |||
Kritter-yellow-DKC.png|Kritter (yellow) (5) | |||
Zinger-orange-DKC.png|[[Zinger]] (orange) (7) | |||
Zinger-pink-DKC.png|Zinger (red) (5) | |||
</gallery> | |||
| | |||
| | |||
==Items and objects== | ==Items and objects== | ||
The following items and objects appear in the following quantities: | |||
<gallery> | |||
Banana DKC SNES.png|[[Banana]] (106) | |||
DK Barrel DKC.png|[[DK Barrel]] (3) | |||
Expresso Token Sprite SNES.png|[[Expresso]] [[Animal token|token]] | |||
Rambi Token Sprite SNES.png|[[Rambi]] token (second Bonus Level) | |||
Winky Token Sprite SNES.png|[[Winky]] token (second Bonus Level) | |||
Enguarde Token Sprite SNES.png|[[Enguarde]] token (second Bonus Level) | |||
Vine Barrel DKC.png|[[Vine Barrel]] (1) | |||
</gallery> | |||
===K-O-N-G Letters=== | ===K-O-N-G Letters=== | ||
[[File:RopeBridgeRumble-SNES-1.png|thumb|The location of the letter K]] | |||
*'''K:''' A Zinger orbits the letter K, which is on top of a tire on a platform in the fourth abyss. | |||
*'''O:''' Just after the Continue Barrel, the Kongs can roll jump into a gap to collect the letter O under a bouncing Kritter. | |||
*'''N:''' At the third gap from the Continue Barrel, the Kongs must bounce from a round tire on a horizontally-moving platform to reach the letter N. | |||
*'''G:''' The letter G hovers in a gap between a pair of platforms between two bouncing Kritters; the right platform has an arrow sign which indicates the nearby level exit. Like the letter O, the Kongs must perform a roll jump to safely collect the letter. | |||
===Key items=== | |||
*'''[[Photograph]]''' (Game Boy Advance version only): After the first [[Bonus Barrel]], the Kongs must pass two Armys and bounce left from a half tire to the very right. By doing so, they can get a [[photograph]] hidden in midair. The photograph shows a group picture of the Kongs in a treetop village in the fifteenth page of the [[Scrapbook (Donkey Kong Country series)|Scrapbook]]. | |||
{{br}} | |||
==Bonus Levels== | ==Bonus Levels== | ||
[[File:RopeBridgeRumble-GBC-2.png|thumb|The second Bonus Level in the Game Boy Color version]] | |||
| | Rope Bridge Rumble has two Bonus Levels, listed by their type in the Game Boy Advance version: | ||
*'''''Find the Exit!''''': After encountering the first Kritter, the Kongs must jump down into the second pit in the level to land into the first [[Bonus Barrel]]. In the [[Bonus Level]], the Kongs must bounce from six half tires each on a small platform to bounce up to sets of nine bananas arranged in a square shape. An [[animal crate]] of Winky is on a platform to the very right, in front of the exit. | |||
*'''''Stop the Barrel!''''': After the letter G, the Kongs must bounce from a round tire on a horizontally-moving platform. When the platform goes to the rightmost part of its set path, the Kongs can bounce up into the Bonus Barrel. Alternatively, they can bounce from the second moving platform below to reach a banana and enter a Bonus Barrel. In the Bonus Level, the Kongs must jump at three barrels to match either of the four [[animal token]]s on each of them. By doing so, the Kongs are awarded with that animal token. The Kongs return into the main level after either winning or losing the challenge. | |||
==Gallery== | ==Gallery== | ||
<gallery> | <gallery> | ||
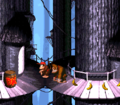
RopeBridgeRumble- | Rope Bridge Rumble.png|The start of the level | ||
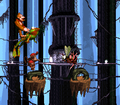
RopeBridgeRumble-GBA-2.png | RopeBridgeRumble-SNES-2.png|The Kongs and Winky jumping from a tire | ||
Rope Bridge Rumble 2.png|The location of the letter O | |||
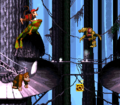
RopeBridgeRumble-GBA-2.png|Winky and the Kongs jumping toward a Zinger in the Game Boy Advance version | |||
</gallery> | </gallery> | ||
==Names in other languages== | ==Names in other languages== | ||
{{foreign names | {{foreign names | ||
|Jap=もりのかくれが2 | |Jap=もりのかくれが2 | ||
|JapR=Mori no kakurega 2 | |JapR=Mori no kakurega 2 | ||
| Line 135: | Line 78: | ||
|Spa=Puente de Cuerda | |Spa=Puente de Cuerda | ||
|SpaM=Rope Bridge | |SpaM=Rope Bridge | ||
| | |Fre=Grondement du Pont à Cordes (SNES)<br>Pont Fracas (GBC) | ||
| | |FreM=Rumble of the Rope Bridge<br>Fracas Bridge | ||
|Ger=Selbstgestrickte Brücken (SNES)<br | |Ger=Selbstgestrickte Brücken (SNES)<br>Gestrickte Brücken (GBC) | ||
|GerM=Hand-Knit Bridges<br | |GerM=Hand-Knit Bridges<br>Knitted Bridges | ||
|Ita=Ponti di Corda | |Ita=Ponti di Corda | ||
|ItaM=Rope Bridges | |ItaM=Rope Bridges | ||
}} | }} | ||
{{DKC | {{DKC levels}} | ||
[[Category:Forests | [[Category:Forests]] | ||
[[Category: | [[Category:Towns]] | ||
[[Category:Donkey Kong Island]] | [[Category:Donkey Kong Island]] | ||
[[Category:Donkey Kong Country | [[Category:Donkey Kong Country levels]] | ||
Latest revision as of 14:29, January 20, 2024
It has been requested that more images be uploaded for this article. Remove this notice only after the additional image(s) have been added. Reason: the first Bonus Level
| Level | |
|---|---|
| Rope Bridge Rumble | |

| |
| Level code | 4 - 6 (SNES & GBC) 4 - 5 (GBA) |
| Game | Donkey Kong Country |
| Music track | Treetop Rock |
| << Directory of levels (SNES & GBC) >> | |
| << Directory of levels (GBA) >> | |
Rope Bridge Rumble is the twenty-second level of Donkey Kong Country and the sixth and final level of Gorilla Glacier. In the Game Boy Advance version, the level switched positions with Torchlight Trouble, making it the fifth level of Gorilla Glacier and the twenty-first level overall. Rope Bridge Rumble is a treetop level that has a light blue background compared to that of Tree Top Town. Throughout the level, Donkey Kong and Diddy Kong must bounce from several tires to get across abysses. Many of the tires are on moving platforms, and some of them are out of reach. Like most levels, the Kongs encounter several Zingers in the air and around the gaps. They encounter bouncing yellow and regular Kritters on land, as well as a few Armies. An animal crate of Winky is at the end of the first Bonus Level, and the Kongs can ride him to the end of the level.
Layout[edit]


At the beginning of the level, the primates travel along several wooden planks that surround a tree. A gap with stationary platform supporting a tire within it follows. They can use the platform to their advantage by crossing the large gap with it. A Kritter marches on a solid bridge platform next to a ledge with another tire at the top of it. The Kongs must use the tire to bounce over a wide abyss and land on a separate platform with a third tire on it. As the heroes travel along this platform, an Army attacks them. They can reach a platform placed at a higher elevation with the assistance of a rubber tire protruding from the ground. This platform holds another tire that stands at the edge of it. An additional tire is placed on the following platform after a small gap. A platform supporting a tire floats inside of the gap. The letter K hovers above it, while a Zinger orbits the platform.
Once they cross the gap and cross the area of planks, they can find a tire at the edge of the bridge. It can be used to cross an abyss just ahead with a Zinger flying above it. Another Zinger can be discovered orbiting a platform with a tire on it in the next abyss. The bridge platform following this has an additional tire at the end of it after a small ledge. The tire is required to reach a higher piece of ground, where another tire can be found. A gap is immediately after the tire with a small platform in it. A Zinger surrounds this platform, trying to attack the Kongs when they approach. Once the gap is crossed, the duo can find a DK Barrel wobbling on a bridge platform. A wide abyss is ahead with four platforms in it. A tire stands on each platform, and Zingers orbit some of them. The objects can be used to cross the pit and reach a bridge platform with some bananas hovering over it. Another platform like this just after a small gap holds the level's Continue Barrel.
After passing the barrel, the heroes discover a small gap with a Kritter bouncing along the edges of it. The letter O floats in the pit. Two bridge platforms are ahead, and they are both connected by a long, straight bridge with several bananas on it. The bananas are too high up to reach with a jump, but the two friends can get to them if they bounce on a nearby tire to land on a platform that moves under them. After the second bridge platform, they approach another gap with two Kritters hopping over it. A Banana Bunch is suspended over the pit, which is followed by a bridge platform supporting a Kritter. A platform holding a bouncy tire moves back and forth in a horizontal path in the abyss to the right of here. The letter N is located in the air above it. On the opposite side of the abyss, the heroes can find a bridge platform with another gap on the other side of it. The gap must be crossed with the use of two moving platforms that support tires.
As they travel on the platforms, Zingers stand in their way. In the center of the gap, they can discover a stationary platform with a DK Barrel on it. Once the primates walk across the bridge platform on the other side of this abyss, they can find another gap that is much smaller. As before, two Kritters hop over it, and the letter G hovers above it. Another bridge platform is ahead of here with a sign on it that indicates that the level is almost over. A barrel sits on a raised part of the bridge. In a wide gap located east of here, the Kongs can find three platforms that move back and forth in a horizontal path. Each platform holds a bouncy tire, and they must be used to cross the whole abyss. Once it is passed, Donkey and Diddy find themselves on a bridge platform with a ledge on it. An Army waits to attack them at the top of the ledge. A wide pit follows with a wall of three Zingers within it. Using a moving platform with a lone tire on it, the two primates must bounce over the wall and make their way onto a pair of bridge platforms with an exit sign between them. If the heroes enter the hut to the right of the sign, they complete the level.
Enemies[edit]
The following enemies appear in the following quantities:


Items and objects[edit]
The following items and objects appear in the following quantities:

Banana (106)

DK Barrel (3)

Rambi token (second Bonus Level)

Winky token (second Bonus Level)

Enguarde token (second Bonus Level)

Vine Barrel (1)


K-O-N-G Letters[edit]

- K: A Zinger orbits the letter K, which is on top of a tire on a platform in the fourth abyss.
- O: Just after the Continue Barrel, the Kongs can roll jump into a gap to collect the letter O under a bouncing Kritter.
- N: At the third gap from the Continue Barrel, the Kongs must bounce from a round tire on a horizontally-moving platform to reach the letter N.
- G: The letter G hovers in a gap between a pair of platforms between two bouncing Kritters; the right platform has an arrow sign which indicates the nearby level exit. Like the letter O, the Kongs must perform a roll jump to safely collect the letter.
Key items[edit]
- Photograph (Game Boy Advance version only): After the first Bonus Barrel, the Kongs must pass two Armys and bounce left from a half tire to the very right. By doing so, they can get a photograph hidden in midair. The photograph shows a group picture of the Kongs in a treetop village in the fifteenth page of the Scrapbook.
Bonus Levels[edit]

Rope Bridge Rumble has two Bonus Levels, listed by their type in the Game Boy Advance version:
- Find the Exit!: After encountering the first Kritter, the Kongs must jump down into the second pit in the level to land into the first Bonus Barrel. In the Bonus Level, the Kongs must bounce from six half tires each on a small platform to bounce up to sets of nine bananas arranged in a square shape. An animal crate of Winky is on a platform to the very right, in front of the exit.
- Stop the Barrel!: After the letter G, the Kongs must bounce from a round tire on a horizontally-moving platform. When the platform goes to the rightmost part of its set path, the Kongs can bounce up into the Bonus Barrel. Alternatively, they can bounce from the second moving platform below to reach a banana and enter a Bonus Barrel. In the Bonus Level, the Kongs must jump at three barrels to match either of the four animal tokens on each of them. By doing so, the Kongs are awarded with that animal token. The Kongs return into the main level after either winning or losing the challenge.
Gallery[edit]
The start of the level
The Kongs and Winky jumping from a tire
The location of the letter O

Winky and the Kongs jumping toward a Zinger in the Game Boy Advance version


Names in other languages[edit]
| Language | Name | Meaning |
|---|---|---|
| Japanese | もりのかくれが2 Mori no kakurega 2 |
Forest Hideout #2 |
| French | Grondement du Pont à Cordes (SNES) Pont Fracas (GBC) |
Rumble of the Rope Bridge Fracas Bridge |
| German | Selbstgestrickte Brücken (SNES) Gestrickte Brücken (GBC) |
Hand-Knit Bridges Knitted Bridges |
| Italian | Ponti di Corda |
Rope Bridges |
| Spanish | Puente de Cuerda |
Rope Bridge |