Platform Perils: Difference between revisions
(don't think this section is require since it mentioned above) |
|||
| (69 intermediate revisions by 36 users not shown) | |||
| Line 1: | Line 1: | ||
{{ | {{rewrite-expand|add captions to the gallery}} | ||
{{level | {{about|the last non-boss level of ''[[Donkey Kong Country]]''|the ''[[Mario Party]]'' and ''[[Mario Party 2]]'' [[minigame]]|[[Platform Peril]]}} | ||
{{level infobox | |||
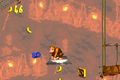
|image=[[ | |image=[[File:Platform Perils DKC screenshot.png]] | ||
|code=6 - 5 (SNES & GBA)<br>6 - 6 (GBC) | |code=6 - 5 (SNES & GBA)<br>6 - 6 (GBC) | ||
|game=''[[Donkey Kong Country]] | |game=''[[Donkey Kong Country]] | ||
|before=[[Loopy Lights|<<]] | |before=[[Loopy Lights|<<]] | ||
|after=[[ | |after=[[Necky's Revenge|>>]] | ||
|track=Life in the Mines | |||
}} | }} | ||
'''Platform Perils''' is the thirty-third and final level | '''Platform Perils''' is the thirty-third level and final non-boss level in ''[[Donkey Kong Country]]''. It is also the final level of [[Chimp Caverns]]. In the [[Donkey Kong Country (Game Boy Color)|Game Boy Color version]], Platform Perils is the thirty-fourth level, as the result of the remake's new level, [[Necky Nutmare]]. Platform Perils is a walkway level with several challenges. As the name suggests, [[Donkey Kong]] and [[Diddy Kong]] primarily traverse the level by moving on small arrow platforms, which previously appeared in [[Blackout Basement]]. The level features gray [[Krusha]]s, which are usually on the arrow platforms, and can only be defeated from having a [[barrel]] thrown at it. They can throw a nearby [[Vine Barrel]] at them to defeat them (or [[TNT Barrel|TNT Drum]]s in the European version). The first part of Platform Perils involves going across the walkways, with [[Army|Armies]] and [[Klump]]s appearing along the way. Later on, the rest of the level takes place on moving arrow platforms, most of which are guarded by gray Krushas. | ||
==Layout== | |||
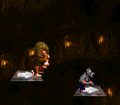
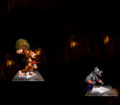
{{multiframe|[[File:PlatformPerils GBC 3.png]] [[File:PlatformPerils GBA 2.png|180px]]|Platform Perils' appearance in the Game Boy Color version, top, and the Game Boy Advance version, bottom|align=left|size=200}} | |||
The Kongs begin the level on a set of long scaffolds that also support a [[barrel]] and a Krusha. A black platform floats in an abyss ahead that begins to pull them to a slanted platform when landed on. The primates are attacked by an Army as they walk up the pathway, which is followed by another scaffold that holds another Army, a barrel, and the level's first [[DK Barrel]]. Two black platforms float in an abyss immediately after here that can take them over and up to another set of scaffolds with a trio of Klumps on them. A trail of [[banana]]s to the right of the scaffolds with the [[KONG Letters|letter K]] between them leads the heroes down to a black platform that can pull them back upwards. Two more black platforms are ahead, with a Zinger before each of them. The first platform carries them downwards, and then the second one carries them to a long scaffold after a Zinger. Another scaffold floats near here with a pair of Armies on it. This is followed by a wide abyss that can be crossed with the help of a black platform that moves upwards when landed on. A small scaffold with two more black platforms next to it in another abyss is after this pit. A Zinger flies around both sides of the two platform, which both descend and then fall when touched. The primates can find two scaffolds holding some Armies ahead of here. An abyss follows the scaffolds, but it can be crossed with the use of a black platform that moves downwards when touched and a Necky that they can bounce on. On the other side of this pit, the duo can find two large scaffolds with a smaller one hanging above them that supports two Armies. An abyss nearby consists of four black platforms that move downwards when the heroes land on them, and several Zinger fly among each of them. After passing the abyss, the heroes reach a small scaffold holding a barrel that is followed by two groups of two scaffolds with Armies on them. A smaller, slanted scaffold hangs after these platforms, and it is followed by a black platform that pulls the heroes downwards to the letter O and another scaffold that hangs under the level's [[Star Barrel|Continue Barrel]], which is orbited by a Zinger. | |||
After passing this barrel, the primates reach a large abyss that can be fully crossed with a black platform that moves to the east when landed on. As they ride along it, they travel under another black platform with a DK Barrel above it. This platform moves downwards when landed on. The primates soon make their way onto a small scaffold holding an Army. A trail of bananas next to here leads them down onto a black platform with a Gnawty on it. This platform pulls the two friends east past a Zinger who orbits the letter N. After the primates ride on another black platform that pulls them eastward nearby, they can reach a platform that carries them north, which supports a Gnawty. Another black platform with a Gnawty on it can be reached with the previous platform. It guides the heroes to another black platform holding a Gnawty. This platform pulls them to the east, where a Klump can be found walking on a black platform that falls when landed on by the Kongs. They can find a slanted scaffold immediately after the enemy with another Klump on it, who is followed by a tire sticking out of a smaller scaffold. It can bounce them to another scaffold holding a tire, which can then help them reach a wide abyss containing four black platforms that fall when landed on by the Kongs. Gnawties walk along each of them, and the primates can avoid making the platforms drop by bouncing on these foes. After crossing the abyss, the heroes reach a pair of scaffolds, both supporting a barrel, with a Zinger between them. | |||
Another abyss follows the scaffolds, and the primates can only cross it with the use of a black platform, which is blocked by a gray Krusha, whom the Kongs can only defeat by hitting it with a barrel. On the small scaffold after this pit, a sign indicating that the level is almost over can be found. In another huge abyss to the right of here, a black platform that travels east when landed on can be discovered next to a Zinger. The platform pulls them past a trail of bananas onto another platform that leads them farther east once activated. The platform supports barrel, which must be used to defeat a gray Krusha blocking the next platform located nearby. This platform can guide the duo upwards to a tire, which can bounce them onto another platform that pulls them farther upwards when touched. A barrel sits on it, which must be used to defeat a gray Krusha standing on the next platform. Once the primates get on this platform, they are guided to the east again, where they find another platform holding a barrel. | |||
A Zinger flies in front of the platform, which begins to pull them back downwards when landed on. Soon, the Kongs encounter another gray Krusha on a black platform that moves to the east when touched. The primates can use the previously mentioned barrel to defeat it and progress onto the platform, which leads them to another platform holding nothing but a barrel. This platform falls down when landed on, forcing the Kongs to continue on the previous platform. A Krusha stands on the next black platform, but once the primates defeat it, they can safely reach it to be taken towards a tire. This tire can help them get onto another platform that can pull them to the west, where the letter G and the next platform can be discovered. This platform, supporting a barrel, can be used to travel to the east, where a Gnawty can be found on a platform that descends when landed on. A long set of scaffolds are immediately after this enemy, leading the heroes past a Klump towards the level's exit sign. The outlet of the level is ahead of the sign. | |||
==Names in other | ==Profiles== | ||
{{ | *<u>'''GBA Prima Official Game Guide'''</u> (page 163): ''This is by far the most challenging stage in all of Kongdom. It features shuddering platforms that disappear in seconds, and leaps of complete and blind faith in many different directions. In addition, you must knock invincible Krushas off tiny platforms with Wooden Barrels! You've got to time every jump perfectly, and utilize Donkey at the end of the level—where real platform players are separated from the amateurs!'' | ||
| | ==Enemies== | ||
| | The following enemies appear in the following quantities: | ||
<gallery> | |||
Army_DKC_sprite.png|[[Army]] (11) | |||
Gnawty.png|[[Gnawty]] (11) | |||
Klump DKC sprite.png|[[Klump]] (6) | |||
Krusha-gray-DKC.png|[[Krusha]] (gray) (4) | |||
Necky.png|[[Necky]] (1) | |||
Zinger_DKC.png|[[Zinger]] (10) | |||
</gallery> | |||
==Items and objects== | |||
The following items and objects appear in the following quantities: | |||
<gallery> | |||
DK Barrel DKC.png|[[DK Barrel]] (2) | |||
Enguarde Token Sprite SNES.png|[[Enguarde]] [[animal token|token]] (1, in the first Bonus Level) | |||
Winky Token Sprite SNES.png|[[Winky]] token (1) | |||
Red Balloon DKC SNES.png|[[Red Balloon|Life Balloon]] (1) | |||
</gallery> | |||
===K-O-N-G Letters=== | |||
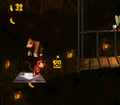
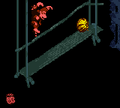
[[File:PlatformPerils SNES 2.png|thumb|The location of the letter K]] | |||
*'''K:''' After the first group of Klumps, the Kongs drop on a platform with the letter K. | |||
*'''O:''' The letter O can be found in a pit next to the final platform before the Continue Barrel. | |||
*'''N:''' The Kongs find the letter N being circled by a Zinger as they travel along the second platform from the Continue Barrel. | |||
*'''G:''' Near the end of the level, the Kongs can find the letter G above an arrow platform that takes them right toward the last arrow platform of the level. | |||
===Key items=== | |||
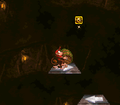
*[[Photograph]] (Game Boy Advance version only): A camera icon is located to the left of the letter O. A super-jump is required to reach it. Once they grab it, they gain a [[photograph]] of a Krusha in the third page of their [[Scrapbook (Donkey Kong Country series)|scrapbook]]. | |||
{{br}} | |||
==Bonus Levels== | |||
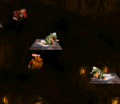
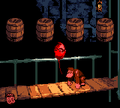
[[File:DKC SNES Platform Perils Bonus Room 1.png|thumb|The first Bonus Level]] | |||
Platform Perils has two [[Bonus Level]]s, listed by their type in the Game Boy Advance version: | |||
*'''''Spell it Out!''''': When the Kongs land on the level's first moving platform, they must walk left and fall off. They can land on a hidden platform directly below where the first platform started. The hidden platform travels left to a hidden [[Bonus Barrel]]. In the Bonus Level, they need to hit four barrels displaying one of the four [[KONG Letters|K-O-N-G Letters]] to spell out "KONG" in the correct order. If they do it correctly, they are given an [[Expresso]] [[animal token|Token]] or a [[Red Balloon|Life Balloon]]. After either winning or losing, the Kongs return into the main level. | |||
*'''''Stop the Barrel!''''': On the very last platform, which has a Gnawty on it, the Kongs are taken downwards. Instead of jumping to the scaffolds to the right, the Kongs must continue down to find a hidden scaffold. They must jump on it and then off to the right to enter the second Bonus Barrel. In the final Bonus Level, the Kongs have to watch an [[Enguarde]] [[animal token|Token]] move through four barrels. Once it stops and disappears, the Kongs must jump at the barrel that it stopped on. If they choose the correct one, the Enguarde Token is released for the Kongs to collect. After either winning or losing, the Kongs are sent back into the main level. | |||
==Gallery== | |||
<gallery> | |||
PlatformPerils SNES 1.png | |||
DKC SNES Platform Perils O.png|The letter O | |||
PlatformPerils SNES 3.png|The letter N | |||
DKC SNES Platform Perils G.png|The letter G | |||
Platform Perils SNES.png|The Kongs miss a tricky platform | |||
PlatformPerils SNES 4.png | |||
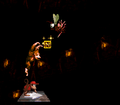
PlatformPerils SNES 5.png|Donkey Kong preparing to throw a barrel at a gray Krusha | |||
PlatformPerils GBC 2.png | |||
PlatformPerils GBC 1.png | |||
PlatformPerils GBA 1.png | |||
PlatformPerils GBA 3.png | |||
PlatformPerils GBA 1.png|The location of the photograph in the Game Boy Advance version | |||
</gallery> | |||
==Names in other languages== | |||
{{foreign names | |||
|Jap=さいごのステップ | |||
|JapR=Saigo no Suteppu | |||
|JapM=The Final Step | |||
|Spa=Plataforma Peligrosa | |Spa=Plataforma Peligrosa | ||
|SpaM=Dangerous Platform | |SpaM=Dangerous Platform | ||
| | |Fre=Plates-formes Péril | ||
| | |FreM=Peril Platforms | ||
|Ita=Pena di Piani | |||
{{DKC}} | |ItaM=Floor of Penalty | ||
[[Category: | }} | ||
{{DKC levels}} | |||
[[Category:Mines]] | |||
[[Category:Donkey Kong Island]] | [[Category:Donkey Kong Island]] | ||
[[Category:Donkey Kong | [[Category:Donkey Kong Country levels]] | ||
Latest revision as of 18:45, February 12, 2024
It has been requested that this article be rewritten and expanded to include more information. Reason: add captions to the gallery
- This article is about the last non-boss level of Donkey Kong Country. For the Mario Party and Mario Party 2 minigame, see Platform Peril.
| Level | |
|---|---|
| Platform Perils | |

| |
| Level code | 6 - 5 (SNES & GBA) 6 - 6 (GBC) |
| Game | Donkey Kong Country |
| Music track | Life in the Mines |
| << Directory of levels >> | |
Platform Perils is the thirty-third level and final non-boss level in Donkey Kong Country. It is also the final level of Chimp Caverns. In the Game Boy Color version, Platform Perils is the thirty-fourth level, as the result of the remake's new level, Necky Nutmare. Platform Perils is a walkway level with several challenges. As the name suggests, Donkey Kong and Diddy Kong primarily traverse the level by moving on small arrow platforms, which previously appeared in Blackout Basement. The level features gray Krushas, which are usually on the arrow platforms, and can only be defeated from having a barrel thrown at it. They can throw a nearby Vine Barrel at them to defeat them (or TNT Drums in the European version). The first part of Platform Perils involves going across the walkways, with Armies and Klumps appearing along the way. Later on, the rest of the level takes place on moving arrow platforms, most of which are guarded by gray Krushas.
Layout[edit]


The Kongs begin the level on a set of long scaffolds that also support a barrel and a Krusha. A black platform floats in an abyss ahead that begins to pull them to a slanted platform when landed on. The primates are attacked by an Army as they walk up the pathway, which is followed by another scaffold that holds another Army, a barrel, and the level's first DK Barrel. Two black platforms float in an abyss immediately after here that can take them over and up to another set of scaffolds with a trio of Klumps on them. A trail of bananas to the right of the scaffolds with the letter K between them leads the heroes down to a black platform that can pull them back upwards. Two more black platforms are ahead, with a Zinger before each of them. The first platform carries them downwards, and then the second one carries them to a long scaffold after a Zinger. Another scaffold floats near here with a pair of Armies on it. This is followed by a wide abyss that can be crossed with the help of a black platform that moves upwards when landed on. A small scaffold with two more black platforms next to it in another abyss is after this pit. A Zinger flies around both sides of the two platform, which both descend and then fall when touched. The primates can find two scaffolds holding some Armies ahead of here. An abyss follows the scaffolds, but it can be crossed with the use of a black platform that moves downwards when touched and a Necky that they can bounce on. On the other side of this pit, the duo can find two large scaffolds with a smaller one hanging above them that supports two Armies. An abyss nearby consists of four black platforms that move downwards when the heroes land on them, and several Zinger fly among each of them. After passing the abyss, the heroes reach a small scaffold holding a barrel that is followed by two groups of two scaffolds with Armies on them. A smaller, slanted scaffold hangs after these platforms, and it is followed by a black platform that pulls the heroes downwards to the letter O and another scaffold that hangs under the level's Continue Barrel, which is orbited by a Zinger.
After passing this barrel, the primates reach a large abyss that can be fully crossed with a black platform that moves to the east when landed on. As they ride along it, they travel under another black platform with a DK Barrel above it. This platform moves downwards when landed on. The primates soon make their way onto a small scaffold holding an Army. A trail of bananas next to here leads them down onto a black platform with a Gnawty on it. This platform pulls the two friends east past a Zinger who orbits the letter N. After the primates ride on another black platform that pulls them eastward nearby, they can reach a platform that carries them north, which supports a Gnawty. Another black platform with a Gnawty on it can be reached with the previous platform. It guides the heroes to another black platform holding a Gnawty. This platform pulls them to the east, where a Klump can be found walking on a black platform that falls when landed on by the Kongs. They can find a slanted scaffold immediately after the enemy with another Klump on it, who is followed by a tire sticking out of a smaller scaffold. It can bounce them to another scaffold holding a tire, which can then help them reach a wide abyss containing four black platforms that fall when landed on by the Kongs. Gnawties walk along each of them, and the primates can avoid making the platforms drop by bouncing on these foes. After crossing the abyss, the heroes reach a pair of scaffolds, both supporting a barrel, with a Zinger between them.
Another abyss follows the scaffolds, and the primates can only cross it with the use of a black platform, which is blocked by a gray Krusha, whom the Kongs can only defeat by hitting it with a barrel. On the small scaffold after this pit, a sign indicating that the level is almost over can be found. In another huge abyss to the right of here, a black platform that travels east when landed on can be discovered next to a Zinger. The platform pulls them past a trail of bananas onto another platform that leads them farther east once activated. The platform supports barrel, which must be used to defeat a gray Krusha blocking the next platform located nearby. This platform can guide the duo upwards to a tire, which can bounce them onto another platform that pulls them farther upwards when touched. A barrel sits on it, which must be used to defeat a gray Krusha standing on the next platform. Once the primates get on this platform, they are guided to the east again, where they find another platform holding a barrel.
A Zinger flies in front of the platform, which begins to pull them back downwards when landed on. Soon, the Kongs encounter another gray Krusha on a black platform that moves to the east when touched. The primates can use the previously mentioned barrel to defeat it and progress onto the platform, which leads them to another platform holding nothing but a barrel. This platform falls down when landed on, forcing the Kongs to continue on the previous platform. A Krusha stands on the next black platform, but once the primates defeat it, they can safely reach it to be taken towards a tire. This tire can help them get onto another platform that can pull them to the west, where the letter G and the next platform can be discovered. This platform, supporting a barrel, can be used to travel to the east, where a Gnawty can be found on a platform that descends when landed on. A long set of scaffolds are immediately after this enemy, leading the heroes past a Klump towards the level's exit sign. The outlet of the level is ahead of the sign.
Profiles[edit]
- GBA Prima Official Game Guide (page 163): This is by far the most challenging stage in all of Kongdom. It features shuddering platforms that disappear in seconds, and leaps of complete and blind faith in many different directions. In addition, you must knock invincible Krushas off tiny platforms with Wooden Barrels! You've got to time every jump perfectly, and utilize Donkey at the end of the level—where real platform players are separated from the amateurs!
Enemies[edit]
The following enemies appear in the following quantities:


Items and objects[edit]
The following items and objects appear in the following quantities:

DK Barrel (2)

Winky token (1)

Life Balloon (1)

K-O-N-G Letters[edit]

- K: After the first group of Klumps, the Kongs drop on a platform with the letter K.
- O: The letter O can be found in a pit next to the final platform before the Continue Barrel.
- N: The Kongs find the letter N being circled by a Zinger as they travel along the second platform from the Continue Barrel.
- G: Near the end of the level, the Kongs can find the letter G above an arrow platform that takes them right toward the last arrow platform of the level.
Key items[edit]
- Photograph (Game Boy Advance version only): A camera icon is located to the left of the letter O. A super-jump is required to reach it. Once they grab it, they gain a photograph of a Krusha in the third page of their scrapbook.
Bonus Levels[edit]

Platform Perils has two Bonus Levels, listed by their type in the Game Boy Advance version:
- Spell it Out!: When the Kongs land on the level's first moving platform, they must walk left and fall off. They can land on a hidden platform directly below where the first platform started. The hidden platform travels left to a hidden Bonus Barrel. In the Bonus Level, they need to hit four barrels displaying one of the four K-O-N-G Letters to spell out "KONG" in the correct order. If they do it correctly, they are given an Expresso Token or a Life Balloon. After either winning or losing, the Kongs return into the main level.
- Stop the Barrel!: On the very last platform, which has a Gnawty on it, the Kongs are taken downwards. Instead of jumping to the scaffolds to the right, the Kongs must continue down to find a hidden scaffold. They must jump on it and then off to the right to enter the second Bonus Barrel. In the final Bonus Level, the Kongs have to watch an Enguarde Token move through four barrels. Once it stops and disappears, the Kongs must jump at the barrel that it stopped on. If they choose the correct one, the Enguarde Token is released for the Kongs to collect. After either winning or losing, the Kongs are sent back into the main level.
Gallery[edit]

The letter O
The letter N
The letter G
The Kongs miss a tricky platform
Donkey Kong preparing to throw a barrel at a gray Krusha
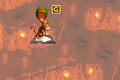
The location of the photograph in the Game Boy Advance version


Names in other languages[edit]
| Language | Name | Meaning |
|---|---|---|
| Japanese | さいごのステップ Saigo no Suteppu |
The Final Step |
| French | Plates-formes Péril |
Peril Platforms |
| Italian | Pena di Piani |
Floor of Penalty |
| Spanish | Plataforma Peligrosa |
Dangerous Platform |