Castle Crush: Difference between revisions
No edit summary |
|||
| (42 intermediate revisions by 21 users not shown) | |||
| Line 1: | Line 1: | ||
{{ | {{DKC level infobox | ||
|title=Castle Crush | |title=Castle Crush | ||
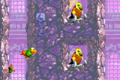
|image=[[ | |image=[[File:Castle Crush.png]] | ||
|code=6 - 3 (SNES)<br>6 - 2 (GBA) | |code=6 - 3 (SNES)<br>6 - 2 (GBA) | ||
|world=[[K. Rool's Keep]] | |||
|game=''[[Donkey Kong Country 2: Diddy's Kong Quest]]'' | |game=''[[Donkey Kong Country 2: Diddy's Kong Quest]]'' | ||
| | |track=Krook's March | ||
|before=[[Windy Well|<<]] | |before=[[Windy Well (Donkey Kong Country 2: Diddy's Kong Quest)|<<]] | ||
|after=[[Clapper's Cavern|>>]] | |after=[[Clapper's Cavern (Donkey Kong Country 2: Diddy's Kong Quest)|>>]] | ||
| | |before3=[[Arctic Abyss (Donkey Kong Country 2: Diddy's Kong Quest)|<<]] | ||
| | |after3=[[Clapper's Cavern (Donkey Kong Country 2: Diddy's Kong Quest)|>>]] | ||
}} | }} | ||
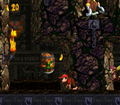
'''Castle Crush''' is the thirtieth level of ''[[Donkey Kong Country 2: Diddy's Kong Quest]]'' | '''Castle Crush''' is the thirtieth level of ''[[Donkey Kong Country 2: Diddy's Kong Quest]]'' and the third level of [[K. Rool's Keep]]. In the [[Donkey Kong Country 2 (Game Boy Advance)|Game Boy Advance version]], it switched positions with [[Windy Well (Donkey Kong Country 2: Diddy's Kong Quest)|Windy Well]] on the world map, becoming the second level of K. Rool's Keep and the twenty-ninth level overall. Castle Crush is one of the two levels to not have an identically-named counterpart in ''[[Donkey Kong Land 2]]'', as it was replaced by [[Dungeon Danger]]. Castle Crush is the first castle level, and it uniquely features a rising floor. As it rises, [[Diddy Kong]] and [[Dixie Kong]] have to avoid being squished by ceilings and dodge enemies along the way. Two [[Animal Friend]]s appear in Castle Crush, both appearing in their [[Animal Barrel]] outside of the main path. There is [[Rambi]], whose Animal Barrel can be found picking up the first [[DK Barrel]] in the level, defeating a nearby Kutlass with it on the left, and continuing left to the Animal Barrel. The other Animal Friend is [[Squawks]], whose Animal Barrel is hidden behind a wall located left of a DK Barrel. Squawks can quickly fly through the level rather than wait for the rising floor. | ||
The [[Super Nintendo Entertainment System]] version of Castle Crush contains a game-breaking [[list of Donkey Kong Country 2: Diddy's Kong Quest glitches#Castle Crush Glitch|glitch]]. | |||
==Layout== | |||
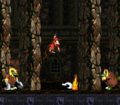
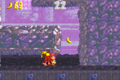
The [[Super Nintendo Entertainment System]] version of Castle Crush | [[File:CastleCrushGBA1.png|thumb|left|Castle Crush in the Game Boy Advance version]] | ||
== | |||
The Kongs begin the level on a flat pathway surrounded by walls. Soon, a separate structure rises and lifts them off the ground, leading them up to a large group of [[banana]]s. As they are lifted higher, a Neek and a Spiny emerge from nearby alcoves to attack. A [[DK Barrel]] is located to the left of them on the other side of the wall as they encounter these foes. When the floor rises high enough, the wall blocking them from the barrel ends, allowing them to reach the barrel, which they can use to defeat a Kutlass in a narrow passage higher up. A passage is located to the left of the Kutlass, and an alternate path is to the right of it. The path on the left contains an [[Animal Barrel]], and if the heroes enter it, they are turned into Rambi. A Krook stands near the path on the right and tries to hit the Kongs with its hooks as they come by. However, the foe is soon crushed into the ceiling from the rising floor. Once the floor rises higher, the two pathways join together and the heroes are lifted into a single passage that contains a Neek, and later, a Kruncha. After the heroes pass this enemy, they are lifted into a wide, open room with Spinies on both sides of it. | The Kongs begin the level on a flat pathway surrounded by walls. Soon, a separate structure rises and lifts them off the ground, leading them up to a large group of [[banana]]s. As they are lifted higher, a Neek and a Spiny emerge from nearby alcoves to attack. A [[DK Barrel]] is located to the left of them on the other side of the wall as they encounter these foes. When the floor rises high enough, the wall blocking them from the barrel ends, allowing them to reach the barrel, which they can use to defeat a Kutlass in a narrow passage higher up. A passage is located to the left of the Kutlass, and an alternate path is to the right of it. The path on the left contains an [[Animal Barrel]], and if the heroes enter it, they are turned into Rambi. A Krook stands near the path on the right and tries to hit the Kongs with its hooks as they come by. However, the foe is soon crushed into the ceiling from the rising floor. Once the floor rises higher, the two pathways join together and the heroes are lifted into a single passage that contains a Neek, and later, a Kruncha. After the heroes pass this enemy, they are lifted into a wide, open room with Spinies on both sides of it. | ||
A few structures are above the foes, and a collectible is inside of the gaps between each of the structures. The letter K is against the wall to the right, while Banana Bunch is in the gap farther to the left of it. A lone banana is in the gap to the left of here, while a [[Banana Coin]] is on the edge of the room near the wall. Once the primates are raised past the structures, they make their way up a wide passage; as they head up, Klampons drop out of nearby alcoves to attack them. Eventually, they are lifted towards an alcove that contains a Banana Bunch. The heroes can find a Krook farther above here that is separated by a wall. After the floor raises them higher, the wall ends, allowing them to reach the Krook. Zingers are above this area, and once they are passed, the heroes reach an alcove that contains a Banana Coin on a platform. The floor then leads them up through a passage with a few alcoves on the sides of it, which Spinies drop out of to attack the Kongs. If they manage to pass these foes, they are raised to a ledge with a group of bananas that form an arrow pointing to a wall, which Rambi can break open to reach a Bonus Level. Once they are lifted past these bananas, they encounter a Klampon, who marches near an alcove in the wall that contains six bananas. | A few structures are above the foes, and a collectible is inside of the gaps between each of the structures. The letter K is against the wall to the right, while a [[Banana Bunch]] is in the gap farther to the left of it. A lone banana is in the gap to the left of here, while a [[Banana Coin]] is on the edge of the room near the wall. Once the primates are raised past the structures, they make their way up a wide passage; as they head up, Klampons drop out of nearby alcoves to attack them. Eventually, they are lifted towards an alcove that contains a Banana Bunch. The heroes can find a Krook farther above here that is separated by a wall. After the floor raises them higher, the wall ends, allowing them to reach the Krook. Zingers are above this area, and once they are passed, the heroes reach an alcove that contains a Banana Coin on a platform. The floor then leads them up through a passage with a few alcoves on the sides of it, which Spinies drop out of to attack the Kongs. If they manage to pass these foes, they are raised to a ledge with a group of bananas that form an arrow pointing to a wall, which Rambi can break open to reach a Bonus Level. Once they are lifted past these bananas, they encounter a Klampon, who marches near an alcove in the wall that contains six bananas. | ||
After they pass the bananas and travel higher, they come up to a [[No Animal Sign]] that makes Rambi disappear when passed. The duo is also given a Banana Bunch if they lead the Animal Friend to the sign. The primates are soon lifted into a wide room that they must travel east through to find a passage on the other side of it. As they try to reach the opposite end of the room, a Spiny and a Klampon get in their way. Once they make it into the next passage, they come past a narrow alcove containing three bananas and then a [[Blast Barrel]] that can blast them to another Blast Barrel, which can then send them onto a high ledge with a Spiny on it far above the rising floor. If the heroes drop down this ledge, they reach a safe area containing the letter O and a Banana Bunch. At this point in the level, they can still not progress without the rising floor, so they must wait for it. Soon, the floor raises them to a room with a passage on the far end of it. They must quickly run across this room to reach the passage, while fighting off five Spinies that try to get in their way. If they reach the passage on the other side of the room, they are lifted into a large room with the level's [[Star Barrel]] in it. | |||
After they pass the bananas and travel higher, they come up to a [[No Animal Sign]] that makes Rambi disappear when passed. The duo is also given a Banana Bunch if they lead the Animal | |||
If the heroes travel farther upwards from here, they can find an area that contains a DK Barrel, a Zinger, and an alcove with some bananas in it. If they run through the wall to the left of here, they can find a hidden area with an Animal Barrel in it, which can turn the primates into Squawks if they enter it. An alternate path is above the Animal | If the heroes travel farther upwards from here, they can find an area that contains a DK Barrel, a Zinger, and an alcove with some bananas in it. If they run through the wall to the left of here, they can find a hidden area with an Animal Barrel in it, which can turn the primates into Squawks if they enter it. An alternate path is above the Animal Friend that leads him past a trio of Krooks. If the primates do not take this secret passage, they must instead head up through a wider passage with the three aforementioned Krooks along the side of it. The foes are soon smashed by the rising floor, which leads the heroes to the meeting point of this path and the hidden path. If they continue to rise from here, they come up to several Zingers that travel back and forth in a horizontal path. A passage leading to the east is at the top of this area, and more passages leading north and south branch from it. With Squawks, they are able to take the passage to the south if the floor has not risen too much. This passage leads to the hidden [[DK Coin|Video Game Hero Coin]] and many bananas. There are north passages to the north from here, and the one in the far right end of the area contains the letter N. The other passage contains a Zinger, who can be defeated with Squawks's nut projectiles. | ||
After they head through one of the passages, they can journey to the left to find a No Animal Sign. If they pass it with Squawks, the Animal | After they head through one of the passages, they can journey to the left to find a No Animal Sign. If they pass it with Squawks, the Animal Friend disappears and a [[TNT Barrel]] appears next to them as a prize for leading him to the sign. They can use the barrel to bust open a wall in a nearby alcove, which contains a group of bananas that form together to create the shape of an arrow pointing towards the wall. If they walk into the wall after breaking it open, they are led to a Bonus Level. If the play the bonus, they are led to an alcove located farther above here when they exit the bonus. A Klampon walks along a path to the right of this alcove. On the other side of the area, the heroes can find a passage that they can be raised through by the floor to reach a wider passage to the west with a Klampon and a Spiny in it. If they manage to reach the passage on the opposite side of this room, they are lifted up a long room with several alcoves on the sides of it. Klampons and Spinies emerge from these alcoves and try to drop down on the Kongs. Once they pass all of the enemy-filled alcoves, they make their way up to a wider room full of Mini-Neckys that swoop down at them as they progress. If they continue to rise from here, they soon make their way to a few Zingers that move in a circular pattern. As they rise through this area, they can notice a DK Barrel on the other side of a wall, which ends when the floor reaches a higher elevation. Once the heroes have access to the barrel, they are raised to an alcove that contains a Kruncha and the letter G. | ||
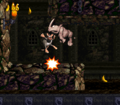
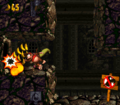
[[File: | [[File:Castle Crush DKC2 shot.png|thumb|The Kongs dodge some Zingers as they rise through the level.]] | ||
Another alcove is to the right of here with six bananas in it. The primates are soon raised high into a narrower passage with two Krooks in long, thin spaces on the sides of it. They must dodge their hook projectiles, until the foes are soon crushed by the rising floor. Farther above this area, the duo can find a pathway leading them to the east past a trio of Spinies. In a wider room higher from here, they can find four Zingers that move in circular paths and orbit bananas. Once they pass the foes, they access a wide room with another passage on the opposite side of it. There are two Klampons with a Spiny between them in this area that the Kongs must pass as they head through the room. Once they reach the passage, they are led into a higher room with a barrel at the end of it. There are two passages at the top of the room, but one, which contains a Banana Coin and a Banana Bunch, is blocked off by a Zinger, who can only be defeated with the nearby barrel. The opposite passage leads simply to a trio of bananas. Either one of the passages can be used to reach a room that contains an [[End of Level Target]]. If they hit this target, they complete the level. Additionally, they can hit the target from a high platform to win a prize from it. | Another alcove is to the right of here with six bananas in it. The primates are soon raised high into a narrower passage with two Krooks in long, thin spaces on the sides of it. They must dodge their hook projectiles, until the foes are soon crushed by the rising floor. Farther above this area, the duo can find a pathway leading them to the east past a trio of Spinies. In a wider room higher from here, they can find four Zingers that move in circular paths and orbit bananas. Once they pass the foes, they access a wide room with another passage on the opposite side of it. There are two Klampons with a Spiny between them in this area that the Kongs must pass as they head through the room. Once they reach the passage, they are led into a higher room with a barrel at the end of it. There are two passages at the top of the room, but one, which contains a Banana Coin and a Banana Bunch, is blocked off by a Zinger, who can only be defeated with the nearby barrel. The opposite passage leads simply to a trio of bananas. Either one of the passages can be used to reach a room that contains an [[End of Level Target]]. If they hit this target, they complete the level. Additionally, they can hit the target from a high platform to win a prize from it. | ||
== | ==Enemies== | ||
The following enemies appear in the following quantities: | |||
<gallery> | |||
Klampon DKC2.png|[[Klampon]] (13) | |||
Krook DKC2.png|[[Krook]] (7) | |||
Kruncha DKC2 pink.png|[[Kruncha]] (pink) (2) | |||
Kutlass DKC2 yellow.png|[[Kutlass]] (yellow) (1) | |||
Mini Necky DKC2.png|[[Mini-Necky]] (6) | |||
Neek DKC2.png|[[Neek]] (2) | |||
Spiny DKC2.png|[[Spiny (Donkey Kong Country 2: Diddy's Kong Quest)|Spiny]] (20) | |||
Zinger DKC2 yellow.png|[[Zinger]] (yellow) (22) | |||
</gallery> | |||
== | ==Items and objects== | ||
The following items and objects appear in the following quantities: | |||
<gallery> | |||
Banana Bunch DKC SNES.png|[[Banana Bunch]] (5) | |||
Banana Coin.png|[[Banana Coin]] (3) | |||
DK Barrel.png|[[DK Barrel]] (3) | |||
</gallery> | |||
=== | ===KONG Letters=== | ||
* | *'''K:''' As the Kongs move up through the start of the level, they eventually enter into a wide area with two Spinies and a few floating pillars. Collectibles are located between each pillar, and the letter K can be collected from the gap on the far right. | ||
*'''O:''' Shortly after Rambi's No Animal Sign, the Kongs are lifted towards two [[Blast Barrel]]s which blast them up onto a tall platform. Before the floor rises up too high, Kongs can drop down from the platform and collect the letter O, which is floating slightly above ground, next to the tall platform's wall. | |||
*'''N:''' The letter N is floating in a gap between the wall just right of the No Animal Sign. | |||
*'''G:''' Late into the level, after the final DK Barrel, the Kongs encounter the second pink Kruncha, who emerges from an alcove containing the letter G. | |||
=== | ===Key items=== | ||
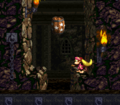
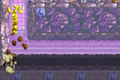
*After the | [[File:Castle Crush DK Coin location.png|thumb|The location of the Video Game Hero Coin]] | ||
*'''[[DK Coin|Cranky's Video Game Hero Coin]]:''' After the Kongs transform into Squawks, he must fly upward and pass some Krooks and Zingers. After passing these enemies, Squawks must go right and then flap down below into a passage, where the Video Game Hero Coin is located. | |||
*'''[[Golden feather]] (Game Boy Advance version only):''' Shortly after exiting the second Bonus Area, a Klampon and Spiny start walking on the rising floor. The Kongs have to quickly move to the rightmost part of the floor and jump at the golden feather at the top right corner, right between the ceiling and the wall. | |||
*'''[[Photograph]] (Game Boy Advance version only):''' After transforming into Squawks, he must fly up a narrow passage. There are three Krooks, the middle of which has a photograph above its head. Squawks can defeat the Krook by spitting an egg at it. The photograph is a picture of Krook, and it appears in the sixth page of the [[Scrapbook]]. | |||
{{br}} | |||
==Bonus Areas== | |||
{{multiframe|[[File:Castle Crush Bonus Area 1.png|200px]] [[File:Castle Crush Bonus Area 2.png|200px]]|size=420|The first and second Bonus Levels respectively}} | |||
*'''Destroy them All!''': As Rambi, the Kongs must continue through the first portion of the level. After encountering two Zingers and three Spinys, there is a group of [[Banana]]s arranged in the formation of a left-facing arrow, pointing to a wall. Rambi must use his Supercharge attack to break the wall open and enter into the Bonus Area. In this challenge, the rising floor carries Rambi up a vertical path with Zingers. Rambi has to defeat all six Zingers along the way so that [[Kremkoin]] appears just outside the exit. | |||
*'''Find the Token!''': The second Bonus Area's location is also pointed to by bananas in the shape of a left-facing arrow. After crossing the No Animal Sign with Squawks, the Kongs are awarded with a [[TNT Barrel]], which can create an opening on the left wall to the next Bonus Area. The floor is rising rapidly, and the Kongs must quickly move underneath each gap while going up. They can also collect some bananas along the way. The Kremkoin appears on a platform at the very top of the Bonus Area. | |||
==Gallery== | ==Gallery== | ||
===Super Nintendo Entertainment System=== | |||
<gallery> | |||
Castle Crush DKC2 screenshot.png|Rambi defeating a Neek | |||
Castle Crush DKC2 Klampon.png|The Kongs jumping toward a Klampon | |||
CastleCrushSNES3.png|The Kongs defeating a row of Spinys | |||
</gallery | CastleCrushSNES1.png|Dixie stands near the Star Barrel | ||
Castle Crush DKC2 Squawks Barrel.png|The location of Squawks Barrel | |||
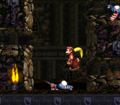
Castle Crush DKC2 Krooks.png|Diddy jumping over hooks thrown by two Krooks | |||
CastleCrushSNES2.png|The Kongs open the path to the second Bonus Area | |||
</gallery> | |||
==Names in | ===Game Boy Advance=== | ||
{{ | <gallery> | ||
|Jap= | CastleCrushGBA2.png|Rambi entering the first Bonus Area. | ||
Castle Crush GBA Squawks.png|Squawks flapping past two Krooks. | |||
Castle Crush GBA Bonus Area 2.png|The Kongs going through the second Bonus Area | |||
</gallery> | |||
==Names in other languages== | |||
{{foreign names | |||
|Jap=クラッシュ エレベーター | |||
|JapR=Kurasshu Erebētā | |JapR=Kurasshu Erebētā | ||
|JapM=Crush Elevator | |JapM=Crush Elevator | ||
|Spa=Castillo Abajo | |Spa=Castillo Abajo | ||
|SpaM=Down with the Castle | |SpaM=Down with the Castle | ||
| | |Fre=Bastion Broyeur | ||
| | |FreM=Bastion Crush | ||
|Ger=Quetsch-Schloß (SNES)<br | |Ger=Quetsch-Schloß (SNES)<br>Pressburg (GBA) | ||
|GerM=Crush Castle<br | |GerM=Crush Castle<br>Squeeze Castle | ||
|Ita=Lo Stritolascimmie | |||
|ItaM=The Ape Crusher | |||
}} | |||
{{DKC2}} | {{DKC2}} | ||
[[Category:Crocodile Isle]] | |||
[[Category:Dungeons]] | [[Category:Dungeons]] | ||
[[Category:Donkey Kong Country 2: Diddy's Kong Quest levels]] | |||
[[Category | |||
Revision as of 16:38, January 20, 2024
| Level | |
|---|---|
| Castle Crush | |

| |
| Level code | 6 - 3 (SNES) 6 - 2 (GBA) |
| World | K. Rool's Keep |
| Game | Donkey Kong Country 2: Diddy's Kong Quest |
| Music track | Krook's March |
| << Directory of levels (SNES) >> | |
| << Directory of levels (GBA) >> | |
Castle Crush is the thirtieth level of Donkey Kong Country 2: Diddy's Kong Quest and the third level of K. Rool's Keep. In the Game Boy Advance version, it switched positions with Windy Well on the world map, becoming the second level of K. Rool's Keep and the twenty-ninth level overall. Castle Crush is one of the two levels to not have an identically-named counterpart in Donkey Kong Land 2, as it was replaced by Dungeon Danger. Castle Crush is the first castle level, and it uniquely features a rising floor. As it rises, Diddy Kong and Dixie Kong have to avoid being squished by ceilings and dodge enemies along the way. Two Animal Friends appear in Castle Crush, both appearing in their Animal Barrel outside of the main path. There is Rambi, whose Animal Barrel can be found picking up the first DK Barrel in the level, defeating a nearby Kutlass with it on the left, and continuing left to the Animal Barrel. The other Animal Friend is Squawks, whose Animal Barrel is hidden behind a wall located left of a DK Barrel. Squawks can quickly fly through the level rather than wait for the rising floor.
The Super Nintendo Entertainment System version of Castle Crush contains a game-breaking glitch.
Layout

The Kongs begin the level on a flat pathway surrounded by walls. Soon, a separate structure rises and lifts them off the ground, leading them up to a large group of bananas. As they are lifted higher, a Neek and a Spiny emerge from nearby alcoves to attack. A DK Barrel is located to the left of them on the other side of the wall as they encounter these foes. When the floor rises high enough, the wall blocking them from the barrel ends, allowing them to reach the barrel, which they can use to defeat a Kutlass in a narrow passage higher up. A passage is located to the left of the Kutlass, and an alternate path is to the right of it. The path on the left contains an Animal Barrel, and if the heroes enter it, they are turned into Rambi. A Krook stands near the path on the right and tries to hit the Kongs with its hooks as they come by. However, the foe is soon crushed into the ceiling from the rising floor. Once the floor rises higher, the two pathways join together and the heroes are lifted into a single passage that contains a Neek, and later, a Kruncha. After the heroes pass this enemy, they are lifted into a wide, open room with Spinies on both sides of it.
A few structures are above the foes, and a collectible is inside of the gaps between each of the structures. The letter K is against the wall to the right, while a Banana Bunch is in the gap farther to the left of it. A lone banana is in the gap to the left of here, while a Banana Coin is on the edge of the room near the wall. Once the primates are raised past the structures, they make their way up a wide passage; as they head up, Klampons drop out of nearby alcoves to attack them. Eventually, they are lifted towards an alcove that contains a Banana Bunch. The heroes can find a Krook farther above here that is separated by a wall. After the floor raises them higher, the wall ends, allowing them to reach the Krook. Zingers are above this area, and once they are passed, the heroes reach an alcove that contains a Banana Coin on a platform. The floor then leads them up through a passage with a few alcoves on the sides of it, which Spinies drop out of to attack the Kongs. If they manage to pass these foes, they are raised to a ledge with a group of bananas that form an arrow pointing to a wall, which Rambi can break open to reach a Bonus Level. Once they are lifted past these bananas, they encounter a Klampon, who marches near an alcove in the wall that contains six bananas.
After they pass the bananas and travel higher, they come up to a No Animal Sign that makes Rambi disappear when passed. The duo is also given a Banana Bunch if they lead the Animal Friend to the sign. The primates are soon lifted into a wide room that they must travel east through to find a passage on the other side of it. As they try to reach the opposite end of the room, a Spiny and a Klampon get in their way. Once they make it into the next passage, they come past a narrow alcove containing three bananas and then a Blast Barrel that can blast them to another Blast Barrel, which can then send them onto a high ledge with a Spiny on it far above the rising floor. If the heroes drop down this ledge, they reach a safe area containing the letter O and a Banana Bunch. At this point in the level, they can still not progress without the rising floor, so they must wait for it. Soon, the floor raises them to a room with a passage on the far end of it. They must quickly run across this room to reach the passage, while fighting off five Spinies that try to get in their way. If they reach the passage on the other side of the room, they are lifted into a large room with the level's Star Barrel in it.
If the heroes travel farther upwards from here, they can find an area that contains a DK Barrel, a Zinger, and an alcove with some bananas in it. If they run through the wall to the left of here, they can find a hidden area with an Animal Barrel in it, which can turn the primates into Squawks if they enter it. An alternate path is above the Animal Friend that leads him past a trio of Krooks. If the primates do not take this secret passage, they must instead head up through a wider passage with the three aforementioned Krooks along the side of it. The foes are soon smashed by the rising floor, which leads the heroes to the meeting point of this path and the hidden path. If they continue to rise from here, they come up to several Zingers that travel back and forth in a horizontal path. A passage leading to the east is at the top of this area, and more passages leading north and south branch from it. With Squawks, they are able to take the passage to the south if the floor has not risen too much. This passage leads to the hidden Video Game Hero Coin and many bananas. There are north passages to the north from here, and the one in the far right end of the area contains the letter N. The other passage contains a Zinger, who can be defeated with Squawks's nut projectiles.
After they head through one of the passages, they can journey to the left to find a No Animal Sign. If they pass it with Squawks, the Animal Friend disappears and a TNT Barrel appears next to them as a prize for leading him to the sign. They can use the barrel to bust open a wall in a nearby alcove, which contains a group of bananas that form together to create the shape of an arrow pointing towards the wall. If they walk into the wall after breaking it open, they are led to a Bonus Level. If the play the bonus, they are led to an alcove located farther above here when they exit the bonus. A Klampon walks along a path to the right of this alcove. On the other side of the area, the heroes can find a passage that they can be raised through by the floor to reach a wider passage to the west with a Klampon and a Spiny in it. If they manage to reach the passage on the opposite side of this room, they are lifted up a long room with several alcoves on the sides of it. Klampons and Spinies emerge from these alcoves and try to drop down on the Kongs. Once they pass all of the enemy-filled alcoves, they make their way up to a wider room full of Mini-Neckys that swoop down at them as they progress. If they continue to rise from here, they soon make their way to a few Zingers that move in a circular pattern. As they rise through this area, they can notice a DK Barrel on the other side of a wall, which ends when the floor reaches a higher elevation. Once the heroes have access to the barrel, they are raised to an alcove that contains a Kruncha and the letter G.

Another alcove is to the right of here with six bananas in it. The primates are soon raised high into a narrower passage with two Krooks in long, thin spaces on the sides of it. They must dodge their hook projectiles, until the foes are soon crushed by the rising floor. Farther above this area, the duo can find a pathway leading them to the east past a trio of Spinies. In a wider room higher from here, they can find four Zingers that move in circular paths and orbit bananas. Once they pass the foes, they access a wide room with another passage on the opposite side of it. There are two Klampons with a Spiny between them in this area that the Kongs must pass as they head through the room. Once they reach the passage, they are led into a higher room with a barrel at the end of it. There are two passages at the top of the room, but one, which contains a Banana Coin and a Banana Bunch, is blocked off by a Zinger, who can only be defeated with the nearby barrel. The opposite passage leads simply to a trio of bananas. Either one of the passages can be used to reach a room that contains an End of Level Target. If they hit this target, they complete the level. Additionally, they can hit the target from a high platform to win a prize from it.
Enemies
The following enemies appear in the following quantities:

Klampon (13)

Krook (7)

Kruncha (pink) (2)

Kutlass (yellow) (1)

Mini-Necky (6)

Neek (2)

Spiny (20)

Zinger (yellow) (22)


Items and objects
The following items and objects appear in the following quantities:

Banana Bunch (5)

Banana Coin (3)

DK Barrel (3)


KONG Letters
- K: As the Kongs move up through the start of the level, they eventually enter into a wide area with two Spinies and a few floating pillars. Collectibles are located between each pillar, and the letter K can be collected from the gap on the far right.
- O: Shortly after Rambi's No Animal Sign, the Kongs are lifted towards two Blast Barrels which blast them up onto a tall platform. Before the floor rises up too high, Kongs can drop down from the platform and collect the letter O, which is floating slightly above ground, next to the tall platform's wall.
- N: The letter N is floating in a gap between the wall just right of the No Animal Sign.
- G: Late into the level, after the final DK Barrel, the Kongs encounter the second pink Kruncha, who emerges from an alcove containing the letter G.
Key items

- Cranky's Video Game Hero Coin: After the Kongs transform into Squawks, he must fly upward and pass some Krooks and Zingers. After passing these enemies, Squawks must go right and then flap down below into a passage, where the Video Game Hero Coin is located.
- Golden feather (Game Boy Advance version only): Shortly after exiting the second Bonus Area, a Klampon and Spiny start walking on the rising floor. The Kongs have to quickly move to the rightmost part of the floor and jump at the golden feather at the top right corner, right between the ceiling and the wall.
- Photograph (Game Boy Advance version only): After transforming into Squawks, he must fly up a narrow passage. There are three Krooks, the middle of which has a photograph above its head. Squawks can defeat the Krook by spitting an egg at it. The photograph is a picture of Krook, and it appears in the sixth page of the Scrapbook.
Bonus Areas


- Destroy them All!: As Rambi, the Kongs must continue through the first portion of the level. After encountering two Zingers and three Spinys, there is a group of Bananas arranged in the formation of a left-facing arrow, pointing to a wall. Rambi must use his Supercharge attack to break the wall open and enter into the Bonus Area. In this challenge, the rising floor carries Rambi up a vertical path with Zingers. Rambi has to defeat all six Zingers along the way so that Kremkoin appears just outside the exit.
- Find the Token!: The second Bonus Area's location is also pointed to by bananas in the shape of a left-facing arrow. After crossing the No Animal Sign with Squawks, the Kongs are awarded with a TNT Barrel, which can create an opening on the left wall to the next Bonus Area. The floor is rising rapidly, and the Kongs must quickly move underneath each gap while going up. They can also collect some bananas along the way. The Kremkoin appears on a platform at the very top of the Bonus Area.
Gallery
Super Nintendo Entertainment System
Rambi defeating a Neek
The Kongs jumping toward a Klampon
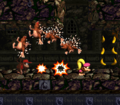
The Kongs defeating a row of Spinys
Dixie stands near the Star Barrel
The location of Squawks Barrel
Diddy jumping over hooks thrown by two Krooks
The Kongs open the path to the second Bonus Area


Game Boy Advance
Rambi entering the first Bonus Area.
Squawks flapping past two Krooks.
The Kongs going through the second Bonus Area


Names in other languages
| Language | Name | Meaning |
|---|---|---|
| Japanese | クラッシュ エレベーター Kurasshu Erebētā |
Crush Elevator |
| French | Bastion Broyeur |
Bastion Crush |
| German | Quetsch-Schloß (SNES) Pressburg (GBA) |
Crush Castle Squeeze Castle |
| Italian | Lo Stritolascimmie |
The Ape Crusher |
| Spanish | Castillo Abajo |
Down with the Castle |