
Parrot Chute Panic (Donkey Kong Country 2: Diddy's Kong Quest): Difference between revisions
(Added French translation and meaning.) |
LinkTheLefty (talk | contribs) mNo edit summary |
||
| (59 intermediate revisions by 30 users not shown) | |||
| Line 1: | Line 1: | ||
{{ | {{italic title|id=yes}} | ||
| | {{level infobox | ||
|image=[[File: | |image=[[File:Parrot Chute Panic.png]] | ||
|code=5 - 4 | |code=5 - 4 | ||
|game=''[[Donkey Kong Country 2: Diddy's Kong Quest | |world=[[Gloomy Gulch]] | ||
| | |game=''[[Donkey Kong Country 2: Diddy's Kong Quest]]'' | ||
|before=[[Gusty Glade|<<]] | |track=Flight of the Zinger | ||
|after=[[Web Woods|>>]] | |before=[[Gusty Glade (Donkey Kong Country 2: Diddy's Kong Quest)|<<]] | ||
|after=[[Web Woods (Donkey Kong Country 2: Diddy's Kong Quest)|>>]] | |||
|secret=<sup>[[Fiery Furnace (Donkey Kong Country 2: Diddy's Kong Quest)|KK]] | |||
}} | }} | ||
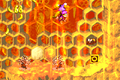
'''Parrot Chute Panic''' is the twenty-sixth level of ''[[Donkey Kong Country 2: Diddy's Kong Quest]]'' and | '''Parrot Chute Panic''' is the twenty-sixth level of ''[[Donkey Kong Country 2: Diddy's Kong Quest]]'' and the fourth level of [[Gloomy Gulch]]. It is the last [[Zinger]] hive level. There are a couple of [[Quawks]] in the level that [[Diddy Kong]] and [[Dixie Kong]] must use to descend the narrow pathways while avoiding several Zingers along the way. After reaching a point, Quawks drops both Kongs, and the next Quawks is found either shortly or directly afterward. Additionally, [[Squawks]] is used in both of the level's [[Bonus Area]]s. The ground portions are short, straightforward paths that sometimes have a [[Klampon]] or a [[Spiny (Donkey Kong Country 2: Diddy's Kong Quest)|Spiny]] walking around, and one path even has three [[Click-Clack]]s. The honey-coated ground from previous hive levels also appear during this part. Parrot Chute Panic's name is a play on "parrot" and "parachute," as a reference to Quawks being a parrot and by slowly taking the Kongs down the level like a parachute. | ||
==Layout== | |||
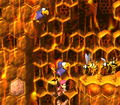
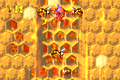
[[File:Parrot Chute Panic GBA dismount.png|thumb|left|Parrot Chute Panic in the Game Boy Advance version]] | |||
The level begins on a flat ledge with a gap ahead of it. A [[DK Barrel]] wobbles above the gap. If the heroes drop into the gap, they fall past many floating [[banana]]s and an alcove containing a [[DK Coin|Video Game Hero Coin]], and then land on another flat surface with some honey splattered on it. The honey is sticky so the Kongs cannot walk through it easily. A Quawks waits for them in a small gap. Once they grab onto the parrot, they slowly descend through a small passage with a few Zingers in the center of it. At the bottom of the passage, the Quawks drops the Kongs, who then land on more honey. A crate lies next to the honey, followed by a Zinger floating in the air and a Klampon who marches along a flat pathway found in a slightly lower area. The crate can be used to break open a nearby wall. If they enter the opening in the wall once they do so, they enter a hidden area with many bananas that form the shape of the [[Rareware]] logo. After they travel through the exit of this area, they reach a thin passage that they must drop though to reach the [[KONG Letters|letter K]], many bananas, and a [[Banana Coin]], and then land in an area located farther into the level. | |||
A Quawks hovers in a gap near the Klampon to the left of the aforementioned wall. It can pull the heroes into a wider passage with more Zingers around it. Some of these wasp enemies are placed in the center of the passage, while others line the walls. Another letter K is between two of the Zingers in the center of the area. The Quawks soon drops them above a few Zingers that they must avoid. After a small spot of honey, a Zinger can be found. If the heroes drop into the gap next to it, they land in a lower section of the level, where there are two additional Klampons and a DK Barrel. A pair of Zingers surround the third Quawks, who is present nearby. The bird helps them travel through a narrow passage with more Zingers in it. As before, some of the foes line the walls, while others fly in the middle of the area. The primates come past a Banana Coin and some bananas as they descend. | |||
The | |||
The parrot soon carries them into a narrower passage, which is followed by a wide room with a few more Zinger in it. Two Spinies walk along some sticky honey at the bottom of the room. The letter O is next to them. On the opposite side of the area, a small gap can be found. If they drop into it, they land on a Quawks, who carries them farther down the level, where there are more Zingers. This time, the passage is narrower than usual. A platform can be found in the center of the area with one of the Zingers on it. A Banana Bunch can be found on the right side of the platform, but only a single banana is on the left side. After the heroes fly over a trio of Zingers at the small turn, they Quawks prepares to drop them. Once they let go, they fall past a few ledges and land next to the [[Star Barrel]] in a small gap. | |||
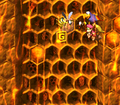
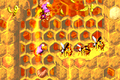
The | [[File:Parrot Chute Panic DKC2 shot 2.png|thumb|The heroes maneuver around many Zingers.]] | ||
A Quawks and a DK Barrel are in this gap. The Quawks carries them into a narrow passage, where they must maneuver around Zingers by flying from left to right in the area. The parrot soon drops them on a flat piece of land with a crate on it. Another Quawks is in the air near here over a gap. It can slowly lead the heroes down through the gap, which features some Zingers moving back a forth across the area. Once they pass three Zingers, the Quawks drops them onto a large, flat ledge with a Spiny on it. A gap is near here with the letter N by it. If the Kongs fall into the gap, they land in a slightly lower elevation, where they can find a Quawks in a small gap. This Animal Friend carries them through another narrow passage infested with dangerous Zingers, who are scattered all around. Three platforms are in the center of the area farther down. A trio of bananas are on the one side of the first two platforms, while Zingers wait to attack on the other sides. The third platform has collectibles all around it, although the right side has more valuable items by it. | |||
After the heroes pass these platforms, they ride through narrow turns that have Zingers around them. Soon, the Quawks drops the Kongs past a Zinger and through a narrower passage. An area of land is under here with a Klampon and a DK Barrel on it. A small gap is to the left of here that leads down to a tight passage with three Click-Clacks in it. After dropping off of the ledge near the trio, the Kongs can find a small hill with a gap next to it. A Quawks waits here. This parrot guides the group deeper into the hive, where Zingers line the walls around a few sharp turns. After three turns, the bird drops the heroes into the claws of another Quawks. It pulls them past a small group of Zingers found along the walls and in the middle of the path. A wider area follows here with some Zingers flying back and forth. Another Zinger in this area also flies in a circular path, surrounding the letter G. After passing a few pairs of Zingers floating from left to right, the parrot leads them into a narrow passage and prepares to drop them onto a pile of sticky honey. Once they reach land, they can see the [[End of Level Target]] just ahead, rotating between a Banana, Banana Coin, [[Banana Bunch]], and a [[Red Balloon]]. If the Kongs jump on the target from a hidden hook to the right, they can win one of these prizes. | |||
{{br|left}} | |||
==Enemies== | |||
The following enemies appear in the following quantities: | |||
[[ | <gallery> | ||
Click Clack DKC2.png|[[Click-Clack]] (3) | |||
Klampon DKC2.png|[[Klampon]] (4) | |||
Spiny DKC2.png|[[Spiny (Donkey Kong Country 2: Diddy's Kong Quest)|Spiny]] (3) | |||
Zinger DKC2 yellow.png|[[Zinger]] (yellow) (92) | |||
</gallery> | |||
==Items and objects== | |||
The following items and objects appear in the following quantities: | |||
<gallery> | |||
Banana Bunch DKC SNES.png|[[Banana Bunch]] (2) | |||
Banana Coin.png|[[Banana Coin]] (5) | |||
Crate DKC2.png|[[Crate]] (1) | |||
DK Barrel.png|[[DK Barrel]] (5) | |||
TNT Barrel.png|[[TNT Barrel]] (1, Bonus Area only) | |||
</gallery> | |||
===K-O-N-G Letters=== | |||
[[File:Parrot Chute Panic second letter K.png|thumb|The alternate letter K, found by exiting a room with bananas in the formation of the Rare logo.]] | |||
*'''K:''' There are two letter K's. While riding the second Quawks, the Kongs can find the letter K between the second and third Zingers. Alternatively, the Kongs can skip the second Quawks' segment and carry the [[Crate]] into a wall next to a [[Klampon]]. Doing so takes them into a room with many bananas sorted in the shape of the [[Rare, Ltd.|Rare]] logo. They must exit out the other side, back into the main level, to find the letter K floating above the following opening. | |||
*'''O:''' After the third Quawks drops Diddy and Dixie on the ground, they can go right to find the letter O near the two Spinys. | |||
*'''N:''' After the fifth Quawks (second from the Star Barrel) drops both Kongs on the ground, they must pass another Spiny and jump down to find the letter N below a few bananas. | |||
*'''G:''' After passing three Click-Clacks, the Kongs must continue down another Quawks segment and then onto the next Quawks. As they pass through Zingers with the second Quawks, they eventually stumble into a Zinger circling around the letter G. | |||
{{br}} | |||
After passing a | ===Key items=== | ||
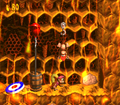
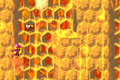
[[File:Parrot Chute Panic DK Coin.png|thumb|The location of the Video Game Hero Coin.]] | |||
*'''[[DK Coin|Cranky's Video Game Hero Coin]]:''' At the very start, the Kongs jump down the abyss. As they fall, Dixie must use her [[Helicopter Spin]] to slow them and keep to the left. The Video Game Hero Coin appears in a gap on the left. | |||
*'''[[Golden feather]] (Game Boy Advance version only):''' After passing three Click-Clacks, the Kongs must grab onto Quawks and continue down. After passing some Zingers, the Kongs can obtain the golden feather at a corner on the left. | |||
*'''[[Photograph]] (Game Boy Advance version only):''' After the Star Barrel, the Kongs must continue down with Quawks. After he drops them, the Kongs can find a Crate on the ground (which does not appear in the original). They must pick up the Crate and throw it at a nearby Zinger with a camera icon over its head. This gives the photograph of Zinger in the third page of the [[Scrapbook (Donkey Kong Country series)|Scrapbook]]. | |||
{{br}} | |||
==Bonus Areas== | |||
{{multiframe|[[File:Parrot Chute Panic Bonus Area 1.png|200px]] [[File:Parrot Chute Panic GBA Bonus Area 2.png|200px]]|size=420|The first and second Bonus Levels respectively}} | |||
Parrot Chute Panic has two Bonus Levels, listed by type: | |||
*'''Find the Token!''': Shortly after the start of the level, the Kongs encounter two Klampons, with a Quawks to the left. They must carefully navigate around several Zingers. Eventually the Kongs and Quawks enter a more spacious area, where they must quickly move left. The Kongs must drop from Quawks onto the small path and go in the Bonus Area entryway on the left. In the Bonus Area, Diddy and Dixie must ride Squawks and collect the [[Kremkoin]] at the top within 15 seconds. They must navigate around a few curves, with some bananas appearing along the trail, before finding the Kremkoin at the top. The Kongs exit out the Bonus Area from another small path, which has a No Animal Sign. | |||
*'''Destroy them All!''': Just after the Kongs let go of the second Quawks past the Star Barrel, they must jump left and grab on a patch of honey on the wall. They must jump between a few honey patches to reach the Bonus Area entrance above. In the Bonus Area, the Kongs must grab onto another Squawks, who must defeat the eight Zingers by spitting coconuts at them. After defeating the seventh Zinger, the Kongs must pass the No Animal Sign, which releases a TNT Barrel. They must use the TNT Barrel to defeat the eighth and final Zinger. The Kremkoin then appears, and the Kongs must jump up a couple of steps to obtain it. | |||
==Gallery== | ==Gallery== | ||
===Super Nintendo Entertainment System=== | |||
<gallery> | |||
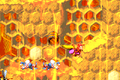
Parrot Chute Panic DKC2 shot.png|The Kongs and Quawks go past some Zingers | |||
ParrotChutePanicSNES1.png|Quawks and the Kongs descend around the first few Zingers at the start. | |||
</gallery> | Parrot Chute Panic third Quawks.png|The Kongs jump to the third Quawks of the level | ||
==Names in | Parrot Chute Panic Bonus Area 1 location.png|The Kongs go to the first Bonus Area's entrance. | ||
{{ | ParrotChutePanicSNES2.png|Dixie continuing down the level from the next Quawks | ||
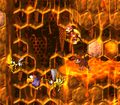
Parrot Chute Panic DKC2 letter G.png|The Kongs and Quawks encounter a Zinger guarding the letter G. | |||
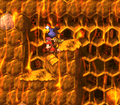
Parrot Chute Panic DKC2 end hook.png|The Kongs hanging from the hidden hook to the right of the End of Level Target. | |||
</gallery> | |||
===Game Boy Advance=== | |||
<gallery> | |||
Parrot Chute Panic DKC2 GBA.png|The Kongs lower themselves towards the first letter K, located on the main path. | |||
Parrot Chute Panic GBA Klampons.png|Dixie throwing a barrel at two Klampons. | |||
Parrot Chute Panic GBA letter O.png|Quawks carries both Kongs to the letter O and two Spinys | |||
Parrot Chute Panic GBA Bonus Area 2 location.png|The Kongs next to the second Bonus Area entryway | |||
Parrot Chute Panic GBA Golden Feather.png|The Kongs and Quawks find the golden feather | |||
Parrot Chute Panic GBA dismount.png|The Kongs dismount one Quawks and onto the next one | |||
Parrot Chute Panic GBA screenshot.png|The Kongs and Quawks pass through two Zingers | |||
</gallery> | |||
==Names in other languages== | |||
{{foreign names | |||
|Jap=パラシュート パニック | |||
|JapR=Parashūto Panikku | |||
|JapM=Parachute Panic | |||
|Spa=Pánico Lorito | |Spa=Pánico Lorito | ||
|SpaM=Parrot Panic | |SpaM=Parrot Panic | ||
| | |Fre=Perroquet Paniqué | ||
| | |FreM=Panicked Parrot | ||
|Ger=Papageien-Absturz | |Ger=Papageien-Absturz | ||
|GerM=Parrot Fall | |GerM=Parrot Fall | ||
|Ita=I Pappacadute | |||
|ItaM=The Parrot Chute | |||
}} | |||
==Trivia== | |||
*Parrot Chute Panic is one of the few levels where the Kongs cannot obtain every K-O-N-G Letter and enter each Bonus Area in a single run; upon finishing the first Bonus Area, the Kongs are brought back to the level beyond the "O", unable to return. | |||
{{DKC2}} | {{DKC2}} | ||
[[Category:Food areas]] | |||
[[Category: | |||
[[Category:Crocodile Isle]] | [[Category:Crocodile Isle]] | ||
[[Category | [[Category:Donkey Kong Country 2: Diddy's Kong Quest levels]] | ||
Latest revision as of 13:19, March 30, 2024
| Level | |
|---|---|
| Parrot Chute Panic | |

| |
| Level code | 5 - 4 |
| World | Gloomy Gulch |
| Game | Donkey Kong Country 2: Diddy's Kong Quest |
| Music track | Flight of the Zinger |
| << Directory of levels >> KK | |
Parrot Chute Panic is the twenty-sixth level of Donkey Kong Country 2: Diddy's Kong Quest and the fourth level of Gloomy Gulch. It is the last Zinger hive level. There are a couple of Quawks in the level that Diddy Kong and Dixie Kong must use to descend the narrow pathways while avoiding several Zingers along the way. After reaching a point, Quawks drops both Kongs, and the next Quawks is found either shortly or directly afterward. Additionally, Squawks is used in both of the level's Bonus Areas. The ground portions are short, straightforward paths that sometimes have a Klampon or a Spiny walking around, and one path even has three Click-Clacks. The honey-coated ground from previous hive levels also appear during this part. Parrot Chute Panic's name is a play on "parrot" and "parachute," as a reference to Quawks being a parrot and by slowly taking the Kongs down the level like a parachute.
LayoutEdit

The level begins on a flat ledge with a gap ahead of it. A DK Barrel wobbles above the gap. If the heroes drop into the gap, they fall past many floating bananas and an alcove containing a Video Game Hero Coin, and then land on another flat surface with some honey splattered on it. The honey is sticky so the Kongs cannot walk through it easily. A Quawks waits for them in a small gap. Once they grab onto the parrot, they slowly descend through a small passage with a few Zingers in the center of it. At the bottom of the passage, the Quawks drops the Kongs, who then land on more honey. A crate lies next to the honey, followed by a Zinger floating in the air and a Klampon who marches along a flat pathway found in a slightly lower area. The crate can be used to break open a nearby wall. If they enter the opening in the wall once they do so, they enter a hidden area with many bananas that form the shape of the Rareware logo. After they travel through the exit of this area, they reach a thin passage that they must drop though to reach the letter K, many bananas, and a Banana Coin, and then land in an area located farther into the level.
A Quawks hovers in a gap near the Klampon to the left of the aforementioned wall. It can pull the heroes into a wider passage with more Zingers around it. Some of these wasp enemies are placed in the center of the passage, while others line the walls. Another letter K is between two of the Zingers in the center of the area. The Quawks soon drops them above a few Zingers that they must avoid. After a small spot of honey, a Zinger can be found. If the heroes drop into the gap next to it, they land in a lower section of the level, where there are two additional Klampons and a DK Barrel. A pair of Zingers surround the third Quawks, who is present nearby. The bird helps them travel through a narrow passage with more Zingers in it. As before, some of the foes line the walls, while others fly in the middle of the area. The primates come past a Banana Coin and some bananas as they descend.
The parrot soon carries them into a narrower passage, which is followed by a wide room with a few more Zinger in it. Two Spinies walk along some sticky honey at the bottom of the room. The letter O is next to them. On the opposite side of the area, a small gap can be found. If they drop into it, they land on a Quawks, who carries them farther down the level, where there are more Zingers. This time, the passage is narrower than usual. A platform can be found in the center of the area with one of the Zingers on it. A Banana Bunch can be found on the right side of the platform, but only a single banana is on the left side. After the heroes fly over a trio of Zingers at the small turn, they Quawks prepares to drop them. Once they let go, they fall past a few ledges and land next to the Star Barrel in a small gap.

A Quawks and a DK Barrel are in this gap. The Quawks carries them into a narrow passage, where they must maneuver around Zingers by flying from left to right in the area. The parrot soon drops them on a flat piece of land with a crate on it. Another Quawks is in the air near here over a gap. It can slowly lead the heroes down through the gap, which features some Zingers moving back a forth across the area. Once they pass three Zingers, the Quawks drops them onto a large, flat ledge with a Spiny on it. A gap is near here with the letter N by it. If the Kongs fall into the gap, they land in a slightly lower elevation, where they can find a Quawks in a small gap. This Animal Friend carries them through another narrow passage infested with dangerous Zingers, who are scattered all around. Three platforms are in the center of the area farther down. A trio of bananas are on the one side of the first two platforms, while Zingers wait to attack on the other sides. The third platform has collectibles all around it, although the right side has more valuable items by it.
After the heroes pass these platforms, they ride through narrow turns that have Zingers around them. Soon, the Quawks drops the Kongs past a Zinger and through a narrower passage. An area of land is under here with a Klampon and a DK Barrel on it. A small gap is to the left of here that leads down to a tight passage with three Click-Clacks in it. After dropping off of the ledge near the trio, the Kongs can find a small hill with a gap next to it. A Quawks waits here. This parrot guides the group deeper into the hive, where Zingers line the walls around a few sharp turns. After three turns, the bird drops the heroes into the claws of another Quawks. It pulls them past a small group of Zingers found along the walls and in the middle of the path. A wider area follows here with some Zingers flying back and forth. Another Zinger in this area also flies in a circular path, surrounding the letter G. After passing a few pairs of Zingers floating from left to right, the parrot leads them into a narrow passage and prepares to drop them onto a pile of sticky honey. Once they reach land, they can see the End of Level Target just ahead, rotating between a Banana, Banana Coin, Banana Bunch, and a Red Balloon. If the Kongs jump on the target from a hidden hook to the right, they can win one of these prizes.
EnemiesEdit
The following enemies appear in the following quantities:

Click-Clack (3)

Klampon (4)

Spiny (3)

Zinger (yellow) (92)


Items and objectsEdit
The following items and objects appear in the following quantities:

Banana Bunch (2)

Banana Coin (5)

Crate (1)

DK Barrel (5)

TNT Barrel (1, Bonus Area only)


K-O-N-G LettersEdit

- K: There are two letter K's. While riding the second Quawks, the Kongs can find the letter K between the second and third Zingers. Alternatively, the Kongs can skip the second Quawks' segment and carry the Crate into a wall next to a Klampon. Doing so takes them into a room with many bananas sorted in the shape of the Rare logo. They must exit out the other side, back into the main level, to find the letter K floating above the following opening.
- O: After the third Quawks drops Diddy and Dixie on the ground, they can go right to find the letter O near the two Spinys.
- N: After the fifth Quawks (second from the Star Barrel) drops both Kongs on the ground, they must pass another Spiny and jump down to find the letter N below a few bananas.
- G: After passing three Click-Clacks, the Kongs must continue down another Quawks segment and then onto the next Quawks. As they pass through Zingers with the second Quawks, they eventually stumble into a Zinger circling around the letter G.
Key itemsEdit

- Cranky's Video Game Hero Coin: At the very start, the Kongs jump down the abyss. As they fall, Dixie must use her Helicopter Spin to slow them and keep to the left. The Video Game Hero Coin appears in a gap on the left.
- Golden feather (Game Boy Advance version only): After passing three Click-Clacks, the Kongs must grab onto Quawks and continue down. After passing some Zingers, the Kongs can obtain the golden feather at a corner on the left.
- Photograph (Game Boy Advance version only): After the Star Barrel, the Kongs must continue down with Quawks. After he drops them, the Kongs can find a Crate on the ground (which does not appear in the original). They must pick up the Crate and throw it at a nearby Zinger with a camera icon over its head. This gives the photograph of Zinger in the third page of the Scrapbook.
Bonus AreasEdit


Parrot Chute Panic has two Bonus Levels, listed by type:
- Find the Token!: Shortly after the start of the level, the Kongs encounter two Klampons, with a Quawks to the left. They must carefully navigate around several Zingers. Eventually the Kongs and Quawks enter a more spacious area, where they must quickly move left. The Kongs must drop from Quawks onto the small path and go in the Bonus Area entryway on the left. In the Bonus Area, Diddy and Dixie must ride Squawks and collect the Kremkoin at the top within 15 seconds. They must navigate around a few curves, with some bananas appearing along the trail, before finding the Kremkoin at the top. The Kongs exit out the Bonus Area from another small path, which has a No Animal Sign.
- Destroy them All!: Just after the Kongs let go of the second Quawks past the Star Barrel, they must jump left and grab on a patch of honey on the wall. They must jump between a few honey patches to reach the Bonus Area entrance above. In the Bonus Area, the Kongs must grab onto another Squawks, who must defeat the eight Zingers by spitting coconuts at them. After defeating the seventh Zinger, the Kongs must pass the No Animal Sign, which releases a TNT Barrel. They must use the TNT Barrel to defeat the eighth and final Zinger. The Kremkoin then appears, and the Kongs must jump up a couple of steps to obtain it.
GalleryEdit
Super Nintendo Entertainment SystemEdit
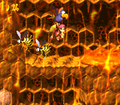
The Kongs and Quawks go past some Zingers
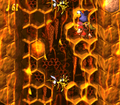
Quawks and the Kongs descend around the first few Zingers at the start.
The Kongs jump to the third Quawks of the level
The Kongs go to the first Bonus Area's entrance.
Dixie continuing down the level from the next Quawks
The Kongs and Quawks encounter a Zinger guarding the letter G.
The Kongs hanging from the hidden hook to the right of the End of Level Target.


Game Boy AdvanceEdit

The Kongs lower themselves towards the first letter K, located on the main path.
Dixie throwing a barrel at two Klampons.
Quawks carries both Kongs to the letter O and two Spinys
The Kongs next to the second Bonus Area entryway

The Kongs and Quawks find the golden feather
The Kongs dismount one Quawks and onto the next one
The Kongs and Quawks pass through two Zingers


Names in other languagesEdit
| Language | Name | Meaning |
|---|---|---|
| Japanese | パラシュート パニック Parashūto Panikku |
Parachute Panic |
| French | Perroquet Paniqué |
Panicked Parrot |
| German | Papageien-Absturz |
Parrot Fall |
| Italian | I Pappacadute |
The Parrot Chute |
| Spanish | Pánico Lorito |
Parrot Panic |
TriviaEdit
- Parrot Chute Panic is one of the few levels where the Kongs cannot obtain every K-O-N-G Letter and enter each Bonus Area in a single run; upon finishing the first Bonus Area, the Kongs are brought back to the level beyond the "O", unable to return.