Tanked Up Trouble: Difference between revisions
Fawfulfury65 (talk | contribs) (Wow. This is one heck of a long level to write about.) |
mNo edit summary |
||
| (63 intermediate revisions by 33 users not shown) | |||
| Line 1: | Line 1: | ||
{{ | {{more images|K-O-N-G Letter locations and Bonus Level.}} | ||
{{level infobox | |||
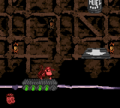
|image=[[ | |image=[[File:Tanked Up Trouble SNES.png]] | ||
|code=6 - 1 | |code=6 - 1 | ||
|game=''[[Donkey Kong Country]] | |game=''[[Donkey Kong Country]] | ||
|before=[[Boss Dumb Drum|<<]] | |||
|before=[[ | |||
|after=[[Manic Mincers|>>]] | |after=[[Manic Mincers|>>]] | ||
}} | }} | ||
'''Tanked Up Trouble''' is the twenty-ninth level of the [[ | '''Tanked Up Trouble''' is the twenty-ninth level of ''[[Donkey Kong Country]]'' and the first level of [[Chimp Caverns]]. [[Donkey Kong]] and [[Diddy Kong]] must stand on a moving platform to progress through the level. The platform is similar to those in [[Trick Track Trek]], as it moves slowly on a set path. However, the platforms of Tanked Up Trouble are mainly different in that they run on limited fuel, and the [[Kong]]s must provide it with [[Fuel Drum|Fuel Canister]]s to keep it running. The platform starts entirely fueled, and its fuel gauge is represented by five circles on the side of the platform. The circles start out green, but as the fuel depletes, the circles slowly change to red. If the circles are orange, it means that the platform is fueled halfway. The Kongs cannot skip a Fuel Canister because it usually results in the platform running out of fuel before coming within distance of another Fuel Canister. [[Zinger]]s are the main enemy in the level, and they are encountered during the latter half of the level. Some [[Kritter]]s are on the small boardwalk platforms which hang from the ceiling. The Kongs also encounter some [[Necky]]s, mostly during the first half of the level. If the platform runs out of fuel, it falls off the track with the Kongs. | ||
==Layout== | |||
{{multiframe|[[File:TankedUpTrouble-GBC-1.png]] [[File:TankedUpTrouble-GBA-2.png|180px]]|Tanked Up Trouble's appearance in the Game Boy Color version, top, and the Game Boy Advance version, bottom|align=left|size=200}} | |||
At the start of the level, the Kongs can find a pit with a slanted pathway on the other side of it. After crossing another gap, they land on a flat scaffold with a dark platform ahead of it. The platform is activated upon touching it. The platform, running on a limited supply of fuel leads them to a Fuel Canister, which refuels it completely. Afterwards, the platform makes a 90 degree turn, beginning to travel upwards. Shortly after, it pulls them to the east, where a Fuel Canister can be found above a Necky. The third Fuel Canister waits just ahead next to a hanging platform with some [[banana]]s on it. The platform then leads them down a few sharp turns to a Necky, who is followed by a thin, black platform with an arrow on it; this platform slowly drops after being stood on. A Fuel Canister hovers above the platform. Eventually, the Kongs' mobile platform pulls them towards a set of hanging platforms, one of which that holds a Kritter and another Fuel Canister. At this point, the platform begins to gain speed, heading towards a pair of black platforms, similar to the one found previously. A Fuel Canister hovers around them. The heroes can also find a Necky after the second of these platforms. Once they get back onto the mobile platform, it makes a sharp turn, beginning to move upwards. As they ride up, they ride past a Kritter, who stands on a hanging platform with the [[KONG Letters|letter O]] above it. Another Kritter stands on a platform at the top of the area; this foe has a Fuel Canister above it. After passing this Kritter, the moving platform carries the duo to the east, where they can find another black platform that falls when they land on it. Soon after this, the heroes come up to a platform hanging between two Neckys. A Fuel Canister floats above the second Necky. The moving platform then leads the primates towards a Fuel Canister found high in the air. It can be reached with the use of a [[Blast Barrel]] hidden at the lower part of the area. After passing the barrel, the platform makes a stop next to a few hanging platforms with a villainous Kritter on one of them. The level's [[Star Barrel|Continue Barrel]] is located on one of the platforms. | |||
Following the Continue Barrel is a nearby mobile platform that begins to move along the track once activated. It leads them straight towards a DK Barrel with a [[tire (object)|tire]] to the right of it. A Fuel Canister positioned high in the air can be reached with the bouncy object. Neckys can be found ahead with hanging scaffolds after them; a tire stands on each of the platforms. The Kongs can find a Fuel Canister just ahead. After passing the barrel, the mobile platform follows a pathway farther down the area, where a Zinger can be found between a tire and another Fuel Canister. Another Fuel Canister is just ahead of here in the center of two Zingers. They can reach both barrels with a tire. Soon, the fuel-powered platform rises along a vertical path and then moves east under a hanging scaffold and a tire. Larger hanging scaffolds are ahead with a tire and a pair of Gnawties placed on them. The tire can be rolled along the two platforms to help the heroes reach a Fuel Canister that they can bounce to. The primates are then lead back downwards towards a Blast Barrel that can shoot them to a DK Barrel and another Fuel Canister. If the heroes manage to travel farther, they come up to a long scaffold holding two Gnawties. The fuel-powered platform moves under this platform, coming up to the letter N on the way. A pair of Zingers follow the scaffold with a Fuel Canister between them. Once the moving platform passes these wasps, it pulls the duo up to a Barrel Cannon with a Blast Barrel to the upper-right of it. They blast the heroes into a Banana Bunch and back onto the platform, which then guides them towards some Zingers. The first Zinger is found alone, but the next two are piled on top of each other. At this point, the mobile platform begins to drain fuel faster and gain less fuel for the barrels. Once they jump over the enemies, the primates are led farther down to a Fuel Canister with another pair of Zingers around it. | |||
The heroes must jump between the wasps to grab the barrel and avoid the foes. The moving platform then leads the Kongs upwards towards two more Zinger with a Fuel Canister above each of them. The next Fuel Canister is located ahead in a higher part of the track, where a Zinger orbits it. A trio of Zingers are ahead with a Banana Bunch between all of them. The primates must maneuver over and under them to survive and reach a trail of bananas. After passing the trail, the moving platform slowly approaches a Fuel Canister, which has a scaffold hanging above it. If the Kongs continue through the area after the Fuel Canister, they come up to a trio of Zingers and then the letter G. If they jump to the scaffold, they can reach a Blast Barrel that shoots them away from the mobile platform and onto a safe set of scaffolds. The first scaffold here holds a sign indicating that the level is almost over. After climbing along two scaffolds following this, both carrying Gnawty enemies, they make their way onto a flat scaffold with an exit sign on it. Once the two friends pass the sign, they gain access to the next level, [[Manic Mincers]]. | |||
==Enemies== | |||
The following enemies appear in the following quantities: | |||
<gallery> | |||
Gnawty.png|[[Gnawty]] (6) | |||
Kritter-DKC.png|[[Kritter]] (4) | |||
Necky.png|[[Necky]] (7) | |||
Zinger_DKC.png|[[Zinger]] (21) | |||
</gallery> | |||
==Items and objects== | |||
The following items and objects appear in the following quantities: | |||
==Names in other | <gallery> | ||
{{ | DK Barrel DKC.png|[[DK Barrel]] (3) | ||
| | Enguarde Token Sprite SNES.png|[[Enguarde]] [[animal token|Token]] (1){{footnote|main|a}} | ||
| | Red Balloon DKC SNES.png|[[Red Balloon|Life Balloon]] (1) | ||
</gallery> | |||
{{footnote|note|a|To get the Enguarde Token, the Kongs must keep standing on the first moving platform after its path appears to end, causing it to go further on an invisible path toward the token.}} | |||
===K-O-N-G Letters=== | |||
*'''K:''' The letter K hovers above the second Necky, which flies up and down under it. | |||
*'''O:''' Shortly after the letter K, there are two down arrow platforms, which a 5-unit Fuel Canister floats between. The Kongs must pass a Necky and then ascend past two Kritters. The letter O is directly over the lower Kritter to the right. | |||
*'''N:''' The letter N is directly under a hanging platform just after the third DK Barrel. | |||
*'''G:''' Near the end of the level, the Kongs must ride past several Zingers. If they skip the Blast Barrel shortcut, they can collect the letter G, which is hovering over the last Zinger. | |||
==Bonus Level== | |||
Tanked Up Trouble has only one Bonus Level, listed by its type in the Game Boy Advance version: | |||
*'''''Stop the Barrel!''''': When the Kongs start to ride a platform, they must continue until the line goes up. They can jump down into a [[Bonus Barrel]] directly below. In the [[Bonus Level]], the Kongs must observe a [[Red Balloon|Life Balloon]] move between four barrels until it eventually stops. The Kongs must jump at the barrel that it stopped in to win the Life Balloon. They are then sent back into the main level. | |||
==Gallery== | |||
<gallery> | |||
Tanked Up Trouble DKC shot.png|The Kongs jump onto the fuel-powered platform]] | |||
TankedUpTrouble-SNES-1.png|Donkey Kong jumps at a Necky, whom he must bounce on to reach a Fuel Canister. | |||
TankedUpTrouble-SNES-2.png|Donkey Kong jumps at a Fuel Canister above a Kritter. | |||
TankedUpTrouble-SNES-3.png|Diddy bounces off a Tire to reach a Fuel Canister. | |||
Tanked Up Trouble DKC shot 2.png|The Kongs approach the end of the level | |||
Tanked Up Trouble GBC.png|Diddy approaches a Fuel Canister in the Game Boy Color version | |||
TankedUpTrouble-GBA-1.png|The platform moves on an invisible path to an Enguarde Token in the Game Boy Advance version | |||
</gallery> | |||
==Names in other languages== | |||
{{foreign names | |||
|Jap=トリックトラックリフト2 | |||
|JapR=Torikku Torakku Rifuto 2 | |||
|JapM=Trick Track Lift 2 | |||
The title is represented as a sequel to [[Trick Track Trek]]. | |||
|Spa=Problema de Tanques | |||
|SpaM=Tanks Problem | |||
|Fre=Tracas Trouble | |||
|FreM=Terrible Trouble | |||
|Ger=Aufgetankter Ärger | |Ger=Aufgetankter Ärger | ||
|GerM= | |GerM=Tanked Up Trouble | ||
|Ita=Fa' il Pieno | |||
{{DKC}} | |ItaM=Do the Full | ||
}} | |||
==Trivia== | |||
*In the original version, if the moving platform runs out of fuel and the Kongs manage to jump to safety when it falls off the track, the leader will become upset as shown by the animation that plays when losing a [[Bonus Level]], and then the player will lose a life.{{Ref needed}} | |||
{{DKC levels}} | |||
[[Category:Mines]] | |||
[[Category:Donkey Kong Island]] | [[Category:Donkey Kong Island]] | ||
[[Category:Donkey Kong | [[Category:Donkey Kong Country levels]] | ||
Latest revision as of 10:19, March 27, 2024
It has been requested that more images be uploaded for this article. Remove this notice only after the additional image(s) have been added. Reason: K-O-N-G Letter locations and Bonus Level.
| Level | |
|---|---|
| Tanked Up Trouble | |

| |
| Level code | 6 - 1 |
| Game | Donkey Kong Country |
| << Directory of levels >> | |
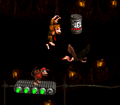
Tanked Up Trouble is the twenty-ninth level of Donkey Kong Country and the first level of Chimp Caverns. Donkey Kong and Diddy Kong must stand on a moving platform to progress through the level. The platform is similar to those in Trick Track Trek, as it moves slowly on a set path. However, the platforms of Tanked Up Trouble are mainly different in that they run on limited fuel, and the Kongs must provide it with Fuel Canisters to keep it running. The platform starts entirely fueled, and its fuel gauge is represented by five circles on the side of the platform. The circles start out green, but as the fuel depletes, the circles slowly change to red. If the circles are orange, it means that the platform is fueled halfway. The Kongs cannot skip a Fuel Canister because it usually results in the platform running out of fuel before coming within distance of another Fuel Canister. Zingers are the main enemy in the level, and they are encountered during the latter half of the level. Some Kritters are on the small boardwalk platforms which hang from the ceiling. The Kongs also encounter some Neckys, mostly during the first half of the level. If the platform runs out of fuel, it falls off the track with the Kongs.
Layout[edit]


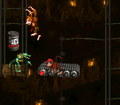
At the start of the level, the Kongs can find a pit with a slanted pathway on the other side of it. After crossing another gap, they land on a flat scaffold with a dark platform ahead of it. The platform is activated upon touching it. The platform, running on a limited supply of fuel leads them to a Fuel Canister, which refuels it completely. Afterwards, the platform makes a 90 degree turn, beginning to travel upwards. Shortly after, it pulls them to the east, where a Fuel Canister can be found above a Necky. The third Fuel Canister waits just ahead next to a hanging platform with some bananas on it. The platform then leads them down a few sharp turns to a Necky, who is followed by a thin, black platform with an arrow on it; this platform slowly drops after being stood on. A Fuel Canister hovers above the platform. Eventually, the Kongs' mobile platform pulls them towards a set of hanging platforms, one of which that holds a Kritter and another Fuel Canister. At this point, the platform begins to gain speed, heading towards a pair of black platforms, similar to the one found previously. A Fuel Canister hovers around them. The heroes can also find a Necky after the second of these platforms. Once they get back onto the mobile platform, it makes a sharp turn, beginning to move upwards. As they ride up, they ride past a Kritter, who stands on a hanging platform with the letter O above it. Another Kritter stands on a platform at the top of the area; this foe has a Fuel Canister above it. After passing this Kritter, the moving platform carries the duo to the east, where they can find another black platform that falls when they land on it. Soon after this, the heroes come up to a platform hanging between two Neckys. A Fuel Canister floats above the second Necky. The moving platform then leads the primates towards a Fuel Canister found high in the air. It can be reached with the use of a Blast Barrel hidden at the lower part of the area. After passing the barrel, the platform makes a stop next to a few hanging platforms with a villainous Kritter on one of them. The level's Continue Barrel is located on one of the platforms.
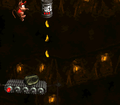
Following the Continue Barrel is a nearby mobile platform that begins to move along the track once activated. It leads them straight towards a DK Barrel with a tire to the right of it. A Fuel Canister positioned high in the air can be reached with the bouncy object. Neckys can be found ahead with hanging scaffolds after them; a tire stands on each of the platforms. The Kongs can find a Fuel Canister just ahead. After passing the barrel, the mobile platform follows a pathway farther down the area, where a Zinger can be found between a tire and another Fuel Canister. Another Fuel Canister is just ahead of here in the center of two Zingers. They can reach both barrels with a tire. Soon, the fuel-powered platform rises along a vertical path and then moves east under a hanging scaffold and a tire. Larger hanging scaffolds are ahead with a tire and a pair of Gnawties placed on them. The tire can be rolled along the two platforms to help the heroes reach a Fuel Canister that they can bounce to. The primates are then lead back downwards towards a Blast Barrel that can shoot them to a DK Barrel and another Fuel Canister. If the heroes manage to travel farther, they come up to a long scaffold holding two Gnawties. The fuel-powered platform moves under this platform, coming up to the letter N on the way. A pair of Zingers follow the scaffold with a Fuel Canister between them. Once the moving platform passes these wasps, it pulls the duo up to a Barrel Cannon with a Blast Barrel to the upper-right of it. They blast the heroes into a Banana Bunch and back onto the platform, which then guides them towards some Zingers. The first Zinger is found alone, but the next two are piled on top of each other. At this point, the mobile platform begins to drain fuel faster and gain less fuel for the barrels. Once they jump over the enemies, the primates are led farther down to a Fuel Canister with another pair of Zingers around it.
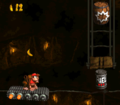
The heroes must jump between the wasps to grab the barrel and avoid the foes. The moving platform then leads the Kongs upwards towards two more Zinger with a Fuel Canister above each of them. The next Fuel Canister is located ahead in a higher part of the track, where a Zinger orbits it. A trio of Zingers are ahead with a Banana Bunch between all of them. The primates must maneuver over and under them to survive and reach a trail of bananas. After passing the trail, the moving platform slowly approaches a Fuel Canister, which has a scaffold hanging above it. If the Kongs continue through the area after the Fuel Canister, they come up to a trio of Zingers and then the letter G. If they jump to the scaffold, they can reach a Blast Barrel that shoots them away from the mobile platform and onto a safe set of scaffolds. The first scaffold here holds a sign indicating that the level is almost over. After climbing along two scaffolds following this, both carrying Gnawty enemies, they make their way onto a flat scaffold with an exit sign on it. Once the two friends pass the sign, they gain access to the next level, Manic Mincers.
Enemies[edit]
The following enemies appear in the following quantities:


Items and objects[edit]
The following items and objects appear in the following quantities:

DK Barrel (3)

Life Balloon (1)

a - To get the Enguarde Token, the Kongs must keep standing on the first moving platform after its path appears to end, causing it to go further on an invisible path toward the token.
K-O-N-G Letters[edit]
- K: The letter K hovers above the second Necky, which flies up and down under it.
- O: Shortly after the letter K, there are two down arrow platforms, which a 5-unit Fuel Canister floats between. The Kongs must pass a Necky and then ascend past two Kritters. The letter O is directly over the lower Kritter to the right.
- N: The letter N is directly under a hanging platform just after the third DK Barrel.
- G: Near the end of the level, the Kongs must ride past several Zingers. If they skip the Blast Barrel shortcut, they can collect the letter G, which is hovering over the last Zinger.
Bonus Level[edit]
Tanked Up Trouble has only one Bonus Level, listed by its type in the Game Boy Advance version:
- Stop the Barrel!: When the Kongs start to ride a platform, they must continue until the line goes up. They can jump down into a Bonus Barrel directly below. In the Bonus Level, the Kongs must observe a Life Balloon move between four barrels until it eventually stops. The Kongs must jump at the barrel that it stopped in to win the Life Balloon. They are then sent back into the main level.
Gallery[edit]
![The Kongs jump onto the fuel-powered platform]]](https://mario.wiki.gallery/images/thumb/f/f6/Tanked_Up_Trouble_DKC_shot.png/120px-Tanked_Up_Trouble_DKC_shot.png)
The Kongs jump onto the fuel-powered platform]]
Donkey Kong jumps at a Necky, whom he must bounce on to reach a Fuel Canister.
Donkey Kong jumps at a Fuel Canister above a Kritter.
Diddy bounces off a Tire to reach a Fuel Canister.
The Kongs approach the end of the level
Diddy approaches a Fuel Canister in the Game Boy Color version

The platform moves on an invisible path to an Enguarde Token in the Game Boy Advance version
![The Kongs jump onto the fuel-powered platform]]](/File:Tanked_Up_Trouble_DKC_shot.png)


Names in other languages[edit]
| Language | Name | Meaning |
|---|---|---|
| Japanese | トリックトラックリフト2 Torikku Torakku Rifuto 2 |
Trick Track Lift 2
The title is represented as a sequel to Trick Track Trek. |
| French | Tracas Trouble |
Terrible Trouble |
| German | Aufgetankter Ärger |
Tanked Up Trouble |
| Italian | Fa' il Pieno |
Do the Full |
| Spanish | Problema de Tanques |
Tanks Problem |
Trivia[edit]
- In the original version, if the moving platform runs out of fuel and the Kongs manage to jump to safety when it falls off the track, the leader will become upset as shown by the animation that plays when losing a Bonus Level, and then the player will lose a life.[citation needed]