Forest Frenzy: Difference between revisions
7feetunder (talk | contribs) No edit summary |
(dkwiki merge) |
||
| Line 1: | Line 1: | ||
{{DKClevelbox | {{DKClevelbox | ||
|image=[[File:Forest Frenzy.png]] | |||
|image=[[File:Forest Frenzy.png | |||
|code=3 - 3 | |code=3 - 3 | ||
|world=[[Vine Valley (world)|Vine Valley]] | |world=[[Vine Valley (world)|Vine Valley]] | ||
| Line 11: | Line 10: | ||
|song=Forest Frenzy | |song=Forest Frenzy | ||
}} | }} | ||
'''Forest Frenzy''' is the thirteenth level of ''[[Donkey Kong Country]]'' | '''Forest Frenzy''' is the thirteenth level of ''[[Donkey Kong Country]]'' and the third level of the [[Vine Valley (world)|Vine Valley]] area on [[Donkey Kong Island]]. | ||
In the forest level, there are several wide abysses that [[Donkey Kong]] and [[Diddy Kong|Diddy]] must go across by holding onto vertical [[rope]]s. When the [[Kong]]s grab on a rope, it starts moving in a direction. As they move across an abyss, the Kongs can climb up and down to avoid the [[Zinger]]s and [[Necky]]s in their path. There are several bouncing [[Kritter]]s on the ground areas. | |||
== | ==Layout== | ||
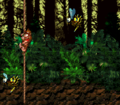
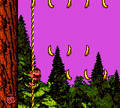
[[File:Forest Frenzy 2.png|thumb|left|200px|The Kongs begin the level]] | [[File:Forest Frenzy 2.png|thumb|left|200px|The Kongs begin the level]] | ||
At the beginning of the level, the Kongs are greeted by a jumping Kritter and a large abyss with a rope moving across it. They can use the rope to cross the pit and access a large piece of land holding two Kritters and a raised area of ground with a [[DK Barrel]] on it. Another abyss is ahead, with the [[K-O-N-G Letters|letter K]] in it and a rope swinging above it. The platform on the other side of this pit holds a Kritter and is followed by a wider abyss that must be crossed by using two ropes that swing towards each other in the center of the pit. A Zinger with some [[banana]]s around it stand in the primates' way as they cross. On the other side of the abyss, the heroes can find a low piece of land with two Kritters near it at a higher elevation. If the Kongs jump on the lower area from the rope they can break a part of the ground that contains a barrel. They can find another pit near here with a rope hovering over it. As the Kongs cross the pit, which can only be done with the use of the rope, they come past the letter O and then reach an area of land carrying two more Kritters and some bananas. A rope dangles above a wide abyss near here. Once they grab onto it, it begins to pull them past an area | At the beginning of the level, the Kongs are greeted by a jumping Kritter and a large abyss with a rope moving across it. They can use the rope to cross the pit and access a large piece of land holding two Kritters and a raised area of ground with a [[DK Barrel]] on it. Another abyss is ahead, with the [[K-O-N-G Letters|letter K]] in it and a rope swinging above it. The platform on the other side of this pit holds a Kritter and is followed by a wider abyss that must be crossed by using two ropes that swing towards each other in the center of the pit. A Zinger with some [[banana]]s around it stand in the primates' way as they cross. On the other side of the abyss, the heroes can find a low piece of land with two Kritters near it at a higher elevation. If the Kongs jump on the lower area from the rope they can break a part of the ground that contains a barrel. They can find another pit near here with a rope hovering over it. As the Kongs cross the pit, which can only be done with the use of the rope, they come past the letter O and then reach an area of land carrying two more Kritters and some bananas. A rope dangles above a wide abyss near here. Once they grab onto it, it begins to pull them past an area with many Zingers. The rope then leads them to a platform with the level's [[Star Barrel]] above it. | ||
Another rope is next to this platform, and it can be used to send the heroes over a wide abyss containing a Zinger that moves in a vertical path around a V-shaped trail of bananas. A DK Barrel wobbles between the bananas. They can find another platform being dominated by a Kritter on the other side of the abyss. A larger abyss is ahead of here that leads the Kongs past a long line of Zingers that move back and forth in a vertical path. Two platforms can be found on the other side of this abyss, each with a Kritter on them. A Necky flies between the two platforms. If the heroes grab onto a rope that hangs over a large pit after here, it begins to pull them past a Zinger moving in a circular path, who moves above a V-shaped trail of bananas with the letter N between them. After passing this Zinger, the rope stops near another rope that the Kongs must jump onto to be guided over the remaining part of the abyss. As they glide over the beginning of this area, they pass many Zingers flying in circular paths. One of these foes orbits a DK Barrel. Soon, they reach a pair of Zingers that move parallel to each other in a vertical path. The letter G hovers between them. Another Zinger ahead of here quickly orbits an [[Extra Life Balloon]]. Once they pass this foe, they are lead into an area full of bananas. As they travel over the rest of the pit, many Neckies approach them, trying to run into the duo. Eventually, the two friends reach a large area of land with four small ledges on it. Kritters bounce on the edges of most of the ledges. On the fourth ledge, the heroes can find a sign indicating that the level is almost over. After climbing down three more ledges, the last two of which that hold Kritters, they reach an exit sign with an entryway ahead of it. If they enter the opening, they complete the level. | Another rope is next to this platform, and it can be used to send the heroes over a wide abyss containing a Zinger that moves in a vertical path around a V-shaped trail of bananas. A DK Barrel wobbles between the bananas. They can find another platform being dominated by a Kritter on the other side of the abyss. A larger abyss is ahead of here that leads the Kongs past a long line of Zingers that move back and forth in a vertical path. Two platforms can be found on the other side of this abyss, each with a Kritter on them. A Necky flies between the two platforms. If the heroes grab onto a rope that hangs over a large pit after here, it begins to pull them past a Zinger moving in a circular path, who moves above a V-shaped trail of bananas with the letter N between them. After passing this Zinger, the rope stops near another rope that the Kongs must jump onto to be guided over the remaining part of the abyss. As they glide over the beginning of this area, they pass many Zingers flying in circular paths. One of these foes orbits a DK Barrel. Soon, they reach a pair of Zingers that move parallel to each other in a vertical path. The letter G hovers between them. Another Zinger ahead of here quickly orbits an [[Extra Life Balloon]]. Once they pass this foe, they are lead into an area full of bananas. As they travel over the rest of the pit, many Neckies approach them, trying to run into the duo. Eventually, the two friends reach a large area of land with four small ledges on it. Kritters bounce on the edges of most of the ledges. On the fourth ledge, the heroes can find a sign indicating that the level is almost over. After climbing down three more ledges, the last two of which that hold Kritters, they reach an exit sign with an entryway ahead of it. If they enter the opening, they complete the level. | ||
| Line 26: | Line 25: | ||
!Sprite | !Sprite | ||
!Name | !Name | ||
! | !Count | ||
|- | |- | ||
|align="center"|[[File:Kritter-DKC.png]] | |align="center"|[[File:Kritter-DKC.png]] | ||
| Line 41: | Line 40: | ||
|} | |} | ||
==Items== | ==Items and objects== | ||
{|class="dktable-brown" width=40% | {|class="dktable-brown" width=40% | ||
|- | |- | ||
!Sprite | !Sprite | ||
!Name | !Name | ||
! | !Count | ||
|- | |- | ||
|align="center"|[[File:DK Barrel DKC.png]] | |align="center"|[[File:DK Barrel DKC.png]] | ||
| Line 53: | Line 52: | ||
|- | |- | ||
|align="center"|[[File:Red Balloon DKC SNES.png]] | |align="center"|[[File:Red Balloon DKC SNES.png]] | ||
|align="center"|[[ | |align="center"|[[Red Balloon]] | ||
|1 | |1 (just after the letter G is a Zinger that quickly orbits around a Red Balloon) | ||
|} | |} | ||
===K-O-N-G Letters=== | ===K-O-N-G Letters=== | ||
{|class="dktable-brown" width=70% | {|class="dktable-brown" width=70% | ||
| Line 63: | Line 63: | ||
|- | |- | ||
|align="center"|[[File:Forest Frenzy K.png]] | |align="center"|[[File:Forest Frenzy K.png]] | ||
| | |After the first DK Barrel, the Kongs must roll jump in the second abyss of the level to reach the letter K. | ||
|- | |- | ||
|align="center"|[[File:Forest Frenzy O.png]] | |align="center"|[[File:Forest Frenzy O.png]] | ||
|The letter O is | |The letter O is to the right of the second Zinger in the level. | ||
|- | |- | ||
|align="center"|[[File:Forest Frenzy N.png]] | |align="center"|[[File:Forest Frenzy N.png]] | ||
| | |After the Star Barrel, the Kongs must go across an abyss and dodge several Zingers. Then after passing a Necky and two bouncing Kritters, the Kongs encounter a Zinger moving in a circle over the letter N. | ||
|- | |- | ||
|align="center"|[[File:Forest Frenzy 6.png]] | |align="center"|[[File:Forest Frenzy 6.png]] | ||
| | |After the letter N, the Kongs must grab on another rope and pass four more circling Zingers. They then encounter a pair of circling Zingers, and the bottom one orbits the letter G. | ||
|} | |} | ||
===Photograph=== | ===Photograph=== | ||
| Line 78: | Line 78: | ||
|- | |- | ||
!Image | !Image | ||
!Location | !Location | ||
|- | |- | ||
|align="center"|[[File:ForestFrenzy-GBA-2.png]] | |align="center"|[[File:ForestFrenzy-GBA-2.png]] | ||
| | |After the letter N, the Kongs ride the last rope in the level. When the rope stops at a ground area, the Kongs must climb to the bottom of it to collect the [[photograph]]. They can also roll jump off a ledge to collect it. The photograph shows a picture of [[Mini-Necky]] in the fourth page of the [[scrapbook]]. | ||
|} | |} | ||
| Line 93: | Line 91: | ||
|- | |- | ||
|align=center|[[File:Forest Frenzy Bonus 1.png]] | |align=center|[[File:Forest Frenzy Bonus 1.png]] | ||
|'''''Stop the Barrel!'''''<br>While the | |'''''Stop the Barrel!'''''<br>While the Kongs ride on the last rope in the level, they encounter numerous Neckys flying at them. The Kongs must climb around them and drop into a [[Bonus Barrel]], which is barely visible at the bottom of the screen. In the [[Bonus Barrel]], the Kongs must observe a [[Animal Token|Rambi Token]] as it quickly moves between four midair barrels before stopping in one. If the Kongs jump at the correct barrel, they are rewarded the Rambi Token. After either winning or losing the Bonus Level, the Kongs return into the main level. | ||
|- | |- | ||
|align=center|[[File:Forest Frenzy Bonus 2.png]] | |align=center|[[File:Forest Frenzy Bonus 2.png]] | ||
|'''''Collect the Bananas!'''''<br> | |'''''Collect the Bananas!'''''<br>Just after the first Bonus Level, the Kongs must jump off the last rope and jump onto a Kritter to land on an item cache, which releases a barrel. The Kongs must carry the barrel around some bouncing Kritters and avoid hitting them with it. At the exit sign, the Kongs must throw a barrel to a wall on the left to break it open and reveal an opening to the second Bonus Level. There, the Kongs must grab on a moving rope and collect numerous bananas. An Enguarde Token is on the right platform just before the exit. The Kongs can also fall into an abyss to return into the main level. | ||
|} | |} | ||
==Gallery== | ==Gallery== | ||
===Super Nintendo Entertainment System=== | |||
<gallery> | <gallery> | ||
Forest Frenzy 3.png|Donkey swings on a long rope. | Forest Frenzy 3.png|Donkey swings on a long rope. | ||
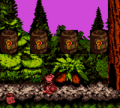
Forest Frenzy 4.png|Donkey and Diddy ride among many yellow Zingers. | Forest Frenzy 4.png|Donkey and Diddy ride among many yellow Zingers. | ||
Forest Frenzy 5.png|The | Forest Frenzy 5.png|Donkey Kong encounters many Neckies. The barrel to the first Bonus Level is hidden below. | ||
ForestFrenzy-GBC-1.png| | </gallery> | ||
Forest Frenzy GBC Bonus Area 1.png|The first Bonus Level | |||
ForestFrenzy-GBC-2.png|The second Bonus Level | ===Game Boy Color=== | ||
ForestFrenzy-GBA-1.png| | <gallery> | ||
ForestFrenzy-GBC-1.png|Diddy crouches under a bouncing Kritter | |||
Forest Frenzy GBC Bonus Area 1.png|The first Bonus Level | |||
ForestFrenzy-GBC-2.png|The second Bonus Level | |||
</gallery> | |||
===Game Boy Advance=== | |||
<gallery> | |||
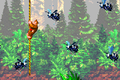
ForestFrenzy-GBA-1.png|Donkey Kong moves on a rope between many blue Zingers | |||
</gallery> | </gallery> | ||
Revision as of 19:25, November 16, 2019
Template:DKClevelbox Forest Frenzy is the thirteenth level of Donkey Kong Country and the third level of the Vine Valley area on Donkey Kong Island.
In the forest level, there are several wide abysses that Donkey Kong and Diddy must go across by holding onto vertical ropes. When the Kongs grab on a rope, it starts moving in a direction. As they move across an abyss, the Kongs can climb up and down to avoid the Zingers and Neckys in their path. There are several bouncing Kritters on the ground areas.
Layout

At the beginning of the level, the Kongs are greeted by a jumping Kritter and a large abyss with a rope moving across it. They can use the rope to cross the pit and access a large piece of land holding two Kritters and a raised area of ground with a DK Barrel on it. Another abyss is ahead, with the letter K in it and a rope swinging above it. The platform on the other side of this pit holds a Kritter and is followed by a wider abyss that must be crossed by using two ropes that swing towards each other in the center of the pit. A Zinger with some bananas around it stand in the primates' way as they cross. On the other side of the abyss, the heroes can find a low piece of land with two Kritters near it at a higher elevation. If the Kongs jump on the lower area from the rope they can break a part of the ground that contains a barrel. They can find another pit near here with a rope hovering over it. As the Kongs cross the pit, which can only be done with the use of the rope, they come past the letter O and then reach an area of land carrying two more Kritters and some bananas. A rope dangles above a wide abyss near here. Once they grab onto it, it begins to pull them past an area with many Zingers. The rope then leads them to a platform with the level's Star Barrel above it.
Another rope is next to this platform, and it can be used to send the heroes over a wide abyss containing a Zinger that moves in a vertical path around a V-shaped trail of bananas. A DK Barrel wobbles between the bananas. They can find another platform being dominated by a Kritter on the other side of the abyss. A larger abyss is ahead of here that leads the Kongs past a long line of Zingers that move back and forth in a vertical path. Two platforms can be found on the other side of this abyss, each with a Kritter on them. A Necky flies between the two platforms. If the heroes grab onto a rope that hangs over a large pit after here, it begins to pull them past a Zinger moving in a circular path, who moves above a V-shaped trail of bananas with the letter N between them. After passing this Zinger, the rope stops near another rope that the Kongs must jump onto to be guided over the remaining part of the abyss. As they glide over the beginning of this area, they pass many Zingers flying in circular paths. One of these foes orbits a DK Barrel. Soon, they reach a pair of Zingers that move parallel to each other in a vertical path. The letter G hovers between them. Another Zinger ahead of here quickly orbits an Extra Life Balloon. Once they pass this foe, they are lead into an area full of bananas. As they travel over the rest of the pit, many Neckies approach them, trying to run into the duo. Eventually, the two friends reach a large area of land with four small ledges on it. Kritters bounce on the edges of most of the ledges. On the fourth ledge, the heroes can find a sign indicating that the level is almost over. After climbing down three more ledges, the last two of which that hold Kritters, they reach an exit sign with an entryway ahead of it. If they enter the opening, they complete the level.
Enemies
| Sprite | Name | Count |
|---|---|---|
| Kritter | 16 | |

|
Necky | 19 |
| Zinger | 36 |
Items and objects
| Sprite | Name | Count |
|---|---|---|
| DK Barrel | 4 | |
| Red Balloon | 1 (just after the letter G is a Zinger that quickly orbits around a Red Balloon) |
K-O-N-G Letters
| Image | Location |
|---|---|

|
After the first DK Barrel, the Kongs must roll jump in the second abyss of the level to reach the letter K. |

|
The letter O is to the right of the second Zinger in the level. |

|
After the Star Barrel, the Kongs must go across an abyss and dodge several Zingers. Then after passing a Necky and two bouncing Kritters, the Kongs encounter a Zinger moving in a circle over the letter N. |

|
After the letter N, the Kongs must grab on another rope and pass four more circling Zingers. They then encounter a pair of circling Zingers, and the bottom one orbits the letter G. |
Photograph
| Image | Location |
|---|---|

|
After the letter N, the Kongs ride the last rope in the level. When the rope stops at a ground area, the Kongs must climb to the bottom of it to collect the photograph. They can also roll jump off a ledge to collect it. The photograph shows a picture of Mini-Necky in the fourth page of the scrapbook. |
Bonus Levels
| Image | Type and description |
|---|---|

|
Stop the Barrel! While the Kongs ride on the last rope in the level, they encounter numerous Neckys flying at them. The Kongs must climb around them and drop into a Bonus Barrel, which is barely visible at the bottom of the screen. In the Bonus Barrel, the Kongs must observe a Rambi Token as it quickly moves between four midair barrels before stopping in one. If the Kongs jump at the correct barrel, they are rewarded the Rambi Token. After either winning or losing the Bonus Level, the Kongs return into the main level. |

|
Collect the Bananas! Just after the first Bonus Level, the Kongs must jump off the last rope and jump onto a Kritter to land on an item cache, which releases a barrel. The Kongs must carry the barrel around some bouncing Kritters and avoid hitting them with it. At the exit sign, the Kongs must throw a barrel to a wall on the left to break it open and reveal an opening to the second Bonus Level. There, the Kongs must grab on a moving rope and collect numerous bananas. An Enguarde Token is on the right platform just before the exit. The Kongs can also fall into an abyss to return into the main level. |
Gallery
Super Nintendo Entertainment System
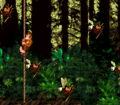
Donkey swings on a long rope.
Donkey and Diddy ride among many yellow Zingers.
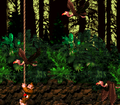
Donkey Kong encounters many Neckies. The barrel to the first Bonus Level is hidden below.


Game Boy Color

Diddy crouches under a bouncing Kritter
The first Bonus Level
The second Bonus Level


Game Boy Advance
Donkey Kong moves on a rope between many blue Zingers

Names in other languages
| Language | Name | Meaning |
|---|---|---|
| Japanese | ジンガーのもり Jingā no mori |
Zinger's Forest |
| German | Grüner Taumel Wahnsinns-Wald (GBA) |
Green Frenzy Madness Forest |
| Italian | Bosco da Brividi |
Woods from Chills |
| Spanish | Bosque Frenético |
Frantic Forest |