Red-Hot Ride: Difference between revisions
Fawfulfury65 (talk | contribs) m (→Secrets) |
LinkTheLefty (talk | contribs) mNo edit summary |
||
| (68 intermediate revisions by 34 users not shown) | |||
| Line 1: | Line 1: | ||
{{level | {{about|the level in Donkey Kong Country 2: Diddy's Kong Quest|the level in ''[[Donkey Kong Land 2]]'' with a similar spelling|[[Redhot Ride]]}} | ||
{{level infobox | |||
|title=Red-Hot Ride | |title=Red-Hot Ride | ||
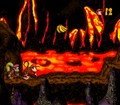
|image=[[ | |image=[[File:Red-Hot Ride DKC2.png]] | ||
|code=2 - 4 | |code=2 - 4 | ||
|game=''[[Donkey Kong Country 2: Diddy's Kong Quest | |world=[[Crocodile Cauldron]] | ||
| | |game=''[[Donkey Kong Country 2: Diddy's Kong Quest]]'' | ||
|before=[[Lava Lagoon|<<]] | |track=Hot Head Bop | ||
|after=[[Squawks's Shaft|>>]] | |before=[[Lava Lagoon (Donkey Kong Country 2: Diddy's Kong Quest)|<<]] | ||
|after=[[Squawks's Shaft (Donkey Kong Country 2: Diddy's Kong Quest)|>>]] | |||
}} | }} | ||
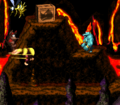
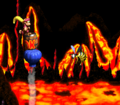
'''Red-Hot Ride''' is the ninth level of ''[[Donkey Kong Country 2: Diddy's Kong Quest]]'' and | '''Red-Hot Ride''', also parsed as '''Red Hot Ride''',<ref>''Nintendo Magazine System'' (UK) issue 39, page 17.</ref> is the ninth [[level]] of ''[[Donkey Kong Country 2: Diddy's Kong Quest]]'' and the fourth level of [[Crocodile Cauldron]]. It is the second level to take place in a volcanic setting, the first being [[Hot-Head Hop]]. A lot of the level involves [[Diddy Kong]] and [[Dixie Kong]] riding on [[Hot Air Balloon]]s to cross wide pits of [[lava]]. However, each Hot Air Balloon slowly descends into the lava, so the [[Kong]]s must constantly move above thermals along the way to keep it afloat. Diddy and Dixie often have to jump from Hot Air Balloons as they move across the lava. There is a [[Animal crate|Rambi Crate]] just after the letter K, allowing the Kongs to ride [[Rambi]] up until the [[No Animal Sign]], which comes just before the [[Star Barrel]]. Many [[Zinger]]s appear, mostly during sections where the Kongs have to navigate the Hot Air Balloon around them while above the lava. | ||
==Layout== | |||
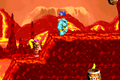
[[File:Red-Hot Ride DKC2 GBA.png|thumb|left|Red-Hot Ride in the Game Boy Advance version]] | |||
When the heroes begin the level, they find themselves outside of a tunnel with a [[Banana Bunch]] ahead of it. A raised area of ground is near of here that they can climb to find a Klobber and a wide pit of lava with a Hot Air Balloon suspended by a thermal above it. A group of bananas are to the right of the banana, and they form the shape of an arrow, which points to the right. Once the Kongs cross this pit, they come up to another high piece of land on a solid, rocky area of ground. They can find a Kruncha here, who is followed by a lava pit with two thermals in it. The first of the thermals holds up a balloon that the heroes can ride on to cross the pit, and the [[KONG Letters|letter K]] is between it and the following thermal. After the primates glide past the second thermal, they reach a Banana Bunch and another area of ground, where they can find a rocky hill with a Kruncha and an [[animal crate]] containing Rambi on it. The Kruncha stands on a slightly lower part of the ground than the crate, which sits to the right of a Zinger. If the heroes head east from here, they find a Klobber and a small pit with another Zinger above it. On the other side of this small pit, they can find another Klobber on a flat piece of ground and then another wide pit. | |||
A thermal keeping a Hot Air Balloon suspended in the air is at the beginning of the gap, and the Kongs can ride over the pit if they ride on the balloon. Two thermals are ahead of here to raise the balloon, and a pair of Zingers, one of which that guards a [[Banana Coin]], are between them. If the heroes continue forward from here, they reach another thermal with two Zingers above it. They must pass the thermal quickly to avoid being pushed towards the enemies. Once they pass an additional thermal, they reach a Zinger that flies above the letter O. A thermal is behind the enemy that can push the Hot Air Balloon carrying Kongs into it. Four more thermals are farther ahead of here, and a Zinger and a Banana Bunch are above the second of these thermals. The thermal next to this holds a Hot Air Balloon with a Kruncha on it, who marches under a Banana Coin. An area of land is ahead of these thermals, and it carries a pair of Krunchas and a [[No Animal Sign]]. If the primates cross the sign with Rambi, the rhino disappears and they are given a Banana Bunch. On a slightly higher area of ground near here, the primates can find a Click-Clack that walks next to a small pit. On the other side of the pit, the primates can find another large, rocky platform that holds a Kruncha. They can also find the level's [[Star Barrel]] above this platform. | |||
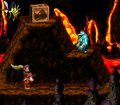
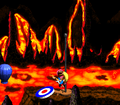
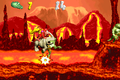
[[File:Red-Hot Ride DKC2 shot 3.png|thumb|Dixie and Diddy jump onto a Hot Air Balloon with a DK Barrel on it.]] | |||
To the east of the Star Barrel, the duo can find another wide pit that begins with a thermal holding up a Hot Air Balloon, which supports a DK Barrel. A Zinger is to the right of this thermal, and it is followed by a second thermal. After the heroes pass the columns of heat, they approach a few Flitters that try to fly into them. A small thermal can be found farther ahead of here, and it is followed by a larger thermal that holds up a Hot Air Balloon. This balloon is surrounded by two Zingers, who hover under the letter N and a [[DK Coin|Video Game Hero Coin]]. Once Diddy and Dixie pass another small thermal near here, they reach a Hot Air Balloon that holds a Neek and a [[TNT Barrel]]. The balloon is suspended by an additional thermal. They can ride along this balloon or their current balloon to reach another thermal that is located next to a trio of Zingers that the heroes must hover under to pass. They can also defeat some of the Zingers, who guard a Banana Coin, with the nearby TNT Barrel to pass them. On the other side of these Zingers, the primates can find a pair of thermals and a high, rocky platform that holds a Klobber. | |||
A Neek marches along a Hot Air Balloon being suspended by a thermal above a pit near here. They can ride the balloon to approach a Flitter, who they can bounce on to reach another balloon on a thermal. They must control the balloon so that it leads them past a Zinger and to another Flitter with a Banana Bunch above it. A Hot Air Balloon slowly descends to the right of the Flitter, as it is not held up by a thermal. The two primates can find another Hot Air Balloon ahead of here that holds a Neek. Before the balloon falls into the lava pit, they must control it so that it hovers above a small thermal nearby. They can find another thermal farther ahead of here with two Zingers next to it. The primates must hover between these foes in order to safely progress to the next part of the pit, where there is another thermal placed under a [[golden feather]] (an item found exclusively in the Game Boy Advance version of the game). The letter G is near here next to a trio of Zingers who are all positioned above separate thermals. They must head under these foes quickly, as the thermals may push them up into the Zingers if they are too slow. After they pass these Zingers, the heroes approach a thermal next to a Hot Air Balloon that slowly descends towards the lava. They can use this balloon to reach an area of ground with an [[End of Level Target]] on it, which they must hit to complete the level. If they hit this target immediately after jumping from the final balloon before descends too much, then they win a prize (either a Banana Coin, Banana Bunch, or a Red Balloon). | |||
== | ==Enemies== | ||
The following enemies appear in the following quantities: | |||
<gallery> | |||
Click Clack DKC2.png|[[Click-Clack]] (1) | |||
Flitter DKC2.png|[[Flitter]] (7) | |||
Klobber DKC2 yellow.png|[[Klobber]] (yellow) (4) | |||
Klomp DKC2.png|[[Klomp]] (5) | |||
Kruncha DKC2 blue.png|[[Kruncha]] (blue) (6) | |||
Neek DKC2.png|[[Neek]] (3) | |||
Zinger DKC2 yellow.png|[[Zinger]] (yellow) (20) | |||
</gallery> | |||
==Items and objects== | |||
The following items and objects appear in the following quantities, and items marked in '''bold''' are also an [[End of Level Target]] prize: | |||
<gallery> | |||
Banana Bunch DKC SNES.png|'''[[Banana Bunch]]''' (4) | |||
Banana Coin.png|'''[[Banana Coin]]''' (5) | |||
DK Barrel.png|[[DK Barrel]] (2) | |||
Hot Air Balloon.png|[[Hot Air Balloon]] (13) | |||
Red Extra Life Balloon DKC2.png|'''[[Red Balloon]]''' (1) | |||
TNT Barrel.png|[[TNT Barrel]] (1) | |||
</gallery> | |||
===KONG Letters=== | |||
[[File:Red-Hot Ride Letter N screenshot.png|thumb|The location of the letter N]] | |||
*'''K:''' Centered between two thermals where the second Hot Air Balloon is located. | |||
*'''O:''' After the Rambi Crate, the Kongs must continue on the next Hot Air Balloon. Once they pass two pairs of Zingers, the Kongs must lower the Hot Air Balloon and collect the letter O, which appears on a thermal beneath Zinger. | |||
*'''N:''' Shortly after the Star Barrel, the letter N is hovering above two Zingers which are surrounding a Hot Air Balloon. | |||
*'''G:''' Late into the level, the letter G appears in front of three Zingers, each of whom are flying above a thermal. | |||
{{br}} | |||
== | ===Key items=== | ||
[[File:Red-Hot Ride GBA DK Coin.png|thumb|The location of the Video Game Hero Coin, as seen in the Game Boy Advance version]] | |||
*'''[[DK Coin|Cranky's Video Game Hero]]:''' After the Star Barrel, the Kongs must continue onward until they find two Zingers. The Video Game Hero Coin hovers directly above the letter N, and the Kongs can reach it with a [[team up]] throw. | |||
* | *'''[[Golden feather]] ([[Donkey Kong Country 2 (Game Boy Advance)|Game Boy Advance version]] only):''' The golden feather is floating above the thermal, which is located right before the letter G. | ||
*'''[[Photograph]] (Game Boy Advance version only):''' Beneath the Star Barrel, there is a Kruncha with a photograph icon floating over its head. The Kongs must use team up to defeat Kruncha and obtain the photograph, which depicts Kruncha in the second page of the [[Scrapbook (Donkey Kong Country series)|Scrapbook]]. | |||
{{br}} | |||
==== | ==Bonus Levels== | ||
After | {{multiframe|[[File:Red-Hot Ride Bonus Area 1.png|200px]] [[File:Red-Hot Ride Bonus Area 2.png|200px]]|size=420|The first and second Bonus Levels respectively}} | ||
Red-Hot Ride has two Bonus Levels, listed by type: | |||
*'''''Destroy Them All!''''': Rambi is required to access the first Bonus Level. After the Kongs move across the large pit of lava, they must jump return on land. To their right is a breakable wall, which appears just before two Krunchas. Rambi must perform a [[super move|supercharge]] to break the wall open and enter the Bonus Level. Here, the goal is two defeat eight enemies (five are Klomps and three are Flitters) within fifteen seconds. After meeting this objective, the [[Kremkoin]] appears. | |||
*'''''Collect the Stars!''''': Below the Star Barrel and the ground is a banana meant to hint to the [[Bonus Barrel]] that appears right below it. The Kongs can reach and enter into the Bonus Barrel by moving beneath the ground surface, either with Dixie's [[Helicopter Spin]] or from a Hot Air Balloon. In the Bonus Level, the Kongs have to obtain forty [[Star (Donkey Kong franchise)|star]]s within a time limit of thirty seconds. At the start, there is a Hot Air Balloon hovering above a thermal. The Kongs must ride it in order to reach the stars. After jumping and collecting every star, the Kremkoin appears on a small platform to the right. | |||
== | ==Warp Barrel== | ||
The Kongs must go onto the second Hot Air Balloon and pass the letter K. Right as the Hot Air Balloon moves onto the third thermal in the level, the Kongs must use a [[team up]] throw to enter into the [[Warp Barrel]] above. The warp area features several bananas arranged in the shape of an exclamation mark, followed by an exit on the right. Exiting takes the Kongs onto a Hot Air Balloon just before the End of Level Target. | |||
==== | ==Gallery== | ||
<gallery> | |||
Red-Hot Ride start.png|The start of the level | |||
Red-Hot Ride Letter K screenshot.png|The Letter K | |||
Red-Hot Ride Letter O screenshot.png|The letter O | |||
Red-Hot Ride Rambi Crate.png|The location of Rambi's Animal Crate | |||
Red-Hot Ride DKC2 shot 2.png|Dixie hovers in front of the rocky hill with the Rambi Crate | |||
Red-Hot Ride Bonus Level 1 location.png|Rambi charging at the wall that leads into the first Bonus Level | |||
Red-Hot Ride No Animal Sign.png|The Kongs and Rambi move to the No Animal Sign | |||
Red-Hot Ride Star Barrel.png|The location of the Star Barrel | |||
Red-Hot Ride DKC2 shot 3.png|The Kongs approach a Zinger right after the Star Barrel | |||
Red-Hot Ride Letter G screenshot.png|The letter G | |||
Red-Hot Ride end.png|Dixie playing her guitar at the End of Level Target | |||
Red-Hot Ride GBA Golden Feather.png|The location of the Golden Feather in the Game Boy Advance version | |||
Red-Hot Ride GBA photograph location.png|The location of the photograph in the Game Boy Advance version | |||
Red-Hot Ride GBA Bonus Level 1.png|The Kongs and Rambi in the first Bonus Level in the Game Boy Advance version | |||
Red-Hot Ride GBA Bonus Level 2.png|The Kongs collecting stars in the Second Bonus Level in the Game Boy Advance version | |||
</gallery> | |||
=== | ==Names in other languages== | ||
==== | {{foreign names | ||
|Jap=ねっききゅうライド | |||
|JapR=Nekkikyū Raido | |||
|JapM=Hot Air Balloon Ride | |||
|Spa=Viaje Picante | |||
|SpaM=Spicy Trip | |||
|Fre=Traversée Embrasée | |||
|FreM=Burning Voyage | |||
|Ger=Heißer Ritt | |||
|GerM=Hot Ride | |||
|Ita=Pericolo Magma | |||
|ItaM=Magma Danger | |||
}} | |||
==References== | |||
<references/> | |||
{{DKC2}} | {{DKC2}} | ||
[[Category:Crocodile Isle]] | [[Category:Crocodile Isle]] | ||
[[Category: | [[Category:Underground areas]] | ||
[[Category: | [[Category:Volcanic areas]] | ||
[[Category | [[Category:Donkey Kong Country 2: Diddy's Kong Quest levels]] | ||
Latest revision as of 13:17, March 30, 2024
- This article is about the level in Donkey Kong Country 2: Diddy's Kong Quest. For the level in Donkey Kong Land 2 with a similar spelling, see Redhot Ride.
| Level | |
|---|---|
| Red-Hot Ride | |

| |
| Level code | 2 - 4 |
| World | Crocodile Cauldron |
| Game | Donkey Kong Country 2: Diddy's Kong Quest |
| Music track | Hot Head Bop |
| << Directory of levels >> | |
Red-Hot Ride, also parsed as Red Hot Ride,[1] is the ninth level of Donkey Kong Country 2: Diddy's Kong Quest and the fourth level of Crocodile Cauldron. It is the second level to take place in a volcanic setting, the first being Hot-Head Hop. A lot of the level involves Diddy Kong and Dixie Kong riding on Hot Air Balloons to cross wide pits of lava. However, each Hot Air Balloon slowly descends into the lava, so the Kongs must constantly move above thermals along the way to keep it afloat. Diddy and Dixie often have to jump from Hot Air Balloons as they move across the lava. There is a Rambi Crate just after the letter K, allowing the Kongs to ride Rambi up until the No Animal Sign, which comes just before the Star Barrel. Many Zingers appear, mostly during sections where the Kongs have to navigate the Hot Air Balloon around them while above the lava.
Layout[edit]

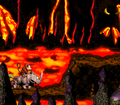
When the heroes begin the level, they find themselves outside of a tunnel with a Banana Bunch ahead of it. A raised area of ground is near of here that they can climb to find a Klobber and a wide pit of lava with a Hot Air Balloon suspended by a thermal above it. A group of bananas are to the right of the banana, and they form the shape of an arrow, which points to the right. Once the Kongs cross this pit, they come up to another high piece of land on a solid, rocky area of ground. They can find a Kruncha here, who is followed by a lava pit with two thermals in it. The first of the thermals holds up a balloon that the heroes can ride on to cross the pit, and the letter K is between it and the following thermal. After the primates glide past the second thermal, they reach a Banana Bunch and another area of ground, where they can find a rocky hill with a Kruncha and an animal crate containing Rambi on it. The Kruncha stands on a slightly lower part of the ground than the crate, which sits to the right of a Zinger. If the heroes head east from here, they find a Klobber and a small pit with another Zinger above it. On the other side of this small pit, they can find another Klobber on a flat piece of ground and then another wide pit.
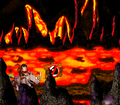
A thermal keeping a Hot Air Balloon suspended in the air is at the beginning of the gap, and the Kongs can ride over the pit if they ride on the balloon. Two thermals are ahead of here to raise the balloon, and a pair of Zingers, one of which that guards a Banana Coin, are between them. If the heroes continue forward from here, they reach another thermal with two Zingers above it. They must pass the thermal quickly to avoid being pushed towards the enemies. Once they pass an additional thermal, they reach a Zinger that flies above the letter O. A thermal is behind the enemy that can push the Hot Air Balloon carrying Kongs into it. Four more thermals are farther ahead of here, and a Zinger and a Banana Bunch are above the second of these thermals. The thermal next to this holds a Hot Air Balloon with a Kruncha on it, who marches under a Banana Coin. An area of land is ahead of these thermals, and it carries a pair of Krunchas and a No Animal Sign. If the primates cross the sign with Rambi, the rhino disappears and they are given a Banana Bunch. On a slightly higher area of ground near here, the primates can find a Click-Clack that walks next to a small pit. On the other side of the pit, the primates can find another large, rocky platform that holds a Kruncha. They can also find the level's Star Barrel above this platform.

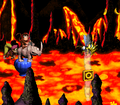
To the east of the Star Barrel, the duo can find another wide pit that begins with a thermal holding up a Hot Air Balloon, which supports a DK Barrel. A Zinger is to the right of this thermal, and it is followed by a second thermal. After the heroes pass the columns of heat, they approach a few Flitters that try to fly into them. A small thermal can be found farther ahead of here, and it is followed by a larger thermal that holds up a Hot Air Balloon. This balloon is surrounded by two Zingers, who hover under the letter N and a Video Game Hero Coin. Once Diddy and Dixie pass another small thermal near here, they reach a Hot Air Balloon that holds a Neek and a TNT Barrel. The balloon is suspended by an additional thermal. They can ride along this balloon or their current balloon to reach another thermal that is located next to a trio of Zingers that the heroes must hover under to pass. They can also defeat some of the Zingers, who guard a Banana Coin, with the nearby TNT Barrel to pass them. On the other side of these Zingers, the primates can find a pair of thermals and a high, rocky platform that holds a Klobber.
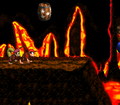
A Neek marches along a Hot Air Balloon being suspended by a thermal above a pit near here. They can ride the balloon to approach a Flitter, who they can bounce on to reach another balloon on a thermal. They must control the balloon so that it leads them past a Zinger and to another Flitter with a Banana Bunch above it. A Hot Air Balloon slowly descends to the right of the Flitter, as it is not held up by a thermal. The two primates can find another Hot Air Balloon ahead of here that holds a Neek. Before the balloon falls into the lava pit, they must control it so that it hovers above a small thermal nearby. They can find another thermal farther ahead of here with two Zingers next to it. The primates must hover between these foes in order to safely progress to the next part of the pit, where there is another thermal placed under a golden feather (an item found exclusively in the Game Boy Advance version of the game). The letter G is near here next to a trio of Zingers who are all positioned above separate thermals. They must head under these foes quickly, as the thermals may push them up into the Zingers if they are too slow. After they pass these Zingers, the heroes approach a thermal next to a Hot Air Balloon that slowly descends towards the lava. They can use this balloon to reach an area of ground with an End of Level Target on it, which they must hit to complete the level. If they hit this target immediately after jumping from the final balloon before descends too much, then they win a prize (either a Banana Coin, Banana Bunch, or a Red Balloon).
Enemies[edit]
The following enemies appear in the following quantities:

Click-Clack (1)

Flitter (7)

Klobber (yellow) (4)

Klomp (5)

Kruncha (blue) (6)

Neek (3)

Zinger (yellow) (20)


Items and objects[edit]
The following items and objects appear in the following quantities, and items marked in bold are also an End of Level Target prize:

Banana Bunch (4)

Banana Coin (5)

DK Barrel (2)

Hot Air Balloon (13)

Red Balloon (1)

TNT Barrel (1)


KONG Letters[edit]

- K: Centered between two thermals where the second Hot Air Balloon is located.
- O: After the Rambi Crate, the Kongs must continue on the next Hot Air Balloon. Once they pass two pairs of Zingers, the Kongs must lower the Hot Air Balloon and collect the letter O, which appears on a thermal beneath Zinger.
- N: Shortly after the Star Barrel, the letter N is hovering above two Zingers which are surrounding a Hot Air Balloon.
- G: Late into the level, the letter G appears in front of three Zingers, each of whom are flying above a thermal.
Key items[edit]

- Cranky's Video Game Hero: After the Star Barrel, the Kongs must continue onward until they find two Zingers. The Video Game Hero Coin hovers directly above the letter N, and the Kongs can reach it with a team up throw.
- Golden feather (Game Boy Advance version only): The golden feather is floating above the thermal, which is located right before the letter G.
- Photograph (Game Boy Advance version only): Beneath the Star Barrel, there is a Kruncha with a photograph icon floating over its head. The Kongs must use team up to defeat Kruncha and obtain the photograph, which depicts Kruncha in the second page of the Scrapbook.
Bonus Levels[edit]


Red-Hot Ride has two Bonus Levels, listed by type:
- Destroy Them All!: Rambi is required to access the first Bonus Level. After the Kongs move across the large pit of lava, they must jump return on land. To their right is a breakable wall, which appears just before two Krunchas. Rambi must perform a supercharge to break the wall open and enter the Bonus Level. Here, the goal is two defeat eight enemies (five are Klomps and three are Flitters) within fifteen seconds. After meeting this objective, the Kremkoin appears.
- Collect the Stars!: Below the Star Barrel and the ground is a banana meant to hint to the Bonus Barrel that appears right below it. The Kongs can reach and enter into the Bonus Barrel by moving beneath the ground surface, either with Dixie's Helicopter Spin or from a Hot Air Balloon. In the Bonus Level, the Kongs have to obtain forty stars within a time limit of thirty seconds. At the start, there is a Hot Air Balloon hovering above a thermal. The Kongs must ride it in order to reach the stars. After jumping and collecting every star, the Kremkoin appears on a small platform to the right.
Warp Barrel[edit]
The Kongs must go onto the second Hot Air Balloon and pass the letter K. Right as the Hot Air Balloon moves onto the third thermal in the level, the Kongs must use a team up throw to enter into the Warp Barrel above. The warp area features several bananas arranged in the shape of an exclamation mark, followed by an exit on the right. Exiting takes the Kongs onto a Hot Air Balloon just before the End of Level Target.
Gallery[edit]
The start of the level
The Letter K
The letter O
The location of Rambi's Animal Crate
Dixie hovers in front of the rocky hill with the Rambi Crate
Rambi charging at the wall that leads into the first Bonus Level
The Kongs and Rambi move to the No Animal Sign
The location of the Star Barrel
The Kongs approach a Zinger right after the Star Barrel
The letter G
Dixie playing her guitar at the End of Level Target
The location of the Golden Feather in the Game Boy Advance version
The location of the photograph in the Game Boy Advance version
The Kongs and Rambi in the first Bonus Level in the Game Boy Advance version
The Kongs collecting stars in the Second Bonus Level in the Game Boy Advance version


Names in other languages[edit]
| Language | Name | Meaning |
|---|---|---|
| Japanese | ねっききゅうライド Nekkikyū Raido |
Hot Air Balloon Ride |
| French | Traversée Embrasée |
Burning Voyage |
| German | Heißer Ritt |
Hot Ride |
| Italian | Pericolo Magma |
Magma Danger |
| Spanish | Viaje Picante |
Spicy Trip |
References[edit]
- ^ Nintendo Magazine System (UK) issue 39, page 17.