User:Koopa con Carne/sandbox: Difference between revisions
(→Images) |
(→Images) |
||
| Line 138: | Line 138: | ||
| style="background:#FF8383" |An image composed of smaller black-and-white artworks depicting unused concepts and sceneries. Donkey and Diddy Kong are often shown standing on the ground as on dry land, although the captured motion of their surroundings suggest being in an underwater environment. | | style="background:#FF8383" |An image composed of smaller black-and-white artworks depicting unused concepts and sceneries. Donkey and Diddy Kong are often shown standing on the ground as on dry land, although the captured motion of their surroundings suggest being in an underwater environment. | ||
Clockwise from top-left, the first artwork shows silhouettes of DK and Diddy exploring the seabed through transparent underwater tubes, with | Clockwise from top-left, the first artwork shows silhouettes of DK and Diddy exploring the seabed through transparent underwater tubes, with kelp wrapped around them and a few sharks swimming in the background. In the second artwork, the Kongs are caught in a vortex of rising bubbles. In the following artwork, the characters are obscured by a large colony of sea anemones, in an area with ammonite fossils encrusted in rectangular rock formations. The next artwork shows the characters navigating ferris wheels with a curved, spiralled design reminiscent of ammonite shells; the heads of two gigantic eel-like monsters are seen at the bottom. The last artwork renders a habitat consisting of numerous dome aquariums populated by menacing fish; the Kongs are on dry land, gazing at the aquariums in the background. | ||
| align="center" style="background:#FF8383" |Collecting all Puzzle Pieces in [[High Tide Ride]] | | align="center" style="background:#FF8383" |Collecting all Puzzle Pieces in [[High Tide Ride]] | ||
|- | |- | ||
| align="center" style="background:#DAF7A6" | | | align="center" style="background:#DAF7A6" | | ||
| style="background:#DAF7A6" |A gloomy, deep-sea scenery filled with luminescent jellyfish and other assorted creatures. Shadows of DK, Diddy, and other frontground elements are imposed on the scenery. The artwork | | style="background:#DAF7A6" |A gloomy, deep-sea scenery filled with luminescent jellyfish and other assorted creatures. Shadows of DK, Diddy, and other frontground elements are imposed on the scenery. The artwork was likely the basis of [[Amiss Abyss]]. | ||
| align="center" style="background:#DAF7A6" |Collecting all Puzzle Pieces in [[Amiss Abyss]] | | align="center" style="background:#DAF7A6" |Collecting all Puzzle Pieces in [[Amiss Abyss]] | ||
|- | |- | ||
| Line 150: | Line 150: | ||
|- | |- | ||
| align="center" style="background:#FF8383" | | | align="center" style="background:#FF8383" | | ||
| style="background:#FF8383" |DK using a plug to uncover the ruins of a submerged city. The city is based on ancient Roman architecture and consists of two temples and a dome. A mechanism of gigantic gears help these constructions rise above the water. The buildings are populated by corals, clams and seaweed. | | style="background:#FF8383" |DK using a plug to uncover the ruins of a submerged city. The city is based on ancient Roman architecture and consists of two temples and a dome. A mechanism of gigantic gears help these constructions rise above the water. The buildings are populated by corals, clams and seaweed. A hill landscape can be seen behind the city ruins. | ||
| align="center" style="background:#FF8383" |Collecting all Puzzle Pieces in [[Sea Stack Attack]] | | align="center" style="background:#FF8383" |Collecting all Puzzle Pieces in [[Sea Stack Attack]] | ||
|- | |- | ||
| align="center" style="background:#FF8383" | | | align="center" style="background:#FF8383" | | ||
| style="background:#FF8383" | | | style="background:#FF8383" |Side view of Donkey Kong platforming in and above water; none of the concepts present in the image, aside from swimming, are used in the game. First, DK is pushed out of the water by a springing eel, above a few seagulls and a giant rock pillar with a spiky top. Back underwater, there are several krill clouds followed by a dense kelp area. DK is seen again swimming towards a dragnet, carried by a Viking ship. It is stated through notes in the picture that the dragnet is risen and lowered by the ship and that it should be avoided, but there is nothing to specify how the krill clouds or the kelp forest would have affected gameplay. | ||
| align="center" style="background:#FF8383" |Collecting all Puzzle Pieces in [[Current Capers]] | | align="center" style="background:#FF8383" |Collecting all Puzzle Pieces in [[Current Capers]] | ||
|- | |- | ||
Revision as of 14:37, August 31, 2017
I'm currently working on a List of extras in Donkey Kong Country: Tropical Freeze page. This is casual work I'm doing, so I might abandon it for a long time before I get around to it again. If this happens, you may take on the project and complete it. Anyway, feel free to give me any suggestions/corrections in the talk page!
I'll upload images at another time. Here's a video for reference.
List of extras in Donkey Kong Country: Tropical Freeze
Figurines

- Main article: Capsule Toy Machine
Funky Kong's Capsule Toy Machine vends figurines which are miniature versions of characters in the game. They are received at random, but only five figurines are possible to obtain at the beginning of the game. Defeating a boss unlocks six more figurines, and completing every level of Secret Seclusion unlocks the Professor Chops figurine.
Images

Many concept artworks depicting used and unused ideas are available in the game, and can be gradually unlocked in the Image Gallery by collecting Puzzle Pieces (certain images, however, are only unlocked after beating the game on Hard Mode, and are the sole reward for completing this task). The Image Gallery consists of eight sub-galleries, each entirely dedicated to a world of the game, except for the seventh and eighth sub-galleries which house general concepts. Unlike in Donkey Kong Country Returns, images are not given titles.
The following table lists every concept artwork found in the game, as well as a description and the condition to unlock it. The color assigned to an image indicates to what extent the idea or ideas depicted in the image were used for the final game: green for ideas used entirely, yellow for ideas used partially, and red for completely unused ideas.
| Lost Mangroves | ||
|---|---|---|
| Image | Description | Unlocked after... |

|
Here, it is shown that at least Donkey Kong and Diddy Kong, together with their treehouse, would have been flung in Lost Mangroves. Washed ashore, the Kongs watch as two unseen figures approach them, their shadows projected on sand. In the final game, the Kongs wind up into a dilapidated plane in the treetops, the treehouse having remained on Donkey Kong Island. | Collecting all Puzzle Pieces in Mangrove Cove |

|
A mangrove wetland with Donkey Kong in the frontground and several flamingos resting on a mangrove shrub nearby. Ship wreckage appears to be tangled into mangroves. No flamingos appear in the final game, having probably been rejected in favor of birds like Dozies and Sour Dodos. | Collecting all Puzzle Pieces in Shipwreck Shore |

|
Sketch for a water-coveying trunk and an obstacle. According to a note found beside, the obstacle consists of a broken plane carcass connected with a rope to a big propeller. The Kongs are able to stay on the carcass, but as water falls down on the propeller, it spins and moves the carcass closer to it. The Kongs should "jump before getting sliced". No such contraption appears in the final game, but there are water mills in Canopy Chaos that move giant platforms from side to side, driving them into rotating propellers. | Collecting all Puzzle Pieces in Canopy Chaos |

|
A different vision of the Lost Mangroves island. The island was originally depicted as having a large tree trunk in the middle, with a waterfall coming from it into a lagoon beneath. A group of flamingos can be seen relaxing into the lagoon. The shoreline on the left side of the island is littered with shipwrecks, and the wooden hulls tangled in the trees from the second artwork can be seen further behind. On the right side, there is a Mine Cart railtrack weaving through broken planes and wooden logs, heading right onto what appears to be an early Snowmad ship. This ship holds a half-pipe arena, similar to the one found in Big Top Bop, the boss level of Lost Mangroves in the final game. This suggests that the battle against Pompy was going to take place on a ship instead of a circus.
The artwork is faithful to the final version for presenting numerous wreckages, as well as featuring a minecart area before the boss battle. |
Collecting all Puzzle Pieces in Trunk Twister |

|
Donkey Kong resting on a branch protruding from a shipwreck. The leaves on the branch are reddish-yellow, something that is not seen in the final game. The scene is set in a mangrove glade and is reminiscent of Canopy Chaos. | Collecting all Puzzle Pieces in Zip-Line Shrine |

|
Silhouettes of DK and Diddy Kong are seen running in a shady area, resembling Busted Bayou. | Collecting all Puzzle Pieces in Busted Bayou |
| Autumn Heights | ||
| Image | Description | Unlocked after... |

|
Probably an early idea for Windmill Hills. It is set in a mountainous Swiss landscape with a windmill peering from behind a rocky cliff. There are rope cables transporting bales of hay. These would have been used as platforms, as Donkey Kong and Cranky Kong are being ferried by one of them in the picture. | Collecting all Puzzle Pieces in Windmill Hills |

|
Side overview of an autumnal level, possibly a lighter version of Horn Top Hop. Donkey Kong is seen resting on a bed of leaves next to some oval huts, which do not appear in the final game. | Collecting all Puzzle Pieces in Mountain Mania |

|
An enormous pine tree, decorated with bird houses, candelabrums, globes, and a Brass pipe. This tree was probably meant to be an early Hootz residence or village, and is reminiscent of Mountaintop Tussle, where the battle against Skowl, the Startling, takes place. | Collecting all Puzzle Pieces in Horn Top Hop |

|
Donkey Kong is shown riding a Mine Cart during a rain, jumping from one log of wood to another, the logs being carried by a water slide. This most probably stands as the concept for Sawmill Thrill. | Collecting all Puzzle Pieces in Sawmill Thrill |

|
Concept for a wheel with beavers, which did not made the cut. Nothing else appears in the artwork. These beavers do not seem to be Gnawties, a beaver species present in other Donkey Kong games. | Collecting all Puzzle Pieces in Alpine Incline |

|
A basic representation of Autumn Heights. The mountains are entirely surrounded by autumnal woods and two windmills in a corner. Midway on the mountains, a watermill stands between some pines on a cliff. Beyond a large cloud, two owl visages are carved in the summit, and a Swiss house rises aloft. An airship can be seen next to the cloud, although nothing like that can be seen in the final game. | Collecting all Puzzle Pieces in Wing Ding |

|
Donkey Kong jumps a gap inside a large cavern. The place is filled with luminescent mushrooms and red tufts of vegetation. The artwork most probably served as basis for Crumble Cavern. | Collecting all Puzzle Pieces in Crumble Cavern |

|
Donkey Kong rides a Rocket Barrel while two Cheesy Chesters try to stop him. The concept appears to have been used for Rodent Ruckus. | Collecting all Puzzle Pieces in Rodent Ruckus |
| Bright Savannah | ||
| Image | Description | Unlocked after... |

|
Scene of a desolate savannah territory, which is used as a theme throughout Bright Savannah. A lone, round hut sustained by stilts is built on a large rock in the middle. Pieces of cloth and other tribal accessories surround the hut; two heads resembling Tiki Goons are seen in one corner of the giant rock. Some vultures rest on the hut and a tree branch grown from the rock. | Collecting all Puzzle Pieces in Grassland Groove |

|
An African-looking landscape with a river flowing in the middle, flanked by baobabs and acacias. A path rises and ends abruptly at the edge of the river bed, but continues slightly downhill on the other side. The left side of the river seems to belong to a savannah, while the territory on the right resembles more of a desert, due to the smoother terrain. Two upright crocodiles, purported enemies, are seen in the river, and a series of small elephants rest along the desert path. These elements do not appear in the game. | Collecting all Puzzle Pieces in Baobab Bonanza |

|
A scene with the Kongs riding Rambi the Rhinoceros through tall grass. While Rambi does appear in a level of Bright Savannah, Frantic Fields, the weather in the picture looks tranquil rather than stormy as in said level. | Collecting all Puzzle Pieces in Frantic Fields |

|
Concept for a silhouetted stage in Bright Savannah, which does not exist in the game. DK and Diddy run through a shaded field with young acacia trees. In the background, there is a vast plain surrounded by plateaus, with a lake covering a large part of it. | Collecting all Puzzle Pieces in Scorch 'n' Torch |

|
An area with baobabs, acacia and other plants, irrigated by a river. Donkey Kong is platforming on treetops while Diddy skips on hippopotami peering from the river. These resemble Bopapodamuses from Donkey Kong Country Returns, and it is possible they would have functioned like red Krockheads from Donkey Kong Country 2: Diddy's Kong Quest. | Collecting all Puzzle Pieces in Twilight Terror |

|
In the first half of the image, Donkey Kong is shown standing on a cliff, closely surrounded by a group of chicks or Kiwi-like birds. In the second half, DK uses one of these birds to carefully float down a bramble ravine. | Collecting all Puzzle Pieces in Cannon Canyon |

|
Sketch of Donkey Kong gazing at the obstacles ahead: a Papa Painguin holding its spear from a window, a spiky roller in the lower-right corner, and, above, a gigantic octopus (possibly Squiddicus) peeking a tentacle with a club from behind some bars. A wooden platform linked to a chain appears in the middle, and part of a mill wheel can be seen lower to the left. The whole scene appears to take place in a heavily guarded, mechanized area. In the game itself, Twilight Terror and Rickety Rafters contain various mechanisms, but few of them resemble the specific elements in the sketch. | Collecting all Puzzle Pieces in Rickety Rafters |

|
Early visualization of Bramble Scramble. Aside from its main focus, the brambles, it is also faithful to the final version for being set in a steep canyon with various rock columns. However, in the picture, the brambles are green instead of red, and are weaving through a village of red anthill-like huts, which do not appear in the game. | Collecting all Puzzle Pieces in Bramble Scramble |
| Sea Breeze Cove | ||
| Image | Description | Unlocked after... |
| Donkey Kong carefully stepping into the sea. Sea life, including schools of tropical fish and forests of seaweed, appear underwater. A few small islands can be seen towards the horizon on a clear sky. | Collecting all Puzzle Pieces in Deep Keep | |
| An image composed of smaller black-and-white artworks depicting unused concepts and sceneries. Donkey and Diddy Kong are often shown standing on the ground as on dry land, although the captured motion of their surroundings suggest being in an underwater environment.
Clockwise from top-left, the first artwork shows silhouettes of DK and Diddy exploring the seabed through transparent underwater tubes, with kelp wrapped around them and a few sharks swimming in the background. In the second artwork, the Kongs are caught in a vortex of rising bubbles. In the following artwork, the characters are obscured by a large colony of sea anemones, in an area with ammonite fossils encrusted in rectangular rock formations. The next artwork shows the characters navigating ferris wheels with a curved, spiralled design reminiscent of ammonite shells; the heads of two gigantic eel-like monsters are seen at the bottom. The last artwork renders a habitat consisting of numerous dome aquariums populated by menacing fish; the Kongs are on dry land, gazing at the aquariums in the background. |
Collecting all Puzzle Pieces in High Tide Ride | |
| A gloomy, deep-sea scenery filled with luminescent jellyfish and other assorted creatures. Shadows of DK, Diddy, and other frontground elements are imposed on the scenery. The artwork was likely the basis of Amiss Abyss. | Collecting all Puzzle Pieces in Amiss Abyss | |
| View from inside an underwater grotto with abounding flora and fauna. Several lightbeams propagate into the water through an aperture at the surface. | Collecting all Puzzle Pieces in Irate Eight | |
| DK using a plug to uncover the ruins of a submerged city. The city is based on ancient Roman architecture and consists of two temples and a dome. A mechanism of gigantic gears help these constructions rise above the water. The buildings are populated by corals, clams and seaweed. A hill landscape can be seen behind the city ruins. | Collecting all Puzzle Pieces in Sea Stack Attack | |
| Side view of Donkey Kong platforming in and above water; none of the concepts present in the image, aside from swimming, are used in the game. First, DK is pushed out of the water by a springing eel, above a few seagulls and a giant rock pillar with a spiky top. Back underwater, there are several krill clouds followed by a dense kelp area. DK is seen again swimming towards a dragnet, carried by a Viking ship. It is stated through notes in the picture that the dragnet is risen and lowered by the ship and that it should be avoided, but there is nothing to specify how the krill clouds or the kelp forest would have affected gameplay. | Collecting all Puzzle Pieces in Current Capers | |
| Collecting all Puzzle Pieces in Rockin' Relics | ||
| Collecting all Puzzle Pieces in Shoal Atoll | ||
| Juicy Jungle | ||
| Image | Description | Unlocked after... |

|
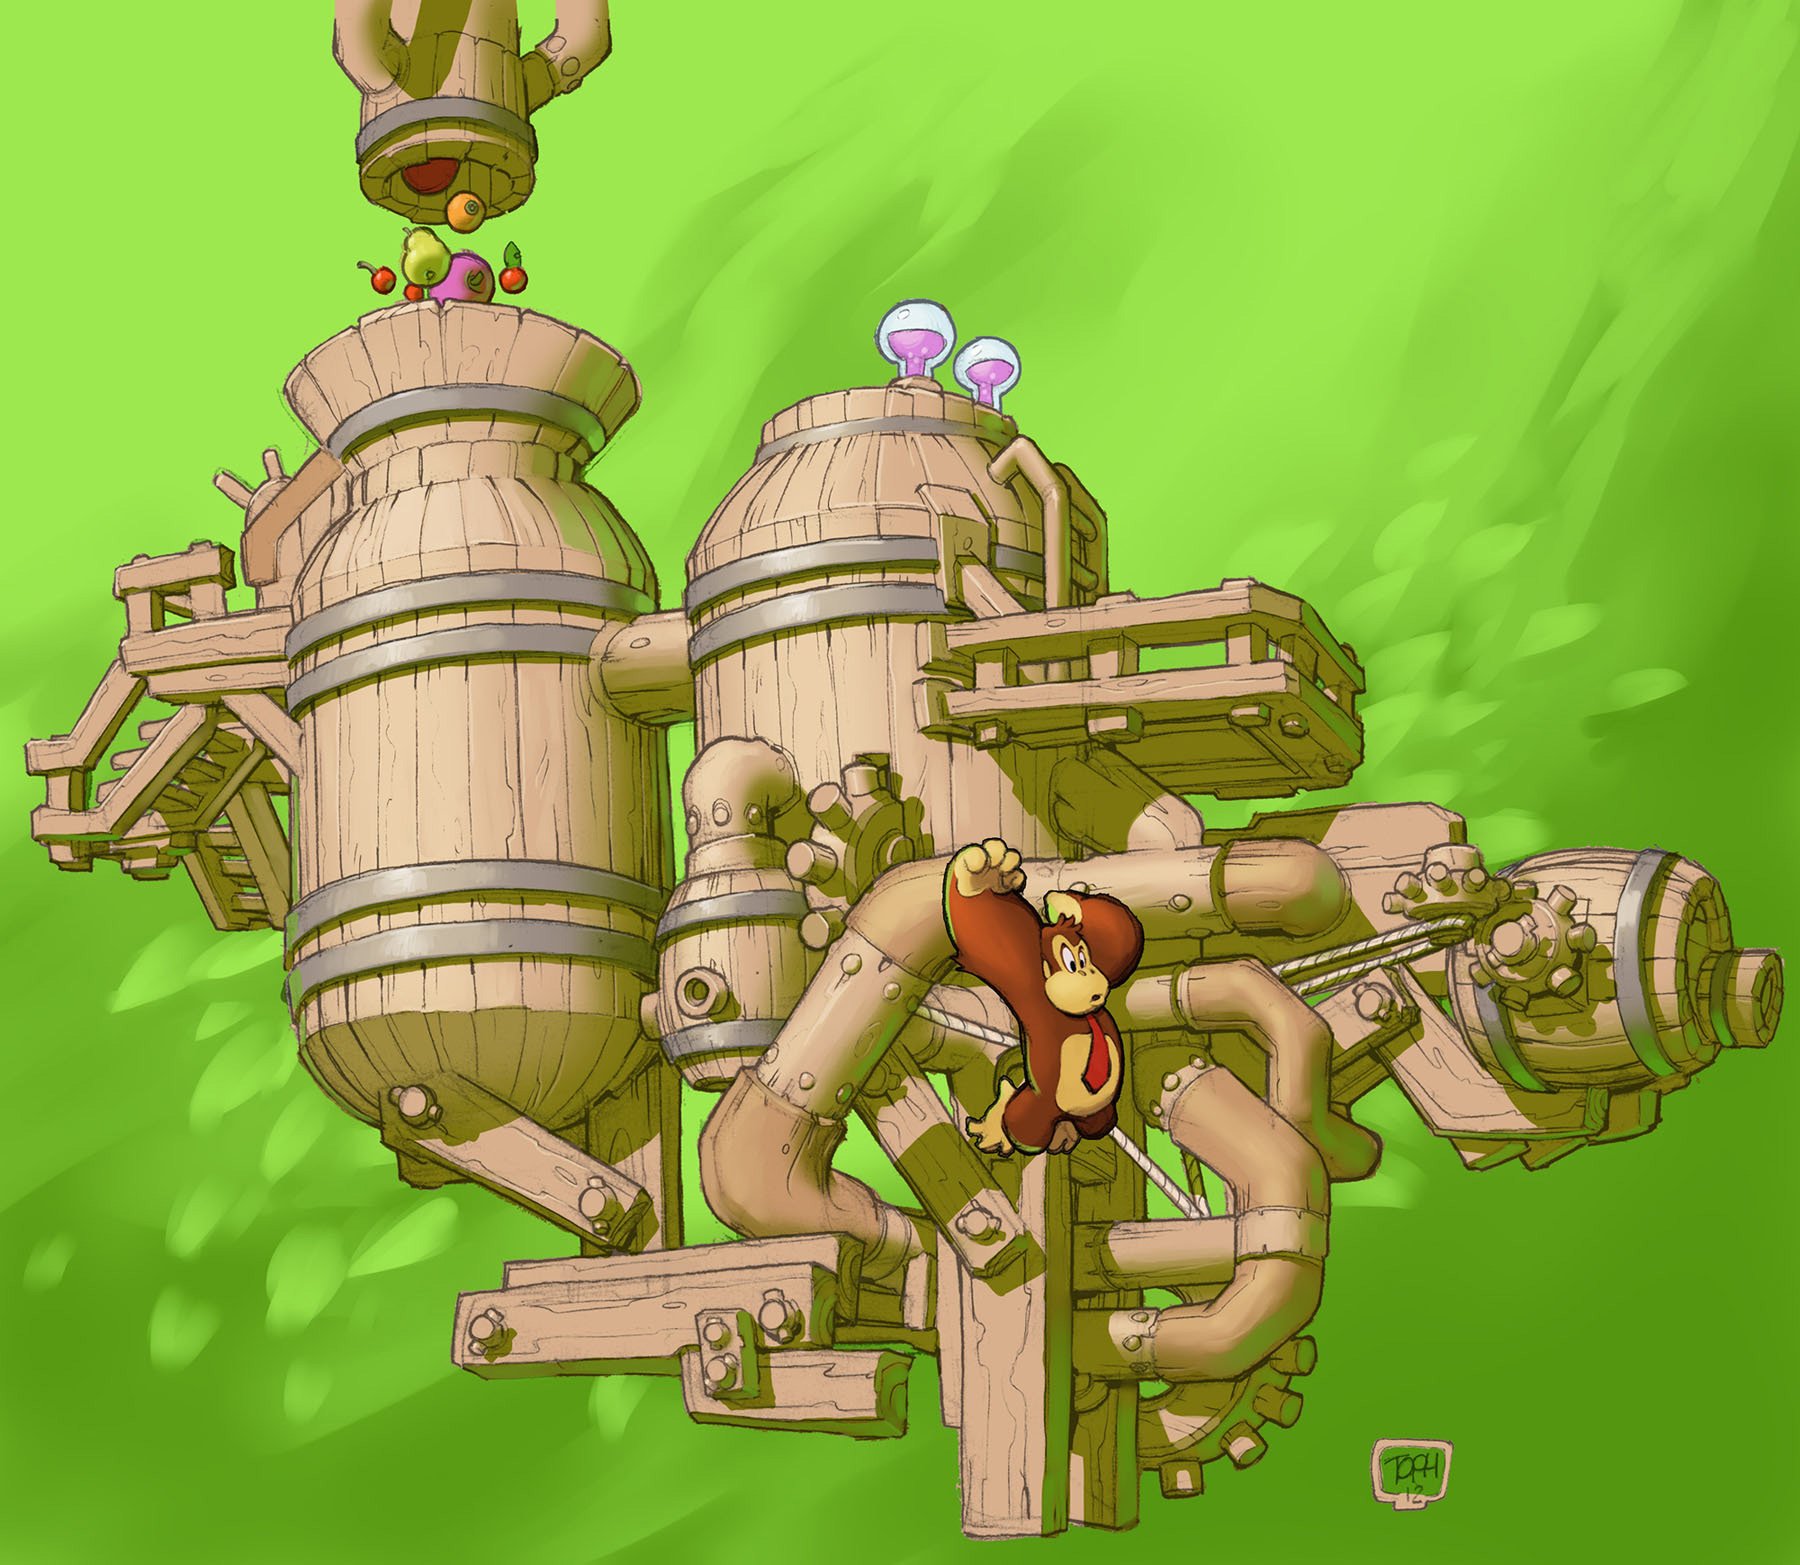
DK in front of a timbered fruit-processing plant, which is a basis for the world's most common setting. It is composed of numerous tanks resembling barrels painted in various shades and tints of green. Many screws and valves in the construction resemble pig snouts; as it can be seen in the following artworks, anthropomorphic pigs, similar to Professor Chops, were meant to populate and work on the island. An extended version of the artwork, though lacking the snout-like designs and the various colors on the plant, can be seen here. | Collecting all Puzzle Pieces in Harvest Hazards |

|
Sketch of DK riding a Rocket Barrel through a run-down factory in the jungle, filled with giant fruit carried by elevators on chains. The fruit appear to be passed through some liquid flows, coming from wooden pipes at the top. Trails of bananas mark the way between obstacles. Although not many elements seen in the sketch are used in the game itself, the concept of a Rocket Barrel level in Juicy Jungle is used for the level Reckless Ride. | Collecting all Puzzle Pieces in Reckless Ride |

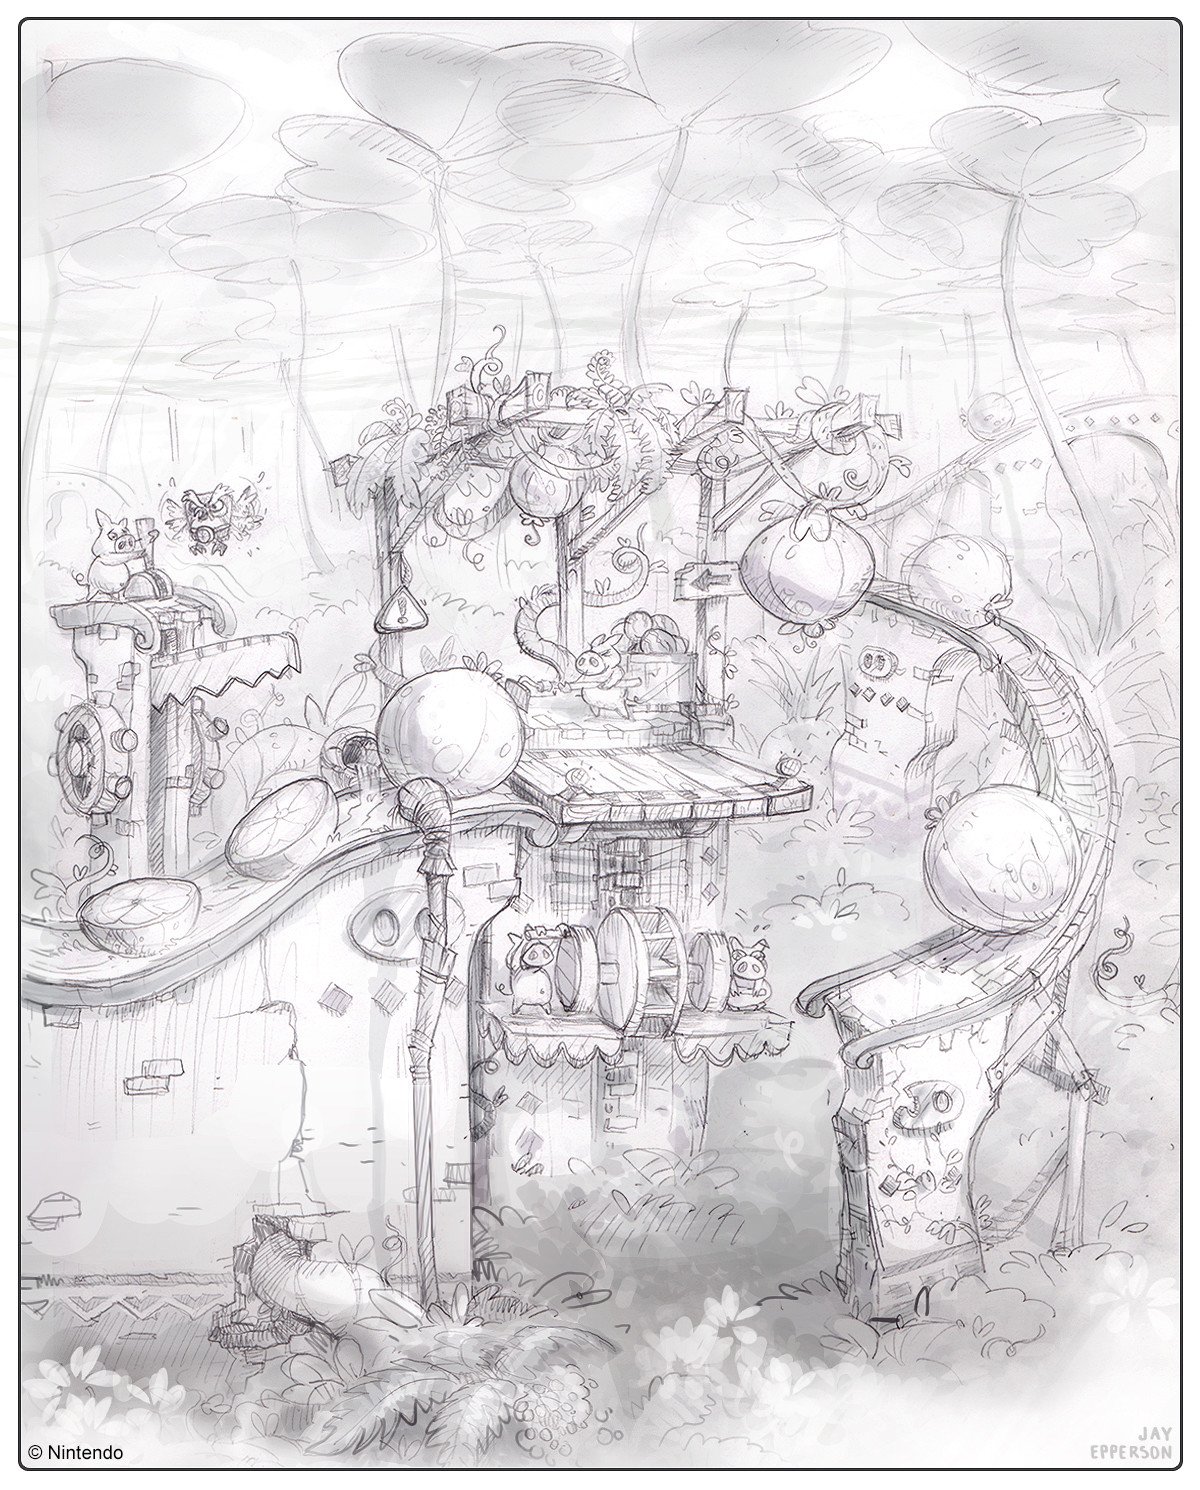
|
Another sketch capturing the jungle factory setting. Multiple pigs are seen working to process giant fruit coming on wooden gutters. Their actions include powering mills, pushing fruit forward, and cutting them. The pig at the top left corner, who maneuvres a saw with a lever, appears to be harassed by a Hootz. The artwork is cropped from a larger image.
In the game itself, the factory of Juicy Jungle is entirely automated, and no pigs are seen throughout, except for Professor Chops. |
Collecting all Puzzle Pieces in Fruity Factory |

|
Donkey Kong traveling on a slice of fruit along a large juice slide. A barrier with lights is placed ahead of him, and a sign in the background urges him to jump over the barrier. This concept is not used in any levels of the game. | Collecting all Puzzle Pieces in Panicky Paddles |

|
A group of four pigs harvest a giant pumpkin-like fruit from a vine, using a saw to cut its stem, some string to sustain it, and a cart to transport it on rails. The scene takes place above a body of water surrounded by sown fields. It is one of the two artworks to show that Juicy Jungle was originally conceived as a farmland, rather than a jungle. | Collecting all Puzzle Pieces in Jelly Jamboree |

|
An early look of Juicy Jungle; this is the second artwork to show the island as a farmland instead of jungle, although the factory setting is kept. Basic stages of processing and production are depicted in the artwork. The largest rock on the island is home to some crop fields; starting from here, juice and fruit slices are dropped into a large funnel house, then transported into a processing plant emitting fumes. The products are then being conveyed by a looped gutter inside a large transparent bowl. The island and factory are surrounded by numerous pear-shaped huts built on stilts, presumably the homes of the pigs seen in earlier artworks. | Collecting all Puzzle Pieces in Frosty Fruits |

|
DK and Cranky Kong standing on a sliced fruit in the frontground. The artwork focuses on the jungle aspect of the island, but branched water pipes are seen in the image. Large citruses and strawberries are grown on vines. | Collecting all Puzzle Pieces in Beehive Brawl |

|
Scene of a pig-populated town with whitewashed buildings, heavily inspired by Cycladic architecture and art. Donkey Kong, Dixie Kong and Professor Chops stand close to a house with a balcony and a passage underneath. Many stairways and passages weave between houses, and two pigs are seen conversing on a balustrade. A seaside cliff with houses in the far background peeks between two buildings, further showing the similarity of this place with Greek landscapes. In the game, there is no trace of such town or village. | Collecting all Puzzle Pieces in Jammin' Jams |
| Donkey Kong Island | ||
| Image | Description | Unlocked after... |
| Collectin all Puzzle Pieces in Homecoming Hijinxs | ||
| Collecting all Puzzle Pieces in Seashore War | ||
| Collecting all Puzzle Pieces in Aqueduct Assault | ||
| Collecting all Puzzle Pieces in Blurry Flurry | ||
| Collecting all Puzzle Pieces in Forest Folly | ||
| Collecting all Puzzle Pieces in Cliffside Slide | ||

|
Front, profile, and top view of an ice dragon over a white background. | Collecting all Puzzle Pieces in Frozen Frenzy |
| Collecting all Puzzle Pieces in Meltdown Mayhem | ||

|
Concepts for several walrus warriors. Waldoughs and their relatives from the game are close to what the artwork depicts, but they are not named as in the drawing. The sketch depicts the following: "Sven the Fisheater", a character wielding a quiver of fish on his back and a possible precursor of Chum Chucker Charlie; "Olaf the Forgetful", a pelt-clad enemy in a ship-like vehicle, with no obvious equivalent in the actual game; "Lars the Immovable", an armored walrus and an early version of Walbrick; and "Krob the Konqueror", an enemy wearing a bib around its neck and wielding a spear with a crab on its head. | Collecting all Puzzle Pieces in Dynamite Dash |
| Collecting all Puzzle Pieces in Icicle Arsenal | ||
| Hidden Kong Temple | ||
| Image | Description | Unlocked after... |

|
Various species from Lost Mangroves: a Thug Slug, a Dozy, a Punchy Paddy, a Wild Wendell, and a Monocle Monica. Their designs have remained widely unchanged, apart from the Monocle Monica having a bird-like beak in its final version instead of insect mandibles as depicted here. | Collecting all Puzzle Pieces in Swinger Flinger |

|
Various species from Autumn Heights: a Cheesy Chester, a goat, and a Schnautzel. A skunk-like being and some bees swarming over a bale of hay are also seen among the previous, though they are inexistent in the game itself. | Collecting all Puzzle Pieces in Bopopolis |

|
Various species from Bright Savannah: a Porcupal, a Buffaloafer, and a Swooper Dooper. A lynx-like enemy and a Bopapodamus wearing a rubber ring also appear in the artwork, though not in the game itself. Of note is that the proportions in the withers and hips of the Buffaloafer are more exaggerated here than in the final version. | Collecting all Puzzle Pieces in Precarious Pendulums |

|
Various species from Sea Breeze Cove, most of which are inexistent in the final version: a giant eel monster, a nautillus enemy, a crustacean, a Fritz, and a jellyfish foe. | Collecting all Puzzle Pieces in Spinning Spines |

|
Various species from Juicy Jungle: a Bouncelisk, a Buzzy, a Bucky, a Chompasaurus, and a Toucan't, respectively. | Collecting all Puzzle Pieces in Platform Problems |

|
Various Snowmad warriors | Collecting all Puzzle Pieces in Slippy Spikes |
| Secret Seclusion | ||
| Image | Description | Unlocked after... |
| Collecting all Puzzle Pieces in Levitation Station | ||
| Collecting all Puzzle Pieces in Rocket Rails | ||
| Collecting all Puzzle Pieces in Crazy Clouds | ||

|
Beating the game on Hard Mode | |

|
||
Music
The music gallery is a collection of themes that play throughout the game, and is divided into six sets, each covering some of the music that plays in one world of the game (excluding Secret Seclusion). Each set is composed of four themes and can be unlocked by defeating the boss of its corresponding world.
Dioramas

The diorama gallery comprises elaborate models that represent the six main worlds of the game. They feature Donkey Kong and his pals, depicted in numerous poses and instances, often facing the dangers of one world. A diorama is unlocked after defeating the boss of its represented world. Like figurines, dioramas can be rotated and zoomed in or out in the gallery.
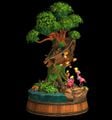
Lost Mangroves diorama

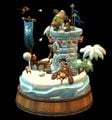
Autumn Heights diorama
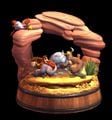
Bright Savannah diorama
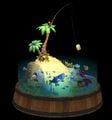
Sea Breeze Cove diorama
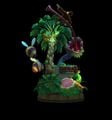
Juicy Jungle diorama
Donkey Kong Island diorama


List of Donkey Kong Country: Tropical Freeze pre-release and unused content
Lost Mangroves

A steamboat model was built to serve as the basis for all mechanical structures present in Lost Mangroves. The steamboat itself is not fully used in the game, but a few instances appear in Trunk Twister.[1]
Sea Breeze Cove
Despite being set in an aquatic world, only a few artworks show the Kongs swimming in water, the rest showing them walking on the shoreline or beside aquarium-like environments. This was probably in anticipation that the game would lack swimming mechanics, like Donkey Kong Country Returns, the predecessor, did.
Juicy Jungle
In most artworks related to Juicy Jungle, many pig characters looking similar to Professor Chops appear to populate the area and work inside the factory. Even though the factory setting of Juicy Jungle was kept, no pigs are seen, and the factory itself is fully automated in the final version.