List of Super Smash Bros. glitches: Difference between revisions
mNo edit summary |
(merging identical stuff) |
||
| Line 6: | Line 6: | ||
==={{conjecturaltext|Black Hole glitch}}=== | ==={{conjecturaltext|Black Hole glitch}}=== | ||
All 4 players must be Link. At hyrule castle (or any place with a straight wall) all four links should walk to the right, fall into the place with the canopy, and run left against the wall so they are inside each other. Then let the game push them all apart. After this, all 4 links must simultaneously throw bombs upwards weakly, quickly. After just a few throws, the bombs will hit each other and continuously stay, trapping the players within. | All 4 players must be Link. At hyrule castle (or any place with a straight wall) all four links should walk to the right, fall into the place with the canopy, and run left against the wall so they are inside each other. Then let the game push them all apart. After this, all 4 links must simultaneously throw bombs upwards weakly, quickly. After just a few throws, the bombs will hit each other and continuously stay, trapping the players within. | ||
==={{conjecturaltext|Shell Stack glitch}}=== | |||
[[Image:Donkey Shells.png|thumb|left|The Shell Stack glitch using the Mario Tornado.]] | |||
This glitch involves the usage of Training Mode's ability to spawn items. By creating 4 Green or Red Shells in the same location, attacking them with various moves will deal ridiculous damage to the attacker, the opponent, or possibly both. Multiple variants of this glitch exist. | |||
====Mario Tornado==== | |||
Possibly the most well-known version of the glitch, caused by using the Mario Tornado to simultaneously hit an opponent and a stack of Green Shells. As the shells and the attack hit each other and the opponent in a chain reaction, all of them will be locked in freeze frames until the items eventually vanish and the Tornado can run to completion; the time this takes (about 30 seconds) is guaranteed to ring up the opponent's damage to 999%. As the Mario Tornado has fixed knockback, the opponent will not be KO'd once the glitch completes, though essentially any other move will. This can also be done with the Super Jump Punch, Luigi Cyclone, and Screw Attack. Using Red Shells instead of Green ones will cause more unpredictable results, such as immediately raising both characters' damage to over 800% and knocking them both away with fixed knockback. | |||
====Ground Pound==== | |||
This variant involves Yoshi using his Ground Pound into a stack of Red Shells near the opponent. If done correctly, Yoshi and then the opponent will each receive about 250% to 400% damage. | |||
====Spin Attack==== | |||
This variant involves Link using his Spin Attack on an opponent and a nearby stack of Red Shells. If done correctly, the opponent gains up to 999% damage and slashing sound effects can be heard. | |||
====Ness's forward smash==== | |||
This variant involves using Ness's forward smash (his bat) on a stack of a stack of Red Shells next to the opponent. If done correctly, the opponent will take 600% to 999% damage and go flying. This may also hit the player, depending on the distance from the shells. | |||
<gallery> | |||
Image:Yoshi's Ground Pound on Red Shells.PNG|The Ground Pound variant. | |||
Image:Link attacks Donkey.png|The Spin Attack variant. | |||
Image:Donkey Red Shells.png|The Ness forward smash variant. | |||
</gallery> | |||
==={{conjecturaltext|Drifting away from the stage}}=== | ==={{conjecturaltext|Drifting away from the stage}}=== | ||
| Line 15: | Line 37: | ||
}} | }} | ||
The player has to use Mario for this glitch. Mario must go to any stage with a wall and stand against a wall. Then he must use shield and roll against that wall as much as he can. If Mario is rolling left, he goes further away. If he is rolling right he goes towards the camera. If Mario falls or gets attacked, he reverts to normal. | The player has to use Mario for this glitch. Mario must go to any stage with a wall and stand against a wall. Then he must use shield and roll against that wall as much as he can. If Mario is rolling left, he goes further away. If he is rolling right he goes towards the camera. If Mario falls or gets attacked, he reverts to normal. | ||
<br clear=all> | <br clear=all> | ||
| Line 36: | Line 42: | ||
Only 2 players are required for this glitch. One should be Ness, the other should be Fox. Choose a stage with a direct line between Ness and Fox (ideally, Hyrule Castle or Sector Z). PK thunder against Fox's reflector so that the PK thunder is in direct line back to Ness, and quickly bat the PK thunder away. The thunder should have 2 tails, and if it reaches the edge of the screen, the game can't handle it and will freeze. | Only 2 players are required for this glitch. One should be Ness, the other should be Fox. Choose a stage with a direct line between Ness and Fox (ideally, Hyrule Castle or Sector Z). PK thunder against Fox's reflector so that the PK thunder is in direct line back to Ness, and quickly bat the PK thunder away. The thunder should have 2 tails, and if it reaches the edge of the screen, the game can't handle it and will freeze. | ||
{{BoxTop}} | {{BoxTop}} | ||
{{Glitches}} | {{Glitches}} | ||
[[Category:Glitches]] | [[Category:Glitches]] | ||
Revision as of 13:14, February 14, 2013
This is a list of glitches that appear in Super Smash Bros.
Glitches
- Main article: SmashWiki:Category:Glitches
Template:Conjecturaltext
All 4 players must be Link. At hyrule castle (or any place with a straight wall) all four links should walk to the right, fall into the place with the canopy, and run left against the wall so they are inside each other. Then let the game push them all apart. After this, all 4 links must simultaneously throw bombs upwards weakly, quickly. After just a few throws, the bombs will hit each other and continuously stay, trapping the players within.
Template:Conjecturaltext

This glitch involves the usage of Training Mode's ability to spawn items. By creating 4 Green or Red Shells in the same location, attacking them with various moves will deal ridiculous damage to the attacker, the opponent, or possibly both. Multiple variants of this glitch exist.
Mario Tornado
Possibly the most well-known version of the glitch, caused by using the Mario Tornado to simultaneously hit an opponent and a stack of Green Shells. As the shells and the attack hit each other and the opponent in a chain reaction, all of them will be locked in freeze frames until the items eventually vanish and the Tornado can run to completion; the time this takes (about 30 seconds) is guaranteed to ring up the opponent's damage to 999%. As the Mario Tornado has fixed knockback, the opponent will not be KO'd once the glitch completes, though essentially any other move will. This can also be done with the Super Jump Punch, Luigi Cyclone, and Screw Attack. Using Red Shells instead of Green ones will cause more unpredictable results, such as immediately raising both characters' damage to over 800% and knocking them both away with fixed knockback.
Ground Pound
This variant involves Yoshi using his Ground Pound into a stack of Red Shells near the opponent. If done correctly, Yoshi and then the opponent will each receive about 250% to 400% damage.
Spin Attack
This variant involves Link using his Spin Attack on an opponent and a nearby stack of Red Shells. If done correctly, the opponent gains up to 999% damage and slashing sound effects can be heard.
Ness's forward smash
This variant involves using Ness's forward smash (his bat) on a stack of a stack of Red Shells next to the opponent. If done correctly, the opponent will take 600% to 999% damage and go flying. This may also hit the player, depending on the distance from the shells.
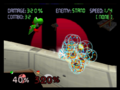
The Ground Pound variant.
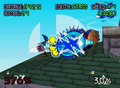
The Spin Attack variant.
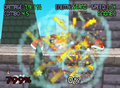
The Ness forward smash variant.


Template:Conjecturaltext


The player has to use Mario for this glitch. Mario must go to any stage with a wall and stand against a wall. Then he must use shield and roll against that wall as much as he can. If Mario is rolling left, he goes further away. If he is rolling right he goes towards the camera. If Mario falls or gets attacked, he reverts to normal.
Template:Conjecturaltext
Only 2 players are required for this glitch. One should be Ness, the other should be Fox. Choose a stage with a direct line between Ness and Fox (ideally, Hyrule Castle or Sector Z). PK thunder against Fox's reflector so that the PK thunder is in direct line back to Ness, and quickly bat the PK thunder away. The thunder should have 2 tails, and if it reaches the edge of the screen, the game can't handle it and will freeze.