Toad's Factory: Difference between revisions
No edit summary |
No edit summary Tag: Mobile edit |
||
| (22 intermediate revisions by 13 users not shown) | |||
| Line 3: | Line 3: | ||
|appears_in=''[[Mario Kart Wii]]'' ([[List of games by date#2008|2008]]) | |appears_in=''[[Mario Kart Wii]]'' ([[List of games by date#2008|2008]]) | ||
|cups=[[Mushroom Cup]] | |cups=[[Mushroom Cup]] | ||
|online_play= No longer available ([[Wii]]) | |online_play= No longer available ([[Wii]]) | ||
|sample=[[File:ToadsFactoryMKW.oga]] | |sample=Exterior<br>[[File:ToadsFactoryMKW.oga]]<br>Interior<br>[[File:ToadsFactoryInsideMKW.oga]] | ||
|map=[[File:Toad Factory MKWii layout.png|140px]] | |map=[[File:Toad Factory MKWii layout.png|140px]] | ||
|ghost={{ghost|Wii|Nin★Misa|2:22.480|[[File:ToadMKW.png|32px|link=Toad]][[File:Jet Bubble (Toad) Model.png|32px|link=Jet Bubble]]}}{{ghost|Wii <small>Expert</small>|Nin★GQO|2:05.593|[[File:ToadMKW.png|32px|link=Toad]][[File:Blue Falcon (Toad) Model.png|32px|link=Blue Falcon]]}} | |||
}} | }} | ||
'''Toad's Factory''' is the fourth and final course of the [[Mushroom Cup]] in ''[[Mario Kart Wii]]''. | '''Toad's Factory''' is the fourth and final course of the [[Mushroom Cup]] in ''[[Mario Kart Wii]]''. [[Item Box]]es are seen produced in several parts of the course. Toad's Factory is one of four courses from ''Mario Kart Wii'' that has yet to reappear as a [[classic course]] in a future game, the others being [[Luigi Circuit (Mario Kart Wii)|Luigi Circuit]], [[Mario Circuit (Mario Kart Wii)|Mario Circuit]], and [[Bowser's Castle (Mario Kart Wii)|Bowser's Castle]]. | ||
==Course layout== | ==Course layout== | ||
[[File:MKW Toads Factory Machines.png|thumb|left|Toad racing near the hydraulic machines]] | [[File:MKW Toads Factory Machines.png|thumb|left|Toad racing near the hydraulic machines]] | ||
The course begins just outside the factory. Racers immediately enter the factory and take a 90° turn to the right, with the first set of [[Item Box]]es in the middle. Racers then enter a room where there is a [[conveyor belt]] in the middle of the road and two conveyor belts on the sides of the road. The conveyor belt in the middle is going forwards and is green, while the conveyor belts on the sides are going backwards and are red. Above each conveyor belt is a pair of hydraulic presses which can crush the player akin to a [[Thwomp]]. On the conveyor belts on the sides, the hydraulic presses crush boxes and turn them into additional Item Boxes that racers can grab. The boxes are absent during Time Trials. | |||
After this area, the | After this room, racers exit the factory into an area suspended over water, and they take another 90° turn to the right, bringing them to a [[Dash Panel|dash panel]] ramp. Upon landing, racers must cross a platform that is being moved left and right by a crane, sometimes forcing racers to adjust their angle as they go off the prior ramp. There then is a brief section with four conveyor belts that lie perpendicular to the road and alternate in direction. Item Boxes and breakable wooden crates alternate spawning onto each conveyor belt, requiring players to wave past the latter. The breakable wooden crates are replaced with unbreakable metal boxes during Time Trials. After this section is a second moving platform before racers reenter the factory. Right above the entrance is a picture of Toad holding an Item Box. When any player is playing as a [[Mii]], Toad's face in the picture is replaced with a random Mii's face. | ||
[[File:MKW Toads Factory Conveyors.png|thumb | [[File:MKW Toads Factory Conveyors.png|thumb|Toad approaching the hall with conveyor belts]] | ||
When racers reenter the factory, there is a U-turn to the right with another item set in the middle, followed by a short drop. If racers take the U-turn too tightly, they are able to fall off the track. After this is a U-turn to the left where the main path has been replaced with two curved conveyor belts that go in opposite directions, though there is a narrow stretch of road on the outside of the turn that is slanted upwards. As with the first room, the conveyor belt that is going forward will be green while the one going backwards will be red. At certain times the conveyor belts will swap colors and directions, as indicated by them briefly shutting off. On the narrow stretch of road on the outside of the turn, there are two pairs of Item Boxes. After this U-turn, racers take a turn to the right through a room with blaring red sirens. Here they encounter the final item set and a dash panel ramp as they exit the factory again. When this happens, the course's music is restarted from the beginning. | |||
As racers exit the factory, there is a brief straightaway with several consecutive mounds that span the width of the road and that racers can perform [[Jump Boost|tricks]] on. To the left and right of this straight are large patches of mud. Racers then encounter one last 90° turn to the right, with a pool of water on the inside of the turn that racers can fall into. After this turn is one final straightaway, where there is a very large patch of mud. To go through without losing speed, racers must make use of two pairs of dash panels followed by a dash panel ramp in the middle of the track. However, there are very large tractors that block the dash panels; if the left dash panel is exposed, the dash panel directly right of it will get covered by a tractor and vice versa. The second pair of dash panels will always be inverted compared to the first, requiring players to drive back and forth through the section. After going off the dash panel ramp, racers soon reach the finish line. | |||
==Shortcuts== | |||
The main shortcut on this course can be found where racers exit the factory for the second time: If the player tricks off the dash panel ramp and then tricks off the far right side of the first mound, it is possible to jump over the pool of water and cut off the turn. If done correctly, it is possible to complete this shortcut without using a [[Dash Mushroom|Mushroom]], though having one makes the shortcut much easier. | |||
An extremely difficult glitch shortcut can also be performed at the section with the moving platforms. By slowing down after the first dash panel ramp and facing slightly right, it is possible to use a Mushroom to clip the edge of one of the moving crates, gain significant air time, and land inside a later section of the factory.<ref>https://youtu.be/m6f9J2yHuCs The world record, as of Jan 10 23, using the glitch</ref> | |||
==Tournaments== | ==Tournaments== | ||
[[File:2009-TournamentJanuary1.jpg|thumb|200px|The Toad's Factory tournament]] | [[File:2009-TournamentJanuary1.jpg|thumb|200px|The Toad's Factory tournament]] | ||
[[List of Mario Kart Wii tournaments#January 2009 Tournament 1|January 2009's first tournament]] required players to complete a Time Trial in reverse on Toad's Factory. There are several ramps added to make this possible. Players start the Time Trial with no items, but the section with the hydraulic presses still has Item Boxes which will always contain Mushrooms. This tournament was later repeated as the first tournament of January 2011, the second tournament of April 2012, and the first tournament of July 2013. | |||
{{br}} | {{br}} | ||
==Profiles== | ==Profiles== | ||
===''Mario Kart Wii''=== | ===''Mario Kart Wii''=== | ||
*'''Website bios:''' | *'''Website bios:''' | ||
**[[File:Flag of USA.png|20px]] "''Drive over conveyer{{sic}} belts, through muck, and across moving platforms in one of the trickiest new courses.''" | **[[File:Flag of USA.png|20px]] "''Drive over conveyer{{sic}} belts, through muck, and across moving platforms in one of the trickiest new courses.''" | ||
**[[File:Flag of Europe.png|20px]] "''Technology isn't always helpful! With moving walls, conveyer belts and heavy machinery obstructing your path, it's going to take some special driving to bring home the Mushroom Cup.''" | **[[File:Flag of Europe.png|20px]] "''Technology isn't always helpful! With moving walls, conveyer belts and heavy machinery obstructing your path, it's going to take some special driving to bring home the Mushroom Cup.''" | ||
*'''Guide:''' "''The final course offers a relatively square-shaped track, complete with a wide starting tarmac run that enters a conveyor-belt building where crushers and arrows are part of your racing run. An exterior series of leaps across more conveyor belts forces you to keep a straight line into a winding tunnel, and make a large leap onto a sandy track before a final race across the mud.''" | *'''Guide:'''{{ref needed}} "''The final course offers a relatively square-shaped track, complete with a wide starting tarmac run that enters a conveyor-belt building where crushers and arrows are part of your racing run. An exterior series of leaps across more conveyor belts forces you to keep a straight line into a winding tunnel, and make a large leap onto a sandy track before a final race across the mud.''" | ||
==Sponsors== | ==Sponsors== | ||
| Line 67: | Line 63: | ||
|Spa=Fábrica de Toad | |Spa=Fábrica de Toad | ||
|SpaM=Toad's Factory | |SpaM=Toad's Factory | ||
| | |FreE=Usine Toad | ||
| | |FreEM=Toad Factory | ||
| | |FreA=Usine de Toad | ||
| | |FreAM=Toad's Factory | ||
|Kor=키노피오 팩토리 | |Kor=키노피오 팩토리 | ||
|KorR=Kinopio Paektori | |KorR=Kinopio Paektori | ||
| Line 77: | Line 73: | ||
==Trivia== | ==Trivia== | ||
*The first seven seconds of the course's music do not play at the start of the race. Instead, the music will restart from the beginning when the player takes the large jump after the room filled with gas. This is the only course in the ''[[Mario Kart (series)|Mario Kart]]'' series where this happens, therefore making it practically impossible to hear the whole song (unless one simply sits in place long enough for the whole song to play through). However, the music restart did not occur during the Toad's Factory competition. | *The first seven seconds of the course's music do not play at the start of the race. Instead, the music will restart from the beginning when the player takes the large jump after the room filled with gas. This is the only course in the ''[[Mario Kart (series)|Mario Kart]]'' series where this happens, therefore making it practically impossible to hear the whole song under normal circumstances (unless one simply sits in place long enough for the whole song to play through). However, the music restart did not occur during the Toad's Factory competition. | ||
**Because of this, it is the only course in ''Mario Kart Wii'' besides {{classic-link|SNES|Ghost Valley 2}} where the song's intro is not skipped on the third lap. | **Because of this, it is the only course in ''Mario Kart Wii'' besides {{classic-link|SNES|Ghost Valley 2}} and {{classic-link|N64|DK's Jungle Parkway}} where the song's intro is not skipped on the third lap. | ||
==References== | ==References== | ||
Latest revision as of 23:20, April 19, 2024
| Toad's Factory | |||||||||||
|---|---|---|---|---|---|---|---|---|---|---|---|

| |||||||||||
| Information | |||||||||||
| Appears in | Mario Kart Wii (2008) | ||||||||||
| Cup(s) | Mushroom Cup | ||||||||||
| Online play | No longer available (Wii) | ||||||||||
| |||||||||||
| |||||||||||
| |||||||||||

Toad's Factory is the fourth and final course of the Mushroom Cup in Mario Kart Wii. Item Boxes are seen produced in several parts of the course. Toad's Factory is one of four courses from Mario Kart Wii that has yet to reappear as a classic course in a future game, the others being Luigi Circuit, Mario Circuit, and Bowser's Castle.
Course layout[edit]

The course begins just outside the factory. Racers immediately enter the factory and take a 90° turn to the right, with the first set of Item Boxes in the middle. Racers then enter a room where there is a conveyor belt in the middle of the road and two conveyor belts on the sides of the road. The conveyor belt in the middle is going forwards and is green, while the conveyor belts on the sides are going backwards and are red. Above each conveyor belt is a pair of hydraulic presses which can crush the player akin to a Thwomp. On the conveyor belts on the sides, the hydraulic presses crush boxes and turn them into additional Item Boxes that racers can grab. The boxes are absent during Time Trials.
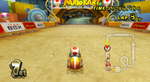
After this room, racers exit the factory into an area suspended over water, and they take another 90° turn to the right, bringing them to a dash panel ramp. Upon landing, racers must cross a platform that is being moved left and right by a crane, sometimes forcing racers to adjust their angle as they go off the prior ramp. There then is a brief section with four conveyor belts that lie perpendicular to the road and alternate in direction. Item Boxes and breakable wooden crates alternate spawning onto each conveyor belt, requiring players to wave past the latter. The breakable wooden crates are replaced with unbreakable metal boxes during Time Trials. After this section is a second moving platform before racers reenter the factory. Right above the entrance is a picture of Toad holding an Item Box. When any player is playing as a Mii, Toad's face in the picture is replaced with a random Mii's face.

When racers reenter the factory, there is a U-turn to the right with another item set in the middle, followed by a short drop. If racers take the U-turn too tightly, they are able to fall off the track. After this is a U-turn to the left where the main path has been replaced with two curved conveyor belts that go in opposite directions, though there is a narrow stretch of road on the outside of the turn that is slanted upwards. As with the first room, the conveyor belt that is going forward will be green while the one going backwards will be red. At certain times the conveyor belts will swap colors and directions, as indicated by them briefly shutting off. On the narrow stretch of road on the outside of the turn, there are two pairs of Item Boxes. After this U-turn, racers take a turn to the right through a room with blaring red sirens. Here they encounter the final item set and a dash panel ramp as they exit the factory again. When this happens, the course's music is restarted from the beginning.
As racers exit the factory, there is a brief straightaway with several consecutive mounds that span the width of the road and that racers can perform tricks on. To the left and right of this straight are large patches of mud. Racers then encounter one last 90° turn to the right, with a pool of water on the inside of the turn that racers can fall into. After this turn is one final straightaway, where there is a very large patch of mud. To go through without losing speed, racers must make use of two pairs of dash panels followed by a dash panel ramp in the middle of the track. However, there are very large tractors that block the dash panels; if the left dash panel is exposed, the dash panel directly right of it will get covered by a tractor and vice versa. The second pair of dash panels will always be inverted compared to the first, requiring players to drive back and forth through the section. After going off the dash panel ramp, racers soon reach the finish line.
Shortcuts[edit]
The main shortcut on this course can be found where racers exit the factory for the second time: If the player tricks off the dash panel ramp and then tricks off the far right side of the first mound, it is possible to jump over the pool of water and cut off the turn. If done correctly, it is possible to complete this shortcut without using a Mushroom, though having one makes the shortcut much easier.
An extremely difficult glitch shortcut can also be performed at the section with the moving platforms. By slowing down after the first dash panel ramp and facing slightly right, it is possible to use a Mushroom to clip the edge of one of the moving crates, gain significant air time, and land inside a later section of the factory.[1]
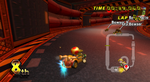
Tournaments[edit]

January 2009's first tournament required players to complete a Time Trial in reverse on Toad's Factory. There are several ramps added to make this possible. Players start the Time Trial with no items, but the section with the hydraulic presses still has Item Boxes which will always contain Mushrooms. This tournament was later repeated as the first tournament of January 2011, the second tournament of April 2012, and the first tournament of July 2013.
Profiles[edit]
Mario Kart Wii[edit]
- Website bios:
 "Drive over conveyer[sic] belts, through muck, and across moving platforms in one of the trickiest new courses."
 "Technology isn't always helpful! With moving walls, conveyer belts and heavy machinery obstructing your path, it's going to take some special driving to bring home the Mushroom Cup."
- Guide:[citation needed] "The final course offers a relatively square-shaped track, complete with a wide starting tarmac run that enters a conveyor-belt building where crushers and arrows are part of your racing run. An exterior series of leaps across more conveyor belts forces you to keep a straight line into a winding tunnel, and make a large leap onto a sandy track before a final race across the mud."
Sponsors[edit]
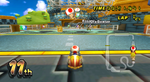
Gallery[edit]

The course banner

A preview of the course
The area with the floating platforms and conveyor belts
The red room
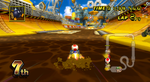
The muddy tractor area
The end of the course


Names in other languages[edit]
| Language | Name | Meaning |
|---|---|---|
| Japanese | キノピオファクトリー Kinopio Fakutorī |
Toad Factory |
| French (NOA) | Usine de Toad |
Toad's Factory |
| French (NOE) | Usine Toad |
Toad Factory |
| German | Toads Fabrik |
Toad's Factory |
| Italian | Fabbrica di Toad |
Toad's Factory |
| Korean | 키노피오 팩토리 Kinopio Paektori |
Toad Factory |
| Spanish | Fábrica de Toad |
Toad's Factory |
Trivia[edit]
- The first seven seconds of the course's music do not play at the start of the race. Instead, the music will restart from the beginning when the player takes the large jump after the room filled with gas. This is the only course in the Mario Kart series where this happens, therefore making it practically impossible to hear the whole song under normal circumstances (unless one simply sits in place long enough for the whole song to play through). However, the music restart did not occur during the Toad's Factory competition.
- Because of this, it is the only course in Mario Kart Wii besides SNES Ghost Valley 2 and N64 DK's Jungle Parkway where the song's intro is not skipped on the third lap.
References[edit]
- ^ https://youtu.be/m6f9J2yHuCs The world record, as of Jan 10 23, using the glitch