Tower of Revival: Difference between revisions
(Revamped Treasures section; Added Musical Coins section) |
No edit summary |
||
| Line 17: | Line 17: | ||
===Red Chest: Super Smash=== | ===Red Chest: Super Smash=== | ||
The Super Smash<ref name=Smash>Brady, Matthew K., Nathan Beittenmiller, Debra McBride, and David Cassady. ''Game Boy Game Secrets, 2001 Edition'' Prima's Official Strategy Guide. Page 94.</ref> in the Red Chest requires the blue snake door in this level to be open. After entering the door, there is a torch found next to the door. The room also have [[doughnut block]]s blocking the [[Bonfire Block]]s. To break the doughnut blocks, Wario must go up the pipe to the area with [[ | The Super Smash<ref name=Smash>Brady, Matthew K., Nathan Beittenmiller, Debra McBride, and David Cassady. ''Game Boy Game Secrets, 2001 Edition'' Prima's Official Strategy Guide. Page 94.</ref> in the Red Chest requires the blue snake door in this level to be open. This requires both the Right Glass Eye from [[The West Crater]]'s Gray Chest and the Left Glass Eye from [[The Colossal Hole]]'s Gray Chest to unlock. | ||
After entering the door, there is a torch found next to the door. The room also have [[doughnut block]]s blocking the [[Bonfire Block]]s. To break the doughnut blocks, Wario must go up the pipe to the area with [[zombie]]s, and then from there go up another up to an area with Doughnuteers. To break the doughnut blocks, Fat Wario needs to be triggered by the topmost Doughnuteer and then drop to the gap on the left to break a layer of doughnut blocks in the zombie area and another layer in the torch area. After the bonfire blocks are open, then Hot Wario needs to be triggered with the torch so that Wario reaches the top of the area to break the bonfire blocks. After the thin platforms are unobstructed, Wario must go to the zombie area and trigger [[Zombie Wario]] from the topmost zombie, allowing him to go through the platforms. | |||
While the area past the platforms has a Red Chest, the Red Key is still in the area where the Doughnuteers are. After the [[Switch (Wario Land II)|switch]] is flipped, Wario must make his way to the Doughnuteer area to collect the Red Key, and then go back to the zombie area to trigger Zombie Wario to go through the platforms to collect the treasure in the Red Chest. | While the area past the platforms has a Red Chest, the Red Key is still in the area where the Doughnuteers are. After the [[Switch (Wario Land II)|switch]] is flipped, Wario must make his way to the Doughnuteer area to collect the Red Key, and then go back to the zombie area to trigger Zombie Wario to go through the platforms to collect the treasure in the Red Chest. | ||
| Line 25: | Line 27: | ||
===Green Chest: Treasure Map=== | ===Green Chest: Treasure Map=== | ||
[[File:Cratermap.PNG|thumb|left|The Treasure Map showing a secret path to The East Crater]] | [[File:Cratermap.PNG|thumb|left|The Treasure Map showing a secret path to The East Crater]] | ||
The Treasure Map<ref>Brady, Matthew K., Nathan Beittenmiller, Debra McBride, and David Cassady. ''Game Boy Game Secrets, 2001 Edition'' Prima's Official Strategy Guide. Page 96.</ref> in the Green Chest requires the Statue from [[Bank of the Wild River]]. Wario has to light all the torches and make his way to the top, then enter the warp pipe. This area contains a large area of chain-link fence, whereas it was smaller before acquiring the Statue. From the beginning of the fence, Wario must climb up and to the left while avoiding [[Spike (Wario Land series)|spike]]s, sparks and the first [[Appleby]]. The second Appleby is needed to trigger Fat Wario so that he can break the doughnut blocks in the floor below to the left while avoiding the sparks. The Green Key is underneath the doughnut blocks. | The Treasure Map<ref>Brady, Matthew K., Nathan Beittenmiller, Debra McBride, and David Cassady. ''Game Boy Game Secrets, 2001 Edition'' Prima's Official Strategy Guide. Page 96.</ref> in the Green Chest requires the Statue from [[Bank of the Wild River]]'s Green Chest. | ||
Wario has to light all the torches and make his way to the top, then enter the warp pipe. This area contains a large area of chain-link fence, whereas it was smaller before acquiring the Statue. From the beginning of the fence, Wario must climb up and to the left while avoiding [[Spike (Wario Land series)|spike]]s, sparks and the first [[Appleby]]. The second Appleby is needed to trigger Fat Wario so that he can break the doughnut blocks in the floor below to the left while avoiding the sparks. The Green Key is underneath the doughnut blocks. | |||
After Wario returns back to normal, then he must climb up by first going all the way up by going around the row of spikes, then to the right, and then up again, and then to the left, where the Green Chest is. | After Wario returns back to normal, then he must climb up by first going all the way up by going around the row of spikes, then to the right, and then up again, and then to the left, where the Green Chest is. | ||
| Line 34: | Line 38: | ||
===Blue Chest: Sky Key=== | ===Blue Chest: Sky Key=== | ||
[[File:keytoclouds.PNG|thumb|The Sky Key opening the door to Above the Clouds]] | [[File:keytoclouds.PNG|thumb|The Sky Key opening the door to Above the Clouds]] | ||
The {{conjectural|Sky Key}} requires the golden snake door in this level to be unlocked. This door is located in the room with the chain-link fence, where the door can be reached by climbing up, then left, then down, then left to reach it. In this room, there is a long ladder, but every time the [[Omodon]] is dropped by the [[Omodonmeka]], Wario will lose his grip from the ladder and temporarily fall. To not lose progress, one of the spaces beside the ladder are safe spots. Atop the ladder, Wario must drop to the right and then hug the wall to the left to reach the compartment with the Blue Key, and then go up the ladder again after collecting the key. | The {{conjectural|Sky Key}} requires the golden snake door in this level to be unlocked. This requires both the Golden Right Eye from [[Sea Turtle Rocks]]'s Red Chest and the Golden Left Eye from [[A Town in Chaos]]'s Green Chest to unlock. | ||
This door is located in the room with the chain-link fence, where the door can be reached by climbing up, then left, then down, then left to reach it. In this room, there is a long ladder, but every time the [[Omodon]] is dropped by the [[Omodonmeka]], Wario will lose his grip from the ladder and temporarily fall. To not lose progress, one of the spaces beside the ladder are safe spots. Atop the ladder, Wario must drop to the right and then hug the wall to the left to reach the compartment with the Blue Key, and then go up the ladder again after collecting the key. | |||
Atop the first ladder, the second ladder also has an Omodonmeka dropping an Omodon nearby to shake the ground. After going around that section, [[Flat Wario]] must be triggered by the same Omodon to cross the narrow gap and then let the blue Omodonmeka unflatten Wario. In the room above the Omodonmeka, there is a Blue Chest blocked by a [[Yarn Block]]. To break it, Wario must break the blocks all the way up to the Silky and carry the [[Brrr Bear]] to throw it and break the blocks blocking the [[Silky]]. After that, Wario needs to carry the Silky down near the Yarn Block to trigger [[Ball o' String Wario]] and break that block, so that the way to the Blue Chest is opened. | Atop the first ladder, the second ladder also has an Omodonmeka dropping an Omodon nearby to shake the ground. After going around that section, [[Flat Wario]] must be triggered by the same Omodon to cross the narrow gap and then let the blue Omodonmeka unflatten Wario. In the room above the Omodonmeka, there is a Blue Chest blocked by a [[Yarn Block]]. To break it, Wario must break the blocks all the way up to the Silky and carry the [[Brrr Bear]] to throw it and break the blocks blocking the [[Silky]]. After that, Wario needs to carry the Silky down near the Yarn Block to trigger [[Ball o' String Wario]] and break that block, so that the way to the Blue Chest is opened. | ||
Revision as of 05:36, March 18, 2023

Tower of Revival is one of the many levels in Wario Land 3 located in the south part of the music box world. It will raise from the ground only if Wario collects the two Skull Rings found in The Vast Plain's Green Chest and The Pool of Rain's Red Chest.
The Tower of Revival is an ancient tower. It has two doors with snake drawings on them which Wario can enter by using the snakes' eyes. There is also a room that Wario can explore after getting the Statue from Bank of the Wild River.
Treasures
Gray Chest: Swimming Flippers

The Swimming Flippers[1], also called the Swim Fins[2], is in the Gray Chest behind Wario when he started.
To get to the Gray Key, first the three flame torches must be lighted up using the only lit torch to trigger Hot Wario, so that the flame block disappears. Up the ladder, the furnace needs to be moved with a Dash Attack all the way to the left so that Wario can crawl past the gap in the level above. After crossing the gap by crouching and jumping through it, there is a ladder. Atop the ladder, the player needs to go left and make it all the way down past the Pneumo, and then go left to trigger Puffy Wario with the Pneumo found there. The Gray Key is at the very top of this room, which requires moving to the right and to the left, and the going all the way to the right while avoiding the sparks and the Doughnuteer's doughnuts.
After collecting the Gray Key, the player can exit the area by breaking the rightmost floor on the Doughnuteer's right by triggering Fat Wario, or by going all the way down and then the right to break the blocks to the right, so that Wario can reach the ladder to go down and then downwards some more to reach the Gray Chest.
With the Swimming Flippers, Wario is able to swim underwater. This opens the way for new treasures in The Pool of Rain and The Big Bridge.
Red Chest: Super Smash
The Super Smash[3] in the Red Chest requires the blue snake door in this level to be open. This requires both the Right Glass Eye from The West Crater's Gray Chest and the Left Glass Eye from The Colossal Hole's Gray Chest to unlock.
After entering the door, there is a torch found next to the door. The room also have doughnut blocks blocking the Bonfire Blocks. To break the doughnut blocks, Wario must go up the pipe to the area with zombies, and then from there go up another up to an area with Doughnuteers. To break the doughnut blocks, Fat Wario needs to be triggered by the topmost Doughnuteer and then drop to the gap on the left to break a layer of doughnut blocks in the zombie area and another layer in the torch area. After the bonfire blocks are open, then Hot Wario needs to be triggered with the torch so that Wario reaches the top of the area to break the bonfire blocks. After the thin platforms are unobstructed, Wario must go to the zombie area and trigger Zombie Wario from the topmost zombie, allowing him to go through the platforms.
While the area past the platforms has a Red Chest, the Red Key is still in the area where the Doughnuteers are. After the switch is flipped, Wario must make his way to the Doughnuteer area to collect the Red Key, and then go back to the zombie area to trigger Zombie Wario to go through the platforms to collect the treasure in the Red Chest.
The garlic allows Wario to Super Smash[3][4] solid blocks. This opens the way for new treasures in the Bank of the Wild River, The Tidal Coast, and The Colossal Hole. It also opens up access to Sea Turtle Rocks.
Green Chest: Treasure Map

The Treasure Map[5] in the Green Chest requires the Statue from Bank of the Wild River's Green Chest.
Wario has to light all the torches and make his way to the top, then enter the warp pipe. This area contains a large area of chain-link fence, whereas it was smaller before acquiring the Statue. From the beginning of the fence, Wario must climb up and to the left while avoiding spikes, sparks and the first Appleby. The second Appleby is needed to trigger Fat Wario so that he can break the doughnut blocks in the floor below to the left while avoiding the sparks. The Green Key is underneath the doughnut blocks.
After Wario returns back to normal, then he must climb up by first going all the way up by going around the row of spikes, then to the right, and then up again, and then to the left, where the Green Chest is.
The Treasure Map unlocks The East Crater.
Blue Chest: Sky Key

The Sky Key requires the golden snake door in this level to be unlocked. This requires both the Golden Right Eye from Sea Turtle Rocks's Red Chest and the Golden Left Eye from A Town in Chaos's Green Chest to unlock.
This door is located in the room with the chain-link fence, where the door can be reached by climbing up, then left, then down, then left to reach it. In this room, there is a long ladder, but every time the Omodon is dropped by the Omodonmeka, Wario will lose his grip from the ladder and temporarily fall. To not lose progress, one of the spaces beside the ladder are safe spots. Atop the ladder, Wario must drop to the right and then hug the wall to the left to reach the compartment with the Blue Key, and then go up the ladder again after collecting the key.
Atop the first ladder, the second ladder also has an Omodonmeka dropping an Omodon nearby to shake the ground. After going around that section, Flat Wario must be triggered by the same Omodon to cross the narrow gap and then let the blue Omodonmeka unflatten Wario. In the room above the Omodonmeka, there is a Blue Chest blocked by a Yarn Block. To break it, Wario must break the blocks all the way up to the Silky and carry the Brrr Bear to throw it and break the blocks blocking the Silky. After that, Wario needs to carry the Silky down near the Yarn Block to trigger Ball o' String Wario and break that block, so that the way to the Blue Chest is opened.
The Sky Key unlocks Above the Clouds.
Musical Coins
| Location | Description |
|---|---|

|
Behind the blue snake door, the Musical Coin is in the area all the way up to where the Doughnuteers are. It is to the right of the middle Doughnuteer. |

|
Behind the blue snake door, the Musical Coin is below the first set of doughnut blocks. They require Fat Wario triggered by the topmost Doughnuteer in the topmost area to break past them to reach the coin. |

|
Behind the blue snake door, the Musical Coin is next to the ladder in the bottom area. In order to reach it, Fat Wario is required to clear the doughnut blocks in the top layer, then Fire Wario (triggered by this room's flame) is required to break the Bonfire Blocks, and then Zombie Wario is needed to be triggered by the topmost zombie in the middle area to collapse through the thin platforms. |

|
In the main area above the ladder, there are multiple Pneumo. To get to this Musical Coin, Wario must go left from the pipe up the ladder, then make his way down and then to the left to let the Pneumo found there to trigger Puffy Wario and float all the way up and then to the left to reach the coin. |

|
From the Warp Pipe, there is an area with a chain-link fence to climb on. To get to this Musical Coin, Wario must go upwards, then left, then slightly down, then left, and then up. It is above the golden snake door. |

|
From the Warp Pipe, there is an area with a chain-link fence to climb on, and the Musical Coin is in sight. To get there, Fat Wario must be triggered by the second Appleby to break the doughnut blocks near the bottom, above the Green Key. The wall to the right of the Green Key is breakable all the way to the Musical Coin. |

|
Behind the golden snake door, Wario must climb the first ladder to the left all the way up, and then drop to the right to collect the Musical Coin. |

|
Behind the golden snake door, and then behind the top right door above the blue Omodonmeka is the room with the Blue Chest. The Musical Coin is at the top near Silky, but there is a wall of blocks that require throwing this room's Brrr Bear at them. To get there, the breakable blocks must be broken by Wario and then carry the Brrr Bear up to break those blocks in order to reach the coin. |


Enemies
- Para-Goom (1)
- Pneumo (6)
- Spark (14)
- Doughnuteer (4)
- Flame (5, 3 has no fire)
- Zombie (3)
- Appleby (5)
- Omodonmeka (3, 2 carrying Omodon)
- Omodon (2)
- Spearhead (2)
- Brrr Bear (1)
- Silky (1)
Reaction abilities in this level
- Ball o' String Wario (via Silky)
- Fat Wario (via Doughnuteer or Appleby)
- Flat Wario (via Omodon)
- Hot Wario (via flame)
- Ice Skatin' Wario (via Brrr Bear)
- Puffy Wario (via Pneumo)
- Zombie Wario (via zombie)
Gallery
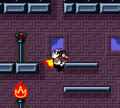
The first area of the level
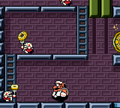
A room full of Doughnuteers

Wario climbing fences created by the Statue


Names in other languages
| Language | Name | Meaning |
|---|---|---|
| Japanese | 復活の塔 Fukkatsu no Tō |
Tower of Revival |
References
- ^ Brady, Matthew K., Nathan Beittenmiller, Debra McBride, and David Cassady. Game Boy Game Secrets, 2001 Edition Prima's Official Strategy Guide. Page 92.
- ^ Official American Wario Land 3 website (Internet Archive)
- ^ a b Brady, Matthew K., Nathan Beittenmiller, Debra McBride, and David Cassady. Game Boy Game Secrets, 2001 Edition Prima's Official Strategy Guide. Page 94.
- ^ Nintendo Power Volume 133, page 59.
- ^ Brady, Matthew K., Nathan Beittenmiller, Debra McBride, and David Cassady. Game Boy Game Secrets, 2001 Edition Prima's Official Strategy Guide. Page 96.