User:Zaku/Sandbox: Difference between revisions

From the Super Mario Wiki, the Mario encyclopedia
Jump to navigationJump to search
(380 intermediate revisions by 2 users not shown)
Line 1: Line 1:
==Sandbox==
==Sandbox details==
My page for large edits or article creations, to ensure all parts are displayed as intended.
{|
<br>Text in {{color|blue|blue}} is simply colored, I will correctly change them to links in the final version.
|rowspan=2|[[File:Peter Blue Pumpkin (Dancing).svg|64px|Hi there!]]
|My page for large edits or article creations, to ensure all parts are displayed as intended.
|-
|Text in {{color|blue|blue}} is simply colored, I will correctly change them to links in the final version.
|}
__TOC__
__TOC__


===Current Projects===
* Complicated Entry: Fishing Storage (Paper Mario: The Origami King)
* Complicated Entries: Fishing Storage and Weapon Manipulation (''[[List of Paper Mario: The Origami King glitches]]'')
* Creating page for ? blocks (Paper Mario: The Origami King)
* Expand on Paper Mario sections of the Trampoline page
* Expand on sections of the Party member page
* Add relevant information to the Magic brush page
* Collect information for Glowing Spot article
* Renovate sections of the Ladder page
* Add to tables for [[Super Paper Mario]] objects and obstacles


===Glitch Category Names===
Line 25: Line 34:
{{Template:No image|thumb}}
  File:PMTOK Fishing Storage Glitch.png
  File:PMTOK Fishing Storage Glitch.png
Fishing storage allows the player to hold the fishing rod outside of the restriction of the docks. Due to how loading zones work, this glitch is limited to: {{color|Overlook Mountain|blue}}, {{color|Shogun Studios|blue}}, and {{color|Full Moon Island|blue}}. Despite this limit, this glitch is very potent due to the fishing rod having collision while held by Mario, the ability to quit fishing while catching something, and the ability to return to the dock by pressing {{button|switch|B}} at any time, regardless of what actions are taking place.
Fishing storage allows the player to hold the fishing rod outside of the restriction of the docks. Due to how loading zones work, this glitch is limited to: [[Overlook Mountain]], [[Shogun Studios]], and [[Full Moon Island]], as those areas have [[fishing spot]]s. Despite this limitation, this glitch is very potent due to the fishing rod having collision while held by Mario, the ability to quit fishing while catching something, and the ability to return to the dock by pressing {{button|switch|B}} at any time, regardless of what actions are taking place.


====Methods====
====Methods====
There are multiple methods of initiating fishing storage, all of which involve teetering:
There are multiple methods of initiating fishing storage, all of which involve [[List of Paper Mario: The Origami King glitches#Teeter storage|teetering]] at a ledge and performing one of the following actions at the same time:


Digging with Professor Toad {{button|switch|up}} First method discovered.
{{button|switch|up}} Digging with [[Professor Toad]] (see [[List of Paper Mario: The Origami King glitches#Professor Toad|Partner duplication]])


Reading the Sea Chart {{button|switch|L}}
{{button|switch|L}} Reading the [[Sea Chart]]


Item Menu {{button|switch|Y}}
{{button|switch|Y}} Opening the Item Menu


Talking with Oliva {{button|switch|X}}
{{button|switch|X}} Talking with [[Olivia]]


====Effects====
====Effects====
<gallery widths=180>
Nocoverart.png|Mario floating across the air.
Nocoverart.png|Mario relocating a Toad.
Nocoverart.png|Mario relocating a [[Toad (species)|Toad]].
Nocoverart.png|Mario clipping through the door to {{color|Big Sho Theater|blue}}.
Nocoverart.png|Mario clipping through the door to [[Big Sho Theater]].
Nocoverart.png|Mario moonwalking after ending fishing storage on a ladder.
Nocoverart.png|A Collectible Treasure suspended in midair.
Nocoverart.png|A [[List of Collectible Treasures in Paper Mario: The Origami King|Collectible Treasure]] suspended in midair.
Nocoverart.png|An interrupted loading sequence, revealing how the game manipulates different assets.
Nocoverart.png|Mario walking inside a loading zone.
Nocoverart.png|Mario initiating a battle while using a {{color|Magic Circle|blue}}
Nocoverart.png|Mario initiating a battle while using a [[Magic Circle]].
</gallery>
</gallery>


===Weapon slot manipulation===
{{Template:No image|thumb}}
The section in memory that stores Mario's party members and the section that stores Mario's equipped weapons are only separated by 4 empty bytes. By gaining a fifth partner, partner information [[wikipedia:Buffer_overflow|buffer overflows]] into the first slot of the equipped weapons section, which the game reinterprets as the item obtained at a certain point by Mario.
The section in memory that stores Mario's [[party member]]s and the section that stores Mario's equipped weapons are only separated by 4 empty bytes. By gaining a fifth partner, partner information [[wikipedia:Buffer_overflow|buffer overflows]] into the first slot of the equipped weapons section, which the game reinterprets as an item obtained at a certain point by Mario.
 
For example: if Kamek (<tt>P_KM'''K'''</tt> internally) joins as the fifth partner, "'''K'''" exceeds the 4 byte buffer and overwrites the first equipped weapon slot. This is reinterpreted as ''76'' when converted to a number, meaning the ''76th'' item Mario obtained will replace his Basic Hammer. Any non-weapon equipped in this manner will not have associated attacks, so the game defaults to using a [[Mushroom]], without consuming the item.


For example: if Kamek (P_KM'''K''' internally) joins as the fifth partner, "'''K'''" exceeds the 4 byte buffer and overwrites the first equipped weapon slot. This is reinterpreted as ''76'' when converted to a number, meaning the ''76th'' item Mario obtained will replace his Basic Hammer.
'''NOTE''': This buffer overflow is what results in the game crashing or corrupting when gaining [[List_of_Paper_Mario:_The_Origami_King_glitches#Crashes_and_corruptions|more than 4 partners]].
{{br}}
{{br}}


=[[Paper Mario: The Origami King bestiary]]=
===Wrong turn number===
==Item Drops==
{{Template:No image|thumb}}
When fighting a particular [[Goomba]] near the [[Sensor Lab]] in [[Picnic Road]], if the player uses less than the given amount of ring moves and lets the timer run out while preparing the last move, this action carries over to Mario's next turn. Pressing {{button|switch|B}} will undo this action, giving one extra ring movement for that turn than intended. It is also possible for this action to solve the puzzle, however the game and Olivia will not recognize this until the player makes a move, and paying the audience will unsolve the puzzle.
 
When trying to flee from the [[Li'l Cutout Soldier]] battle on the stairs of [[Bowser's Castle#Paper Mario: The Origami King|Bowser's Castle]] mess hall, the game can give the player 1 less
puzzle turn than intended. By paying the audience, Mario is left with an unfinished board and {{color|'''0x'''| #32CD32}} moves. Finishing the layout will briefly show {{color|'''-1x'''|green}} moves.
 
==[[Paper Mario: The Origami King bestiary]]==
===Item Drops===
In Paper Mario: The Origami King, item drops are determined by an enemies assigned item drop set, a group of items that chosen at random to be dropped. There are 5* sets used in the game:
{| class="wikitable"
Line 86: Line 104:
|-
|-
|rowspan=2|<tt>MEKAKOOPA
|rowspan=2|<tt>MEKAKOOPA
|[[File:PMTOK 10000 Coins indicator.png|105px|link=Coin|10,000 Coins]]
|[[File:PMTOK Coin Bag leaf icon.png|64px|link=Coin|Coin bag]]
|-
|-
|<center>[[File:PMTOK question mark indicator.png|40px]]</center>
|<center>[[File:PMTOK question mark indicator.png|40px]]</center>
Line 129: Line 147:
}}}}</onlyinclude>
}}}}</onlyinclude>


==Image Map Test==
===Image Map Test===
<imagemap>
<imagemap>
File:PMTOK Weapon and Item Shop Display.jpg|640px|thumb|center
Line 158: Line 176:
</imagemap><noinclude><!--[[Category:Image map templates]]--></noinclude>


=Structure of the Collectible Treasures page=
<div class="contentbox mw-collapsible mw-collapsed"data-expandtext="Show level appearances"data-collapsetext="Hide level appearances">
[[File:PMTOK Treasure Gallery 1.jpg|thumb|320px|Display of [[Musée Champignon#Treasure Gallery|Collectible Treasures]] in the [[Musée Champignon]].]]
*[[World 2-3 (New Super Mario Bros.)|World 2-3]]: Raises the water level
{{Quote|Collectible Treasure? Ooh, it's cute! You should try to collect more of these, Mario. Maybe even all of them!|Olivia|Paper Mario: The Origami King}}
*[[World 2-4 (New Super Mario Bros.)|World 2-4]]: Causes certain sand hills to form
In [[Paper Mario: The Origami King]], Mario can collect treasures throughout the different [[Streamer]] areas, which are miniature representations of objects and characters found throughout the game. These treasures are often held within [[chest]]s and [[? Blocks]], and can also be rewarded to Mario after completing certain tasks or purchased from certain shopkeepers. Locating these blocks is made easier after purchasing the [[Treasure Alert]] from the [[Fun, Funky, and Functional]] vendor in [[Breezy Tunnel]]. This page lists the locations of all '''120''' Collectible Treasures, including pictures and information on how to obtain them.
*{{world-link|2|castlen|World 2-Castle (New Super Mario Bros.)}}: Causes certain sand trenches to form
 
*[[World 3-3 (New Super Mario Bros.)|World 3-3]]: Disables [[current]]s
'''NOTE''': Some treasures are found in areas that are inaccessible until returning later; these entries are highlighted in beige. Locations absent from the list contain no Collectible Treasures.
*{{world-link|3|ghostn|World 3-Ghost House (New Super Mario Bros.)}}: Causes staircases to form over slopes, and causing certain [[Warp Door]]s to appear
{{br}}
*[[World 4-3 (New Super Mario Bros.)|World 4-3]]: Disables currents
==Red Streamer==
*{{world-link|4|ghostn|World 4-Ghost House (New Super Mario Bros.)}}: Causes [[? Block]]s on strings to drop down
<!--Image maps created by [[User:Eldritchdraaks/sandbox#PMTOK_Maps|Eldritchdraaks]] and modified for the purposes of this page-->
*{{world-link|4|castlen|World 4-Castle (New Super Mario Bros.)}}: Causes elevating platforms to appear to allow Mario to reach [[Mega Goomba (boss)|Mega Goomba]]
<imagemap>
*[[World 5-C]]: Causes some [[Red Block]]s to appear, one column after another
File:PMTOK Red Streamer Map.png|400px|thumb|Click an area to see the Collectible Treasures found there.
*{{world-link|7|ghostn|World 7-Ghost House (New Super Mario Bros.)}}
rect 33 388 222 414 [[#Whispering Woods|Whispering Woods]]
**Causes certain Warp Doors to appear
circle 128 370 16 [[#Whispering Woods|Whispering Woods]]
**Causes certain [[lift]]s to appear
rect 45 258 167 279 [[#Toad Town|Toad Town]]
*[[World 8-2 (New Super Mario Bros.)|World 8-2]]: Raises the water level
circle 181 248 16 [[#Toad Town|Toad Town]]
*{{world-link|8|bowsern|World 8-Bowser's Castle (New Super Mario Bros.)}}
rect 3 92 233 112 [[#Graffiti Underground|Graffiti Underground]]
**Tilts certain parts of the level upside down
circle 69 176 16 [[#Graffiti Underground|Graffiti Underground]]
**Causes a certain lift to appear
circle 65 150 25 [[#Graffiti Underground|Graffiti Underground]]
</div>
rect 385 282 523 305 [[#Picnic Road|Picnic Road]]
circle 368 307 16 [[#Picnic Road|Picnic Road]]
rect 243 211 443 232 [[#Overlook Mountain|Overlook Mountain]]
circle 445 195 16 [[#Overlook Mountain|Overlook Mountain]]
rect 332 406 565 428 [[#EV Temple|Earth Vellumental Temple]]
circle 447 376 16 [[#EV Temple|Earth Vellumental Temple]]
rect 248 27 429 49 [[#Overlook Tower|Overlook Tower]]
circle 449 90 16 [[#Overlook Tower|Overlook Tower]]
rect 430 0 468 88 [[#Overlook Tower|Overlook Tower]]
</imagemap><noinclude><!--[[Category:Image map templates]]--></noinclude>


There are a total of 31 treasures to collect in the Red Streamer area:
===Textbox Test===
*[[Whispering Woods]] holds '''3 treasures'''
{|style="float:left; background:#7f9176; border:6px solid #7f9176; border-radius:12%/50%; width:400px; height:140px; box-shadow:1px 1px 5px;"
*[[Toad_Town#Paper_Mario:_The_Origami_King|Toad Town]] holds '''14 treasures'''
*[[Graffiti Underground]] holds '''1 treasure'''
*[[Picnic Road]] holds '''3 treasures'''
*[[Overlook Mountain]] holds '''5 treasures'''
*[[Earth Vellumental Temple]] holds '''3 treasures'''
*[[Overlook Tower]] holds '''2 treasures'''
<br>
{| style="text-align: center; width: 95%; margin: 0 auto; border: #d09091; border-collapse: collapse;" border="1" cellpadding="4" cellspacing="1"
|-style="background: #CB4C57;font-size:14pt;color:white"
!width=10%|Treasure
!Description
!width=25%|Image
|-style="background: #d09091;font-size:120%;color:#202122" id="Whispering Woods"
|colspan=4|'''[[Whispering Woods|{{color|Whispering Woods|#202122}}]] &#173; &#173; &#173; &#173;|&#173; &#173; &#173; &#173; 3 treasures'''
|-
|
|
|
|-
|
|
|
|-
|
|
|
|-style="background: #d09091;font-size:120%;color:#202122" id="Toad Town"
|colspan=4|'''[[Toad Town#Paper Mario: The Origami King|{{color|Toad Town|#202122}}]] &#173; &#173; &#173; &#173;|&#173; &#173; &#173; &#173; 14 treasures'''
|-
|
|
|
|-
|
|
|
|-
|
|
|
|-
|
|
|
|-
|
|
|
|-
|
|
|
|-
|
|
|
|-
|
|
|
|-
|
|
|
|-
|
|
|
|-
|
|
|
|-
|
|
|
|-
|
|
|
|-
|
|
|
|-style="background: #d09091;font-size:120%;color:#202122" id="Graffiti Underground"
|colspan=4|'''[[Graffiti Underground|{{color|Graffiti Underground|#202122}}]] &#173; &#173; &#173; &#173;|&#173; &#173; &#173; &#173; 1 treasure'''
|-
|
|
|
|-style="background: #d09091;font-size:120%;color:#202122" id="Picnic Road"
|colspan=4|'''[[Picnic Road|{{color|Picnic Road|#202122}}]] &#173; &#173; &#173; &#173;|&#173; &#173; &#173; &#173; 3 treasures'''
|-
|
|
|
|-
|
|
|
|-
|
|
|
|-style="background: #d09091;font-size:120%;color:#202122" id="Overlook Mountain"
|colspan=4|'''[[Overlook Mountain|{{color|Overlook Mountain|#202122}}]] &#173; &#173; &#173; &#173;|&#173; &#173; &#173; &#173; 5 treasures'''
|-
|
|
|
|-
|
|
|
|-
|
|
|
|-
|
|
|
|-
|
|
|
|-style="background: #d09091;font-size:120%;color:#202122" id="EV Temple"
|colspan=4|'''[[Earth Vellumental Temple|{{color|Earth Vellumental Temple|#202122}}]] &#173; &#173; &#173; &#173;|&#173; &#173; &#173; &#173; 3 treasures'''
|-
|
|
|
|-
|
|
|
|-
|
|
|
|-style="background: #d09091;font-size:120%;color:#202122" id="Overlook Tower"
|colspan=4|'''[[Overlook Tower|{{color|Overlook Tower|#202122}}]] &#173; &#173; &#173; &#173;|&#173; &#173; &#173; &#173; 2 treasures'''
|-
|
|
|
|-
|
|
|
|
{|style="background:#eeeeee; border-radius:10%/50%; width:380px; height:120px; box-shadow:1.5px 1.5px 2px; line-height:1.7em; text-align:left; color:#373737; font-size:100%; font-family:Comic Sans MS, Chalkboard SE, cursive, sans-serif;" cellpadding="8px"
!
|style="transform:scaleX(1.2); transform-origin:0"|
I've never been so happy to see<br>Lord Bowser's devilish spawn come<br>flying recklessly out of nowhere in<br>his clown car.
!
|}
|}
==Blue Streamer==
<imagemap>
File:PMTOK Blue Streamer Map.png|400px|thumb|Click an area to see the Collectible Treasures found there.
rect 251 64 462 90 [[#Autumn Mountain|Autumn Mountain]]
circle 356 135 16 [[#Autumn Mountain|Autumn Mountain]]
rect 362 248 554 276 [[#Chestnut Valley|Chestnut Valley]]
circle 420 235 16 [[#Chestnut Valley|Chestnut Valley]]
rect 172 18 473 45 [[#WV Shrine|Water Vellumental Shrine]]
circle 489 64 16 [[#WV Shrine|Water Vellumental Shrine]]
rect 465 22 505 64 [[#WV Shrine|Water Vellumental Shrine]]
rect 119 341 302 367 [[#Shogun Studios|Shogun Studios]]
circle 107 318 16 [[#Shogun Studios|Shogun Studios]]
rect 137 243 324 271 [[#Ninja Attraction|Ninja Attraction]]
circle 194 316 16 [[#Ninja Attraction|Ninja Attraction]]
rect 9 82 210 108 [[#Big Sho' Theater|Big Sho' Theater]]
circle 107 233 16 [[#Big Sho' Theater|Big Sho' Theater]]
rect 57 115 157 233 [[#Big Sho' Theater|Big Sho' Theater]]
</imagemap><noinclude><!--[[Category:Image map templates]]--></noinclude>
There are a total of 24 treasures to collect in the Blue Streamer area:
*[[Autumn Mountain]] hides '''4 treasures'''
*[[Chestnut Valley]] hides '''3 treasures'''
*[[Water Vellumental Shrine]] hides '''3 treasures'''
*[[Shogun Studios]] hides '''10 treasures'''
*[[Ninja Attraction]] hides '''3 treasures'''
*[[Big Sho' Theater]] hides '''1 treasure'''
{| style="text-align: center; width: 95%; margin: 0 auto; border: #7b9ec3; border-collapse: collapse;" border="1" cellpadding="4" cellspacing="1"
|-style="background: #2977B5;font-size:14pt;color:white"
!width="10%"|Treasure
!Description
!width="25%"|Image
|-style="background: #7b9ec3;font-size:120%;color:#202122" id="Autumn Mountain"
|colspan=3|'''[[Autumn Mountain|{{color|Autumn Mountain|#202122}}]] &#173; &#173; &#173; &#173;|&#173; &#173; &#173; &#173; 4 treasures'''
|-
|
|
|
|-
|
|
|
|-
|
|
|
|-
|
|
|
|-style="background: #7b9ec3;font-size:120%;color:#202122" id="Chestnut Valley"
|colspan=3|'''[[Chestnut Valley|{{color|Chestnut Valley|#202122}}]] &#173; &#173; &#173; &#173;|&#173; &#173; &#173; &#173; 3 treasures'''
|-
|
|
|
|-
|
|
|
|-
|
|
|
|-style="background: #7b9ec3;font-size:120%;color:#202122" id="Water Vellumental Shrine"
|colspan=3|'''[[Water Vellumental Shrine|{{color|Water Vellumental Shrine|#202122}}]] &#173; &#173; &#173; &#173;|&#173; &#173; &#173; &#173; 3 treasures'''
|-
|
|
|
|-
|
|
|
|-
|
|
|
|-style="background: #7b9ec3;font-size:120%;color:#202122" id="Shogun Studios"
|colspan=3|'''[[Shogun Studios|{{color|Shogun Studios|#202122}}]] &#173; &#173; &#173; &#173;|&#173; &#173; &#173; &#173; 10 treasures'''
|-
|
|
|
|-
|
|
|
|-
|
|
|
|-
|
|
|
|-
|
|
|
|-
|
|
|
|-
|
|
|
|-
|
|
|
|-
|
|
|
|-
|
|
|
|-style="background: #7b9ec3;font-size:120%;color:#202122" id="Ninja Attraction"
|colspan=3|'''[[Ninja Attraction|{{color|Ninja Attraction|#202122}}]] &#173; &#173; &#173; &#173;|&#173; &#173; &#173; &#173; 3 treasures'''
|-
|
|
|
|-
|
|
|
|-
|
|
|
|-style="background: #7b9ec3;font-size:120%;color:#202122" id="Big Sho' Theater"
|colspan=3|'''[[Big Sho' Theater|{{color|Big Sho' Theater|#202122}}]] &#173; &#173; &#173; &#173;|&#173; &#173; &#173; &#173; 1 treasure'''
|-
|
|
|
|}
|}


==Yellow Streamer==
{{br}}
<imagemap>
File:PMTOK Yellow Streamer Map.png|400px|thumb|Click an area to see the Collectible Treasures found there.
rect 148 328 325 356 [[#Breezy Tunnel|Breezy Tunnel]]
circle 336 326 16 [[#Breezy Tunnel|Breezy Tunnel]]
rect 17 273 321 302 [[#Sandpaper Desert|Scorching Sandpaper Desert]]
circle 336 269 16 [[#Sandpaper Desert|Scorching Sandpaper Desert]]
rect 350 283 570 308 [[#FV Cave|Fire Vellumental Cave]]
circle 452 269 16 [[#FV Cave|Fire Vellumental Cave]]
rect 412 200 492 257 [[#FV Cave|Fire Vellumental Cave]]
rect 129 226 381 249 [[#Sandpaper Minor|Scorching Sandpaper Minor]]
circle 254 210 16 [[#Sandpaper Minor|Scorching Sandpaper Minor]]
rect 308 162 557 190 [[Scorching Sandpaper East]]
circle 339 211 16 [[Scorching Sandpaper East]]
rect 184 4 324 30 [[#Shroom City|Shroom City]]
circle 254 89 16 [[#Shroom City|Shroom City]]
rect 3 50 241 71 [[#Sandpaper Far West|Scorching Sandpaper Far West]]
circle 128 89 16 [[#Sandpaper Far West|Scorching Sandpaper Far West]]
rect 27 120 248 144 [[#Temple of Shrooms|Temple of Shrooms]]
circle 255 155 16 [[#Temple of Shrooms|Temple of Shrooms]]
</imagemap><noinclude><!--[[Category:Image map templates]]--></noinclude>
 
There are a total of 17 treasures to collect in the Yellow Streamer area:
*[[Breezy Tunnel]] hold '''2 treasures'''
*[[Scorching Sandpaper Desert]] holds '''3 treasures'''
*[[Scorching Sandpaper Minor]] holds '''1 treasure'''
*[[Scorching Sandpaper East]] holds '''1 treasure'''
*[[Shroom City (Paper Mario: The Origami King)|Shroom City]] holds '''6 treasures'''
*[[Scorching Sandpaper Far West]] holds '''1 treasure'''
*[[Fire Vellumental Cave]] holds '''1 treasure'''
*[[Temple of Shrooms]] holds '''2 treasures'''
<br>
{| style="text-align: center; width: 95%; margin: 0 auto; border: #cbc689; border-collapse: collapse;" border="1" cellpadding="4" cellspacing="1"
|-style="background: #bf9b1c;font-size:14pt;color:white"
!width=10%|Treasure
!Description
!width=25%|Image
|-style="background: #cbc689;font-size:120%;color:#202122" id="Breezy Tunnel"
|colspan=4|'''[[Breezy Tunnel|{{color|Breezy Tunnel|#202122}}]] &#173; &#173; &#173; &#173;|&#173; &#173; &#173; &#173; 2 treasures'''
|-
|
|
|
|-
|
|
|
|-style="background: #cbc689;font-size:120%;color:#202122" id="Sandpaper Desert"
|colspan=4|'''[[Scorching Sandpaper Desert|{{color|Scorching Sandpaper Desert|#202122}}]] &#173; &#173; &#173; &#173;|&#173; &#173; &#173; &#173; 3 treasures'''
|-
|
|
|
|-
|
|
|
|-
|
|
|
|-style="background: #cbc689;font-size:120%;color:#202122" id="Sandpaper Minor"
|colspan=4|'''[[Scorching Sandpaper Minor|{{color|Scorching Sandpaper Minor|#202122}}]] &#173; &#173; &#173; &#173;|&#173; &#173; &#173; &#173; 1 treasure'''
|-
|
|
|
|-style="background: #cbc689;font-size:120%;color:#202122" id="Sandpaper East"
|colspan=4|'''[[Scorching Sandpaper East|{{color|Scorching Sandpaper East|#202122}}]] &#173; &#173; &#173; &#173;|&#173; &#173; &#173; &#173; 1 treasure'''
|-
|
|
|
|-style="background: #cbc689;font-size:120%;color:#202122" id="Shroom City"
|colspan=4|'''[[Shroom City (Paper Mario: The Origami King)|{{color|Shroom City|#202122}}]] &#173; &#173; &#173; &#173;|&#173; &#173; &#173; &#173; 6 treasures'''
|-
|
|
|
|-
|
|
|
|-
|
|
|
|-
|
|
|
|-
|
|
|
|-
|
|
|
|-style="background: #cbc689;font-size:120%;color:#202122" id="Sandpaper Far West"
|colspan=4|'''[[Scorching Sandpaper Far West|{{color|Scorching Sandpaper Far West|#202122}}]] &#173; &#173; &#173; &#173;|&#173; &#173; &#173; &#173; 1 treasure'''
|-
|
|
|
|-style="background: #cbc689;font-size:120%;color:#202122" id="FV Cave"
|colspan=4|'''[[Fire Vellumental Cave|{{color|Fire Vellumental Cave|#202122}}]] &#173; &#173; &#173; &#173;|&#173; &#173; &#173; &#173; 1 treasure'''
|-
|
|
|
|-style="background: #cbc689;font-size:120%;color:#202122" id="Temple of Shrooms"
|colspan=4|'''[[Temple of Shrooms|{{color|Temple of Shrooms|#202122}}]] &#173; &#173; &#173; &#173;|&#173; &#173; &#173; &#173; 2 treasures'''
|-
|
|
|
|-
|
|
|
|}


==Purple Streamer==
{|style="float:left; background:#dfded5; border:3px outset; border-radius:190px; width:380px; height:120px; box-shadow:1px 1px 5px; line-height:1.7em; text-align:left; color:#373737; font-size:100%; font-family:Comic Sans MS, Chalkboard SE, cursive, sans-serif;" cellpadding="8px"
<imagemap>
!
File:PMTOK Purple Streamer Map.png|400px|thumb|Click an area to see the Collectible Treasures found there.
|style="transform:scaleX(1.2); transform-origin:0; vertical-align: top;"|
rect 66 253 234 277 [[#Sea|The Great Sea]]
Hey, look, Mario!<br>See that building over there?
circle 241 242 16 [[#Sea|The Great Sea]]
!
rect 257 387 480 411 [[#Princess Peach|The Princess Peach]]
circle 241 369 16 [[#Princess Peach|The Princess Peach]]
rect 257 350 338 400 [[#Princess Peach|The Princess Peach]]
rect 310 328 498 354 [[#Bonehead|Bonehead Island]]
circle 512 334 16 [[#Bonehead|Bonehead Island]]
rect 256 297 402 323 [[#Heart|Heart Island]]
circle 330 270 16 [[#Heart|Heart Island]]
rect 350 50 499 74 [[#Spade|Spade Island]]
circle 330 49 16 [[#Spade|Spade Island]]
rect 65 148 195 170 [[#Club|Club Island]]
circle 212 155 16 [[#Club|Club Island]]
rect 404 178 565 201 [[#Moon|Full Moon Island]]
circle 436 151 16 [[#Moon|Full Moon Island]]
rect 2 367 101 394 [[#Question|? Island]]
circle 68 351 16 [[#Question|? Island]]
rect 63 292 233 317 [[#Hammer|Hammer Island]]
circle 44 286 16 [[#Hammer|Hammer Island]]
rect 345 102 554 125 [[#IV Mountain|Ice Vellumental Mountain]]
rect 275 100 390 220 [[#IV Mountain|Ice Vellumental Mountain]]
rect 72 13 194 36 [[#Sea Tower|Sea Tower]]
circle 131 94 16 [[#Sea Tower|Sea Tower]]
rect 115 100 147 0 [[#Sea Tower|Sea Tower]]
</imagemap><noinclude><!--[[Category:Image map templates]]--></noinclude>
 
There are a total of 24 treasures to collect in the Purple Streamer area:
*[[The Great Sea]] holds '''10 treasures'''
*[[The Princess Peach]] holds '''3 treasures'''
*[[Bonehead Island]] holds '''1 treasure'''
*[[Full Moon Island]] holds '''1 treasure'''
*[[&#63; Island|? Island]] holds '''2 treasures'''
*[[Hammer Island]] holds '''2 treasures'''
*[[Ice Vellumental Mountain]] holds '''4 treasures'''
*[[Sea Tower]] holds '''1 treasure'''
 
{| style="text-align: center; width: 95%; margin: 0 auto; border: #ad7caa; border-collapse: collapse;" border="1" cellpadding="4" cellspacing="1"
|-style="background: #90248A;font-size:14pt;color:white"
!width=10%|Treasure
!Description
!width=25%|Image
|-style="background: #ad7caa;font-size:120%;color:#202122" id="Sea"
|colspan=4|'''[[The Princess Peach|{{color|The Great Sea|#202122}}]] &#173; &#173; &#173; &#173;|&#173; &#173; &#173; &#173; 10 treasures'''
|-
|
|
|
|-
|
|
|
|-
|
|
|
|-
|
|
|
|-
|
|
|
|-
|
|
|
|-
|
|
|
|-
|
|
|
|-
|
|
|
|-
|
|
|
|-style="background: #ad7caa;font-size:120%;color:#202122" id="Princess Peach"
|colspan=4|'''[[The Princess Peach|{{color|The Princess Peach|#202122}}]] &#173; &#173; &#173; &#173;|&#173; &#173; &#173; &#173; 3 treasures'''
|-
|
|
|
|-
|
|
|
|-
|
|
|
|-style="background: #ad7caa;font-size:120%;color:#202122" id="Bonehead"
|colspan=4|'''[[Bonehead Island|{{color|Bonehead Island|#202122}}]] &#173; &#173; &#173; &#173;|&#173; &#173; &#173; &#173; 1 treasure'''
|-
|
|
|
|-style="background: #ad7caa;font-size:120%;color:#202122" id="Moon"
|colspan=4|'''Crescent Moon Island / [[Full Moon Island|{{color|Full Moon Island|#202122}}]] &#173; &#173; &#173; &#173;|&#173; &#173; &#173; &#173; 1 treasure'''
|-
|
|
|
|-style="background: #ad7caa;font-size:120%;color:#202122" id="Question"
|colspan=4|'''[[&#63; Island|{{color|? Island|#202122}}]] &#173; &#173; &#173; &#173;|&#173; &#173; &#173; &#173; 2 treasures'''
|-
|
|
|
|-
|
|
|
|-style="background: #ad7caa;font-size:120%;color:#202122" id="Hammer"
|colspan=4|'''[[Hammer Island|{{color|Hammer Island|#202122}}]] &#173; &#173; &#173; &#173;|&#173; &#173; &#173; &#173; 2 treasures'''
|-
|
|
|
|-
|
|
|
|-style="background: #ad7caa;font-size:120%;color:#202122" id="IV Mountain"
|colspan=4|'''[[Ice Vellumental Mountain|{{color|Ice Vellumental Mountain|#202122}}]] &#173; &#173; &#173; &#173;|&#173; &#173; &#173; &#173; 4 treasures'''
|-
|
|
|
|-
|
|
|
|-
|
|
|
|-
|
|
|
|-style="background: #ad7caa;font-size:120%;color:#202122" id="Sea Tower"
|colspan=4|'''[[Sea Tower|{{color|Sea Tower|#202122}}]] &#173; &#173; &#173; &#173;|&#173; &#173; &#173; &#173; 1 treasure'''
|-
|
|
|
|}
|}


==Green Streamer==
<imagemap>
File:PMTOK Green Streamer Map.png|400px|thumb|Click an area to see the Collectible Treasures found there.
rect 341 231 489 257 [[#Spa|Shangri-Spa]]
circle 318 242 16 [[#Spa|Shangri-Spa]]
rect 2 69 217 94 [[#Jungle|Spring of Jungle Mist]]
circle 108 146 16 [[#Jungle|Spring of Jungle Mist]]
rect 23 317 231 346 [[#Rainbow|Spring of Rainbows]]
circle 251 328 16 [[#Rainbow|Spring of Rainbows]]
rect 227 117 413 144 [[#Bowser|Bowser's Castle]]
circle 317 162 16 [[#Bowser|Bowser's Castle]]
</imagemap><noinclude><!--[[Category:Image map templates]]--></noinclude>


There are a total of 18 treasures to collect in the Green Streamer area:
{{br}}
*[[Shangri-Spa]] holds '''9 treasures'''
<center style="transform: rotate(180deg);">[[File:SPM Door.png|128px]]</center>
*[[Spring of Jungle Mist]] holds '''4 treasures'''
==Obstacles==
*[[Spring of Rainbows]] holds '''1 treasure'''
{|width=90% cellspacing=0 border=1 cellpadding=4 style="text-align:center; border-collapse:collapse; background:#f8f9fa; margin:0 auto; border:silver; align:center"
*[[Bowser%27s_Castle#Paper_Mario_series|Bowser's Castle]] holds '''4 treasures'''
|-style="background:black; color:white"
<br>
!width=10%|Name
{| style="text-align: center; width: 95%; margin: 0 auto; border: #73cb76; border-collapse: collapse;" border="1" cellpadding="4" cellspacing="1"
!width=15%|Image
|-style="background: #239D53;font-size:14pt;color:white"
!width=10%|Treasure
!Description
!width=25%|Image
|-style="background: #73cb76;font-size:120%;color:#202122" id="Spa"
|colspan=4|'''[[Shangri-Spa|{{color|Shangri-Spa|#202122}}]] &#173; &#173; &#173; &#173;|&#173; &#173; &#173; &#173; 9 treasures'''
|-
|
|
|
|-
|
|
|
|-
|
|
|
|-
|
|
|
|-
|
|
|
|-
|
|
|
|-
|
|
|
|-
|
|
|
|-
|
|
|
|-style="background: #73cb76;font-size:120%;color:#202122" id="Jungle"
|colspan=4|'''[[Spring of Jungle Mist|{{color|Spring of Jungle Mist|#202122}}]] &#173; &#173; &#173; &#173;|&#173; &#173; &#173; &#173; 4 treasures'''
|-
|
|
|
|-
|
|
|
|-
|
|
|
|-
|
|
|
|-style="background: #73cb76;font-size:120%;color:#202122" id="Rainbow"
|colspan=4|'''[[Spring of Rainbows|{{color|Spring of Rainbows|#202122}}]] &#173; &#173; &#173; &#173;|&#173; &#173; &#173; &#173; 1 treasure'''
|-
|
|
|
|-style="background: #73cb76;font-size:120%;color:#202122" id="Bowser"
|colspan=4|'''[[Bowser%27s_Castle#Paper_Mario_series|{{color|Bowser's Castle|#202122}}]] &#173; &#173; &#173; &#173;|&#173; &#173; &#173; &#173; 4 treasures'''
|-
|
|
|
|-
|
|
|
|-
|
|
|
|-
|
|
|
|}
 
==Origami Castle==
There are a total of 6 treasures to collect in [[Origami Castle]]:
<br>
{| style="text-align: center; width: 95%; margin: 0 auto; border: #6b6486; border-collapse: collapse;" border="1" cellpadding="4" cellspacing="1"
|-style="background: #444544;font-size:14pt;color:white"
!width=10%|Treasure
!Description
!Description
!width=25%|Image
!width=10%|Locations
|-style="background: #6b6486;font-size:120%;color:#e6e8e9;border: #6b6486"
|colspan=4|'''[[Origami Castle|{{color|Origami Castle|#e6e8e9}}]] &#173; &#173; &#173; &#173;|&#173; &#173; &#173; &#173; 17 blocks'''
|-
|-
|[[! Switch]]
|style="background:white"|[[File:PM Exclaimation Switch Render.png|! Switch]]
|align=left|Switches trigger various events when hit or jumped on and are often involved in puzzles.
|<div class="contentbox mw-collapsible mw-collapsed"data-expandtext="Show locations"data-collapsetext="Hide locations">[[Mount Lineland]]<br>[[Yold Desert]]<br>[[Yold Ruins]]<br>[[Gloam Valley]]<br>[[Merlee's Mansion]]<br>[[Dotwood Tree]]<br>[[Fort Francis]]<br>[[Gap of Crag]]<br>[[Floro Caverns]]<br>[[Overthere Stair]]<br>[[The Overthere]]<br>[[Castle Bleck Foyer]]<br>[[Castle Bleck Interior]]</div>
|-
|-
|
|Energy blocks/Purple volt
|
|style="background:white"|[[File:SPM Ackpow 1.png|192px]]
|
|align=left|
|}
 
=Placeholder=
{| style="text-align: center; width: 95%; margin: 0 auto; border: Burlywood; border-collapse: collapse;" border="1" cellpadding="4" cellspacing="1"
|-style="background: Peru;font-size:14pt;color:white"
!width=10%|Hidden
!width=10%|Item
!Description
!width=25%|Image
|-style="background: Burlywood;font-size:120%;color:#202122"
|colspan=4|'''2 blocks'''
|-style="background:beige;"|
|[[File:Hidden Block Alert PMTOK icon.png|48px]]
|style="background-color:#392701;"|[[File:PMTOK Collectible Treasure 118 (Origami Castle).jpg|100px]]
|
|[[File:PMTOK Ninja Attraction Question Block 2.png|360px|I will replace this with a new more visible angle via camera glitch, don't worry about it Mid188]]
|-style="background:beige;"|
|[[File:Hidden Block Alert PMTOK icon.png|48px]]
|style="background-color:#493814; background-image:linear-gradient(45deg, #392701 25%, transparent 25%), linear-gradient(135deg, #392701 25%, transparent 25%), linear-gradient(45deg, transparent 75%, #392701 75%), linear-gradient(135deg, transparent 75%, #392701 75%); background-size:50px 50px; background-position:0 0, 25px 0, 25px -25px, 0px 25px;"|[[File:PMTOK Captain T. Ode sprite.png|64px]]<br>[[Musée Champignon#Treasure Gallery|{{color|Collectible Treasure '''#79'''|white}}]]
|
|
|
|}
|}

Revision as of 15:39, May 14, 2024

Sandbox details

Hi there! My page for large edits or article creations, to ensure all parts are displayed as intended.
Text in blue is simply colored, I will correctly change them to links in the final version.

Current Projects

  • Complicated Entries: Fishing Storage and Weapon Manipulation (List of Paper Mario: The Origami King glitches)
  • Expand on Paper Mario sections of the Trampoline page
  • Expand on sections of the Party member page
  • Add relevant information to the Magic brush page
  • Collect information for Glowing Spot article
  • Renovate sections of the Ladder page
  • Add to tables for Super Paper Mario objects and obstacles

Glitch Category Names

  • Graphics
  • Camera
  • Audio
  • Physics
  • Out of bounds and clips
  • Scripting
  • Softlocks/Crashes/Freezes
  • Battles
  • Patched Glitches
  • Sequence breaks
  • Oversights

List of Paper Mario: The Origami King Glitches

Fishing storage

Used in case of images missing from a section gallery, table, bestiary box, or certain infoboxes.
File:PMTOK Fishing Storage Glitch.png

Fishing storage allows the player to hold the fishing rod outside of the restriction of the docks. Due to how loading zones work, this glitch is limited to: Overlook Mountain, Shogun Studios, and Full Moon Island, as those areas have fishing spots. Despite this limitation, this glitch is very potent due to the fishing rod having collision while held by Mario, the ability to quit fishing while catching something, and the ability to return to the dock by pressing B Button at any time, regardless of what actions are taking place.

Methods

There are multiple methods of initiating fishing storage, all of which involve teetering at a ledge and performing one of the following actions at the same time:

Up Button Digging with Professor Toad (see Partner duplication)

L Button Reading the Sea Chart

Y Button Opening the Item Menu

X Button Talking with Olivia

Effects

Weapon slot manipulation

Used in case of images missing from a section gallery, table, bestiary box, or certain infoboxes.

The section in memory that stores Mario's party members and the section that stores Mario's equipped weapons are only separated by 4 empty bytes. By gaining a fifth partner, partner information buffer overflows into the first slot of the equipped weapons section, which the game reinterprets as an item obtained at a certain point by Mario.

For example: if Kamek (P_KMK internally) joins as the fifth partner, "K" exceeds the 4 byte buffer and overwrites the first equipped weapon slot. This is reinterpreted as 76 when converted to a number, meaning the 76th item Mario obtained will replace his Basic Hammer. Any non-weapon equipped in this manner will not have associated attacks, so the game defaults to using a Mushroom, without consuming the item.

NOTE: This buffer overflow is what results in the game crashing or corrupting when gaining more than 4 partners.

Wrong turn number

Used in case of images missing from a section gallery, table, bestiary box, or certain infoboxes.

When fighting a particular Goomba near the Sensor Lab in Picnic Road, if the player uses less than the given amount of ring moves and lets the timer run out while preparing the last move, this action carries over to Mario's next turn. Pressing B Button will undo this action, giving one extra ring movement for that turn than intended. It is also possible for this action to solve the puzzle, however the game and Olivia will not recognize this until the player makes a move, and paying the audience will unsolve the puzzle.

When trying to flee from the Li'l Cutout Soldier battle on the stairs of Bowser's Castle mess hall, the game can give the player 1 less puzzle turn than intended. By paying the audience, Mario is left with an unfinished board and 0x moves. Finishing the layout will briefly show -1x moves.

Paper Mario: The Origami King bestiary

Item Drops

In Paper Mario: The Origami King, item drops are determined by an enemies assigned item drop set, a group of items that chosen at random to be dropped. There are 5* sets used in the game:

Set Name Items
LV1 / LV2 / LV3 An icon from Paper Mario: The Origami King. A UI icon from Paper Mario: The Origami King. An item from Paper Mario: The Origami King.
An icon from Paper Mario: The Origami King.
Paper / Paper M / Paper L An icon from Paper Mario: The Origami King. A UI icon from Paper Mario: The Origami King. Confetti (in increasingly high amounts)
An icon from Paper Mario: The Origami King.
Gold An icon from Paper Mario: The Origami King. A UI icon from Paper Mario: The Origami King. An icon from Paper Mario: The Origami King.
An icon from Paper Mario: The Origami King.
BOOTS KURIBOO A weapon/battle item in Paper Mario: The Origami King. A weapon/battle item in Paper Mario: The Origami King. A weapon/battle item in Paper Mario: The Origami King. A weapon/battle item in Paper Mario: The Origami King.
An icon from Paper Mario: The Origami King.
MEKAKOOPA Coin bag
An icon from Paper Mario: The Origami King.
BTL_ZAKO_ITEM_L

UNUSED ?
An icon from Paper Mario: The Origami King. A UI icon from Paper Mario: The Origami King. The Lamination Suit, a special item in Paper Mario: The Origami King.
An icon from Paper Mario: The Origami King.
BTL_ZAKO_LV1: Cheep Cheep, Scaredy Rat, Swoop, Spiny, Shy Guy, Black Shy Guy, Fly Guy, Goomba, Galoomba, Koopa Troopa, Red and Blue Sidestepper
BTL_ZAKO_LV2: Stingby, Blooper, Pokey, Ninji, Boo, Spike, Buzzy Beetle, Snifit, Bone Goomba, Rocky Wrench, Scuttlebug, Crowber
BTL_ZAKO_LV3: Fire/Ice/Boomerang/Hammer/Sledge Bro, Chargin' Chuck, Snow Spike, Grass Ninji, Piranha Plant, Spike Top, Stone Spike, Sumo Bro
BTL_ZAKO_PAPER: Paragoomba
BTL_ZAKO_PAPER_M: Paratroopa, Jumping Piranha Plant, Nipper Plant, Li'l Cutout Soldier
BTL_ZAKO_PAPER_L: Ptooie, Big Cutout Soldier
BTL_ZAKO_BOOTS_KURIBOO: Shoe Goomba
BTL_ZAKO_MEKAKOOPA: Mechakoopa

Dry Bones do not drop anything


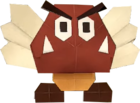
No. 07 | Paragoomba
An origami Paragoomba from Paper Mario: The Origami King. HP 15 Moves Location(s)
Type Flying Flyin' Headbonk (4), Group Headbonk (4 per Paragoomba), Foe Throw (9) Overlook Mountain, Overlook Tower, Autumn Mountain, Club Island
Role
Item drops Small Bag of Confetti
Paragoombas transformed into origami. They’re pretty smug about those wings, but one stomp and they fall right off.

Image Map Test

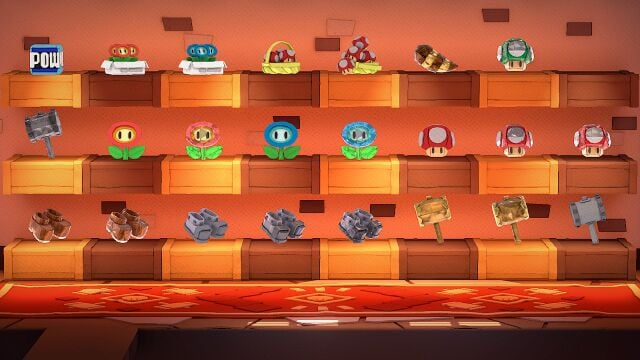
POW BlockFire Flower SetIce Flower SetMushroom 3-PackMushroom 6-PackShiny Tail1-Up MushroomShiny HurlhammerFire FlowerShiny Fire FlowerIce FlowerShiny Ice FlowerMushroomShiny MushroomFlashy MushroomShiny BootsFlashy BootsIron BootsShiny Iron BootsFlashy Iron BootsShiny HammerFlashy HammerHurlhammerThe full display of weapons and battle-related items available for purchase at the Weapon and Item Shop in Toad Town.

Textbox Test

I've never been so happy to see
Lord Bowser's devilish spawn come
flying recklessly out of nowhere in
his clown car.

Hey, look, Mario!
See that building over there?


A typical door from Super Paper Mario.

Obstacles

Name Image Description Locations
! Switch ! Switch Switches trigger various events when hit or jumped on and are often involved in puzzles.
Energy blocks/Purple volt The Ackpow in the normal generator room in Chapter 2-3 of Super Paper Mario