The Vast Plain: Difference between revisions
m (Robot: Removing template: BoxTop) |
m (→Musical Coins) |
||
| (44 intermediate revisions by 10 users not shown) | |||
| Line 1: | Line 1: | ||
[[File:WL3 S VastPlain8.PNG|thumb|N3 | [[File:WL3 S VastPlain8.PNG|thumb|N3 The Vast Plain]] | ||
'''The Vast Plain''' is | '''The Vast Plain''' is the third level on the northern side of the [[music box (world)|music box world]] in ''[[Wario Land 3]]''. This level, along with [[The Peaceful Village]], becomes accessible after [[Wario]] acquires the Axe from [[Out of the Woods]]' Gray Chest, which is used to chop the large tree that blocks the way to those levels. Notably, this level requires Wario to go to the halfway point between the first and second levels, in order to go right to access this level. | ||
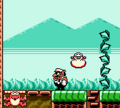
The starting point of The Vast Plain is a prairie-like environment, with grass growing along the way and mountains in the background. | The starting point of The Vast Plain is a prairie-like environment, with grass growing along the way and mountains in the background. From the level, there is a path leading sky connected to a pipe, which leads to an area within the clouds and either the [[Sun (Wario Land 3)|sun]] or [[Mr. Moon]] depending on the time of day. There is also an underground area behind a 5-ton block that contains torches and zombies. This is the only level where there are two Golf minigame rooms and two mini-game blocks. Despite there being two of each, completing only one of the Golf minigame rooms is required to lift both blocks. | ||
== | ==Treasures== | ||
===Gray Chest: | ===Gray Chest: Green Tablet=== | ||
[[File:WL3 S PeacefulVillage5.PNG|thumb|left|The | [[File:WL3 S PeacefulVillage5.PNG|thumb|left|The Blue and Green Tablets, opening the gate]] | ||
The Green Tablet<ref>Brady, Matthew K., Nathan Beittenmiller, Debra McBride, and David Cassady. ''Game Boy Game Secrets, 2001 Edition'' Prima's Official Strategy Guide. Page 89.</ref> can be found inside the [[treasure chest|Gray Chest]]. It is available as soon as the level is unlocked. | |||
The Gray Key is all the way to the right above ground, where Wario must jump across the platforms. On the way, there are [[Para-Goom]]s, as well as [[Teruteru]] that will obscure Wario's view until he hits a wall or he gets damaged. Further along, there is a [[Mad Scienstein]] right above a [[seeing-eye door]], where in order to get past the door, Wario must get hit by one of Mad Scienstein's potions to become [[Invisible Wario]]. Past the seeing-eye door and all the way to the right, there is a ladder in which the Gray Chest is, as well as another seeing-eye door to the left. The Gray Key is to the left of the door. | |||
After getting the Gray Key, Wario must get rid of his invisibility in order to be able to collect the chest. In order to do that, Wario must enter a [[Warp Pipe|pipe]] which causes him to become visible again. Some pipes can be found underneath the plains. After becoming visible, he must go back to the Gray Chest by going up the ladder, all the way right, and then up the ladder to reach the chest. | |||
The Green Tablet from this chest and the Blue Tablet from The Peaceful Village's Gray Chest causes the western side to be unlocked after both of them are fitted into slots on a door to open it, thus making [[Desert Ruins]] accessible. | |||
{{br}} | {{br}} | ||
===Red Chest: | ===Red Chest: Crayon (blue)=== | ||
[[File:WL3 S VastPlain5.PNG|thumb|The bushes, colored by the | [[File:WL3 S VastPlain5.PNG|thumb|The bushes, colored by the blue crayon]] | ||
The | The blue Crayon<ref name=CrayonRing>Brady, Matthew K., Nathan Beittenmiller, Debra McBride, and David Cassady. ''Game Boy Game Secrets, 2001 Edition'' Prima's Official Strategy Guide. Page 91.</ref> is in the Red Chest. It requires the Lead Overalls from [[The Volcano's Base]]'s Gray Chest to access, which allows Wario to [[Ground Pound|Smash Attack]] to bump [[Futamogu]] down and destroy damaged blocks beneath Wario. | ||
In order to get the area containing the Red Key, Wario must use a [[Ground Pound|Smash Attack]] on the [[Futamogu]] to the left to lower it, after which he can enter the pipe to the new area. Within this area, Wario must go to the third [[Jellybob (Wario Land 3)|Pneumo]] to trigger [[Puffy Wario]], in order to float past the thin platform above. After returning to normal, Wario can use a [[Dash Attack]] to the right to break the blocks in order to collect the Red Key. | |||
After collecting it, Wario must then go all the way to the left while breaking the blocks on the way. The wall to the left can be broken with a Dash Attack, which returns Wario to where he started after descending from the pipe. After dropping, Wario must go to the Golf minigame room in order to lift the mini-game block to the right. After completing the Golf minigame, Wario can go all the way to the right where there are three columns separated by [[Spike (Wario Land series)|spikes]] and a Pneumo. That Pneumo must be used to trigger Puffy Wario so that he floats on the middle column, which brings him up past a thin platform. After returning to normal, Wario can go left, which is where the Red Chest is. | |||
===Green Chest: | The blue Crayon flies to the tower on the northern side of the world. The crayon is used to color one part of the are that is initially monochrome. The blue crayon colors the bushes that surround the building. After the area is colored by seven different crayons, the Golf minigame there can be played. | ||
[[File:WL3 S VastPlain6.PNG|thumb|left|The Rings | ===Green Chest: Skull Ring (red)=== | ||
The | [[File:WL3 S VastPlain6.PNG|thumb|left|The Skull Rings.]] | ||
The Skull Ring<ref name=CrayonRing/> is in the Green Chest. It requires the Magic Seeds from [[The Big Bridge]]'s Gray Chest, which causes vines to grow in this level, one of which leads to the area with this chest. | |||
The | To get to the pipe that leads to the chest, Wario must first go past the first seeing-eye door as Invisible Wario, and then climb the vine to the right all the way up to enter the pipe to the left. In the area up the pipe, Wario must go right while avoiding being squashed by the [[Omodon]] dropped by the [[Omodonmeka]]. If they trigger [[Flat Wario]], Wario must unflatten himself by the blue Omodonmeka all the way to the left. After Wario makes his way all the way to the right, he must go up, and then to the left to a pipe to go up. The pipe leads to the sky, where the [[Sun (Wario Land 3)|sun]] or [[Mr. Moon]] (during the day or night respectively) is waiting. To get to the Green Key, Wario must follow the platforms to the right, while avoiding the blasts by either the sun or Mr. Moon. | ||
After collecting the Green Key, Wario must complete a round of Golf. The room to play the minigame is higher in this area, where he must return to the left to the third platform from the left, and then jump up to the right platforms, and then up to the left platforms, where the room is at the end. After completing the minigame, Wario must make his way to the right to break the blocks and pass the mini-game block to a door. The Green Chest is up in this room, where there are [[Silky|Silkies]] on the way there. | |||
After collecting the red Skull Ring and the blue one from [[The Pool of Rain]]'s Red Chest, the [[Tower of Revival]] is erected from the ground on the southern side after both rings click together. | |||
{{br}} | {{br}} | ||
===Blue Chest: Red Gem=== | |||
[[File:WL3 S VastPlain7.PNG|thumb|Wario finds the Red Gem]] | |||
The {{conjectural|Red Gem}} is inside the Blue Chest, which requires both the Red Chemical from [[Beneath the Waves]]' Green Chest and the Blue Chemical from [[The Steep Canyon]]'s Blue Chest to obtain. The chemical reaction after pouring both of them on the ground causes it to soften, sinking the 5-ton block above it to enable access to the area behind it. | |||
The 5-ton block is located underground past the first seeing-eye door, which requires the Mad Scienstein to trigger Invisible Wario to not only bypass it, but also another seeing-eye door underground to the right. From the first seeing-eye door, Wario must jump down the third pit, which is past the pipe that would have returned him back to normal. After crossing the second seeing-eye door, Wario must go down the ladder below the Musical Coin and then go right to the area past the block. In the new area, Wario must go past the seeing-eye door and go up the ladder, and then to the right, up, then left past the seeing-eye door while avoiding the [[zombie]]s that would trigger [[Zombie Wario]] even when invisible. If Wario becomes a zombie before crossing the upper seeing-eye door, he must descend to one of the torches below to return to normal, and then catch the Mad Scienstein's potion to become Invisible Wario to go up again. The Blue Key is past the upper seeing-eye door. | |||
After acquiring the Blue Key, Wario must go right past the topmost seeing-eye door so that he is above the middle seeing-eye door. After that, he must use a nearby zombie to trigger Zombie Wario, and then jump over the torch below to revert to normal, in order to be able to enter the door nearby. The room has invisible platforms, where Wario must go all the way right, jump on the platforms all the way up, go all the way left to drop down below, and then jump to the right to reach the Blue Chest since there is an invisible gap in between. | |||
The Red Gem does not affect the world in any way. | |||
{{br}} | |||
==[[Musical Coin]]s== | |||
{|width=60% cellspacing=0 border=2 cellpadding=3 style="border-collapse:collapse;" | |||
|- | |||
!Location | |||
!Description | |||
|- | |||
|[[File:WL3 S VastPlain MC1.png]] | |||
|align="center"|In the room underneath the Futamogu and under the pipe, there is a Musical Coin at the rightmost area, only accessible after you clear the Golf minigame. In this area, the rightmost Pneumo is required to trigger Puffy Wario to float to the rightmost column, where the coin is at the ceiling. | |||
|- | |||
|[[File:WL3 S VastPlain MC2.png]] | |||
|align="center"|From the starting point, the Musical Coin is atop the second vine from the left. | |||
|- | |||
|[[File:WL3 S VastPlain MC3.png]] | |||
|align="center"|In the vertical pipe underneath past the first Seeing-eye door, it leads to a room with bubbles. The Musical Coin is to the left, which requires travelling to the bottom, then the left, then upwards where the current is moving downwards. To reach this coin, either Bubble Wario or the Prince Frog's Glove power-up is required to go against this current. | |||
|- | |||
|[[File:WL3 S VastPlain MC4.png]] | |||
|align="center"|Up the pipe from the vine past the first Seeing-eye door, the Musical Coin is above the blue Omodonmeka, and would require Wario to be in his normal state to reach one of the platforms above it. | |||
|- | |||
|[[File:WL3 S VastPlain MC5.png]] | |||
|align="center"|In the sky that is reached by going up the pipe found in the cave with Omodonmeka, there is a Musical Coin around the top of the area. | |||
|- | |||
|[[File:WL3 S VastPlain MC6.png]] | |||
|align="center"|Past the bottom-right Seeing-eye door, there is a Musical Coin that is reachable with Invisible Wario. | |||
|- | |||
|[[File:WL3 S VastPlain MC7.png]] | |||
|align="center"|In the area past the 5-ton block, located past the bottom-right seeing-eye door and downwards from a ladder, there is a Musical Coin at the top-left in this area. Invisible Wario is required to go right, upwards, then left while avoiding zombies to get past the topmost seeing-eye door to where the Blue Key is. From there, a nearby zombie is needed to trigger Zombie Wario, then go towards the left to fall past the thin platform to collect the Musical Coin below. | |||
|- | |||
|[[File:WL3 S VastPlain MC8.png]] | |||
|align="center"|In the area past the bottom-right Seeing-eye door and downwards from a ladder, there is a Musical Coin past the spikes on the left, which requires Zombie Wario to pass. From the previous Musical Coin, Zombie Wario must go all the way left to the left area, and then past the spikes to retrieve this coin. | |||
|} | |||
==Enemies== | |||
*[[Futamogu]] (1) | |||
*[[Teruteru]] (2) | |||
*[[Para-Goom]] (10) | |||
*[[Spearhead (enemy)|Spearhead]] (3) | |||
*[[Jellybob (Wario Land 3)|Pneumo]] (4) | |||
*[[Mad Scienstein]] (2) | |||
*[[Omodon]] (2) | |||
*[[Omodonmeka]] (3, 2 carrying Omodon) | |||
*[[Sun (Wario Land 3)|Sun]] (day only) | |||
*[[Mr. Moon]] (night only) | |||
*[[Seeing-eye door]] (6) | |||
*[[Silky]] (2) | |||
*[[Zombie]] (4) | |||
==Reaction abilities in this level== | ==Reaction abilities in this level== | ||
*[[Ball o' String Wario]] | *[[Ball o' String Wario]] (via Silky) | ||
*[[Bubble Wario]] | *[[Bubble Wario]] | ||
*[[Electric Wario]] | *[[Electric Wario]] (via Mr. Moon, night only) | ||
*[[Flat Wario]] | *[[Flat Wario]] (via Omodon) | ||
*[[Flaming Wario|Hot Wario]] | *[[Flaming Wario|Hot Wario]] (via sun, day only) | ||
*[[Invisible Wario]] | *[[Invisible Wario]] (via Mad Scienstein) | ||
*[[Zombie Wario]] | *[[Zombie Wario]] (via zombie) | ||
==Gallery== | ==Gallery== | ||
<gallery> | <gallery> | ||
WL3 S VastPlain1.PNG|The plain itself | |||
WL3 S VastPlain2.PNG|The sky at daytime | |||
WL3 S VastPlain3.PNG|The sky at nighttime | |||
WL3 S VastPlain4.PNG|The cavern beneath the plain | |||
</gallery> | </gallery> | ||
==Names in other languages== | ==Names in other languages== | ||
{{ | {{foreign names | ||
|Jap=広大な平原 | |Jap=広大な平原 | ||
|JapR=Kōdai na Heigen | |JapR=Kōdai na Heigen | ||
|JapM=Vast Plain}} | |JapM=The Vast Plain | ||
}} | |||
==Trivia== | ==Trivia== | ||
*There is a graphical glitch in the room where the Green | *There is a graphical glitch in the room where the Green Chest is held. When Wario is on the right edge of the platform the [[Silky|Silkies]] are on, part of Wario's body disappears. This glitch only works when there are two Silkies on the platform. | ||
==References== | |||
<references/> | |||
{{WL3}} | {{WL3}} | ||
[[Category:Grasslands]] | [[Category:Grasslands]] | ||
[[Category: | [[Category:Underground areas]] | ||
[[Category: | [[Category:Sky areas]] | ||
[[Category:Wario | [[Category:Wario Land 3 levels]] | ||
Latest revision as of 12:42, April 1, 2023

The Vast Plain is the third level on the northern side of the music box world in Wario Land 3. This level, along with The Peaceful Village, becomes accessible after Wario acquires the Axe from Out of the Woods' Gray Chest, which is used to chop the large tree that blocks the way to those levels. Notably, this level requires Wario to go to the halfway point between the first and second levels, in order to go right to access this level.
The starting point of The Vast Plain is a prairie-like environment, with grass growing along the way and mountains in the background. From the level, there is a path leading sky connected to a pipe, which leads to an area within the clouds and either the sun or Mr. Moon depending on the time of day. There is also an underground area behind a 5-ton block that contains torches and zombies. This is the only level where there are two Golf minigame rooms and two mini-game blocks. Despite there being two of each, completing only one of the Golf minigame rooms is required to lift both blocks.
Treasures[edit]
Gray Chest: Green Tablet[edit]

The Green Tablet[1] can be found inside the Gray Chest. It is available as soon as the level is unlocked.
The Gray Key is all the way to the right above ground, where Wario must jump across the platforms. On the way, there are Para-Gooms, as well as Teruteru that will obscure Wario's view until he hits a wall or he gets damaged. Further along, there is a Mad Scienstein right above a seeing-eye door, where in order to get past the door, Wario must get hit by one of Mad Scienstein's potions to become Invisible Wario. Past the seeing-eye door and all the way to the right, there is a ladder in which the Gray Chest is, as well as another seeing-eye door to the left. The Gray Key is to the left of the door.
After getting the Gray Key, Wario must get rid of his invisibility in order to be able to collect the chest. In order to do that, Wario must enter a pipe which causes him to become visible again. Some pipes can be found underneath the plains. After becoming visible, he must go back to the Gray Chest by going up the ladder, all the way right, and then up the ladder to reach the chest.
The Green Tablet from this chest and the Blue Tablet from The Peaceful Village's Gray Chest causes the western side to be unlocked after both of them are fitted into slots on a door to open it, thus making Desert Ruins accessible.
Red Chest: Crayon (blue)[edit]

The blue Crayon[2] is in the Red Chest. It requires the Lead Overalls from The Volcano's Base's Gray Chest to access, which allows Wario to Smash Attack to bump Futamogu down and destroy damaged blocks beneath Wario.
In order to get the area containing the Red Key, Wario must use a Smash Attack on the Futamogu to the left to lower it, after which he can enter the pipe to the new area. Within this area, Wario must go to the third Pneumo to trigger Puffy Wario, in order to float past the thin platform above. After returning to normal, Wario can use a Dash Attack to the right to break the blocks in order to collect the Red Key.
After collecting it, Wario must then go all the way to the left while breaking the blocks on the way. The wall to the left can be broken with a Dash Attack, which returns Wario to where he started after descending from the pipe. After dropping, Wario must go to the Golf minigame room in order to lift the mini-game block to the right. After completing the Golf minigame, Wario can go all the way to the right where there are three columns separated by spikes and a Pneumo. That Pneumo must be used to trigger Puffy Wario so that he floats on the middle column, which brings him up past a thin platform. After returning to normal, Wario can go left, which is where the Red Chest is.
The blue Crayon flies to the tower on the northern side of the world. The crayon is used to color one part of the are that is initially monochrome. The blue crayon colors the bushes that surround the building. After the area is colored by seven different crayons, the Golf minigame there can be played.
Green Chest: Skull Ring (red)[edit]

The Skull Ring[2] is in the Green Chest. It requires the Magic Seeds from The Big Bridge's Gray Chest, which causes vines to grow in this level, one of which leads to the area with this chest.
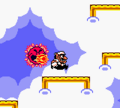
To get to the pipe that leads to the chest, Wario must first go past the first seeing-eye door as Invisible Wario, and then climb the vine to the right all the way up to enter the pipe to the left. In the area up the pipe, Wario must go right while avoiding being squashed by the Omodon dropped by the Omodonmeka. If they trigger Flat Wario, Wario must unflatten himself by the blue Omodonmeka all the way to the left. After Wario makes his way all the way to the right, he must go up, and then to the left to a pipe to go up. The pipe leads to the sky, where the sun or Mr. Moon (during the day or night respectively) is waiting. To get to the Green Key, Wario must follow the platforms to the right, while avoiding the blasts by either the sun or Mr. Moon.
After collecting the Green Key, Wario must complete a round of Golf. The room to play the minigame is higher in this area, where he must return to the left to the third platform from the left, and then jump up to the right platforms, and then up to the left platforms, where the room is at the end. After completing the minigame, Wario must make his way to the right to break the blocks and pass the mini-game block to a door. The Green Chest is up in this room, where there are Silkies on the way there.
After collecting the red Skull Ring and the blue one from The Pool of Rain's Red Chest, the Tower of Revival is erected from the ground on the southern side after both rings click together.
Blue Chest: Red Gem[edit]

The Red Gem is inside the Blue Chest, which requires both the Red Chemical from Beneath the Waves' Green Chest and the Blue Chemical from The Steep Canyon's Blue Chest to obtain. The chemical reaction after pouring both of them on the ground causes it to soften, sinking the 5-ton block above it to enable access to the area behind it.
The 5-ton block is located underground past the first seeing-eye door, which requires the Mad Scienstein to trigger Invisible Wario to not only bypass it, but also another seeing-eye door underground to the right. From the first seeing-eye door, Wario must jump down the third pit, which is past the pipe that would have returned him back to normal. After crossing the second seeing-eye door, Wario must go down the ladder below the Musical Coin and then go right to the area past the block. In the new area, Wario must go past the seeing-eye door and go up the ladder, and then to the right, up, then left past the seeing-eye door while avoiding the zombies that would trigger Zombie Wario even when invisible. If Wario becomes a zombie before crossing the upper seeing-eye door, he must descend to one of the torches below to return to normal, and then catch the Mad Scienstein's potion to become Invisible Wario to go up again. The Blue Key is past the upper seeing-eye door.
After acquiring the Blue Key, Wario must go right past the topmost seeing-eye door so that he is above the middle seeing-eye door. After that, he must use a nearby zombie to trigger Zombie Wario, and then jump over the torch below to revert to normal, in order to be able to enter the door nearby. The room has invisible platforms, where Wario must go all the way right, jump on the platforms all the way up, go all the way left to drop down below, and then jump to the right to reach the Blue Chest since there is an invisible gap in between.
The Red Gem does not affect the world in any way.
Musical Coins[edit]
| Location | Description |
|---|---|

|
In the room underneath the Futamogu and under the pipe, there is a Musical Coin at the rightmost area, only accessible after you clear the Golf minigame. In this area, the rightmost Pneumo is required to trigger Puffy Wario to float to the rightmost column, where the coin is at the ceiling. |

|
From the starting point, the Musical Coin is atop the second vine from the left. |

|
In the vertical pipe underneath past the first Seeing-eye door, it leads to a room with bubbles. The Musical Coin is to the left, which requires travelling to the bottom, then the left, then upwards where the current is moving downwards. To reach this coin, either Bubble Wario or the Prince Frog's Glove power-up is required to go against this current. |

|
Up the pipe from the vine past the first Seeing-eye door, the Musical Coin is above the blue Omodonmeka, and would require Wario to be in his normal state to reach one of the platforms above it. |

|
In the sky that is reached by going up the pipe found in the cave with Omodonmeka, there is a Musical Coin around the top of the area. |

|
Past the bottom-right Seeing-eye door, there is a Musical Coin that is reachable with Invisible Wario. |

|
In the area past the 5-ton block, located past the bottom-right seeing-eye door and downwards from a ladder, there is a Musical Coin at the top-left in this area. Invisible Wario is required to go right, upwards, then left while avoiding zombies to get past the topmost seeing-eye door to where the Blue Key is. From there, a nearby zombie is needed to trigger Zombie Wario, then go towards the left to fall past the thin platform to collect the Musical Coin below. |

|
In the area past the bottom-right Seeing-eye door and downwards from a ladder, there is a Musical Coin past the spikes on the left, which requires Zombie Wario to pass. From the previous Musical Coin, Zombie Wario must go all the way left to the left area, and then past the spikes to retrieve this coin. |
Enemies[edit]
- Futamogu (1)
- Teruteru (2)
- Para-Goom (10)
- Spearhead (3)
- Pneumo (4)
- Mad Scienstein (2)
- Omodon (2)
- Omodonmeka (3, 2 carrying Omodon)
- Sun (day only)
- Mr. Moon (night only)
- Seeing-eye door (6)
- Silky (2)
- Zombie (4)
Reaction abilities in this level[edit]
- Ball o' String Wario (via Silky)
- Bubble Wario
- Electric Wario (via Mr. Moon, night only)
- Flat Wario (via Omodon)
- Hot Wario (via sun, day only)
- Invisible Wario (via Mad Scienstein)
- Zombie Wario (via zombie)
Gallery[edit]
The plain itself
The sky at daytime
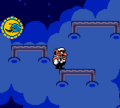
The sky at nighttime
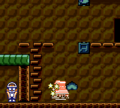
The cavern beneath the plain


Names in other languages[edit]
| Language | Name | Meaning |
|---|---|---|
| Japanese | 広大な平原 Kōdai na Heigen |
The Vast Plain |
Trivia[edit]
- There is a graphical glitch in the room where the Green Chest is held. When Wario is on the right edge of the platform the Silkies are on, part of Wario's body disappears. This glitch only works when there are two Silkies on the platform.
References[edit]
- ^ Brady, Matthew K., Nathan Beittenmiller, Debra McBride, and David Cassady. Game Boy Game Secrets, 2001 Edition Prima's Official Strategy Guide. Page 89.
- ^ a b Brady, Matthew K., Nathan Beittenmiller, Debra McBride, and David Cassady. Game Boy Game Secrets, 2001 Edition Prima's Official Strategy Guide. Page 91.